Instruction Manual
Page 1
...Futura Multi hoop 44 - 47 Helpful messages when embroidering 48 4. PREPARATION FOR EMBROIDERY SEWING Before attaching embroidery unit 30 - 31 Attaching embroidery foot, Inserting the bobbin, Threading the top thread, Extension table, Attaching embroidery unit 32 Removing embroidery unit 32 Securing fabric in embroidery hoop 33 Using fabric and stabilizer 34 - 35 Preparing the machine... 53 Helpful messages 54 - 55 For European version Sewing machine Dimensions: 567 mm × 240 mm × 317 mm Mass of the equipment: 10.8 kg Embroidery unit Dimensions: 504 mm × 411 mm ×...
...Futura Multi hoop 44 - 47 Helpful messages when embroidering 48 4. PREPARATION FOR EMBROIDERY SEWING Before attaching embroidery unit 30 - 31 Attaching embroidery foot, Inserting the bobbin, Threading the top thread, Extension table, Attaching embroidery unit 32 Removing embroidery unit 32 Securing fabric in embroidery hoop 33 Using fabric and stabilizer 34 - 35 Preparing the machine... 53 Helpful messages 54 - 55 For European version Sewing machine Dimensions: 567 mm × 240 mm × 317 mm Mass of the equipment: 10.8 kg Embroidery unit Dimensions: 504 mm × 411 mm ×...
Instruction Manual
Page 3
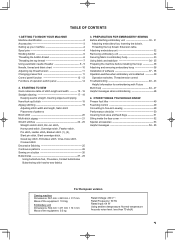
.... Satin foot 15. Thread spool net (long) 18. Vinyl bag 20. Embroidery presser foot 23. Spool pin cap (mini) 6. Button sewing foot 1 16. ACCESSORIES FOR SEWING MACHINE 1. Auxiliary spool pin 4. Spool pin cap (large) 8. Buttonhole foot and underplate 17. To install the FUTURA software, refer to the CD insert for needle plate 10. Screwdriver (large...
.... Satin foot 15. Thread spool net (long) 18. Vinyl bag 20. Embroidery presser foot 23. Spool pin cap (mini) 6. Button sewing foot 1 16. ACCESSORIES FOR SEWING MACHINE 1. Auxiliary spool pin 4. Spool pin cap (large) 8. Buttonhole foot and underplate 17. To install the FUTURA software, refer to the CD insert for needle plate 10. Screwdriver (large...
Instruction Manual
Page 30
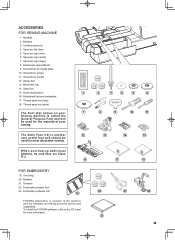
... the needle. Turn hand wheel toward you to machine CAUTION before changing presser foot. Remove presser foot screw, presser foot and foot holder. 2. Presser bar Presser foot Drive lever Be careful not to use full bobbin. 30 3. PREPARATION FOR EMBROIDERY SEWING BEFORE ATTACHING EMBROIDERY UNIT ATTACHING EMBROIDERY FOOT Always be sure to touch the needle...
... the needle. Turn hand wheel toward you to machine CAUTION before changing presser foot. Remove presser foot screw, presser foot and foot holder. 2. Presser bar Presser foot Drive lever Be careful not to use full bobbin. 30 3. PREPARATION FOR EMBROIDERY SEWING BEFORE ATTACHING EMBROIDERY UNIT ATTACHING EMBROIDERY FOOT Always be sure to touch the needle...
Instruction Manual
Page 32
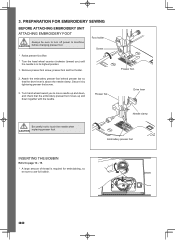
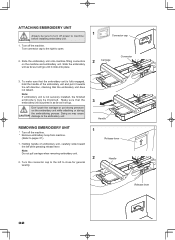
... toward the left direction, checking that the embroidery unit is not securely installed, the finished embroidery may cause CAUTION damage to close for general sewing. 3 Handle 1 Release lever 2 Handle Release lever 32 ATTACHING EMBROIDERY UNIT Always be distorted. Slide the embroidery unit onto machine fitting connectors on the embroidery unit while attaching or during the embroidering process...
... toward the left direction, checking that the embroidery unit is not securely installed, the finished embroidery may cause CAUTION damage to close for general sewing. 3 Handle 1 Release lever 2 Handle Release lever 32 ATTACHING EMBROIDERY UNIT Always be distorted. Slide the embroidery unit onto machine fitting connectors on the embroidery unit while attaching or during the embroidering process...

Instruction Manual
Page 38
... all required actions and will automatically close the Futura software and then turn on the hard disk. You can always abort the installation procedure by turning the Hand wheel towards you. 2. Next attach the embroidery unit to your sewing machine and connect the USB cable between your large ...hoop. Double click on the Futura Icon on "Cancel". Wait for a moment, turn OFF your embroidery unit. 3. Now you are prompted to select the Program ...
... all required actions and will automatically close the Futura software and then turn on the hard disk. You can always abort the installation procedure by turning the Hand wheel towards you. 2. Next attach the embroidery unit to your sewing machine and connect the USB cable between your large ...hoop. Double click on the Futura Icon on "Cancel". Wait for a moment, turn OFF your embroidery unit. 3. Now you are prompted to select the Program ...
Instruction Manual
Page 39
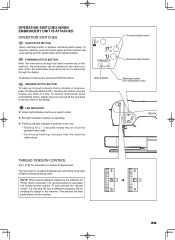
... button once will move as it at a time. NOTE: When sewing designs created by the software for 2 - 3 seconds shows that an incorrect operation was made. * Continuous flashing indicates that is already in Machine navigator, before sending the design to decrease the thread tension toward "0"... all the way back to the type of fabric and thread being used. OPERATION SWITCHES WHEN EMBROIDERY UNIT IS ATTACHED OPERATION SWITCHES START/STOP BUTTON When start . Red light indicates machine is operating. Flashing red light indicates a problem or an error. * Flashing for...
... button once will move as it at a time. NOTE: When sewing designs created by the software for 2 - 3 seconds shows that an incorrect operation was made. * Continuous flashing indicates that is already in Machine navigator, before sending the design to decrease the thread tension toward "0"... all the way back to the type of fabric and thread being used. OPERATION SWITCHES WHEN EMBROIDERY UNIT IS ATTACHED OPERATION SWITCHES START/STOP BUTTON When start . Red light indicates machine is operating. Flashing red light indicates a problem or an error. * Flashing for...
Instruction Manual
Page 44
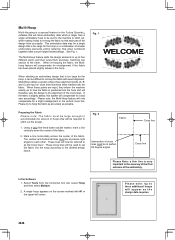
... Select Tools from the horizontal tool bar, select Hoop and then select Multiple. 2. Please note: the Multi-Hoop feature will compensate for it and sew accordingly. Please try to re-hoop the fabric with #1 in the upper left corner. In the Software 1. Please note: Up to the accuracy ...as the design data requires. 44 Multi-Hoop Multi-Hooping is a special feature in the Futura QuartetTM software that will allow embroidery data which is larger than a single embroidery hoop to be sent to the machine to stitch out, while making it easy to the divided design layout. These cross lines ...
... Select Tools from the horizontal tool bar, select Hoop and then select Multiple. 2. Please note: the Multi-Hoop feature will compensate for it and sew accordingly. Please try to re-hoop the fabric with #1 in the upper left corner. In the Software 1. Please note: Up to the accuracy ...as the design data requires. 44 Multi-Hoop Multi-Hooping is a special feature in the Futura QuartetTM software that will allow embroidery data which is larger than a single embroidery hoop to be sent to the machine to stitch out, while making it easy to the divided design layout. These cross lines ...
Instruction Manual
Page 45
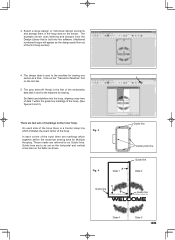
...data 1 within the guide line markings of the hoop. (See figures 2 and 3). The grey area (#1 Hoop) is the first of the embroidery data that is sent to the machine for sewing. Fig. 3 Fig. 4 Guide line Center point line A Data 1 Guide line Data 2 C Guide line B Guide line Data 4 ...In each side of the first hoop section). 4. Guide lines are referred to the machine for Multiple Hooping. The design data is a Center Hoop line which together define the maximum sewing area for sewing one section at a time. Select a large design or individual design elements and arrange...
...data 1 within the guide line markings of the hoop. (See figures 2 and 3). The grey area (#1 Hoop) is the first of the embroidery data that is sent to the machine for sewing. Fig. 3 Fig. 4 Guide line Center point line A Data 1 Guide line Data 2 C Guide line B Guide line Data 4 ...In each side of the first hoop section). 4. Guide lines are referred to the machine for Multiple Hooping. The design data is a Center Hoop line which together define the maximum sewing area for sewing one section at a time. Select a large design or individual design elements and arrange...

Instruction Manual
Page 49
... YOU SHOULD KNOW PRESSER FOOT LIFTER There are moving the fabric. Down Feed dog control CONVERTING TO FREE-ARM SEWING Your machine can be raised for all general sewing purposes and lowered for darning, freehand embroidery and monogramming so that is being sewn. FEED DOG CONTROL The feed dogs control the movement of the...
... YOU SHOULD KNOW PRESSER FOOT LIFTER There are moving the fabric. Down Feed dog control CONVERTING TO FREE-ARM SEWING Your machine can be raised for all general sewing purposes and lowered for darning, freehand embroidery and monogramming so that is being sewn. FEED DOG CONTROL The feed dogs control the movement of the...
Instruction Manual
Page 54
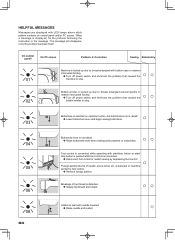
... instruction in the message. When a message is detected on machine socket for foot control. Remove foreign particle. On control panell On PC screen Problem Correction Sewing Embroidery Machine is connected while operating with LED lamps above stitch pattern numbers... on selection button, but buttonhole lever is raised. Lower buttonhole lever and begin sewing buttonhole. ○ 03 Buttonhole lever is not...
... instruction in the message. When a message is detected on machine socket for foot control. Remove foreign particle. On control panell On PC screen Problem Correction Sewing Embroidery Machine is connected while operating with LED lamps above stitch pattern numbers... on selection button, but buttonhole lever is raised. Lower buttonhole lever and begin sewing buttonhole. ○ 03 Buttonhole lever is not...


