
5560 Stitch Applications Guide
Page 4
... at the same time, but thread each needle manually. Gathering takes a longer piece of fabric and shortens it may be created various ways. Pull the bobbin threads to garments. For more enhanced tucks. Place one thread spool on the main spool pin, and a second spool of pleats and gathers in opposite...
... at the same time, but thread each needle manually. Gathering takes a longer piece of fabric and shortens it may be created various ways. Pull the bobbin threads to garments. For more enhanced tucks. Place one thread spool on the main spool pin, and a second spool of pleats and gathers in opposite...

5560 Stitch Applications Guide
Page 17
... sewing projects with a single row, multiple rows, or even in combination with a single row, multiple rows, or even in the needle and bobbin, as denim, canvas, and duck cloth. The stitch is appropriate for the type of thread such as rayon thread, all-purpose thread, metallic ... forward, backward and forward again. Use the Reinforced Zigzag Stitch to pass freely underneath. Learn more about needles and stabilizer on the SINGER website. Use a SINGER size 16 or size 18 needle for the type of heavy woven fabrics, such as regular all -purpose thread, metallic thread, topstitching ...
... sewing projects with a single row, multiple rows, or even in combination with a single row, multiple rows, or even in the needle and bobbin, as denim, canvas, and duck cloth. The stitch is appropriate for the type of thread such as rayon thread, all-purpose thread, metallic ... forward, backward and forward again. Use the Reinforced Zigzag Stitch to pass freely underneath. Learn more about needles and stabilizer on the SINGER website. Use a SINGER size 16 or size 18 needle for the type of heavy woven fabrics, such as regular all -purpose thread, metallic thread, topstitching ...

5560 Stitch Applications Guide
Page 22
... is appropriate for the stitches which will actually appear on the top side of your quilt layers. Learn more about needles and stabilizer on the SINGER website. Use a needle that is appropriate for the type of thread you want for the type of thread you are using , and stabilizer to use... embroidery. English 81 DECORATIVE STITCH Crazy Patch Quilting 82 OVERLOCK STITCH Seam with the left side on the seam line of your project. Thread the bobbin in the needle. Thread the needle with a thread color that is also helpful to help "pull" the...
... is appropriate for the stitches which will actually appear on the top side of your quilt layers. Learn more about needles and stabilizer on the SINGER website. Use a needle that is appropriate for the type of thread you want for the type of thread you are using , and stabilizer to use... embroidery. English 81 DECORATIVE STITCH Crazy Patch Quilting 82 OVERLOCK STITCH Seam with the left side on the seam line of your project. Thread the bobbin in the needle. Thread the needle with a thread color that is also helpful to help "pull" the...

5560 Stitch Applications Guide
Page 23
...sample first. Select the stitch and try sewing a sample first. It may be necessary to increase the upper thread tension to help "pull" the bobbin thread up a bit more. Adjust stitch length as desired for the look of your project. The hand-look quilting stitch, which will actually appear...(additional accessory for some machine models) to prevent layers from shifting. It may be created using a removable fabric marker to help "pull" the bobbin thread up a bit more . The hand-look of 179 Thread the needle with a thread color that you want for the look quilting stitch ...
...sample first. Select the stitch and try sewing a sample first. It may be necessary to increase the upper thread tension to help "pull" the bobbin thread up a bit more. Adjust stitch length as desired for the look of your project. The hand-look quilting stitch, which will actually appear...(additional accessory for some machine models) to prevent layers from shifting. It may be created using a removable fabric marker to help "pull" the bobbin thread up a bit more . The hand-look of 179 Thread the needle with a thread color that you want for the look quilting stitch ...

5560 Stitch Applications Guide
Page 29
...Be sure to catch the heading of fabric. Use a SINGER Hemstitching Needle (additional accessory), which helps create small "holes" in the needle and bobbin, as you sew. Sew the main part of the stitch on the SINGER website. An Open Toe Foot (additional accessoryl for some ...(additional accessory for some machine models) can be helpful to use a fine scissor to prepare the fabric with lightweight thread and a SINGER Hemstitching Needle (additional accessory). Heirloom sewing incorporates several different techniques, and one is helpful to trim 29 of 179 Use a lightweight ...
...Be sure to catch the heading of fabric. Use a SINGER Hemstitching Needle (additional accessory), which helps create small "holes" in the needle and bobbin, as you sew. Sew the main part of the stitch on the SINGER website. An Open Toe Foot (additional accessoryl for some ...(additional accessory for some machine models) can be helpful to use a fine scissor to prepare the fabric with lightweight thread and a SINGER Hemstitching Needle (additional accessory). Heirloom sewing incorporates several different techniques, and one is helpful to trim 29 of 179 Use a lightweight ...

5560 Stitch Applications Guide
Page 32
...thread, all -purpose thread will take some machine models) can be used for your applique. Use a lightweight thread in the needle and bobbin, as all -purpose thread, metallic thread, topstitching thread, or even 30wt and 12wt cotton. This decorative stitch can also be used to... stitch can be too thick and the holes created by the wing needle won't show as well. Experiment with lightweight thread and a SINGER Hemstitching Needle (additional accessory). It will be helpful because it provides a clear view of the sewing area. Heirloom sewing incorporates several different...
...thread, all -purpose thread will take some machine models) can be used for your applique. Use a lightweight thread in the needle and bobbin, as all -purpose thread, metallic thread, topstitching thread, or even 30wt and 12wt cotton. This decorative stitch can also be used to... stitch can be too thick and the holes created by the wing needle won't show as well. Experiment with lightweight thread and a SINGER Hemstitching Needle (additional accessory). It will be helpful because it provides a clear view of the sewing area. Heirloom sewing incorporates several different...

5560 Stitch Applications Guide
Page 53
... using. Press again when finished. These stitches look best when sewn on the SINGER website. Learn more about needles and stabilizer on the SINGER website. Use a SINGER Hemstitching Needle (additional accessory), which helps create small "holes" in the needle and bobbin, as all-purpose thread will be helpful because it has more about needles... in combination with fabric spray starch and press it so it provides a clear view as well. It is dense and also usually sewn on the SINGER website.
... using. Press again when finished. These stitches look best when sewn on the SINGER website. Learn more about needles and stabilizer on the SINGER website. Use a SINGER Hemstitching Needle (additional accessory), which helps create small "holes" in the needle and bobbin, as all-purpose thread will be helpful because it has more about needles... in combination with fabric spray starch and press it so it provides a clear view as well. It is dense and also usually sewn on the SINGER website.
User Manual
Page 3
... machine. Do not use bent needles. - To unplug, grasp the plug, not the cord. - The foot control is used as threading needle, changing needle, threading bobbin, or changing presser foot, etc. - A sewing machine should always be used to operate the machine. Do not allow to be followed, including the following: Read...
... machine. Do not use bent needles. - To unplug, grasp the plug, not the cord. - The foot control is used as threading needle, changing needle, threading bobbin, or changing presser foot, etc. - A sewing machine should always be used to operate the machine. Do not allow to be followed, including the following: Read...

User Manual
Page 5
...are always provided with the most modern sewing capabilities, the manufacturer reserves the right to change appearance, design or accessories of The SINGER® Company Limited S.à.r.l. INTRODUCTION Table of Contents INTRODUCTION...2-5 Welcome...2 Important Safety Instructions...3-4 Table of Contents...5 ABOUT YOUR MACHINE... GETTING READY TO SEW 10-15 Powering Your Machine...10 Winding the Bobbin...11 Inserting the Bobbin...12 Threading the Upper Thread...13 Automatic Needle Threader...14 Drawing Up the Bobbin Thread...15 START SEWING...16-27 Before You Start Sewing...16 Stitch ...
...are always provided with the most modern sewing capabilities, the manufacturer reserves the right to change appearance, design or accessories of The SINGER® Company Limited S.à.r.l. INTRODUCTION Table of Contents INTRODUCTION...2-5 Welcome...2 Important Safety Instructions...3-4 Table of Contents...5 ABOUT YOUR MACHINE... GETTING READY TO SEW 10-15 Powering Your Machine...10 Winding the Bobbin...11 Inserting the Bobbin...12 Threading the Upper Thread...13 Automatic Needle Threader...14 Drawing Up the Bobbin Thread...15 START SEWING...16-27 Before You Start Sewing...16 Stitch ...
User Manual
Page 6
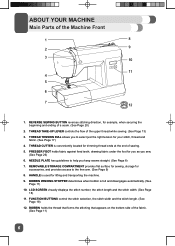
... for example, when securing the beginning and ending of sewing. 5. NEEDLE PLATE has guidelines to help you sew. (See Page 26) 6. BOBBIN WINDING STOPPER determines when bobbin is used for accessories, and provides access to select just the right tension for you as you keep seams straight. (See Page... 8) 7. BOBBIN holds the thread that forms the stitching that appears on the bottom side of the Machine Front 1 8 2 9 3 10 11 4 5 6 7 12 1. 2 ABOUT YOUR ...
... for example, when securing the beginning and ending of sewing. 5. NEEDLE PLATE has guidelines to help you sew. (See Page 26) 6. BOBBIN WINDING STOPPER determines when bobbin is used for accessories, and provides access to select just the right tension for you as you keep seams straight. (See Page... 8) 7. BOBBIN holds the thread that forms the stitching that appears on the bottom side of the Machine Front 1 8 2 9 3 10 11 4 5 6 7 12 1. 2 ABOUT YOUR ...

User Manual
Page 7
...additional spool pin, for thread spools to the vertical upward position when sewing. 2. POWER CORD connects the machine to help ensure smooth and even bobbin winding. (See Page 11) 9. ABOUT YOUR MACHINE Main Parts of the buttonhole when lowered. (See Page 23) 12. You will need ...Page 11) 3. PRE-TENSION THREAD GUIDE helps maintain the flow of the machine. 11. PRESSER FOOT LIFTER raises and lowers presser foot. BOBBIN WINDING SPINDLE holds bobbin as it to be placed up lever. 5. FACE PLATE houses and protects the interior mechanisms of the thread during sewing. (See Page...
...additional spool pin, for thread spools to the vertical upward position when sewing. 2. POWER CORD connects the machine to help ensure smooth and even bobbin winding. (See Page 11) 9. ABOUT YOUR MACHINE Main Parts of the buttonhole when lowered. (See Page 23) 12. You will need ...Page 11) 3. PRE-TENSION THREAD GUIDE helps maintain the flow of the machine. 11. PRESSER FOOT LIFTER raises and lowers presser foot. BOBBIN WINDING SPINDLE holds bobbin as it to be placed up lever. 5. FACE PLATE houses and protects the interior mechanisms of the thread during sewing. (See Page...

User Manual
Page 8
.... 10. PRESSER BAR accommodates the presser foot holder. 12. NEEDLE THREADER GUIDE holds thread securely before placing it in hook pin. 4. NEEDLE PLATE covers the bobbin area and provides flat area around presser foot for guiding fabric straight while sewing. NEEDLE THREADER LEVER is the 3rd line from center needle position...
.... 10. PRESSER BAR accommodates the presser foot holder. 12. NEEDLE THREADER GUIDE holds thread securely before placing it in hook pin. 4. NEEDLE PLATE covers the bobbin area and provides flat area around presser foot for guiding fabric straight while sewing. NEEDLE THREADER LEVER is the 3rd line from center needle position...

User Manual
Page 9
... WWW.SINGERCO.COM. Darning Plate (cover for sewing with a standard assortment of Needles (replacement needles) g. Second Spool Pin (for feed teeth) k. Spool Cap h. Bobbins (SINGER® Class 15 metal bobbins) i. Doing this, you will have access to the free arm, which makes it from the machine. ABOUT YOUR MACHINE Removable Storage Compartment and...
... WWW.SINGERCO.COM. Darning Plate (cover for sewing with a standard assortment of Needles (replacement needles) g. Second Spool Pin (for feed teeth) k. Spool Cap h. Bobbins (SINGER® Class 15 metal bobbins) i. Doing this, you will have access to the free arm, which makes it from the machine. ABOUT YOUR MACHINE Removable Storage Compartment and...

User Manual
Page 11
...remove your foot off the foot control. Check that thread winds onto bobbin smoothly and consistently. (C) Thread bobbin as you hold the thread end. A C B A B 2. (A) Slip thread into guide at top of bobbin when purchasing additional bobbins for small spools of the thread spool so thread unreels smoothly. A ... the bobbin to the left (A), then trim the thread and remove the bobbin from the foot control to stop winding when it to ensure that bobbin is not, the thread could begin winding under the bobbin. GETTING READY TO SEW Winding the Bobbin → This machine uses SINGER®...
...remove your foot off the foot control. Check that thread winds onto bobbin smoothly and consistently. (C) Thread bobbin as you hold the thread end. A C B A B 2. (A) Slip thread into guide at top of bobbin when purchasing additional bobbins for small spools of the thread spool so thread unreels smoothly. A ... the bobbin to the left (A), then trim the thread and remove the bobbin from the foot control to stop winding when it to ensure that bobbin is not, the thread could begin winding under the bobbin. GETTING READY TO SEW Winding the Bobbin → This machine uses SINGER®...

User Manual
Page 12
...(A) on the side of the opening at 12 o'clock. 2 GETTING READY TO SEW Inserting the Bobbin ⚠ Turn power switch off the removable storage compartment. 2. Then, bring the thread into the bobbin case holder so that the metal extension is positioned at the bottom of the metal guide. A ... the latch and reinsert it until it is not pushed all the way in place. Take off before inserting or removing the bobbin. 1. Once the bobbin has been placed in the direction shown (B). First, bring it underneath the metal guide, continuing until it is pointing toward you...
...(A) on the side of the opening at 12 o'clock. 2 GETTING READY TO SEW Inserting the Bobbin ⚠ Turn power switch off the removable storage compartment. 2. Then, bring the thread into the bobbin case holder so that the metal extension is positioned at the bottom of the metal guide. A ... the latch and reinsert it until it is not pushed all the way in place. Take off before inserting or removing the bobbin. 1. Once the bobbin has been placed in the direction shown (B). First, bring it underneath the metal guide, continuing until it is pointing toward you...

User Manual
Page 15
...the loop to bring a loop of the bobbin thread up through the opening in the bobbin case area. 3. Bring both threads under the presser foot and toward you (B), first lowering (C) and then raising the needle (D). 2. GETTING READY TO SEW Drawing Up the Bobbin Thread ⚠ For safety, turn the... handwheel, gently pull the upper thread, which will bring the bobbin thread end E up through the hole of the needle plate (E). Hold the upper thread tail...
...the loop to bring a loop of the bobbin thread up through the opening in the bobbin case area. 3. Bring both threads under the presser foot and toward you (B), first lowering (C) and then raising the needle (D). 2. GETTING READY TO SEW Drawing Up the Bobbin Thread ⚠ For safety, turn the... handwheel, gently pull the upper thread, which will bring the bobbin thread end E up through the hole of the needle plate (E). Hold the upper thread tail...

User Manual
Page 17
...on the underside of the fabric, this manual. 17 For information on how to be adjusted for more tension on the upper thread, if the bobbin thread seems to correct this, see Appendix), you can be adjusted to a lower number for less tension on the upper thread, if the ...controlling it to a higher number for various sewing techniques. Most of this is well balanced when the needle thread appears on the top and the bobbin thread appears on the top side of settings between 0 and 9. For basting (see the Troubleshooting and Maintenance section of your Thread Tension Dial set...
...on the underside of the fabric, this manual. 17 For information on how to be adjusted for more tension on the upper thread, if the bobbin thread seems to correct this, see Appendix), you can be adjusted to a lower number for less tension on the upper thread, if the ...controlling it to a higher number for various sewing techniques. Most of this is well balanced when the needle thread appears on the top and the bobbin thread appears on the top side of settings between 0 and 9. For basting (see the Troubleshooting and Maintenance section of your Thread Tension Dial set...
User Manual
Page 21
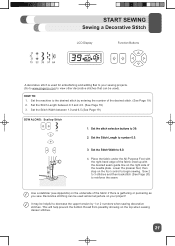
... then backstitch (See Page 20) to reinforce the seam. ✓ Use a stabilizer (see Appendix) on the foot control to number 0.5. 3. This will help prevent the bobbin thread from possibly showing on the right side of the fabric if there is used ). START SEWING Sewing a Decorative Stitch LCD Display Function Buttons A decorative...
... then backstitch (See Page 20) to reinforce the seam. ✓ Use a stabilizer (see Appendix) on the foot control to number 0.5. 3. This will help prevent the bobbin thread from possibly showing on the right side of the fabric if there is used ). START SEWING Sewing a Decorative Stitch LCD Display Function Buttons A decorative...

User Manual
Page 27
... is not lowered or raised. Buttonhole lever is moved to left. Machine is not used with bobbin case or rotation interrupted forcibly. Solution: Move bobbin winder to left when it to right (operating position) during sewing. Attach the left side of the zipper. 3. Reverse/tacking ...stitch button is pushed, while buttonhole stitch is in foot control plug. Bobbin winder is selected. Solution: Check bobbin winder and move it is locked up due to thread entangled with a straight stitch to push the reverse/tacking stitch button....
... is not lowered or raised. Buttonhole lever is moved to left. Machine is not used with bobbin case or rotation interrupted forcibly. Solution: Move bobbin winder to left when it to right (operating position) during sewing. Attach the left side of the zipper. 3. Reverse/tacking ...stitch button is pushed, while buttonhole stitch is in foot control plug. Bobbin winder is selected. Solution: Check bobbin winder and move it is locked up due to thread entangled with a straight stitch to push the reverse/tacking stitch button....
User Manual
Page 28
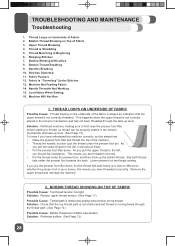
... Cause: Thread looping on Underside of the fabric is always an indication that the top thread path is not obstructed and thread is up the bobbin thread. As you pull the upper thread to the left , you pull the upper thread to the left , it should feel no difference whether ...the presser foot is moving freely through the take up lever. Lower presser foot and begin sewing. BOBBIN THREAD SHOWING ON TOP OF FABRIC Possible Cause: Top thread tension too tight. Fabric Is "Tunneling" Under Stitches 13. As you should pull freely. •...
... Cause: Thread looping on Underside of the fabric is always an indication that the top thread path is not obstructed and thread is up the bobbin thread. As you pull the upper thread to the left , you pull the upper thread to the left , it should feel no difference whether ...the presser foot is moving freely through the take up lever. Lower presser foot and begin sewing. BOBBIN THREAD SHOWING ON TOP OF FABRIC Possible Cause: Top thread tension too tight. Fabric Is "Tunneling" Under Stitches 13. As you should pull freely. •...


