Instruction Manual
Page 2
IMPORTANT SAFETY INSTRUCTIONS When using an electrical appliance, basic safety should never be used by the manufacturer as threading needle, changing needle, threading bobbin, or changing presser foot, and the like. 10. To reduce the risk of burns, fire, electric shock, or injury to persons: 1. Always unplug this appliance ...
IMPORTANT SAFETY INSTRUCTIONS When using an electrical appliance, basic safety should never be used by the manufacturer as threading needle, changing needle, threading bobbin, or changing presser foot, and the like. 10. To reduce the risk of burns, fire, electric shock, or injury to persons: 1. Always unplug this appliance ...
Instruction Manual
Page 5
...-step presser foot lifter/ Adjusting presser foot pressure...9 Attaching the presser foot holder ...10 Winding the bobbin ...11 Inserting the bobbin...12 Inserting and changing needles ...13 Threading the upper thread...14 Thread tension ...16 Raising the bobbin thread ...18 Reverse sewing/ Remove the work/ Cutting the thread ...19 Matching needle/ fabric/ thread...
...-step presser foot lifter/ Adjusting presser foot pressure...9 Attaching the presser foot holder ...10 Winding the bobbin ...11 Inserting the bobbin...12 Inserting and changing needles ...13 Threading the upper thread...14 Thread tension ...16 Raising the bobbin thread ...18 Reverse sewing/ Remove the work/ Cutting the thread ...19 Matching needle/ fabric/ thread...

Instruction Manual
Page 21
... 16 4 2 B D Normal thread tension for straight stitch sewing. - Jerk it by the thread. Lower thread tension To test the bobbin thread tension, remove the bobbin case and bobbin and hold it by about an inch or two. A - A. Turn dial to the next number down. Turn dial to the next .... Please note: - Thread tension too tight for straight stitch sewing. To adjust, turn the small screw on the bottom side of the bobbin case. Proper setting of fabric. If the tension is important to good sewing. - Thread tension too loose for straight stitch construction sewing. ...
... 16 4 2 B D Normal thread tension for straight stitch sewing. - Jerk it by the thread. Lower thread tension To test the bobbin thread tension, remove the bobbin case and bobbin and hold it by about an inch or two. A - A. Turn dial to the next number down. Turn dial to the next .... Please note: - Thread tension too tight for straight stitch sewing. To adjust, turn the small screw on the bottom side of the bobbin case. Proper setting of fabric. If the tension is important to good sewing. - Thread tension too loose for straight stitch construction sewing. ...
Instruction Manual
Page 23
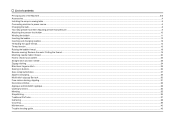
... Gire el volante (1) hacia usted (a izquierdas) bajando y luego elevando la aguja. Lay both threads to make sure the thread is difficult to raise the bobbin thread, check to the back under the presser foot. (3) Elevación del hilo de la canilla 1 Sujete el hilo superior con la mano izquierda. ...Gently pull on the upper thread to bring the bobbin thread up through the needle plate hole (2). Turn the handwheel (1) towards you (counterclockwise) lowering, then raising needle. Raising the...
... Gire el volante (1) hacia usted (a izquierdas) bajando y luego elevando la aguja. Lay both threads to make sure the thread is difficult to raise the bobbin thread, check to the back under the presser foot. (3) Elevación del hilo de la canilla 1 Sujete el hilo superior con la mano izquierda. ...Gently pull on the upper thread to bring the bobbin thread up through the needle plate hole (2). Turn the handwheel (1) towards you (counterclockwise) lowering, then raising needle. Raising the...
Instruction Manual
Page 43
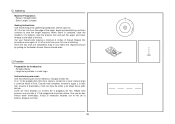
... mínimo de 6 pulgadas de hilo. Once the two rows are completed, draw in your first row of the seam, begin by pulling on the bobbin thread. Secure thread ends. A un 1/4 de pulgada del orillo de la costura, comience a coser costura larga y continúe hasta el final. Fruncido Preparación de...
... mínimo de 6 pulgadas de hilo. Once the two rows are completed, draw in your first row of the seam, begin by pulling on the bobbin thread. Secure thread ends. A un 1/4 de pulgada del orillo de la costura, comience a coser costura larga y continúe hasta el final. Fruncido Preparación de...
Instruction Manual
Page 45
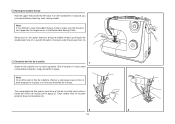
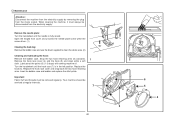
... the needle plate screw withe the screw driver. (1) Cleaning the feed dog: Remove the bobbin case and use the brush supplied to clean the whole area. (2) Cleaning and lubricating the hook: Remove the bobbin case. Replace the hook race cover and snap back the two hook retaining arms. Insert ...he bobbin case and bobbin and replace the stitch plate. Snap the two hook retaining arms (3) outwards. 1 Remove the ...
... the needle plate screw withe the screw driver. (1) Cleaning the feed dog: Remove the bobbin case and use the brush supplied to clean the whole area. (2) Cleaning and lubricating the hook: Remove the bobbin case. Replace the hook race cover and snap back the two hook retaining arms. Insert ...he bobbin case and bobbin and replace the stitch plate. Snap the two hook retaining arms (3) outwards. 1 Remove the ...
Instruction Manual
Page 47
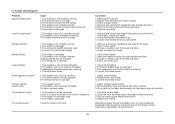
...attached correctly 1. The wrong size needle has been used 4. The machine must suit the fabric and thread 4. Replace the needle 1. Check both bobbin and bobbin case 3. Remove and reinsert needle(flat side towards the back) 5. Check and attach correctly 1. Readjust the stitch length 3. Do not pull ... spool holder pin 6. Select the correct foot 1. The thread is damaged 1. The needle is too thick for the fabric 4. The bobbin case is noisy The machine jams 1. The lower thread tension is too tight Skipped stitches Needle breaks Loose stitches Seams gather or pucker ...
...attached correctly 1. The wrong size needle has been used 4. The machine must suit the fabric and thread 4. Replace the needle 1. Check both bobbin and bobbin case 3. Remove and reinsert needle(flat side towards the back) 5. Check and attach correctly 1. Readjust the stitch length 3. Do not pull ... spool holder pin 6. Select the correct foot 1. The thread is damaged 1. The needle is too thick for the fabric 4. The bobbin case is noisy The machine jams 1. The lower thread tension is too tight Skipped stitches Needle breaks Loose stitches Seams gather or pucker ...


