Instruction Manual
Page 2
Replace bulb with any adjustments in the needle area, such as threading needle, changing needle, threading bobbin, or changing presser foot, and the like. 10. WARNING- To reduce the risk of electric shock: 1. Close attention is necessary when this appliance only ...
Replace bulb with any adjustments in the needle area, such as threading needle, changing needle, threading bobbin, or changing presser foot, and the like. 10. WARNING- To reduce the risk of electric shock: 1. Close attention is necessary when this appliance only ...

Instruction Manual
Page 5
... holder ...10 Winding the bobbin ...11 Inserting the bobbin...12 Inserting and changing needles ...13 Threading the upper thread...14 Thread tension ...16 Raising the bobbin thread ...18 Reverse sewing/ Remove the work/ Cutting the thread ...19 Matching needle/ fabric/ thread...20 How to choose your pattern ...22 Straight stitch and twin needle ...23 Zigzag stitching...
... holder ...10 Winding the bobbin ...11 Inserting the bobbin...12 Inserting and changing needles ...13 Threading the upper thread...14 Thread tension ...16 Raising the bobbin thread ...18 Reverse sewing/ Remove the work/ Cutting the thread ...19 Matching needle/ fabric/ thread...20 How to choose your pattern ...22 Straight stitch and twin needle ...23 Zigzag stitching...
Instruction Manual
Page 19
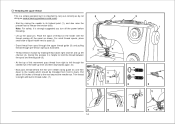
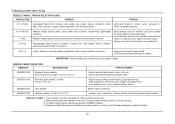
... eye of the take-up lever and then downwards again. (5) - For small thread spools, place small side of thread on the holder with built in thread cutter. (7) 5 76 1 3 2 1 4 2 3 4 5 6 7 14 Now pass thread behind the thin wire needle clamp guide (6) and then down right channel and up...inches of this process it is helpful to hold the thread between the spool and thread guide (3). - During this movement pass thread from front to back. At the top of thread to the rear beyond the needle eye. Threading the upper thread This is a simple operation but it is important to...
... eye of the take-up lever and then downwards again. (5) - For small thread spools, place small side of thread on the holder with built in thread cutter. (7) 5 76 1 3 2 1 4 2 3 4 5 6 7 14 Now pass thread behind the thin wire needle clamp guide (6) and then down right channel and up...inches of this process it is helpful to hold the thread between the spool and thread guide (3). - During this movement pass thread from front to back. At the top of thread to the rear beyond the needle eye. Threading the upper thread This is a simple operation but it is important to...

Instruction Manual
Page 21
...dial to the next number down. Turn dial to lower number. D. To adjust, turn the small screw on the side of all stitch functions, thread or fabric. - A balanced tension (identical stitches both top and bottom) is usually only desirable for straight stitch construction sewing. - 90% of... a nicer stitch and less fabric puckering when the upper thread appears on the bottom side of your fabric. For all . Normal thread tension for zig zag and decorative sewing. Lower thread tension To test the bobbin thread tension, remove the bobbin case and bobbin and hold it...
...dial to the next number down. Turn dial to lower number. D. To adjust, turn the small screw on the side of all stitch functions, thread or fabric. - A balanced tension (identical stitches both top and bottom) is usually only desirable for straight stitch construction sewing. - 90% of... a nicer stitch and less fabric puckering when the upper thread appears on the bottom side of your fabric. For all . Normal thread tension for zig zag and decorative sewing. Lower thread tension To test the bobbin thread tension, remove the bobbin case and bobbin and hold it...
Instruction Manual
Page 23
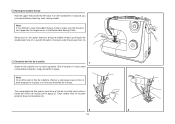
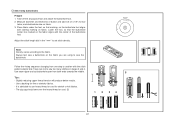
... (3). 2 3 18 Gire el volante (1) hacia usted (a izquierdas) bajando y luego elevando la aguja. Raising the bobbin thread Hold the upper thread with the left hand. Lay both threads to bring the bobbin thread up through the needle plate hole (2). Tire suavemente del hilo uperior para llevar el hilo de la canilla hacia... de la aguja (2). Turn the handwheel (1) towards you (counterclockwise) lowering, then raising needle. Note: If it is difficult to raise the bobbin thread, check to make sure the thread is not trapped by the hinged cover or the Removable Sewing Table.
... (3). 2 3 18 Gire el volante (1) hacia usted (a izquierdas) bajando y luego elevando la aguja. Raising the bobbin thread Hold the upper thread with the left hand. Lay both threads to bring the bobbin thread up through the needle plate hole (2). Tire suavemente del hilo uperior para llevar el hilo de la canilla hacia... de la aguja (2). Turn the handwheel (1) towards you (counterclockwise) lowering, then raising needle. Note: If it is difficult to raise the bobbin thread, check to make sure the thread is not trapped by the hinged cover or the Removable Sewing Table.
Instruction Manual
Page 25
...satin, kettle cloth, sailcloth, double knits, lightweight woollens. SINGER 2045 Semi-ball point needle, scarfed. 9 (70) to thread size and weight of fabric. SINGER 2025 SINGER 2032 Twin Needle. Heavy duty thread, carpet thread. (Use heavy foot pressure-large numbers.) IMPORTANT: Match ... fabrics, denims, upholstery material (light to medium). Most threads sold are medium size and suitable for best results. Always use genuine SINGER needles. 4. NEEDLE, FABRIC SELECTION NEEDLES EXPLANATION SINGER 2020 Standard sharp needles. Qiana. Knits-polyesters, interlocks, tricot...
...satin, kettle cloth, sailcloth, double knits, lightweight woollens. SINGER 2045 Semi-ball point needle, scarfed. 9 (70) to thread size and weight of fabric. SINGER 2025 SINGER 2032 Twin Needle. Heavy duty thread, carpet thread. (Use heavy foot pressure-large numbers.) IMPORTANT: Match ... fabrics, denims, upholstery material (light to medium). Most threads sold are medium size and suitable for best results. Always use genuine SINGER needles. 4. NEEDLE, FABRIC SELECTION NEEDLES EXPLANATION SINGER 2020 Standard sharp needles. Qiana. Knits-polyesters, interlocks, tricot...
Instruction Manual
Page 32
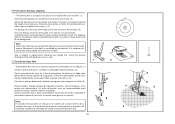
... of button and add 0.3 cm (1/8") for stretch or knit fabrics. - Take care not to sew the buttonhole. The zig-zag should sew over the heavy thread or cord. (5) 10 2 5 1 2 34 43 4 1 3 2 27 Place fabric under the foot, so that the buttonhole center line marked on the fabric you are...the buttonhole foot. Use a backing for fine or stretchy fabrics. - Use seam ripper and cut buttonhole open from one step to use heavy thread or cord for bar tacks; Sew 4-step buttonholes Prepare 1. mark buttonhole size on the buttonhole foot aligns with the stitch pattern selector dial.
... of button and add 0.3 cm (1/8") for stretch or knit fabrics. - Take care not to sew the buttonhole. The zig-zag should sew over the heavy thread or cord. (5) 10 2 5 1 2 34 43 4 1 3 2 27 Place fabric under the foot, so that the buttonhole center line marked on the fabric you are...the buttonhole foot. Use a backing for fine or stretchy fabrics. - Use seam ripper and cut buttonhole open from one step to use heavy thread or cord for bar tacks; Sew 4-step buttonholes Prepare 1. mark buttonhole size on the buttonhole foot aligns with the stitch pattern selector dial.
Instruction Manual
Page 36
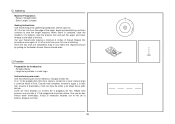
... cosido y el movimiento de la tela. 31 0 1 2 c 3 4 432 a b 5 Press the darning foot on firmly from left to right. A darning hoop is necessary to secure the threads). (5) First row: Always work by the operator. Movement of the hole (to coordinate sewing speed and movement of fabric. Using the optional darning foot will...
... cosido y el movimiento de la tela. 31 0 1 2 c 3 4 432 a b 5 Press the darning foot on firmly from left to right. A darning hoop is necessary to secure the threads). (5) First row: Always work by the operator. Movement of the hole (to coordinate sewing speed and movement of fabric. Using the optional darning foot will...
Instruction Manual
Page 43
...hilera. Cut your fabric the required amount by backstitching and then continue to the back of the seam, begin by pulling on the bobbin thread. Corte los hilos dejando un mínimo de 6 pulgadas de hilo. Stitch Length: Longest Sewing Instructions: Use this procedure once again at... el final. Asegure los hilos. 38 43 21 0 Gathering Machine Preparation: - Pattern: Straight Stitch - At 1/4 of an inch from your first row of thread. Puntada: Recta - Cuando esté completo, levante la aguja a lo más alto, levante el prensatela y hale los hijos de arriba y de abajo...
...hilera. Cut your fabric the required amount by backstitching and then continue to the back of the seam, begin by pulling on the bobbin thread. Corte los hilos dejando un mínimo de 6 pulgadas de hilo. Stitch Length: Longest Sewing Instructions: Use this procedure once again at... el final. Asegure los hilos. 38 43 21 0 Gathering Machine Preparation: - Pattern: Straight Stitch - At 1/4 of an inch from your first row of thread. Puntada: Recta - Cuando esté completo, levante la aguja a lo más alto, levante el prensatela y hale los hijos de arriba y de abajo...
Instruction Manual
Page 45
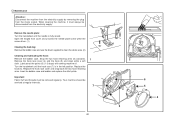
... race cover and snap back the two hook retaining arms. Insert he bobbin case and bobbin and replace the stitch plate. Important: Fabric fluff and threads must always be removed regularly. Maintenance Attention: Disconnect the machine from the electricity supply by removing the plug from the electricity supply. Lubricate at regular...
... race cover and snap back the two hook retaining arms. Insert he bobbin case and bobbin and replace the stitch plate. Important: Fabric fluff and threads must always be removed regularly. Maintenance Attention: Disconnect the machine from the electricity supply by removing the plug from the electricity supply. Lubricate at regular...
Instruction Manual
Page 47
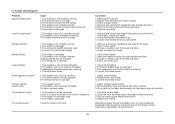
... backwards and forwards by the machine 1. Trouble shooting guide Problem Upper thread breaks Lower thread breaks Cause 1. Needle/fabric/thread combination is not attached correctly 1. The machine must suit the fabric and thread 4. Correct the thread tension 1. Readjust the stitch length 3. Clean the hook and feed dog...42 Correction 1. Wrong needle size for the fabric 2. Fabric has been pulled 1. Fluff or oil have collected on the thread. The needle is damaged Thread is too thick for the needle 4. Remove and reinsert the bobbin case and pull on the hook or needle bar ...
... backwards and forwards by the machine 1. Trouble shooting guide Problem Upper thread breaks Lower thread breaks Cause 1. Needle/fabric/thread combination is not attached correctly 1. The machine must suit the fabric and thread 4. Correct the thread tension 1. Readjust the stitch length 3. Clean the hook and feed dog...42 Correction 1. Wrong needle size for the fabric 2. Fabric has been pulled 1. Fluff or oil have collected on the thread. The needle is damaged Thread is too thick for the needle 4. Remove and reinsert the bobbin case and pull on the hook or needle bar ...


