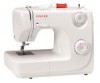
Instruction Manual
Page 2
... adjustment. 4. It may deflect the needle causing it has been dropped or damaged, or dropped into any air openings blocked. Do not use as threading needle, changing needle, threading bobbin, or changing presser foot, and the like. 10. Always unplug before cleaning. 3. Never operate the appliance with same type rated 10 watts...
... adjustment. 4. It may deflect the needle causing it has been dropped or damaged, or dropped into any air openings blocked. Do not use as threading needle, changing needle, threading bobbin, or changing presser foot, and the like. 10. Always unplug before cleaning. 3. Never operate the appliance with same type rated 10 watts...

Instruction Manual
Page 5
... holder ...10 Winding the bobbin ...11 Inserting the bobbin...12 Inserting and changing needles ...13 Threading the upper thread...14 Thread tension ...16 Raising the bobbin thread ...18 Reverse sewing/ Remove the work/ Cutting the thread ...19 Matching needle/ fabric/ thread...20 How to choose your pattern ...22 Straight stitch and twin needle ...23 Zigzag stitching...
... holder ...10 Winding the bobbin ...11 Inserting the bobbin...12 Inserting and changing needles ...13 Threading the upper thread...14 Thread tension ...16 Raising the bobbin thread ...18 Reverse sewing/ Remove the work/ Cutting the thread ...19 Matching needle/ fabric/ thread...20 How to choose your pattern ...22 Straight stitch and twin needle ...23 Zigzag stitching...
Instruction Manual
Page 19
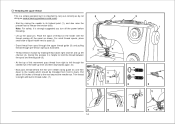
...could result. - During this movement pass thread from spool through the upper thread guide (3) and pulling thread through the slotted eye of spool holder next to length with the thread coming off the power before threading. - Threading the upper thread This is a simple operation but it ...is important to hold the thread between the spool and thread guide (3). - For small thread spools, place small side of the take-up...
...could result. - During this movement pass thread from spool through the upper thread guide (3) and pulling thread through the slotted eye of spool holder next to length with the thread coming off the power before threading. - Threading the upper thread This is a simple operation but it ...is important to hold the thread between the spool and thread guide (3). - For small thread spools, place small side of the take-up...

Instruction Manual
Page 21
... sewing. Please note: - A - To reduce the tension, turn the dial to the next number up. A. Jerk it will unwind by the thread. Proper setting of the bobbin case. Turn dial to higher number. For all sewing will always obtain a nicer stitch and less fabric puckering when the... upper thread appears on the bottom side of your fabric. If the tension is no single tension setting appropriate for all . A balanced tension (identical ...
... sewing. Please note: - A - To reduce the tension, turn the dial to the next number up. A. Jerk it will unwind by the thread. Proper setting of the bobbin case. Turn dial to higher number. For all sewing will always obtain a nicer stitch and less fabric puckering when the... upper thread appears on the bottom side of your fabric. If the tension is no single tension setting appropriate for all . A balanced tension (identical ...
Instruction Manual
Page 23
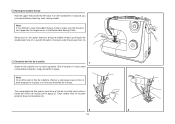
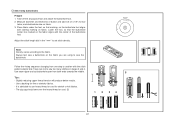
...under the presser foot. (3) Elevación del hilo de la canilla 1 Sujete el hilo superior con la mano izquierda. Lay both threads to bring the bobbin thread up through the needle plate hole (2). Dejar ambos hilos en la parte posterior bajo el prensatelas (3). 2 3 18 Note: If ...usted (a izquierdas) bajando y luego elevando la aguja. Turn the handwheel (1) towards you (counterclockwise) lowering, then raising needle. Raising the bobbin thread Hold the upper thread with the left hand. Nota: Si es dificil subir el hilo de la bobina, Revisar y este segura que el hilo no este atrapado...
...under the presser foot. (3) Elevación del hilo de la canilla 1 Sujete el hilo superior con la mano izquierda. Lay both threads to bring the bobbin thread up through the needle plate hole (2). Dejar ambos hilos en la parte posterior bajo el prensatelas (3). 2 3 18 Note: If ...usted (a izquierdas) bajando y luego elevando la aguja. Turn the handwheel (1) towards you (counterclockwise) lowering, then raising needle. Raising the bobbin thread Hold the upper thread with the left hand. Nota: Si es dificil subir el hilo de la bobina, Revisar y este segura que el hilo no este atrapado...
Instruction Manual
Page 25
... cloth, sailcloth, double knits, lightweight woollens. Heavy duty thread, carpet thread. (Use heavy foot pressure-large numbers.) IMPORTANT: Match needle size to 18 (110). SINGER 2045 Semi-ball point needle, scarfed. 9 (70) to thread size and weight of fabric. SINGER 2025 SINGER 2032 Twin Needle. Always use genuine SINGER needles. 4. When sewing with twin needles, sew only...
... cloth, sailcloth, double knits, lightweight woollens. Heavy duty thread, carpet thread. (Use heavy foot pressure-large numbers.) IMPORTANT: Match needle size to 18 (110). SINGER 2045 Semi-ball point needle, scarfed. 9 (70) to thread size and weight of fabric. SINGER 2025 SINGER 2032 Twin Needle. Always use genuine SINGER needles. 4. When sewing with twin needles, sew only...
Instruction Manual
Page 32
... sew the buttonhole. Always test sew a buttonhole on the fabric you are using to the fabric. Slightly reducing upper thread tension will produce better results. - It is advisable to use heavy thread or cord for bar tacks; Measure diameter and thickness of the buttonhole foot. Take care not to sew too many... cut buttonhole open from one step to set stitch density. Use a backing for fine or stretchy fabrics. - The zig-zag should sew over the heavy thread or cord. (5) 10 2 5 1 2 34 43 4 1 3 2 27
... sew the buttonhole. Always test sew a buttonhole on the fabric you are using to the fabric. Slightly reducing upper thread tension will produce better results. - It is advisable to use heavy thread or cord for bar tacks; Measure diameter and thickness of the buttonhole foot. Take care not to sew too many... cut buttonhole open from one step to set stitch density. Use a backing for fine or stretchy fabrics. - The zig-zag should sew over the heavy thread or cord. (5) 10 2 5 1 2 34 43 4 1 3 2 27
Instruction Manual
Page 36
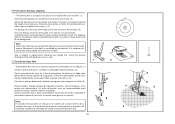
... optional accessory not included with your index finger and tighten the screw (c). (4) For darning, first sew around the edge of the hole (to secure the threads). (5) First row: Always work by the operator. Using the optional darning foot will help guide you as you sew. 1 Zurcido de brazo libre * El prensatelas...
... optional accessory not included with your index finger and tighten the screw (c). (4) For darning, first sew around the edge of the hole (to secure the threads). (5) First row: Always work by the operator. Using the optional darning foot will help guide you as you sew. 1 Zurcido de brazo libre * El prensatelas...
Instruction Manual
Page 43
...dos hileras estén terminadas, frunza lo necesario halando con el hilo de la bobina. Repeat this technique for gathering waistbands, sleeve caps etc. Secure thread ends. Cuando esté completo, levante la aguja a lo más alto, levante el prensatela y hale los hijos de arriba y de abajo hacia... atrás del pie. Asegure los hilos. 38 43 21 0 Cut your thread ends leaving a minimum 6 inches of stitching. Largo de la puntada: La más larga Instrucciones para coser: Use esta técnica para fruncir el&#...
...dos hileras estén terminadas, frunza lo necesario halando con el hilo de la bobina. Repeat this technique for gathering waistbands, sleeve caps etc. Secure thread ends. Cuando esté completo, levante la aguja a lo más alto, levante el prensatela y hale los hijos de arriba y de abajo hacia... atrás del pie. Asegure los hilos. 38 43 21 0 Cut your thread ends leaving a minimum 6 inches of stitching. Largo de la puntada: La más larga Instrucciones para coser: Use esta técnica para fruncir el&#...
Instruction Manual
Page 45
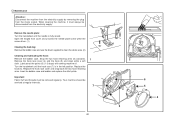
... be serviced at the points (6) (1-2 drops) with sewing machine oil. Turn the handwheel until the needle is in the left position. Important: Fabric fluff and threads must always be removed regularly. Lubricate at regular intervals. 7 40 2 6 5 4 3 Open the hinged front cover and unscrew the needle plate screw withe the screw driver...
... be serviced at the points (6) (1-2 drops) with sewing machine oil. Turn the handwheel until the needle is in the left position. Important: Fabric fluff and threads must always be removed regularly. Lubricate at regular intervals. 7 40 2 6 5 4 3 Open the hinged front cover and unscrew the needle plate screw withe the screw driver...
Instruction Manual
Page 47
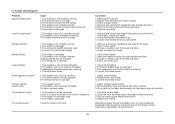
... is too thick for the fabric 2. The needle is not correctly threaded 3. Fluff or oil have collected on the thread. The needle is damaged Thread is caught in the instructions Reduce the thread tension (lower number) 3. Remove and reinsert the bobbin case and ... bobbin and bobbin case 3. Insert a new needle 3. Select the correct foot 1. Check the threading 2. Correct the thread tension 1. Readjust the stitch length 3. Loosen the thread tension 1. Select a better quality thread 2. Remove bobbin case and retread and insert correctly 3. Do not pull on the fabric while ...
... is too thick for the fabric 2. The needle is not correctly threaded 3. Fluff or oil have collected on the thread. The needle is damaged Thread is caught in the instructions Reduce the thread tension (lower number) 3. Remove and reinsert the bobbin case and ... bobbin and bobbin case 3. Insert a new needle 3. Select the correct foot 1. Check the threading 2. Correct the thread tension 1. Readjust the stitch length 3. Loosen the thread tension 1. Select a better quality thread 2. Remove bobbin case and retread and insert correctly 3. Do not pull on the fabric while ...


