Instruction Manual
Page 3
..., Thorn stitch, Reinforced overedge stitch, Wizard stitch More decorative stitches & ideas for decorative machine stitching 62 - 63 Buttonhole making 64 - 69 Automatic buttonhole, Corded buttonholes, Manual buttonhole 3. OTHER INFORMATION Satin stitch foot, Twin needle 72 - 73 Straight stitch needle position 74 - 75 5. TABLE OF CONTENTS 1. SPECIAL ACCESSORIES 76 - 79 Straight stitch...
..., Thorn stitch, Reinforced overedge stitch, Wizard stitch More decorative stitches & ideas for decorative machine stitching 62 - 63 Buttonhole making 64 - 69 Automatic buttonhole, Corded buttonholes, Manual buttonhole 3. OTHER INFORMATION Satin stitch foot, Twin needle 72 - 73 Straight stitch needle position 74 - 75 5. TABLE OF CONTENTS 1. SPECIAL ACCESSORIES 76 - 79 Straight stitch...
Instruction Manual
Page 6
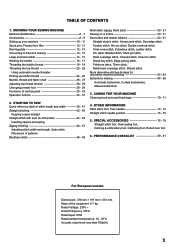
Face cover 5. Bobbin winder shaft 8. Bobbin winder stop 9. Horizontal spool pin 13. Identification plate 18. Presser foot screw 25. Bobbin cover release button 35. Instruction manual 21 22 23 24 25 26 12 17 18 7 8 9 10 11 20 19 27 28 29 30 31 32 33 34 35 36 37 38 6 ...
Face cover 5. Bobbin winder shaft 8. Bobbin winder stop 9. Horizontal spool pin 13. Identification plate 18. Presser foot screw 25. Bobbin cover release button 35. Instruction manual 21 22 23 24 25 26 12 17 18 7 8 9 10 11 20 19 27 28 29 30 31 32 33 34 35 36 37 38 6 ...
Instruction Manual
Page 30
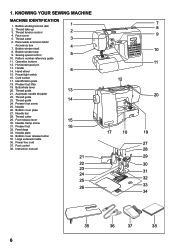
...or needle position for stitch width/needle position Boutons d'ajustement manuel de la largeur du point et de la position d'aiguille Ajuste manual de botones para ancho de puntada/posición de aguja Both left digit and right button to select right digit referring to ...Auto/Default stitch Length and Width. STITCH LENGTH AND STITCH WIDTH/NEEDLE POSITION ADJUSTMENT BUTTONS Your sewing machine will produce your preference pushing manual adjustment buttons. To select stitch patterns, use left button for individual preference settings appears on the LCD display. NOTE: Some patterns ...
...or needle position for stitch width/needle position Boutons d'ajustement manuel de la largeur du point et de la position d'aiguille Ajuste manual de botones para ancho de puntada/posición de aguja Both left digit and right button to select right digit referring to ...Auto/Default stitch Length and Width. STITCH LENGTH AND STITCH WIDTH/NEEDLE POSITION ADJUSTMENT BUTTONS Your sewing machine will produce your preference pushing manual adjustment buttons. To select stitch patterns, use left button for individual preference settings appears on the LCD display. NOTE: Some patterns ...
Instruction Manual
Page 46
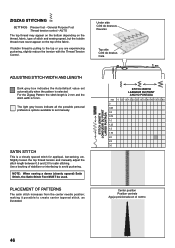
... POINT ANCHO PUNTADA mm 0 0.5 1.0 1.5 2.0 2.5 3.0 3.5 4.0 4.5 5.0 5.5 6.0 0 0.25 0.5 0.75 1.0 1.25 1.5 1.75 2.0 2.5 3.0 Center position Position centrale Aguja posicionada en el centro 46 Slightly loosen the top thread tension and manually adjust the stitch length between 0.5 and 2.0 for appliqué, bar-tacking, etc. making it possible to avoid puckering. AUTO The top thread may appear on...
... POINT ANCHO PUNTADA mm 0 0.5 1.0 1.5 2.0 2.5 3.0 3.5 4.0 4.5 5.0 5.5 6.0 0 0.25 0.5 0.75 1.0 1.25 1.5 1.75 2.0 2.5 3.0 Center position Position centrale Aguja posicionada en el centro 46 Slightly loosen the top thread tension and manually adjust the stitch length between 0.5 and 2.0 for appliqué, bar-tacking, etc. making it possible to avoid puckering. AUTO The top thread may appear on...
Instruction Manual
Page 50
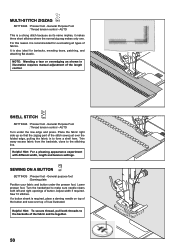
... needle on top of the button and sew over top of the stitch sews just over the folded edge, pulling the fabric in illustration requires manual adjustment of the fabric and tie together. 50 Lower presser foot. General purpose foot :Darning plate Position your fabric and button under the raw edge...
... needle on top of the button and sew over top of the stitch sews just over the folded edge, pulling the fabric in illustration requires manual adjustment of the fabric and tie together. 50 Lower presser foot. General purpose foot :Darning plate Position your fabric and button under the raw edge...
Instruction Manual
Page 54
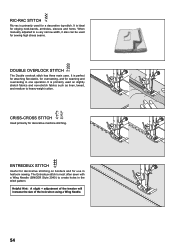
...is perfect for attaching flat elastic, for overcasting, and for decorative machine stitching. The Entredeux stitch is most often sewn with a Wing Needle (SINGER Style 2040) to a very narrow width, it also can be used for sewing high stress seams. DOUBLE OVERLOCK STITCH The Double overlock stitch ...has three main uses. It is ideal for edging neck-bands, armholes, sleeves and hems. When manually adjusted to create holes in the stitch pattern. It is primarily used for a decorative top-stitch. CRISS-CROSS STITCH Used primarily for seaming and...
...is perfect for attaching flat elastic, for overcasting, and for decorative machine stitching. The Entredeux stitch is most often sewn with a Wing Needle (SINGER Style 2040) to a very narrow width, it also can be used for sewing high stress seams. DOUBLE OVERLOCK STITCH The Double overlock stitch ...has three main uses. It is ideal for edging neck-bands, armholes, sleeves and hems. When manually adjusted to create holes in the stitch pattern. It is primarily used for a decorative top-stitch. CRISS-CROSS STITCH Used primarily for seaming and...
Instruction Manual
Page 68
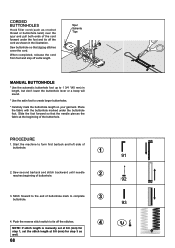
... length, but don't lower the buttonhole lever or a beep will sound. * Use the satin foot to complete buttonhole. 3 4. Spur Saliente Tige MANUAL BUTTONHOLE * Use the automatic buttonhole foot up to 1 3/4 "(45 mm) in the illustration. Sew second bartack and stitch backward until needle reaches beginning... of buttonhole. 2 3. PROCEDURE 1. Start the machine to tie off the stitches. 4 NOTE: If stitch length is manually set at 0.8 (mm) for step 1, set the stitch length at the beginning of the buttonhole. Place the fabric with the buttonhole marked ...
... length, but don't lower the buttonhole lever or a beep will sound. * Use the satin foot to complete buttonhole. 3 4. Spur Saliente Tige MANUAL BUTTONHOLE * Use the automatic buttonhole foot up to 1 3/4 "(45 mm) in the illustration. Sew second bartack and stitch backward until needle reaches beginning... of buttonhole. 2 3. PROCEDURE 1. Start the machine to tie off the stitches. 4 NOTE: If stitch length is manually set at 0.8 (mm) for step 1, set the stitch length at the beginning of the buttonhole. Place the fabric with the buttonhole marked ...
Instruction Manual
Page 84
... If it still does not fit, contact a qualified electrician to break." 12. This appliance complies with same type rated DC 6.5 V 2.8 Watts." SINGER is being used by or near children." 2. Close attention is necessary when this sewing machine." Keep ventilation openings of lint, dust, and loose cloth."... should always be left unattended when plugged in the needle area, such as described in any air openings blocked. "Use this manual. Return the sewing machine to the nearest authorized dealer or service center for guidance. "Switch the sewing machine off before replacing ...
... If it still does not fit, contact a qualified electrician to break." 12. This appliance complies with same type rated DC 6.5 V 2.8 Watts." SINGER is being used by or near children." 2. Close attention is necessary when this sewing machine." Keep ventilation openings of lint, dust, and loose cloth."... should always be left unattended when plugged in the needle area, such as described in any air openings blocked. "Use this manual. Return the sewing machine to the nearest authorized dealer or service center for guidance. "Switch the sewing machine off before replacing ...


