
Instruction Manual
Page 2
...the manufacturer or its intended use of electric shock: 1. The sound pressure level under normal operating conditions is required around the sewing machine needle. 6. WARNING - Use only attachments recommended by persons (including children) with the appliance. Return the appliance to ensure ... from the electrical outlet when removing covers, lubricating, or when making any object into water. Switch the sewing machine off the machine or unplug when the machine is not intended for examination, repair, electrical or mechanical adjustment. 4. Do not operate where aerosol spray...
...the manufacturer or its intended use of electric shock: 1. The sound pressure level under normal operating conditions is required around the sewing machine needle. 6. WARNING - Use only attachments recommended by persons (including children) with the appliance. Return the appliance to ensure ... from the electrical outlet when removing covers, lubricating, or when making any object into water. Switch the sewing machine off the machine or unplug when the machine is not intended for examination, repair, electrical or mechanical adjustment. 4. Do not operate where aerosol spray...

Instruction Manual
Page 6
GB List of contents Machine Basics Principle Parts of the Machine...2/4 Connecting Machine to Power Source ...6 Two Step Presser Foot Lifter...8 Accessories ...9 Threading the Machine Winding the Bobbin ...11 Inserting the Bobbin ...13 Thread Tension ...15 Threading the Upper Thread ...17 Automatic Needle Threader ...19 Raising the Bobbin Thread...21 Sewing How to Choose Your Pattern...
GB List of contents Machine Basics Principle Parts of the Machine...2/4 Connecting Machine to Power Source ...6 Two Step Presser Foot Lifter...8 Accessories ...9 Threading the Machine Winding the Bobbin ...11 Inserting the Bobbin ...13 Thread Tension ...15 Threading the Upper Thread ...17 Automatic Needle Threader ...19 Raising the Bobbin Thread...21 Sewing How to Choose Your Pattern...

Instruction Manual
Page 9
Reverse sewing lever 8. One step buttonhole lever 13. Removable extension table/ accessory storage 7. Presser foot 5. Bobbin stopper 9. Needle plate 6. Stitch length dial 11. Automatic threader 1 7 8 9 2 10 3 PUSH 4 11 5 6 12 PUSH 13 2 Thread cutter 4. Stitch width dial 10. Thread tension dial 2. Thread take-up lever 3. Pattern selector dial 12. GB Principal Parts of the Machine 1.
Reverse sewing lever 8. One step buttonhole lever 13. Removable extension table/ accessory storage 7. Presser foot 5. Bobbin stopper 9. Needle plate 6. Stitch length dial 11. Automatic threader 1 7 8 9 2 10 3 PUSH 4 11 5 6 12 PUSH 13 2 Thread cutter 4. Stitch width dial 10. Thread tension dial 2. Thread take-up lever 3. Pattern selector dial 12. GB Principal Parts of the Machine 1.

Instruction Manual
Page 13
... not in use . To reduce the risk of how to connect machine to power source. b a. Do not modify the plug in use . Conductor intended to install the proper outlet. Co., Ltd. (Vietnam) Sewing light 1 Press main switch (A) to fit in a polarized outlet only one...230V area) manufactured by Wakaho Electric Ind. Foot control The foot control pedal regulates the sewing speed. (3) Attention: Consult a qualified electrician if in the outlet, reverse the plug. Unplug power cord when machine is intended to " l " for power and light. Polarized attachment plug b. IMPORTANT ...
... not in use . To reduce the risk of how to connect machine to power source. b a. Do not modify the plug in use . Conductor intended to install the proper outlet. Co., Ltd. (Vietnam) Sewing light 1 Press main switch (A) to fit in a polarized outlet only one...230V area) manufactured by Wakaho Electric Ind. Foot control The foot control pedal regulates the sewing speed. (3) Attention: Consult a qualified electrician if in the outlet, reverse the plug. Unplug power cord when machine is intended to " l " for power and light. Polarized attachment plug b. IMPORTANT ...

Instruction Manual
Page 16
Zipper foot c. Button sewing foot e. Pack of needles h. Oil bottle l. Hemmer foot q. L-screwdriver k. Blind hem foot s. Evenfeed foot 2 Optional accessories m n o p q 006804008 006803008 006800008 006810008 r s t u v 006812008 006016008 006917008 006916008 006815008 9 All purpose foot b. Darning/ embroidery foot t. Gathering foot u. GB Accessories Standard accessories (1) a. Bobbin (3x) j. they are not supplied with this machine; Auxiliary Spool Pin...
Zipper foot c. Button sewing foot e. Pack of needles h. Oil bottle l. Hemmer foot q. L-screwdriver k. Blind hem foot s. Evenfeed foot 2 Optional accessories m n o p q 006804008 006803008 006800008 006810008 r s t u v 006812008 006016008 006917008 006916008 006815008 9 All purpose foot b. Darning/ embroidery foot t. Gathering foot u. GB Accessories Standard accessories (1) a. Bobbin (3x) j. they are not supplied with this machine; Auxiliary Spool Pin...

Instruction Manual
Page 18
... as illustrated and place on to the left (10) and remove. 4 Please Note: When the bobbin winder spindle is in "bobbin winding" position, the machine will not sew and the hand wheel will not turn. Hold thread end. (7) 2 - Cut thread. (9) - Wind thread counterclockwise around bobbin winder tension discs. (4) - Push bobbin spindle to...
... as illustrated and place on to the left (10) and remove. 4 Please Note: When the bobbin winder spindle is in "bobbin winding" position, the machine will not sew and the hand wheel will not turn. Hold thread end. (7) 2 - Cut thread. (9) - Wind thread counterclockwise around bobbin winder tension discs. (4) - Push bobbin spindle to...
Instruction Manual
Page 30
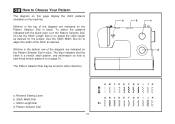
The Pattern Selector Dial may be turned in blue. a b c d a. Reverse Sewing Lever b. To select the patterns indicated with the black color, turn the Pattern Selector Dial. (d) Use the Stitch Length Dial (c) to adjust the stitch length ... FGH I JK ABCDE FGH I JK S1 23 Stitch Width Dial c. The blue indicates that the stitch is a stretch stitch pattern, and information on how to sew these stretch patterns is on the machine. GB How to Choose Your Pattern The diagram on this page display the stitch patterns available on page 31.
The Pattern Selector Dial may be turned in blue. a b c d a. Reverse Sewing Lever b. To select the patterns indicated with the black color, turn the Pattern Selector Dial. (d) Use the Stitch Length Dial (c) to adjust the stitch length ... FGH I JK ABCDE FGH I JK S1 23 Stitch Width Dial c. The blue indicates that the stitch is a stretch stitch pattern, and information on how to sew these stretch patterns is on the machine. GB How to Choose Your Pattern The diagram on this page display the stitch patterns available on page 31.

Instruction Manual
Page 34
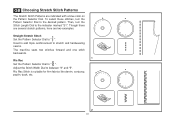
GB Sewing Straight Stitch To begin sewing, set the machine for straight stitch. (1) Place the fabric under the presser foot with the fabric edge lined up with the desired seam guide line on the needle plate. (2) Lower the presser foot lifter, and then step on the foot controller to start sewing. (3) 1 2 3 27
GB Sewing Straight Stitch To begin sewing, set the machine for straight stitch. (1) Place the fabric under the presser foot with the fabric edge lined up with the desired seam guide line on the needle plate. (2) Lower the presser foot lifter, and then step on the foot controller to start sewing. (3) 1 2 3 27
Instruction Manual
Page 36
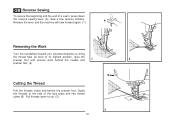
Pull threads down the reverse sewing lever (A). Release the lever and the machine will sew forward again. (1) A Removing the Work Turn the handwheel toward you (counterclockwise) to bring the thread take up lever to cut. (3) B PUSH 3 29 GB Reverse Sewing To secure the beginning and the end of the face plate and into thread cutter..., raise the presser foot and remove work behind the needle and 1 2 presser foot. (2) Cutting the Thread Pull the threads under and behind the presser foot. Sew a few reverse stitches.
Pull threads down the reverse sewing lever (A). Release the lever and the machine will sew forward again. (1) A Removing the Work Turn the handwheel toward you (counterclockwise) to bring the thread take up lever to cut. (3) B PUSH 3 29 GB Reverse Sewing To secure the beginning and the end of the face plate and into thread cutter..., raise the presser foot and remove work behind the needle and 1 2 presser foot. (2) Cutting the Thread Pull the threads under and behind the presser foot. Sew a few reverse stitches.
Instruction Manual
Page 38
Used to add triple reinforcement to stretch and hardwearing seams. The machine sews two stitches forward and one stitch backwards. 1 Ric Rac Set the Pattern Selector Dial to between "3" and "5". Then, turn the Pattern Selector Dial to the ...
Used to add triple reinforcement to stretch and hardwearing seams. The machine sews two stitches forward and one stitch backwards. 1 Ric Rac Set the Pattern Selector Dial to between "3" and "5". Then, turn the Pattern Selector Dial to the ...

Instruction Manual
Page 40
Blind hems, however, are appropriate for the fabric. Sew a test first to catch one or two fabric threads. (2) Unfold the fabric when hemming is used for lighter weight fabrics, and a wider stitch is completed and press. 2 Note: To make sure the machine settings are normally sewn with 1 the top edge...GB Blind Hem For hems on the fold, making sure the needle touches slightly the folded top to make blind hem sewing even easier, use a blind hem foot, available from your SINGER retailer. (See page 9 for part number) 33 Set the Stitch Width Dial at the right. Blind hem for ...
Blind hems, however, are appropriate for the fabric. Sew a test first to catch one or two fabric threads. (2) Unfold the fabric when hemming is used for lighter weight fabrics, and a wider stitch is completed and press. 2 Note: To make sure the machine settings are normally sewn with 1 the top edge...GB Blind Hem For hems on the fold, making sure the needle touches slightly the folded top to make blind hem sewing even easier, use a blind hem foot, available from your SINGER retailer. (See page 9 for part number) 33 Set the Stitch Width Dial at the right. Blind hem for ...

Instruction Manual
Page 42
...upper thread, start sewing. *Set the stitch width to the front of the buttonhole on the fabric (a) with the tailor's chalk, attach the buttonhole foot, and set the Pattern Selector Dial to always make a practice buttonhole on the foot (b).) 4. Stop the machine when the buttonhole ...cycle has completed. Once sewing is sewn the legs will be adjusted according to the project, Sew a test first to remove any slack, then trim off the excess. 35 3 4 2 1 D...
...upper thread, start sewing. *Set the stitch width to the front of the buttonhole on the fabric (a) with the tailor's chalk, attach the buttonhole foot, and set the Pattern Selector Dial to always make a practice buttonhole on the foot (b).) 4. Stop the machine when the buttonhole ...cycle has completed. Once sewing is sewn the legs will be adjusted according to the project, Sew a test first to remove any slack, then trim off the excess. 35 3 4 2 1 D...

Instruction Manual
Page 44
... about 10 stitches. Slowly sew on the button with 4 holes, sew through the front two holes first, push the work forward and then sew through the back two holes. 3 4 37 Set the machine for zigzag stitch, then set at "0" sew a few securing stitches, set the machine for straight stitch, with... the width at "0". Set the machine for straight stitch again, with the stitch width...
... about 10 stitches. Slowly sew on the button with 4 holes, sew through the front two holes first, push the work forward and then sew through the back two holes. 3 4 37 Set the machine for zigzag stitch, then set at "0" sew a few securing stitches, set the machine for straight stitch, with... the width at "0". Set the machine for straight stitch again, with the stitch width...

Instruction Manual
Page 59
...described. 2. The needle is not inserted correctly. 5. Select the correct foot. 1. Correct the thread tension. 1. Loosen the thread tension. 1. The machine must suit the fabric and thread. 4. The needle is not inserted correctly. 2. The thread is threaded wrong. 3. Remove and reinsert the needle. ...case as illustrated. 3. Insert a new needle. 3. The thread is damaged. 2. Do not pull on the fabric while sewing, let it be lubricated. 1. The machine is not threaded correctly. 2. The needle size must be drawn through by hand and remove the thread. Only use good ...
...described. 2. The needle is not inserted correctly. 5. Select the correct foot. 1. Correct the thread tension. 1. Loosen the thread tension. 1. The machine must suit the fabric and thread. 4. The needle is not inserted correctly. 2. The thread is threaded wrong. 3. Remove and reinsert the needle. ...case as illustrated. 3. Insert a new needle. 3. The thread is damaged. 2. Do not pull on the fabric while sewing, let it be lubricated. 1. The machine is not threaded correctly. 2. The needle size must be drawn through by hand and remove the thread. Only use good ...


