Instruction Manual
Page 1
INSTRUCTION MANUAL FOR SEWING MACHINE fli H / H i WHITE Call Toll Free 800-331-3164 www.whftesewing.com
INSTRUCTION MANUAL FOR SEWING MACHINE fli H / H i WHITE Call Toll Free 800-331-3164 www.whftesewing.com
Instruction Manual
Page 2
... unplug by Keep fingers away pulling from other tuhseeresleecrvtriiccianlgoaudtjleutstwmheenntsrmemeonvtiionngedcoivnetrhse, instruction manual. ii Do not Do not use outdoors. Unplug the sewing such as threading machine needle, when making any opening. 6. 7. the sewing ii. SAVE THESE INSTRUCTIONS dust, and loose cloth. Do Do not not use pull bent needles. Special care the plug...
... unplug by Keep fingers away pulling from other tuhseeresleecrvtriiccianlgoaudtjleutstwmheenntsrmemeonvtiionngedcoivnetrhse, instruction manual. ii Do not Do not use outdoors. Unplug the sewing such as threading machine needle, when making any opening. 6. 7. the sewing ii. SAVE THESE INSTRUCTIONS dust, and loose cloth. Do Do not not use pull bent needles. Special care the plug...
Instruction Manual
Page 3
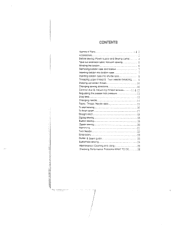
...bobbin case 7 Inserting bobbin case Into shuttle race 3 Threading ucper thread & Twin needle threaoing 9 Drawing up boobin thread 10 Changing sewing directions 10 Control dial & Adjusting thread tension (1 & 12 Regulating the presser toot pressure (3 Drop feed 13 Changing needle 14 ...Fabric. Thread. Needle table (5 To start sewing 16 Toñnishseam 17 Straight stitch 18 Zigzag sewing Button sewing 19 Zipper sewing 20 Hemming 21 Twin Needle 22 Embroidery 22 Quilter & Seam guide 23 Buttonhole sewing 24 Maintenance (Cleaning and oiling) 25 Checking ...
...bobbin case 7 Inserting bobbin case Into shuttle race 3 Threading ucper thread & Twin needle threaoing 9 Drawing up boobin thread 10 Changing sewing directions 10 Control dial & Adjusting thread tension (1 & 12 Regulating the presser toot pressure (3 Drop feed 13 Changing needle 14 ...Fabric. Thread. Needle table (5 To start sewing 16 Toñnishseam 17 Straight stitch 18 Zigzag sewing Button sewing 19 Zipper sewing 20 Hemming 21 Twin Needle 22 Embroidery 22 Quilter & Seam guide 23 Buttonhole sewing 24 Maintenance (Cleaning and oiling) 25 Checking ...
Instruction Manual
Page 7
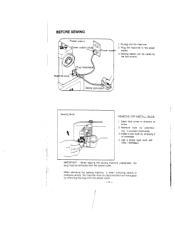
.../1 5W(Max). Plug the macnine tc he power supply 3. Qoen face cover in clockwise. 4. I Sewing speed can be removed from the socket outlet. -4- When servicing the sewing machine, or wnen removing covers or changing amps, the macnine must be varied by the toot control....bulb by removing the plug from the socket outlet. install a new bulb y screwing it counter-clockwise. 3. BEFORE SEWING 1. Sewing lamp REMOVE ORHNSTALL BULB 1. lMPOTANT : When leaving the sewing macnine unattended, the plug must ce disconnected from the supply by unscrew ing it in direction of arrow. 2.
.../1 5W(Max). Plug the macnine tc he power supply 3. Qoen face cover in clockwise. 4. I Sewing speed can be removed from the socket outlet. -4- When servicing the sewing machine, or wnen removing covers or changing amps, the macnine must be varied by the toot control....bulb by removing the plug from the socket outlet. install a new bulb y screwing it counter-clockwise. 3. BEFORE SEWING 1. Sewing lamp REMOVE ORHNSTALL BULB 1. lMPOTANT : When leaving the sewing macnine unattended, the plug must ce disconnected from the supply by unscrew ing it in direction of arrow. 2.
Instruction Manual
Page 8
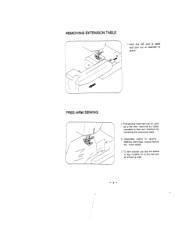
Especially useful for sewing sleeves, pal-it legs, tubular faDr:cs etc., more easily. 3. FREE-ARM SEWiNG 1. To sew tubular ust sliø the sleeve or leg of table and pull out in dIrection or arrow. REMOVING EXTENSION TABLE 1 Hold the left end of pants on to the free arm as a fiat bed machine out easily converts to free arm macnine by removing the extension table. 2. This sewing machine can be used as shown at side. -5- /
Especially useful for sewing sleeves, pal-it legs, tubular faDr:cs etc., more easily. 3. FREE-ARM SEWiNG 1. To sew tubular ust sliø the sleeve or leg of table and pull out in dIrection or arrow. REMOVING EXTENSION TABLE 1 Hold the left end of pants on to the free arm as a fiat bed machine out easily converts to free arm macnine by removing the extension table. 2. This sewing machine can be used as shown at side. -5- /
Instruction Manual
Page 13
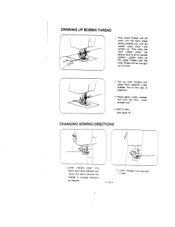
.... 3. I Lower needle oown into fabric and raise presser foot. lightly araw up the upper thread and the lower thread will be brought up . Start to sew. -10-- Hold upper thread with left hand, turn the hana wneel slcwiy towards you until the needle qoes down and comes up in a loop. 4 2. Lower...
.... 3. I Lower needle oown into fabric and raise presser foot. lightly araw up the upper thread and the lower thread will be brought up . Start to sew. -10-- Hold upper thread with left hand, turn the hana wneel slcwiy towards you until the needle qoes down and comes up in a loop. 4 2. Lower...
Instruction Manual
Page 16
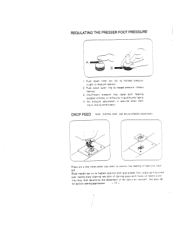
... stitcries, or difficulty in guiding the faoric. 4 No pressure adjustment is required wnen darn- DROP FEED Note: Darning date can be purchased seoarateiy. rig or sewing embroidery. REGULATING THE PRESSER FOOT PRESSURE // A 1 Push oown rifler pin (A) to increase pressure. (Light to release pressure. (Heavy fabrics) 3. Raise needle bar to control me...
... stitcries, or difficulty in guiding the faoric. 4 No pressure adjustment is required wnen darn- DROP FEED Note: Darning date can be purchased seoarateiy. rig or sewing embroidery. REGULATING THE PRESSER FOOT PRESSURE // A 1 Push oown rifler pin (A) to increase pressure. (Light to release pressure. (Heavy fabrics) 3. Raise needle bar to control me...
Instruction Manual
Page 18
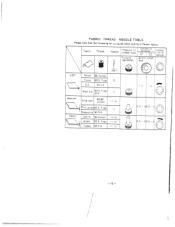
oeri 9 SE\ Sik \ 50 sk Wool silk Fber Medium Ging nam 60-80 Cotton \ \ I. \ Jerse'60 S. :ber Heavy IGaoardtne 60 lk so Denim cotton Jersey 50 S. FABRIC THREAD NEEDLE TABLE Please note that me foIl owing list is a guide when sewing different fabrics. \ \ \ \ Fabric Thread Needle Pressure of oresser foot Ptiissure regulation Ltetnncttsr Z Srtcn ength dIa' Incica tension Lgnt lao Nylon Cotton Trcot 160 S. Fiberl Tweed 150Sk 14 11 14.16 11.14 11.14 13 i- \ o. a - - - 1( ) 0.5 - 3O.5 -4 -15
oeri 9 SE\ Sik \ 50 sk Wool silk Fber Medium Ging nam 60-80 Cotton \ \ I. \ Jerse'60 S. :ber Heavy IGaoardtne 60 lk so Denim cotton Jersey 50 S. FABRIC THREAD NEEDLE TABLE Please note that me foIl owing list is a guide when sewing different fabrics. \ \ \ \ Fabric Thread Needle Pressure of oresser foot Ptiissure regulation Ltetnncttsr Z Srtcn ength dIa' Incica tension Lgnt lao Nylon Cotton Trcot 160 S. Fiberl Tweed 150Sk 14 11 14.16 11.14 11.14 13 i- \ o. a - - - 1( ) 0.5 - 3O.5 -4 -15
Instruction Manual
Page 19
Sufficient fabric should be placed under needle before starttnQ na after stopping sewing. 2. Test the machine stitches n aalusttng the machine tar the a scrap of ...its highest position before owering presser foot. 4. When turning the balaj,ce wneel manually, always turn t toward you stop sewing. - !i5 - Depress foot and start to tne first two or three stitches. 3. Hold born threads about 10 ... fabric. Raise the take-up ever to your hand. 3. Attention 1. TO START SEWING Imoortant Hints 1. To Oreverit breaking needle always raise the needle out of machine to se'i' 5.
Sufficient fabric should be placed under needle before starttnQ na after stopping sewing. 2. Test the machine stitches n aalusttng the machine tar the a scrap of ...its highest position before owering presser foot. 4. When turning the balaj,ce wneel manually, always turn t toward you stop sewing. - !i5 - Depress foot and start to tne first two or three stitches. 3. Hold born threads about 10 ... fabric. Raise the take-up ever to your hand. 3. Attention 1. TO START SEWING Imoortant Hints 1. To Oreverit breaking needle always raise the needle out of machine to se'i' 5.
Instruction Manual
Page 20
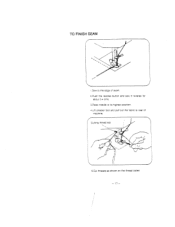
TO FiNISH SEAM I .Sew to the eoge of seam. 2Push the reverse button and sew in reverse for about 3-4 orns. 3.Raise needle to its highest posItion 4.Ltt presser foot ano pull ou the faonc to rear of macnine. 5.Cut threads as shown on the threab cutter. - 17-
TO FiNISH SEAM I .Sew to the eoge of seam. 2Push the reverse button and sew in reverse for about 3-4 orns. 3.Raise needle to its highest posItion 4.Ltt presser foot ano pull ou the faonc to rear of macnine. 5.Cut threads as shown on the threab cutter. - 17-
Instruction Manual
Page 21
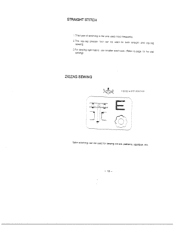
patterns, appllque, etc. - presser foot can be used for both straight arc zig-zag 3.For sewing setting). light fabric, use smaller stitch size. (Refer to cage 15 for diat ZIGZAG SEWING 1 L zIQzaa width t3oStlon E Satin stitching can be used for sewing initiats. STRAIGHT STITCH I This type of siticning is the one useO most treuentIy. 2 The zig-zag sewing.
patterns, appllque, etc. - presser foot can be used for both straight arc zig-zag 3.For sewing setting). light fabric, use smaller stitch size. (Refer to cage 15 for diat ZIGZAG SEWING 1 L zIQzaa width t3oStlon E Satin stitching can be used for sewing initiats. STRAIGHT STITCH I This type of siticning is the one useO most treuentIy. 2 The zig-zag sewing.
Instruction Manual
Page 22
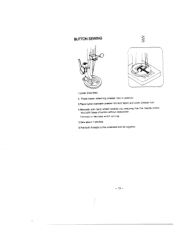
Place button attaching presser toot n position. 3.Ptace button between presser foot and fabric and lower resser foot. 4.Manually turn hand whee towards you ensuring that tne needle enters into both ho'es of button without obstruction. (Increase or decreise width setting). 5.Sew about 7 stitches. 6.PuiI both threads to the underside arid tie together. - 19- BUTTON SEWING 1 .Lower drop teed. 2.
Place button attaching presser toot n position. 3.Ptace button between presser foot and fabric and lower resser foot. 4.Manually turn hand whee towards you ensuring that tne needle enters into both ho'es of button without obstruction. (Increase or decreise width setting). 5.Sew about 7 stitches. 6.PuiI both threads to the underside arid tie together. - 19- BUTTON SEWING 1 .Lower drop teed. 2.
Instruction Manual
Page 23
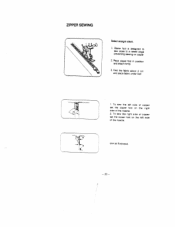
Fold the fabric about 2 cm arid place fabric under foot 1. sew as illustrated. / 20 - - ZIPPER SEWING Select stralgnt stItch. 1. To sew the left side of the needle. 2. Place zipper foot in position arid attach firmly 3. To sew the right side of zipper set the zipper loot on the left side of zipper set the zipper toot on the rigrlt side of the needle. ZIpper foot is designec to sew close to a raised edge preventing sewing cr1 zipper 2.
Fold the fabric about 2 cm arid place fabric under foot 1. sew as illustrated. / 20 - - ZIPPER SEWING Select stralgnt stItch. 1. To sew the left side of the needle. 2. Place zipper foot in position arid attach firmly 3. To sew the right side of zipper set the zipper loot on the left side of zipper set the zipper toot on the rigrlt side of the needle. ZIpper foot is designec to sew close to a raised edge preventing sewing cr1 zipper 2.
Instruction Manual
Page 24
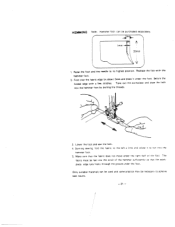
... left a little and allow it under the foot. Raise the foot and the needle to run into the hemmer foot by pulling the threads. 3. Durning sewing, fold the fadric to acneive best results. 21 - - Only suitable materials can be purchased separately. 1. HEMMING Note. Take out the workplece and draw ... into the scroll of the hemmer sutficently so that the work piece edge runs freely through the groove under the foot. Lower the foot and sew the hem. 4. Secure tne folded edge with the hemmer foot. 2. Replace the foot with a few stitches. Fold over the fabric edge by about ...
... left a little and allow it under the foot. Raise the foot and the needle to run into the hemmer foot by pulling the threads. 3. Durning sewing, fold the fadric to acneive best results. 21 - - Only suitable materials can be purchased separately. 1. HEMMING Note. Take out the workplece and draw ... into the scroll of the hemmer sutficently so that the work piece edge runs freely through the groove under the foot. Lower the foot and sew the hem. 4. Secure tne folded edge with the hemmer foot. 2. Replace the foot with a few stitches. Fold over the fabric edge by about ...
Instruction Manual
Page 25
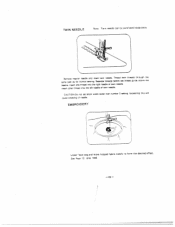
EMBROIDERY Lower feed dog and move hooped fabric slowly to form the desired effect. CAUTTON:Do not set stitch width wider than number 2 setting. I Insert other thread into the right needle of twin needle. Insert one thread into the left needle of needle. See Page 13 drop teed -22- Thread both threads througn me same oath as for normal sewing. Exceeding this will cause breaking of twiii needle. ThVIN NEEDLE Note: Twin needle can be purchased separately emove regular needle and insert twin needle. Seøarate threads before last thread guide above the needle.
EMBROIDERY Lower feed dog and move hooped fabric slowly to form the desired effect. CAUTTON:Do not set stitch width wider than number 2 setting. I Insert other thread into the right needle of twin needle. Insert one thread into the left needle of needle. See Page 13 drop teed -22- Thread both threads througn me same oath as for normal sewing. Exceeding this will cause breaking of twiii needle. ThVIN NEEDLE Note: Twin needle can be purchased separately emove regular needle and insert twin needle. Seøarate threads before last thread guide above the needle.

Instruction Manual
Page 26
tong seam of regular distance from the needle to the right guide of needle fate, and adjust dis for desired seam allowance. 3.Run macrune with edge of presser toot holder. 2.Move guioe to regured stitch distance. QUILTER Note: Quilt guice can be purcnasei separately. SEAM GUIDE Note: Seam guide can be purchased separately. -3 1. Use seam guide wnen sewing edge ci material. Set tance guide hole on top of material touching guide. 23 - - ISlide arm through hole on bed, at from 2.
tong seam of regular distance from the needle to the right guide of needle fate, and adjust dis for desired seam allowance. 3.Run macrune with edge of presser toot holder. 2.Move guioe to regured stitch distance. QUILTER Note: Quilt guice can be purcnasei separately. SEAM GUIDE Note: Seam guide can be purchased separately. -3 1. Use seam guide wnen sewing edge ci material. Set tance guide hole on top of material touching guide. 23 - - ISlide arm through hole on bed, at from 2.

Instruction Manual
Page 27
...KNOB ON 0', ZIGZAG WIDTh KNOB ON 5 AND NEEDLE KNOB ON CENTER POSITION. THEN SEW 3-5 STITCHES AS FIGURE (1)., 4. THEN SEW AS FIGURE (2) UN11LL YOU REACHES ThE END OF THE MARKING. 5. NEEDLE POSITION KNOB SEW UNTILL YOU REACHES THE END OF THE MARKING ON AS FIGURE (4). 7, REMOVE FABRIC ...FROM THE MACHINE AND OPEN ThE BUTTONHOLE WITH A BUTTONHOLE CUTTER CR SEAM CUTTER. (1) (2) (4) 1r it 4 Before sewing fit bultonhole tool as shown. 24 - - SET STITCH LENGTh ABOUT 0.5. ZIGZAG WIDTh KNOB ON 2. SET RIGHT THE STITCH LENGTH KNOB ABOUT POSITION. REMOVE...
...KNOB ON 0', ZIGZAG WIDTh KNOB ON 5 AND NEEDLE KNOB ON CENTER POSITION. THEN SEW 3-5 STITCHES AS FIGURE (1)., 4. THEN SEW AS FIGURE (2) UN11LL YOU REACHES ThE END OF THE MARKING. 5. NEEDLE POSITION KNOB SEW UNTILL YOU REACHES THE END OF THE MARKING ON AS FIGURE (4). 7, REMOVE FABRIC ...FROM THE MACHINE AND OPEN ThE BUTTONHOLE WITH A BUTTONHOLE CUTTER CR SEAM CUTTER. (1) (2) (4) 1r it 4 Before sewing fit bultonhole tool as shown. 24 - - SET STITCH LENGTh ABOUT 0.5. ZIGZAG WIDTh KNOB ON 2. SET RIGHT THE STITCH LENGTH KNOB ABOUT POSITION. REMOVE...

Instruction Manual
Page 29
... etop mollon. * oving dial to 1-4. Do not pull fabric. - Correct use of needle, thread or fabric. - Ioosen upper thread tension. . Adlust sewing loot pmessure - Needle bent. Improper threading. - Incorrect use of fabric, and thread, - [leeds oiling Glean stmutlle. - -Reset. - Use correct fabric...Needle bent. . Increase pressure on presser toot. Re-thread machine. . Replace shuttle, or polish oil burrs completely. Sewing toot pressure too strong - Fit new needle. - Stitch length dial no positicn. - Dust and thread in shuttle. Incorrect use of needle. -...
... etop mollon. * oving dial to 1-4. Do not pull fabric. - Correct use of needle, thread or fabric. - Ioosen upper thread tension. . Adlust sewing loot pmessure - Needle bent. Improper threading. - Incorrect use of fabric, and thread, - [leeds oiling Glean stmutlle. - -Reset. - Use correct fabric...Needle bent. . Increase pressure on presser toot. Re-thread machine. . Replace shuttle, or polish oil burrs completely. Sewing toot pressure too strong - Fit new needle. - Stitch length dial no positicn. - Dust and thread in shuttle. Incorrect use of needle. -...


