
Instruction Manual
Page 2
...to 14. Special care the plug, not the is 8. Unplug the sewing such as threading machine needle, when making any opening. 6. 7. IfRoMWllohewePenadO,udsiniRncgluaTdailnnlAgeltehNicet(nriftTcohsalllotiwSasripnupAgl:siacenFctweEi, ...oibTnansgYicssamfIebtNyaecpSrfheocTiaunrRtieeonU)s usChosuTildnIaOglwaNys Sbe DANGER An appliance appliance from 9. 10. machine needle. SAVE THESE INSTRUCTIONS erAafotlweredayc1sl5euawnnpailntutgsg.. Do Do not not use pull bent needles...
...to 14. Special care the plug, not the is 8. Unplug the sewing such as threading machine needle, when making any opening. 6. 7. IfRoMWllohewePenadO,udsiniRncgluaTdailnnlAgeltehNicet(nriftTcohsalllotiwSasripnupAgl:siacenFctweEi, ...oibTnansgYicssamfIebtNyaecpSrfheocTiaunrRtieeonU)s usChosuTildnIaOglwaNys Sbe DANGER An appliance appliance from 9. 10. machine needle. SAVE THESE INSTRUCTIONS erAafotlweredayc1sl5euawnnpailntutgsg.. Do Do not not use pull bent needles...
Instruction Manual
Page 13
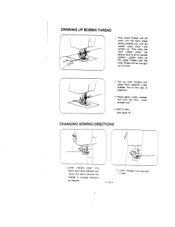
...rear of machine. 3. I Lower needle oown into fabric and raise presser foot. Hold upper thread with left hand, turn the hana wneel slcwiy towards you until the needle qoes down and comes up in a loop. 4 2. Place fabric under presser foot to sow (see page 16) CHANGLNG SEWiNG DIRECTiONS I... pivot the fabric around the needle to sew. -10-- Pull out both threads and place them together under presser foot from the front, lower presser foot. 4. Lower presser foot and ...
...rear of machine. 3. I Lower needle oown into fabric and raise presser foot. Hold upper thread with left hand, turn the hana wneel slcwiy towards you until the needle qoes down and comes up in a loop. 4 2. Place fabric under presser foot to sow (see page 16) CHANGLNG SEWiNG DIRECTiONS I... pivot the fabric around the needle to sew. -10-- Pull out both threads and place them together under presser foot from the front, lower presser foot. 4. Lower presser foot and ...
Instruction Manual
Page 19
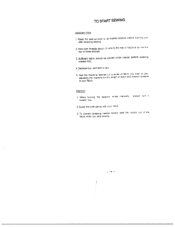
...your hand. 3. Sufficient fabric should be placed under needle before starttnQ na after stopping sewing. 2. Depress foot and start to tne first two or three stitches. 3. Test the machine stitches n aalusttng the machine tar the a scrap of stitch and tension to use, suitaole to its highest position...always turn t toward you clan length of faric you . 2.Guide the cloth gently with your fabric. Hold born threads about 10 cms tc the rear of the fabric when you stop sewing. - !i5 - To Oreverit breaking needle always raise the needle out of machine to se'i' 5. TO START...
...your hand. 3. Sufficient fabric should be placed under needle before starttnQ na after stopping sewing. 2. Depress foot and start to tne first two or three stitches. 3. Test the machine stitches n aalusttng the machine tar the a scrap of stitch and tension to use, suitaole to its highest position...always turn t toward you clan length of faric you . 2.Guide the cloth gently with your fabric. Hold born threads about 10 cms tc the rear of the fabric when you stop sewing. - !i5 - To Oreverit breaking needle always raise the needle out of machine to se'i' 5. TO START...

Instruction Manual
Page 29
.... . Replace shuttle, or polish oil burrs completely. Dust and thread in shuttle. Adlust sewing loot pmessure - Needle bent. CORRECTION - Raise feed dog. - Fit new needle. - Machine Jamming Knocking Noise Puckering - No oil. Sewing toot pressure too strong - Machine not moving Breaking Needle Breaking Bobbin Thread CHECKING PERFORMANCE PROBLEMS WHAT TO DO PROBABLE CAUSE Feed dog down...
.... . Replace shuttle, or polish oil burrs completely. Dust and thread in shuttle. Adlust sewing loot pmessure - Needle bent. CORRECTION - Raise feed dog. - Fit new needle. - Machine Jamming Knocking Noise Puckering - No oil. Sewing toot pressure too strong - Machine not moving Breaking Needle Breaking Bobbin Thread CHECKING PERFORMANCE PROBLEMS WHAT TO DO PROBABLE CAUSE Feed dog down...


