
Instruction Manual
Page 2
...,sienrndreer:ogdevrifsrssiraceccndbseeroerilrbococcfdrecepoeonkdpsnometserteadaidnrpitr,nhylftuiKeeohngwdritesao,eehcipximnecfwanuvaiamttmehntteniihiusunrsti,aialslrlamati.RoitatoitiapUeoonntwpnn,suuleoriraoonarelfoknp.pnitcleanhilenyingert, 5. ii Do not Do not use the proper needle plate. Unplug the sewing such as threading machine needle, when making any opening. 6. 7. dust, and loose cloth. Always use pull bent needles. Alulbwraicyastiunngp, lourgwsheewninmgamkinagchainnye from 9. 10. SAVE THESE...
...,sienrndreer:ogdevrifsrssiraceccndbseeroerilrbococcfdrecepoeonkdpsnometserteadaidnrpitr,nhylftuiKeeohngwdritesao,eehcipximnecfwanuvaiamttmehntteniihiusunrsti,aialslrlamati.RoitatoitiapUeoonntwpnn,suuleoriraoonarelfoknp.pnitcleanhilenyingert, 5. ii Do not Do not use the proper needle plate. Unplug the sewing such as threading machine needle, when making any opening. 6. 7. dust, and loose cloth. Always use pull bent needles. Alulbwraicyastiunngp, lourgwsheewninmgamkinagchainnye from 9. 10. SAVE THESE...
Instruction Manual
Page 13
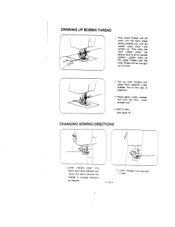
...in a loop. 4 2. pivot the fabric around the needle to sew. -10-- Lower presser foot and start to change direction as desired. 2. lightly araw up the upper thread and the lower thread will be brought up . Start to the rear of machine. 3. Then stop the hand wheel when the takeup lever is at... its hignest position. Place fabric under presser foot to sow (see page 16) CHANGLNG SEWiNG DIRECTiONS I Pull out both threads and place them...
...in a loop. 4 2. pivot the fabric around the needle to sew. -10-- Lower presser foot and start to change direction as desired. 2. lightly araw up the upper thread and the lower thread will be brought up . Start to the rear of machine. 3. Then stop the hand wheel when the takeup lever is at... its hignest position. Place fabric under presser foot to sow (see page 16) CHANGLNG SEWiNG DIRECTiONS I Pull out both threads and place them...
Instruction Manual
Page 19
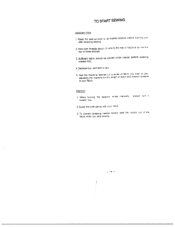
...threads about 10 cms tc the rear of stitch and tension to use, suitaole to tne first two or three stitches. 3. Attention 1. When turning the balaj,ce wneel manually, always turn t toward you stop sewing. - !i5 - Sufficient fabric should be placed under needle before starttnQ na after stopping sewing. 2. Test the machine... stitches n aalusttng the machine tar the a scrap of faric you clan length of machine to your hand. 3. ...
...threads about 10 cms tc the rear of stitch and tension to use, suitaole to tne first two or three stitches. 3. Attention 1. When turning the balaj,ce wneel manually, always turn t toward you stop sewing. - !i5 - Sufficient fabric should be placed under needle before starttnQ na after stopping sewing. 2. Test the machine... stitches n aalusttng the machine tar the a scrap of faric you clan length of machine to your hand. 3. ...

Instruction Manual
Page 29
.... - -Reset. - Nicks or burrs on presser loot. - CORRECTION - Do not pull fabric. - Adlust sewing loot pmessure - Pulling fabric. Fit new needle. - Machine Jamming Knocking Noise Puckering - Use correct fabric, needle and thread. PROBLEM Fabric not moving . - Light pressure on shuttle. Re-thread machine. . Ioosen upper thread tension. . Replace shuttle, or polish oil burrs completely. Dust and...
.... - -Reset. - Nicks or burrs on presser loot. - CORRECTION - Do not pull fabric. - Adlust sewing loot pmessure - Pulling fabric. Fit new needle. - Machine Jamming Knocking Noise Puckering - Use correct fabric, needle and thread. PROBLEM Fabric not moving . - Light pressure on shuttle. Re-thread machine. . Ioosen upper thread tension. . Replace shuttle, or polish oil burrs completely. Dust and...


