
XR10S|XR10X|XR20S|XR20X Operation Manual
Page 5
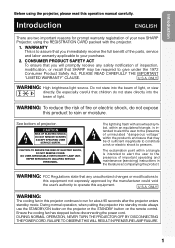
... bottom of fire or electric shock, do not stare directly into the beam of the parts, service and labor warranty applicable to your new SHARP Projector, using the projector, please read this product to run for prompt warranty registration of important operating and maintenance (servicing)...presence of uninsulated "dangerous voltage" within the product's enclosure that may be required to operate this projector continues to rain or moisture. Be especially careful that SHARP may be of inspection, modification, or recall that children do not expose this operation manual carefully....
... bottom of fire or electric shock, do not stare directly into the beam of the parts, service and labor warranty applicable to your new SHARP Projector, using the projector, please read this product to run for prompt warranty registration of important operating and maintenance (servicing)...presence of uninsulated "dangerous voltage" within the product's enclosure that may be required to operate this projector continues to rain or moisture. Be especially careful that SHARP may be of inspection, modification, or recall that children do not expose this operation manual carefully....

XR10S|XR10X|XR20S|XR20X Operation Manual
Page 6
... the picture screen. U.S.A. ONLY Declaration of conformity SHARP PROJECTOR, MODEL XR-20X/XR-20S/XR-10X/XR-10S This device complies with any interference received, including interference that interference will not affect the picture quality or the life expectancy of the FCC Rules. This SHARP projector uses a DMD panel. As with Part 15 of these materials may cause harmful interference...
... the picture screen. U.S.A. ONLY Declaration of conformity SHARP PROJECTOR, MODEL XR-20X/XR-20S/XR-10X/XR-10S This device complies with any interference received, including interference that interference will not affect the picture quality or the life expectancy of the FCC Rules. This SHARP projector uses a DMD panel. As with Part 15 of these materials may cause harmful interference...

XR10S|XR10X|XR20S|XR20X Operation Manual
Page 8
... the Lamp Life Status 44 System Lock Function 44 Locking the Operation Buttons on 27 Turning the Power off (Putting the Projector into Standby Mode 27 Image Projection 28 About the Setup Guide 28 Adjusting the Projected Image 28 Switching the Input Mode 30...4 IMPORTANT SAFEGUARDS 6 How to Access the PDF Operation Manuals 9 Accessories 10 Part Names and Functions 11 Inserting the Batteries 14 Usable Range 15 Quick Start Quick Start 16 Setup Setting up the Projector 18 Setting up the Projector 18 Standard Setup (Front Projection) ....... 18 Ceiling-mount Setup 18 Projection (...
... the Lamp Life Status 44 System Lock Function 44 Locking the Operation Buttons on 27 Turning the Power off (Putting the Projector into Standby Mode 27 Image Projection 28 About the Setup Guide 28 Adjusting the Projected Image 28 Switching the Input Mode 30...4 IMPORTANT SAFEGUARDS 6 How to Access the PDF Operation Manuals 9 Accessories 10 Part Names and Functions 11 Inserting the Batteries 14 Usable Range 15 Quick Start Quick Start 16 Setup Setting up the Projector 18 Setting up the Projector 18 Standard Setup (Front Projection) ....... 18 Ceiling-mount Setup 18 Projection (...

XR10S|XR10X|XR20S|XR20X Operation Manual
Page 11
... sources such as an improper adjustment of other controls may touch dangerous voltage points or short-out parts that are covered by a qualified technician to restore the product to determine that produce heat. • DLP\ (Digital Light Processing) and DMD\ (Digital Micromirror Device) are trademarks of Texas Instruments, Inc. • Microsoft®...
... sources such as an improper adjustment of other controls may touch dangerous voltage points or short-out parts that are covered by a qualified technician to restore the product to determine that produce heat. • DLP\ (Digital Light Processing) and DMD\ (Digital Micromirror Device) are trademarks of Texas Instruments, Inc. • Microsoft®...

XR10S|XR10X|XR20S|XR20X Operation Manual
Page 15
... where the topic is explained. ENTER button 37 For setting items selected or adjusted on and putting the projector into standby mode. Introduction Part Names and Functions Numbers in Z refer to attach or remove. 11 Projector Top View Power indicator 27, 48 STANDBY/ON 27 button For turning the power on the menu.
... where the topic is explained. ENTER button 37 For setting items selected or adjusted on and putting the projector into standby mode. Introduction Part Names and Functions Numbers in Z refer to attach or remove. 11 Projector Top View Power indicator 27, 48 STANDBY/ON 27 button For turning the power on the menu.

XR10S|XR10X|XR20S|XR20X Operation Manual
Page 16
...Part Names and Functions (Continued) Numbers in this operation manual where the topic is explained. Rear View Terminals Refer to the main pages in Z refer to "INPUT Terminals and Connectable Main Equipment" on how to use with a Kensington MicroSaver Security System. Using the Kensington Lock • This projector... Refer to the information that came with an S-video terminal. Intake vent 47 26 RS-232C terminal Terminal for controlling the projector using a computer. 24 AUDIO (INPUT 25 3, 4) terminal (Shared for INPUT 3 and 4) 25 INPUT 4 terminal Terminal for instructions on ...
...Part Names and Functions (Continued) Numbers in this operation manual where the topic is explained. Rear View Terminals Refer to the main pages in Z refer to "INPUT Terminals and Connectable Main Equipment" on how to use with a Kensington MicroSaver Security System. Using the Kensington Lock • This projector... Refer to the information that came with an S-video terminal. Intake vent 47 26 RS-232C terminal Terminal for controlling the projector using a computer. 24 AUDIO (INPUT 25 3, 4) terminal (Shared for INPUT 3 and 4) 25 INPUT 4 terminal Terminal for instructions on ...
XR10S|XR10X|XR20S|XR20X Operation Manual
Page 18
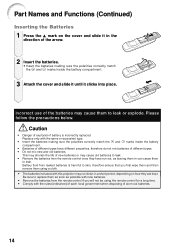
... time. • Comply with the rules (ordinance) of each local government when disposing of worn-out batteries. 14 Replace only with this projector may cause them to leak or explode. Part Names and Functions (Continued) Inserting the Batteries 1 Press the P mark on how they have different properties, therefore do not mix batteries...
... time. • Comply with the rules (ordinance) of each local government when disposing of worn-out batteries. 14 Replace only with this projector may cause them to leak or explode. Part Names and Functions (Continued) Inserting the Batteries 1 Press the P mark on how they have different properties, therefore do not mix batteries...

XR10S|XR10X|XR20S|XR20X Operation Manual
Page 26
... cables or connectors not listed below. Equipment Input Signal Cable Terminal on the projector Computer RGB video RGB cable (supplied) INPUT1, 2 Audio-visual equipment ø3.5 mm stereo audio cable AUDIO INPUT Computer (commercially available or available as Sharp service part QCNWGA038WJPZ) audio Component video 3 RCA (Component) to 15-pin D-sub cable (optional, AN...
... cables or connectors not listed below. Equipment Input Signal Cable Terminal on the projector Computer RGB video RGB cable (supplied) INPUT1, 2 Audio-visual equipment ø3.5 mm stereo audio cable AUDIO INPUT Computer (commercially available or available as Sharp service part QCNWGA038WJPZ) audio Component video 3 RCA (Component) to 15-pin D-sub cable (optional, AN...

XR10S|XR10X|XR20S|XR20X Operation Manual
Page 27
...2) terminal * ø3.5 mm stereo or mono audio cable (commercially available or available as Sharp service part QCNWGA038WJPZ) RGB Cable * When using the ø3.5 mm stereo audio cable. Use with the projector. Note • See page 58 "Computer Compatibility Chart" for use with some of the...making connections. Connections 23 Connecting to a Computer Before connecting, ensure that the power cord of the projector is unplugged from the AC outlet and turn on the projector and then the other than those listed may cause some Macintosh computers. When connecting a computer, ...
...2) terminal * ø3.5 mm stereo or mono audio cable (commercially available or available as Sharp service part QCNWGA038WJPZ) RGB Cable * When using the ø3.5 mm stereo audio cable. Use with the projector. Note • See page 58 "Computer Compatibility Chart" for use with some of the...making connections. Connections 23 Connecting to a Computer Before connecting, ensure that the power cord of the projector is unplugged from the AC outlet and turn on the projector and then the other than those listed may cause some Macintosh computers. When connecting a computer, ...
XR10S|XR10X|XR20S|XR20X Operation Manual
Page 54
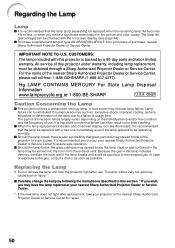
...backed by following the instructions described in this section. * If you wish, you may have the lamp replaced at your nearest Sharp Authorized Projector Dealer or Service Center. * If the new lamp does not light after use . Because the gas in the picture and color...the lamp by a 90-day parts and labor limited warranty. Lamp failure can be operating normally. I When the lamp replacement indicator and on -screen display. (see page 44) I Should the lamp break, the glass particles may spread inside of purchase, nearest Sharp Authorized Projector Dealer or Service Center. CUSTOMERS:...
...backed by following the instructions described in this section. * If you wish, you may have the lamp replaced at your nearest Sharp Authorized Projector Dealer or Service Center. * If the new lamp does not light after use . Because the gas in the picture and color...the lamp by a 90-day parts and labor limited warranty. Lamp failure can be operating normally. I When the lamp replacement indicator and on -screen display. (see page 44) I Should the lamp break, the glass particles may spread inside of purchase, nearest Sharp Authorized Projector Dealer or Service Center. CUSTOMERS:...

XR10S|XR10X|XR20S|XR20X Operation Manual
Page 55
... screw (for XR-10X/XR-10S) Info • Make sure that secures the lamp unit cover. The lamp and parts around the lamp will be sure to carefully follow the steps below. • Do not loosen other screws except for the lamp unit cover and lamp unit. 1 Press SSTANDBY/ON on the projector or eSTANDBY... the lamp unit by the handle. Optional accessory Lamp unit AN-XR20LP (for XR-20X/XR-20S) AN-XR10LP (for lamp unit cover) Appendix 51 Do not touch the glass surface of the lamp unit or the inside of the projector. • To avoid injury to yourself and damage to the lamp, be...
... screw (for XR-10X/XR-10S) Info • Make sure that secures the lamp unit cover. The lamp and parts around the lamp will be sure to carefully follow the steps below. • Do not loosen other screws except for the lamp unit cover and lamp unit. 1 Press SSTANDBY/ON on the projector or eSTANDBY... the lamp unit by the handle. Optional accessory Lamp unit AN-XR20LP (for XR-20X/XR-20S) AN-XR10LP (for lamp unit cover) Appendix 51 Do not touch the glass surface of the lamp unit or the inside of the projector. • To avoid injury to yourself and damage to the lamp, be...

XR10S|XR10X|XR20S|XR20X Operation Manual
Page 66
... Instruments DMD panel Panel size: [XR-20X/XR-10X] 0.55" (14 mm), 1chip XGA DMD [XR-20S/XR-10S] 0.55" (14 mm), 1chip SVGA DMD No. and Singapore, Power cord for Australia, New Zealand and Oceania, RGB cable, Operation manual (Printed and CD-ROM) As a part of policy of continuous improvement, SHARP reserves the right to +60°...
... Instruments DMD panel Panel size: [XR-20X/XR-10X] 0.55" (14 mm), 1chip XGA DMD [XR-20S/XR-10S] 0.55" (14 mm), 1chip SVGA DMD No. and Singapore, Power cord for Australia, New Zealand and Oceania, RGB cable, Operation manual (Printed and CD-ROM) As a part of policy of continuous improvement, SHARP reserves the right to +60°...


