
XG-C55X Operation Manual
Page 8
...Auto Power Off Function 70 Displaying the Remaining Lamp Life (Percentage 70 Reversing/Inverting Projected Images 71 Locking the Operation Buttons on the Projector 71 Setting up the Keylock 71 Canceling the Keylock Setting 72 S 60 Selecting the Color Reproduction Mode 60 Selecting the Target Color 60...Brightness of the Target Color 61 Setting the Chromatic Value of the Target Color ...... 61 Setting the Hue of the Target Color 61 Resetting User-Defined Color Settings 62 Overview of an Image ....... 55 Gamma Correction Function 56 Displaying Dual Pictures (Pict in Pict 57 Black ...
...Auto Power Off Function 70 Displaying the Remaining Lamp Life (Percentage 70 Reversing/Inverting Projected Images 71 Locking the Operation Buttons on the Projector 71 Setting up the Keylock 71 Canceling the Keylock Setting 72 S 60 Selecting the Color Reproduction Mode 60 Selecting the Target Color 60...Brightness of the Target Color 61 Setting the Chromatic Value of the Target Color ...... 61 Setting the Hue of the Target Color 61 Resetting User-Defined Color Settings 62 Overview of an Image ....... 55 Gamma Correction Function 56 Displaying Dual Pictures (Pict in Pict 57 Black ...
XG-C55X Operation Manual
Page 9
... Maintenance Indicators 83 Regarding the Lamp 85 Lamp 85 Caution Concerning the Lamp 85 Replacing the Lamp 85 Removing and Installing the Lamp Unit 86 Resetting the Lamp Timer 87 Connecting Pin Assignments 88 (RS-232C) Specifications and Command Settings 89 Wired Remote Control Terminal Specifications 92 Computer Compatibility Chart 93...
... Maintenance Indicators 83 Regarding the Lamp 85 Lamp 85 Caution Concerning the Lamp 85 Replacing the Lamp 85 Removing and Installing the Lamp Unit 86 Resetting the Lamp Timer 87 Connecting Pin Assignments 88 (RS-232C) Specifications and Command Settings 89 Wired Remote Control Terminal Specifications 92 Computer Compatibility Chart 93...
XG-C55X Operation Manual
Page 38
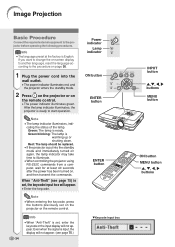
.... Note • When entering the keycode, press the buttons previously set on , and then transmit the commands. After the lamp indicator illuminates, the projector is set , the keycode input box will not appear. Even when the signal is input, the display will not appear. (see page 75) is...INPUT button ',", \, | buttons MENU button ON button MENU button ', ", \, | buttons If you want to change the on-screen display to another language, reset the language according to the procedure on page 36. 1 Plug the power cord into the standby mode and immediately turned on again, the lamp indicator...
.... Note • When entering the keycode, press the buttons previously set on , and then transmit the commands. After the lamp indicator illuminates, the projector is set , the keycode input box will not appear. Even when the signal is input, the display will not appear. (see page 75) is...INPUT button ',", \, | buttons MENU button ON button MENU button ', ", \, | buttons If you want to change the on-screen display to another language, reset the language according to the procedure on page 36. 1 Plug the power cord into the standby mode and immediately turned on again, the lamp indicator...

XG-C55X Operation Manual
Page 43
... image. For details, see page 53. • To access Digital Shift function, press twice. Press to reset the Note image. • The Digital Shift function works with BORDER, STRETCH or SMART STRETCH screen. UNDO button Press " to move the projected image downwards. ...
... image. For details, see page 53. • To access Digital Shift function, press twice. Press to reset the Note image. • The Digital Shift function works with BORDER, STRETCH or SMART STRETCH screen. UNDO button Press " to move the projected image downwards. ...
XG-C55X Operation Manual
Page 44
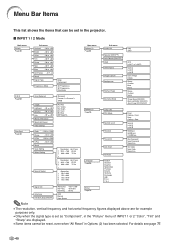
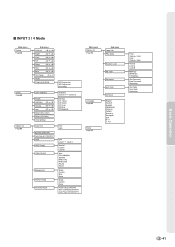
...Sync Page 48 Sub menu Contrast -30 +30 Bright -30 +30 Color -30 +30 Tint -30 +30 Sharp -30 +30 Red -30 +30 Blue -30 +30 CLR Temp -3 +3 Reset Signal Type Progressive Mode RGB Component 2D Progressive 3D Progressive Film Mode Color Selected Target Lightness -30 +30 Chroma -... "Picture" menu of INPUT 1 or 2 "Color", "Tint" and "Sharp" are displayed. • Some items cannot be set in Options (2) has been selected. Menu Bar Items This list shows the items that can be reset, even when "All Reset" in the projector. For details see page 77. -40 I INPUT 1 / 2 Mode ...
...Sync Page 48 Sub menu Contrast -30 +30 Bright -30 +30 Color -30 +30 Tint -30 +30 Sharp -30 +30 Red -30 +30 Blue -30 +30 CLR Temp -3 +3 Reset Signal Type Progressive Mode RGB Component 2D Progressive 3D Progressive Film Mode Color Selected Target Lightness -30 +30 Chroma -... "Picture" menu of INPUT 1 or 2 "Color", "Tint" and "Sharp" are displayed. • Some items cannot be set in Options (2) has been selected. Menu Bar Items This list shows the items that can be reset, even when "All Reset" in the projector. For details see page 77. -40 I INPUT 1 / 2 Mode ...
XG-C55X Operation Manual
Page 45
... 46 C.M.S. Page 60 Options (1) Page 63 Sub menu Contrast -30 +30 Bright -30 +30 Color -30 +30 Tint -30 +30 Sharp -30 +30 Red -30 +30 Blue -30 +30 CLR Temp -3 +3 Reset Progressive Mode 2D Progressive 3D Progressive Film Mode Color Selected Target Lightness -30 +30 Chroma -30 +30 Hue -30 +30... Blue None Sharp Custom None Power Save [ON/OFF] Mntr.out/RS232 [ON/OFF] Auto Power Off [ON/OFF] Main menu Options (2) Page 70 Language Page 36 Status Page 78 Sub menu Lamp Life PRJ Mode Keylock Level RS-232C Password Anti-Theft All Reset English Deutsch Español Nederlands Fran...
... 46 C.M.S. Page 60 Options (1) Page 63 Sub menu Contrast -30 +30 Bright -30 +30 Color -30 +30 Tint -30 +30 Sharp -30 +30 Red -30 +30 Blue -30 +30 CLR Temp -3 +3 Reset Progressive Mode 2D Progressive 3D Progressive Film Mode Color Selected Target Lightness -30 +30 Chroma -30 +30 Hue -30 +30... Blue None Sharp Custom None Power Save [ON/OFF] Mntr.out/RS232 [ON/OFF] Auto Power Off [ON/OFF] Main menu Options (2) Page 70 Language Page 36 Status Page 78 Sub menu Lamp Life PRJ Mode Keylock Level RS-232C Password Anti-Theft All Reset English Deutsch Español Nederlands Fran...

XG-C55X Operation Manual
Page 50
...purplish Skin tones become greenish For making sharper or softer the contour of an image For less sharpness For more sharpness For adjusting the redness level For weaker red For stronger red For adjusting the blue level For...be adjusted when 480I, 480P, 540P, 580I, 580P, 720P, 1035I or 1080I signals are connected. • To reset all adjustment items, select "Reset" and press . •"Red", "Blue" and "CLR Temp" cannot be stored separately in each input mode. ... when selecting INPUT 1 or 2 and the "Signal Type" is set to Component, "Sharp" can adjust the projector's picture to 45.
...purplish Skin tones become greenish For making sharper or softer the contour of an image For less sharpness For more sharpness For adjusting the redness level For weaker red For stronger red For adjusting the blue level For...be adjusted when 480I, 480P, 540P, 580I, 580P, 720P, 1035I or 1080I signals are connected. • To reset all adjustment items, select "Reset" and press . •"Red", "Blue" and "CLR Temp" cannot be stored separately in each input mode. ... when selecting INPUT 1 or 2 and the "Signal Type" is set to Component, "Sharp" can adjust the projector's picture to 45.

XG-C55X Operation Manual
Page 66
"Lightness", "Chroma" and "Hue" of the color selected for "Target" are reset. menu on the menu screen. ➝ For operating the menu screen, see pages 42 to 45. -62 Overview of All Color Settings Select "..." in the "C.M.S." menu on the menu screen. ➝ For operating the menu screen, see pages 42 to 45. Selected item Reset (This Color) Reset (All Colors) Description "Lightness", "Chroma" and "Hue" of all colors are reset. Color Management System (C.M.S.) Resetting User-Defined Color Settings Select "Reset (This Color)" or "Reset (All Colors)" in the "C.M.S."
"Lightness", "Chroma" and "Hue" of the color selected for "Target" are reset. menu on the menu screen. ➝ For operating the menu screen, see pages 42 to 45. -62 Overview of All Color Settings Select "..." in the "C.M.S." menu on the menu screen. ➝ For operating the menu screen, see pages 42 to 45. Selected item Reset (This Color) Reset (All Colors) Description "Lightness", "Chroma" and "Hue" of all colors are reset. Color Management System (C.M.S.) Resetting User-Defined Color Settings Select "Reset (This Color)" or "Reset (All Colors)" in the "C.M.S."

XG-C55X Operation Manual
Page 77
... (2)" menu. Setting up a Password A password can be set , you need to enter the password to change "PRJ Mode", "Keylock Level", "RS232C", "Anti-Theft" and "All Reset" settings. -73 Easy to select the de- Using a password together with the Keylock Level (page 71) is set by the user to prevent adjustments to...
... (2)" menu. Setting up a Password A password can be set , you need to enter the password to change "PRJ Mode", "Keylock Level", "RS232C", "Anti-Theft" and "All Reset" settings. -73 Easy to select the de- Using a password together with the Keylock Level (page 71) is set by the user to prevent adjustments to...

XG-C55X Operation Manual
Page 79
...Enter the keycode after the right password is selected, the password input box will need to bring your projector to them to restore the projector to original factory condition (password and keycode reset). 1 Press any button you will cause images not to be selected unless "Password" is set the ...first digit in a safe place where only authorized users have access. You can choose to use this function. If you lose or forget your nearest Sharp Authorized Projector Dealer or ...
...Enter the keycode after the right password is selected, the password input box will need to bring your projector to them to restore the projector to original factory condition (password and keycode reset). 1 Press any button you will cause images not to be selected unless "Password" is set the ...first digit in a safe place where only authorized users have access. You can choose to use this function. If you lose or forget your nearest Sharp Authorized Projector Dealer or ...

XG-C55X Operation Manual
Page 81
The following items cannot be displayed when selecting "All Reset". S. • "Lightness", "Chroma" and "Hue" respectively saved for Custom 1-3 on the menu screen. ➝ For operating the menu screen, see pages 42 to 45. Note &#... to Use Functions Initializing the Settings This function allows you have made in the "Options (2)" menu on the C.M.S. M. Returning to the Default Settings Select "All Reset" in the projector.
The following items cannot be displayed when selecting "All Reset". S. • "Lightness", "Chroma" and "Hue" respectively saved for Custom 1-3 on the menu screen. ➝ For operating the menu screen, see pages 42 to 45. Note &#... to Use Functions Initializing the Settings This function allows you have made in the "Options (2)" menu on the C.M.S. M. Returning to the Default Settings Select "All Reset" in the projector.

XG-C55X Operation Manual
Page 91
... power cord. • Plug the power cord into the AC socket of the projector. 2 Reset the lamp timer. • While pressing simultaneously , ON and on the projector, press on , even if the power cord is reset. If you reset the lamp timer and continue to use the same lamp, this may cause the ...lamp to reset the lamp timer only when replacing the lamp. INPUT button ON button...
... power cord. • Plug the power cord into the AC socket of the projector. 2 Reset the lamp timer. • While pressing simultaneously , ON and on the projector, press on , even if the power cord is reset. If you reset the lamp timer and continue to use the same lamp, this may cause the ...lamp to reset the lamp timer only when replacing the lamp. INPUT button ON button...

XG-C55X Operation Manual
Page 94
...30) INPUT 2 BLUE (-30 - +30) INPUT 2 COLOR (-30 - +30) INPUT 2 TINT (-30 - +30) INPUT 2 SHARP (-30 - +30) INPUT 2 CLR TEMP (-3 - +3) INPUT 2 DISPLAY INPUT 2 ADJUSTMENT RESET INPUT 1 SIGNAL TYPE : RGB INPUT 1 SIGNAL TYPE : COMPONENT INPUT 2 SIGNAL TYPE : RGB INPUT 2 SIGNAL TYPE : COMPONENT INPUT 1...INPUT 4 BLUE (-30 - +30) INPUT 4 COLOR (-30 - +30) INPUT 4 TINT (-30 - +30) INPUT 4 SHARP (-30 - +30) INPUT 4 CLR TEMP (-3 - +3) INPUT 4 DISPLAY INPUT 4 ADJUSTMENT RESET INPUT 3 2D PROGRESSIVE INPUT 3 3D PROGRESSIVE INPUT 3 FILM MODE INPUT 4 2D PROGRESSIVE INPUT 4 3D PROGRESSIVE INPUT 4 FILM MODE COLOR...
...30) INPUT 2 BLUE (-30 - +30) INPUT 2 COLOR (-30 - +30) INPUT 2 TINT (-30 - +30) INPUT 2 SHARP (-30 - +30) INPUT 2 CLR TEMP (-3 - +3) INPUT 2 DISPLAY INPUT 2 ADJUSTMENT RESET INPUT 1 SIGNAL TYPE : RGB INPUT 1 SIGNAL TYPE : COMPONENT INPUT 2 SIGNAL TYPE : RGB INPUT 2 SIGNAL TYPE : COMPONENT INPUT 1...INPUT 4 BLUE (-30 - +30) INPUT 4 COLOR (-30 - +30) INPUT 4 TINT (-30 - +30) INPUT 4 SHARP (-30 - +30) INPUT 4 CLR TEMP (-3 - +3) INPUT 4 DISPLAY INPUT 4 ADJUSTMENT RESET INPUT 3 2D PROGRESSIVE INPUT 3 3D PROGRESSIVE INPUT 3 FILM MODE INPUT 4 2D PROGRESSIVE INPUT 4 3D PROGRESSIVE INPUT 4 FILM MODE COLOR...

XG-C55X Operation Manual
Page 104
... AC socket 17 Adjusting Computer Images 48 Adjusting the Lens 26 Adjusting the Picture 46 Adjustment buttons 42 Adjustment feet 25 Air filter 81 All Reset 77 Anti-Theft 75 Aspect ratio 52 AUDIO input 1, 2 terminal 17 AUDIO (L/R) input 3, 4 terminals 19 AUDIO OUTPUT terminal 21 Auto Power off 70 Auto Search...
... AC socket 17 Adjusting Computer Images 48 Adjusting the Lens 26 Adjusting the Picture 46 Adjustment buttons 42 Adjustment feet 25 Air filter 81 All Reset 77 Anti-Theft 75 Aspect ratio 52 AUDIO input 1, 2 terminal 17 AUDIO (L/R) input 3, 4 terminals 19 AUDIO OUTPUT terminal 21 Auto Power off 70 Auto Search...


