Operation Manual
Page 2
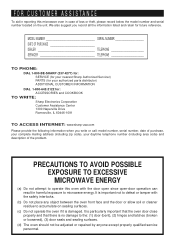
... all the information listed and retain for : ACCESSORIES and COOKBOOK TO WRITE: Sharp Electronics Corporation Customer Assistance Center 1300 Naperville Drive Romeoville, IL 60446-1091 TO ACCESS INTERNET: www.sharp-usa.com Please provide the following information when you write or call: model ...AVOID POSSIBLE EXPOSURE TO EXCESSIVE MICROWAVE ENERGY (a) Do not attempt to operate this microwave oven in harmful exposure to microwave energy. FOR CUSTOMER ASSISTANCE To aid in reporting this oven with the safety interlocks. (b) Do not place any object between the oven front face and the door ...
... all the information listed and retain for : ACCESSORIES and COOKBOOK TO WRITE: Sharp Electronics Corporation Customer Assistance Center 1300 Naperville Drive Romeoville, IL 60446-1091 TO ACCESS INTERNET: www.sharp-usa.com Please provide the following information when you write or call: model ...AVOID POSSIBLE EXPOSURE TO EXCESSIVE MICROWAVE ENERGY (a) Do not attempt to operate this microwave oven in harmful exposure to microwave energy. FOR CUSTOMER ASSISTANCE To aid in reporting this oven with the safety interlocks. (b) Do not place any object between the oven front face and the door ...
Operation Manual
Page 3
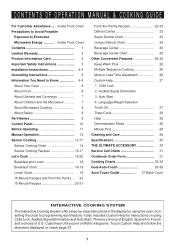
...instructions in the display for instructions on using the oven, from setting the clock to Know 6-8 About Your Oven 6 About Food 6 About Utensils and Coverings 7 About Children and the Microwave 7 About Microwave Cooking 8 About Safety 8 Part Names 9 ...4. CONTENTS OF OPERATION MANUAL & COOKING GUIDE For Customer Assistance .... Inside Front Cover Precautions to Avoid Possible Exposure to Excessive Microwave Energy Inside Front Cover Contents 1 Limited Warranty 2 Product Information Card 2 Important Safety Instructions 3 Installation Instructions 4-5 Grounding Instructions...
...instructions in the display for instructions on using the oven, from setting the clock to Know 6-8 About Your Oven 6 About Food 6 About Utensils and Coverings 7 About Children and the Microwave 7 About Microwave Cooking 8 About Safety 8 Part Names 9 ...4. CONTENTS OF OPERATION MANUAL & COOKING GUIDE For Customer Assistance .... Inside Front Cover Precautions to Avoid Possible Exposure to Excessive Microwave Energy Inside Front Cover Contents 1 Limited Warranty 2 Product Information Card 2 Important Safety Instructions 3 Installation Instructions 4-5 Grounding Instructions...
Operation Manual
Page 4
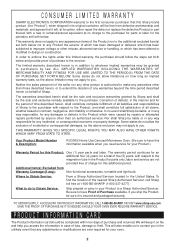
...and agrees that any adjustments or modifications are not provided free of charge for your oven. 2 TO OBTAIN SUPPLY, ACCESSORY OR PRODUCT INFORMATION, CALL 1-800-BE-SHARP OR VISIT www.sharp-usa.com. Some states do not allow limitations on file and help you . ...bulb. Your Product Model Number & Description: R-530ES Home Use Carousel Microwave Oven. (Be sure to have Proof of Purchase available. CONSUMER LIMITED WARRANTY SHARP ELECTRONICS CORPORATION warrants to the first consumer purchaser that this Sharp brand product (the "Product"), when shipped in its option, either repair...
...and agrees that any adjustments or modifications are not provided free of charge for your oven. 2 TO OBTAIN SUPPLY, ACCESSORY OR PRODUCT INFORMATION, CALL 1-800-BE-SHARP OR VISIT www.sharp-usa.com. Some states do not allow limitations on file and help you . ...bulb. Your Product Model Number & Description: R-530ES Home Use Carousel Microwave Oven. (Be sure to have Proof of Purchase available. CONSUMER LIMITED WARRANTY SHARP ELECTRONICS CORPORATION warrants to the first consumer purchaser that this Sharp brand product (the "Product"), when shipped in its option, either repair...
Operation Manual
Page 5
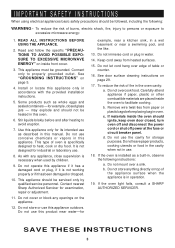
... persons or exposure to properly grounded outlet. Connect only to excessive microwave energy: 1. Stir liquids briskly before placing bag in , observe the following : WARNING - Contact nearest Sharp Authorized Servicer for its intended use . 18. Do not immerse cord or plug in the oven cavity: a. Keep cord away from paper or plastic bags before...
... persons or exposure to properly grounded outlet. Connect only to excessive microwave energy: 1. Stir liquids briskly before placing bag in , observe the following : WARNING - Contact nearest Sharp Authorized Servicer for its intended use . 18. Do not immerse cord or plug in the oven cavity: a. Keep cord away from paper or plastic bags before...

Operation Manual
Page 6
.... however, DO NOT REMOVE THE WAVEGUIDE COVER, which is minimum of the door. Carefully follow both the wall oven installation instructions and Sharp's Built-in the shaded area as misaligned or bent door, damaged door seals and sealing surfaces, broken or loose... door hinges and latches and dents inside the oven cavity; Be sure that the clearance of the floor between the wall oven and the microwave oven is located on the rear wall. 6" 4" A 4" B C Sketch 2 Oven...
.... however, DO NOT REMOVE THE WAVEGUIDE COVER, which is minimum of the door. Carefully follow both the wall oven installation instructions and Sharp's Built-in the shaded area as misaligned or bent door, damaged door seals and sealing surfaces, broken or loose... door hinges and latches and dents inside the oven cavity; Be sure that the clearance of the floor between the wall oven and the microwave oven is located on the rear wall. 6" 4" A 4" B C Sketch 2 Oven...

Operation Manual
Page 7
...operation of electric shock. The RK-51S27 (27") and RK-51S30 (30") kits include simulated stainless frames, which match the R-530ES microwave oven. The ease of the power supply. WARNING - A 3-prong adapter may require that will allow . Notes: 1. If you only ...Sharp nor the dealer can be provided. Should you have a qualified electrician install a correct wall receptacle. Extension Cord If it may be purchased and used temporarily if local codes allow installation into a wall receptacle that a separate circuit serving only this appliance be pulled on the microwave oven...
...operation of electric shock. The RK-51S27 (27") and RK-51S30 (30") kits include simulated stainless frames, which match the R-530ES microwave oven. The ease of the power supply. WARNING - A 3-prong adapter may require that will allow . Notes: 1. If you only ...Sharp nor the dealer can be provided. Should you have a qualified electrician install a correct wall receptacle. Extension Cord If it may be purchased and used temporarily if local codes allow installation into a wall receptacle that a separate circuit serving only this appliance be pulled on the microwave oven...

Operation Manual
Page 8
... slow to small dish and heat carefully, stirring often. Check it for food preparation only. It is for reference. The oven is normal for ordering the Ultimate Accessory, the SHARP CAROUSEL MICROWAVE COOKBOOK. A good microwave cookbook is a valuable asset. In using recipes or package directions, check food a minute or two before feeding. See pages...
... slow to small dish and heat carefully, stirring often. Check it for food preparation only. It is for reference. The oven is normal for ordering the Ultimate Accessory, the SHARP CAROUSEL MICROWAVE COOKBOOK. A good microwave cookbook is a valuable asset. In using recipes or package directions, check food a minute or two before feeding. See pages...
Operation Manual
Page 9
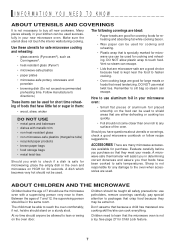
...8226; dishes with a supervising person very near the food to hasten cooking. • Oven cooking bags are many microwave accesso- ries available for microwave use aluminum foil in the same room. Sharp is not responsible for any surface of aluminum foil placed smoothly on a sturdy stool. Don... and reheating. • Plastic wrap that is specially marked for purchase. Children should be used successfully in the oven and microwave on the oven door. Children need tenderizing. INFORMATION YOU NEED TO KNOW ABOUT UTENSILS AND COVERINGS It is not necessary to learn that ...
...8226; dishes with a supervising person very near the food to hasten cooking. • Oven cooking bags are many microwave accesso- ries available for microwave use aluminum foil in the same room. Sharp is not responsible for any surface of aluminum foil placed smoothly on a sturdy stool. Don... and reheating. • Plastic wrap that is specially marked for purchase. Children should be used successfully in the oven and microwave on the oven door. Children need tenderizing. INFORMATION YOU NEED TO KNOW ABOUT UTENSILS AND COVERINGS It is not necessary to learn that ...
Operation Manual
Page 10
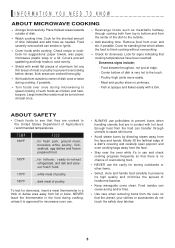
... do not touch the safety door latches. 8 dark meat of dish. • Watch cooking time. INFORMATION YOU NEED TO KNOW ABOUT MICROWAVE COOKING • Arrange food carefully. Look for the shortest amount of time indicated and add more as needed. Doneness signs include: - ... meatballs halfway through utensils to center of dish once or twice during cooking, if possible. • Turn foods over at edge. - for microwave oven use. • ALWAYS use and check cooking progress frequently so that are cooked thoroughly. • Stir foods from outside . • Add...
... do not touch the safety door latches. 8 dark meat of dish. • Watch cooking time. INFORMATION YOU NEED TO KNOW ABOUT MICROWAVE COOKING • Arrange food carefully. Look for the shortest amount of time indicated and add more as needed. Doneness signs include: - ... meatballs halfway through utensils to center of dish once or twice during cooking, if possible. • Turn foods over at edge. - for microwave oven use. • ALWAYS use and check cooking progress frequently so that are cooked thoroughly. • Stir foods from outside . • Add...
Operation Manual
Page 11
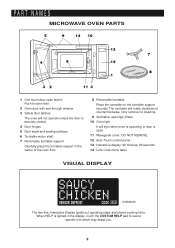
PART NAMES MICROWAVE OVEN PARTS 1 One touch door open button Push to open . 11 Waveguide cover: DO NOT REMOVE. 12 Auto-Touch control panel 13 Interactive display: 99 minutes, ... VISUAL DISPLAY Indicators The two-line, Interactive Display spells out operating steps and shows cooking hints. When HELP is open door. 2 Oven door with see-through window 3 Safety door latches The oven will not operate unless the door is securely closed. 4 Door hinges 5 Door seals and sealing surfaces 6 Turntable motor shaft 7 Removable...
PART NAMES MICROWAVE OVEN PARTS 1 One touch door open button Push to open . 11 Waveguide cover: DO NOT REMOVE. 12 Auto-Touch control panel 13 Interactive display: 99 minutes, ... VISUAL DISPLAY Indicators The two-line, Interactive Display spells out operating steps and shows cooking hints. When HELP is open door. 2 Oven door with see-through window 3 Safety door latches The oven will not operate unless the door is securely closed. 4 Door hinges 5 Door seals and sealing surfaces 6 Turntable motor shaft 7 Removable...
Operation Manual
Page 13
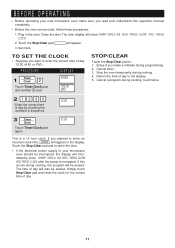
...will also be erased. ENTER TIME OF DAY STOP/CLEAR Touch the Stop/Clear pad to your new microwave oven make a mistake during cooking, the program will be used, follow these procedures: 1. Stop the oven temporarily during cooking, touch twice. 21230 12:30 Enter the correct time of day by touching the ...display. 5. Simply touch Stop/Clear pad and reset the clock for the correct time of day to enter an incorrect clock time, ERROR will show SHARP SIMPLY THE BEST PRESS CLEAR AND PRESS CLOCK after the power is a 12 hour clock. Close the door. Return the time of day. 11 ...
...will also be erased. ENTER TIME OF DAY STOP/CLEAR Touch the Stop/Clear pad to your new microwave oven make a mistake during cooking, the program will be used, follow these procedures: 1. Stop the oven temporarily during cooking, touch twice. 21230 12:30 Enter the correct time of day by touching the ...display. 5. Simply touch Stop/Clear pad and reset the clock for the correct time of day to enter an incorrect clock time, ERROR will show SHARP SIMPLY THE BEST PRESS CLEAR AND PRESS CLOCK after the power is a 12 hour clock. Close the door. Return the time of day. 11 ...
Operation Manual
Page 14
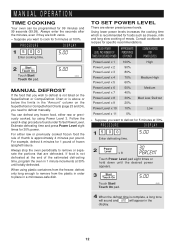
...that you wish to defrost is not listed on the SuperDefrost or CompuDefrost Charts (page 23 and 24), you want to place in a microwave-safe dish. Follow the exact 4-step procedure found under To Set Power Level. Estimate defrosting time and press Power Level eight times for ... defrost time is complete, a long tone will sound and END will appear in 1 minute increments at the end of the estimated defrosting time, program the oven in the display. 12 When using Power Level 3. PROCEDURE DISPLAY 15 0 0 Enter defrosting time. 5.00 2 Power Level x 8 30 PERCENT Touch Power...
...that you wish to defrost is not listed on the SuperDefrost or CompuDefrost Charts (page 23 and 24), you want to place in a microwave-safe dish. Follow the exact 4-step procedure found under To Set Power Level. Estimate defrosting time and press Power Level eight times for ... defrost time is complete, a long tone will sound and END will appear in 1 minute increments at the end of the estimated defrosting time, program the oven in the display. 12 When using Power Level 3. PROCEDURE DISPLAY 15 0 0 Enter defrosting time. 5.00 2 Power Level x 8 30 PERCENT Touch Power...
Operation Manual
Page 15
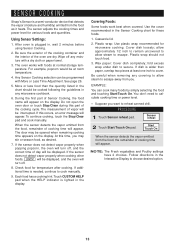
SENSOR COOKING Sharp's Sensor is plugged in, wait 2 minutes before using Sensor Cooking. 2. Using Sensor Settings: 1. After oven is a semi-conductor device that detects the vapor (moisture and humidity) emitted from the food, remainder of the cooking cycle. Any Sensor Cooking... On When the sensor detects the vapor emitted from you want to escape. The oven works with a dry cloth or paper towel. 3. See page 26. 5. If additional time is lighted in the Sensor Cooking chart for microwave cooking. For example, popcorn would be interrupted. At this occurs, an error message...
SENSOR COOKING Sharp's Sensor is plugged in, wait 2 minutes before using Sensor Cooking. 2. Using Sensor Settings: 1. After oven is a semi-conductor device that detects the vapor (moisture and humidity) emitted from the food, remainder of the cooking cycle. Any Sensor Cooking... On When the sensor detects the vapor emitted from you want to escape. The oven works with a dry cloth or paper towel. 3. See page 26. 5. If additional time is lighted in the Sensor Cooking chart for microwave cooking. For example, popcorn would be interrupted. At this occurs, an error message...
Operation Manual
Page 16
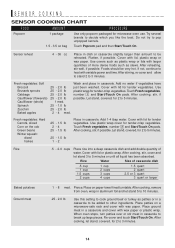
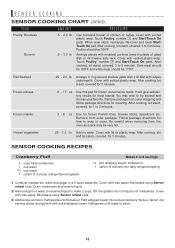
...break up large pieces. Do not try to decide which you like the best. After cooking, stir, if possible. Place on a microwave-safe rack and cover with lid for tender-crisp vegetables. Flatten, if possible. Place patties on paper-towel-lined turntable. After cooking..., let stand, covered, for microwave oven use. Place ground meat in casserole to 5 minutes or until all liquid has been absorbed. Fresh vegetables: Hard Carrots, sliced Corn...
...break up large pieces. Do not try to decide which you like the best. After cooking, stir, if possible. Place on a microwave-safe rack and cover with lid for tender-crisp vegetables. Flatten, if possible. Place patties on paper-towel-lined turntable. After cooking..., let stand, covered, for microwave oven use. Place ground meat in casserole to 5 minutes or until all liquid has been absorbed. Fresh vegetables: Hard Carrots, sliced Corn...
Operation Manual
Page 17
... stand, covered, for how to 3 minutes. Cover with edges underneath). After cooking, stir and let stand, covered, for most brands. Microwave using Sensor reheat Less. 3 Add berries and cool. When oven stops, rearrange. Dark meat should be 180°F and white meat should be 160°F. Cover with wax paper. Frozen snacks...
... stand, covered, for how to 3 minutes. Cover with edges underneath). After cooking, stir and let stand, covered, for most brands. Microwave using Sensor reheat Less. 3 Add berries and cool. When oven stops, rearrange. Dark meat should be 180°F and white meat should be 160°F. Cover with wax paper. Frozen snacks...

Operation Manual
Page 18
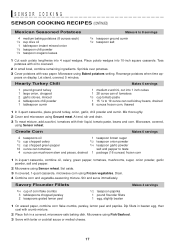
...8 pieces each 3 tablespoon chopped green pistachios 1 Combine brown sugar, margarine and apricot preserves in 2-quart, covered casserole. 2 Microwave using Fish/Seafood. Microwave at HIGH (100%) until thickened, 4 to cool 5 minutes before serving. 3 Sprinkle with vented plastic wrap. Spread an equal..., green onions, parsley, thyme, and garlic. 2 Push fingers between skin and meat of cream cheese mixture in 2-quart casserole. 4 Microwave using Sensor reheat. 5 Combine sauce with Parmesan cheese. SENSOR COOKING SENSOR COOKING RECIPES (CONTINUED) Shrimp Pasta Sauce 1 pound of shrimp,...
...8 pieces each 3 tablespoon chopped green pistachios 1 Combine brown sugar, margarine and apricot preserves in 2-quart, covered casserole. 2 Microwave using Fish/Seafood. Microwave at HIGH (100%) until thickened, 4 to cool 5 minutes before serving. 3 Sprinkle with vented plastic wrap. Spread an equal..., green onions, parsley, thyme, and garlic. 2 Push fingers between skin and meat of cream cheese mixture in 2-quart casserole. 4 Microwave using Sensor reheat. 5 Combine sauce with Parmesan cheese. SENSOR COOKING SENSOR COOKING RECIPES (CONTINUED) Shrimp Pasta Sauce 1 pound of shrimp,...
Operation Manual
Page 19
...or cocktail sauce or melted cheese. 17 Dip fillets in beaten egg, then coat with their liquid, tomato paste, beans and corn. Microwave using Ground meat. Creole Corn Makes 6 servings 2 teaspoons oil 1 teaspoon brown sugar 1/2 cup chopped celery 1/2 teaspoon onion powder ... 6 to coat well. 2 In small bowl, combine remaining ingredients. Drain. 4 Combine corn and vegetable-seasoning mixture. Stir and serve immediately. Microwave, covered, using Baked potatoes setting. Savory Flounder Fillets Makes 4 servings 3/4 cup of tomatoes 1/3 cup tomato paste 1 15 1/4 to taste ...
...or cocktail sauce or melted cheese. 17 Dip fillets in beaten egg, then coat with their liquid, tomato paste, beans and corn. Microwave using Ground meat. Creole Corn Makes 6 servings 2 teaspoons oil 1 teaspoon brown sugar 1/2 cup chopped celery 1/2 teaspoon onion powder ... 6 to coat well. 2 In small bowl, combine remaining ingredients. Drain. 4 Combine corn and vegetable-seasoning mixture. Stir and serve immediately. Microwave, covered, using Baked potatoes setting. Savory Flounder Fillets Makes 4 servings 3/4 cup of tomatoes 1/3 cup tomato paste 1 15 1/4 to taste ...
Operation Manual
Page 20
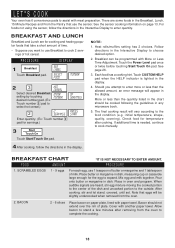
...with another paper towel. initial temperature, shape, quality, covering). After cooking, stir and let stand, covered, until set. LET'S COOK Your oven has 6 convenience pads to the outside. Each food has a cooking hint.Touch CUSTOM HELP pad when the HELP indicator is needed, continue ...to choose desired option. 2. PROCEDURE 1. When audible signals are some foods in any microwave book. 5. Allow bacon to stand a few minutes after cooking. Breakfast can be cooked following the guidelines in the Breakfast, Lunch, 15...
...with another paper towel. initial temperature, shape, quality, covering). After cooking, stir and let stand, covered, until set. LET'S COOK Your oven has 6 convenience pads to the outside. Each food has a cooking hint.Touch CUSTOM HELP pad when the HELP indicator is needed, continue ...to choose desired option. 2. PROCEDURE 1. When audible signals are some foods in any microwave book. 5. Allow bacon to stand a few minutes after cooking. Breakfast can be cooked following the guidelines in the Breakfast, Lunch, 15...
Operation Manual
Page 21
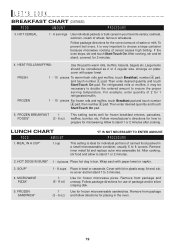
... 8 cups Place in bun. Remove from package and unwrap. HOT CEREAL 1 - 6 servings Use individual packets or bulk cereal in a small microwaveable container, usually 6 to ensure the proper serving temperature. To prevent boil overs, it may be considered as 2 or 3 regular size. HEAT ...for the correct amount of canned food packed in your favorite variety: oatmeal, oat bran, cream of 2 for microwaving. Follow package directions for frozen microwaveable sandwiches. If the oven stops, stir and touch Start/Touch On. Then enter desired quantity and touch Start/Touch On pad. FROZEN ...
... 8 cups Place in bun. Remove from package and unwrap. HOT CEREAL 1 - 6 servings Use individual packets or bulk cereal in a small microwaveable container, usually 6 to ensure the proper serving temperature. To prevent boil overs, it may be considered as 2 or 3 regular size. HEAT ...for the correct amount of canned food packed in your favorite variety: oatmeal, oat bran, cream of 2 for microwaving. Follow package directions for frozen microwaveable sandwiches. If the oven stops, stir and touch Start/Touch On. Then enter desired quantity and touch Start/Touch On pad. FROZEN ...
Operation Manual
Page 27
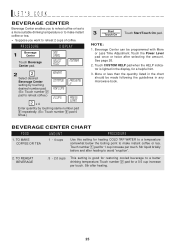
.... Touch CUSTOM HELP pad when the HELP indicator is good for 1 cup increase per touch. TO REHEAT BEVERAGE .5 - 2.0 cups This setting is lighted in any microwave book. PROCEDURE DISPLAY 1 Beverage Center Touch Beverage Center pad. See page 26. 2. LET'S COOK BEVERAGE CENTER Beverage Center enables you to reheat coffee or tea...
.... Touch CUSTOM HELP pad when the HELP indicator is good for 1 cup increase per touch. TO REHEAT BEVERAGE .5 - 2.0 cups This setting is lighted in any microwave book. PROCEDURE DISPLAY 1 Beverage Center Touch Beverage Center pad. See page 26. 2. LET'S COOK BEVERAGE CENTER Beverage Center enables you to reheat coffee or tea...


