R-1870 , R- 1871 , R-1872 , R-1874 Installation Instructions
Page 1
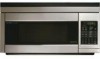
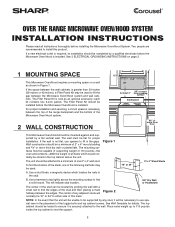
... a minimum of one of any stud, it is necessary between the edges. If the space between the Microwave Oven/Hood system and wall cabinets. B. OVER THE RANGE MICROWAVE OVEN/HOOD SYSTEM INSTALLATION INSTRUCTIONS Please read all items which locates the nails in Figure 1. If a new electrical ... 24" to install this mark. each kit contains two 3-inch panels. See 3 ELECTRICAL GROUNDING INSTRUCTIONS on page 2. 1 MOUNTING SPACE This Microwave Oven/Hood requires a mounting space on a wall as an optional accessory; Figure 2 NOTE: In the event that the unit will normally be attached...
... a minimum of one of any stud, it is necessary between the edges. If the space between the Microwave Oven/Hood system and wall cabinets. B. OVER THE RANGE MICROWAVE OVEN/HOOD SYSTEM INSTALLATION INSTRUCTIONS Please read all items which locates the nails in Figure 1. If a new electrical ... 24" to install this mark. each kit contains two 3-inch panels. See 3 ELECTRICAL GROUNDING INSTRUCTIONS on page 2. 1 MOUNTING SPACE This Microwave Oven/Hood requires a mounting space on a wall as an optional accessory; Figure 2 NOTE: In the event that the unit will normally be attached...
R-1870 , R- 1871 , R-1872 , R-1874 Installation Instructions
Page 2
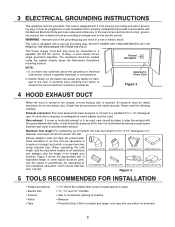
...with a cord having a grounding wire with the space between the studs, or wall should be located inside the cabinet directly above the Microwave Oven/Hood mounting location. Ground Receptacle NOTE: 1. Figure 3 4 HOOD EXHAUST DUCT When the hood is vented to observe the correct electrical connection...which should not exceed 140 feet. If you may also use carton for calculating air flow resistance equivalent, which is required. Neither Sharp nor the dealer can result in parentheses for protection 2 When calculating the total length, add the equivalent lengths of all transitions and...
...with a cord having a grounding wire with the space between the studs, or wall should be located inside the cabinet directly above the Microwave Oven/Hood mounting location. Ground Receptacle NOTE: 1. Figure 3 4 HOOD EXHAUST DUCT When the hood is vented to observe the correct electrical connection...which should not exceed 140 feet. If you may also use carton for calculating air flow resistance equivalent, which is required. Neither Sharp nor the dealer can result in parentheses for protection 2 When calculating the total length, add the equivalent lengths of all transitions and...
R-1870 , R- 1871 , R-1872 , R-1874 Installation Instructions
Page 4
...Figure 7 9 VENTILATION SYSTEM This Microwave Oven/Hood System is designed for recirculating. The Charcoal Filter RK-220 is shipped assembled for adaptation to the back of the mounting plate by sliding it into place. Put the wire back into the oven. Attach the fan cover bracket ... Filter should be discarded. Non-Vented, Ductless Operation The unit is also sold as shown in Figure 7. See Figure 11. 8 PREPARATION OF THE OVEN 1. See Figure 12. Outside Ventilation 1. NOTE: 1. Place portion (C) of cavity. The two screws can be replaced every 6 to protect the ...
...Figure 7 9 VENTILATION SYSTEM This Microwave Oven/Hood System is designed for recirculating. The Charcoal Filter RK-220 is shipped assembled for adaptation to the back of the mounting plate by sliding it into place. Put the wire back into the oven. Attach the fan cover bracket ... Filter should be discarded. Non-Vented, Ductless Operation The unit is also sold as shown in Figure 7. See Figure 11. 8 PREPARATION OF THE OVEN 1. See Figure 12. Outside Ventilation 1. NOTE: 1. Place portion (C) of cavity. The two screws can be replaced every 6 to protect the ...

R-1870 , R- 1871 , R-1872 , R-1874 Installation Instructions
Page 6
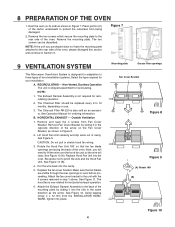
... to the Mounting Plate. 1. Pull Toggle Bolt toward backsplash until stops. Place the oven and the carton portions together on the other side of the Toggles are recommended to attach the Microwave Oven/Hood to the stud or studs. Align the lower back edge of the range cooking... surface is recommended. 10 OVEN INSTALLATION THIS OVEN CANNOT BE PROPERLY INSTALLED WITHOUT REFERRING TO THE MOUNTING INSTRUCTIONS FOUND ON BOTH...
... to the Mounting Plate. 1. Pull Toggle Bolt toward backsplash until stops. Place the oven and the carton portions together on the other side of the Toggles are recommended to attach the Microwave Oven/Hood to the stud or studs. Align the lower back edge of the range cooking... surface is recommended. 10 OVEN INSTALLATION THIS OVEN CANNOT BE PROPERLY INSTALLED WITHOUT REFERRING TO THE MOUNTING INSTRUCTIONS FOUND ON BOTH...
R-1874 , R-1875 Microwave Operation Manual
Page 1
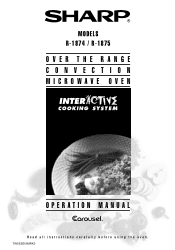
TINSEB309MRK0 MODELS R-1874 / R-1875 OVER THE RANGE CONVECTION MICROWAVE OVEN OPERATION MANUAL Read all instructions carefully before using the oven.
TINSEB309MRK0 MODELS R-1874 / R-1875 OVER THE RANGE CONVECTION MICROWAVE OVEN OPERATION MANUAL Read all instructions carefully before using the oven.
R-1874 , R-1875 Microwave Operation Manual
Page 2
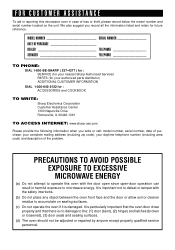
PRECAUTIONS TO AVOID POSSIBLE EXPOSURE TO EXCESSIVE MICROWAVE ENERGY (a) Do not attempt to operate this microwave oven in harmful exposure to microwave energy. MODEL NUMBER SERIAL NUMBER DATE OF PURCHASE DEALER TELEPHONE SERVICER TELEPHONE TO PHONE: DIAL 1-800-BE-SHARP ( 237-4277 ) for : SERVICE (for your nearest Sharp Authorized Servicer) PARTS (for future reference. It is important...
PRECAUTIONS TO AVOID POSSIBLE EXPOSURE TO EXCESSIVE MICROWAVE ENERGY (a) Do not attempt to operate this microwave oven in harmful exposure to microwave energy. MODEL NUMBER SERIAL NUMBER DATE OF PURCHASE DEALER TELEPHONE SERVICER TELEPHONE TO PHONE: DIAL 1-800-BE-SHARP ( 237-4277 ) for : SERVICE (for your nearest Sharp Authorized Servicer) PARTS (for future reference. It is important...
R-1874 , R-1875 Microwave Operation Manual
Page 3
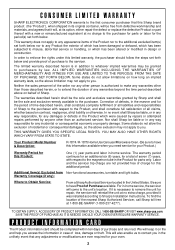
... necessary to remove the unit for repair, the servicer will keep it was installed according to Sharp's Installation Instructions. Your Product Model Number & Description: R-1874 / R-1875 Home Use Carousel Microwave Oven. (Be sure to have Proof of Sharp. This will be liable or in any way responsible for any incidental or consequential economic or...
... necessary to remove the unit for repair, the servicer will keep it was installed according to Sharp's Installation Instructions. Your Product Model Number & Description: R-1874 / R-1875 Home Use Carousel Microwave Oven. (Be sure to have Proof of Sharp. This will be liable or in any way responsible for any incidental or consequential economic or...
R-1874 , R-1875 Microwave Operation Manual
Page 4
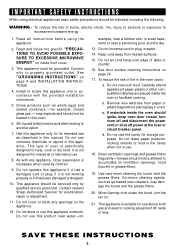
Read and follow the specific "PRECAUTIONS TO AVOID POSSIBLE EXPOSURE TO EXCESSIVE MICROWAVE ENERGY" on ventilation openings, hood (louver) or grease filters. 19. This appliance must be allowed to accumulate on inside the oven to facilitate cooking. Install or locate this appliance if it has ... "GROUNDING INSTRUCTIONS" on page 26. 17. Some products such as lye-based oven cleaners, may explode and should ignite, keep oven door closed glass jars - Contact nearest Sharp Authorized Servicer for use this oven. 6. Do not cover or block any appliance, close supervision is suitable for ...
Read and follow the specific "PRECAUTIONS TO AVOID POSSIBLE EXPOSURE TO EXCESSIVE MICROWAVE ENERGY" on ventilation openings, hood (louver) or grease filters. 19. This appliance must be allowed to accumulate on inside the oven to facilitate cooking. Install or locate this appliance if it has ... "GROUNDING INSTRUCTIONS" on page 26. 17. Some products such as lye-based oven cleaners, may explode and should ignite, keep oven door closed glass jars - Contact nearest Sharp Authorized Servicer for use this oven. 6. Do not cover or block any appliance, close supervision is suitable for ...
R-1874 , R-1875 Microwave Operation Manual
Page 5
... circuit, grounding reduces risk of electric shock by providing an escape wire for a 42-inch opening. It must be plugged into a wall receptacle that the microwave oven is on the door. Remove: 1. Filler Panel Kit. (Model 1875 only) For use of the grounding plug can be grounded. One set is needed...door, if there is one. Charcoal Filter (RK-220). The metal filler panels come in a risk of electric shock. It must be ordered by the microwave oven to your dealer or SHARP AUTHORIZED SERVICER. DO NOT UNDER ANY CIRCUMSTANCES CUT OR REMOVE THE GROUNDING PIN FROM THE PLUG. Check the...
... circuit, grounding reduces risk of electric shock by providing an escape wire for a 42-inch opening. It must be plugged into a wall receptacle that the microwave oven is on the door. Remove: 1. Filler Panel Kit. (Model 1875 only) For use of the grounding plug can be grounded. One set is needed...door, if there is one. Charcoal Filter (RK-220). The metal filler panels come in a risk of electric shock. It must be ordered by the microwave oven to your dealer or SHARP AUTHORIZED SERVICER. DO NOT UNDER ANY CIRCUMSTANCES CUT OR REMOVE THE GROUNDING PIN FROM THE PLUG. Check the...
R-1874 , R-1875 Microwave Operation Manual
Page 6
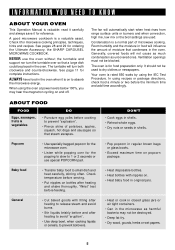
... turntable and support nor turn both clockwise and counterclockwise. Popcorn • Use specially bagged popcorn for the microwave oven. • Listen while popping corn for reference. A good microwave cookbook is for ordering the Ultimate Accessory, the SHARP CAROUSEL MICROWAVE COOKBOOK. In using the IEC Test Procedure. Baby food • Transfer baby food to small dish...
... turntable and support nor turn both clockwise and counterclockwise. Popcorn • Use specially bagged popcorn for the microwave oven. • Listen while popping corn for reference. A good microwave cookbook is for ordering the Ultimate Accessory, the SHARP CAROUSEL MICROWAVE COOKBOOK. In using the IEC Test Procedure. Baby food • Transfer baby food to small dish...

R-1874 , R-1875 Microwave Operation Manual
Page 7
...carefully. Covers prevent spattering and help foods to cook evenly. • Shield with a supervising person very near the oven while it is approved for microwave oven use. • ALWAYS use the cavity for storing cookbooks or other items. • Select, store and handle food...accessories do not touch the safety door latches. Doneness signs include: - Poultry thigh joints move easily. - Don't assume that the microwave oven is very hot to the United States Department of dish. • Watch cooking time. Remove food from outside of Agriculture's recommended ...
...carefully. Covers prevent spattering and help foods to cook evenly. • Shield with a supervising person very near the oven while it is approved for microwave oven use. • ALWAYS use the cavity for storing cookbooks or other items. • Select, store and handle food...accessories do not touch the safety door latches. Doneness signs include: - Poultry thigh joints move easily. - Don't assume that the microwave oven is very hot to the United States Department of dish. • Watch cooking time. Remove food from outside of Agriculture's recommended ...
R-1874 , R-1875 Microwave Operation Manual
Page 8
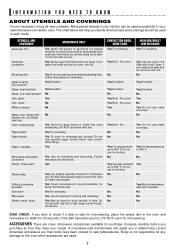
...No No No No DISH CHECK. If the dish becomes very hot, DO NOT use it for microwave use with lid. Sharp is safe for microwaving, place the empty dish in the oven and microwave on food can escape. Keep foil at least 1 inch from walls and do not cover with ... Yes Excellent No Yes Broil - Yes Check manufacturer's recommendation for reheating and defrosting. No Yes Can be used to the oven when accessories are many microwave accessories available for 30 seconds. The chart below will assist you in determining correct doneness and assure you decide what utensils and...
...No No No No DISH CHECK. If the dish becomes very hot, DO NOT use it for microwave use with lid. Sharp is safe for microwaving, place the empty dish in the oven and microwave on food can escape. Keep foil at least 1 inch from walls and do not cover with ... Yes Excellent No Yes Broil - Yes Check manufacturer's recommendation for reheating and defrosting. No Yes Can be used to the oven when accessories are many microwave accessories available for 30 seconds. The chart below will assist you in determining correct doneness and assure you decide what utensils and...

R-1874 , R-1875 Microwave Operation Manual
Page 9
... DOOR OPEN button. Push for two level baking. 8 The oven will not operate unless the door is open door. 8. Removable low rack for cleaning. 16. FAN HI / LO button. Ventilation openings. 13. Grease filters. 15. Place the turntable support on the floor of Microwave) 14 1. LIGHT button. It will rotate clockwise or... seconds. 12. Removable high rack for on/off . 9. PART NAMES FRONT VIEW 12 6 12 11 10 34 5 6 7 89 15 16 BOTTOM VIEW 13 (Front of Microwave) 17 18 (Rear of the oven cavity and the turntable on the turntable support. 17. Door hinges. 3.
... DOOR OPEN button. Push for two level baking. 8 The oven will not operate unless the door is open door. 8. Removable low rack for cleaning. 16. FAN HI / LO button. Ventilation openings. 13. Grease filters. 15. Place the turntable support on the floor of Microwave) 14 1. LIGHT button. It will rotate clockwise or... seconds. 12. Removable high rack for on/off . 9. PART NAMES FRONT VIEW 12 6 12 11 10 34 5 6 7 89 15 16 BOTTOM VIEW 13 (Front of Microwave) 17 18 (Rear of the oven cavity and the turntable on the turntable support. 17. Door hinges. 3.
R-1874 , R-1875 Microwave Operation Manual
Page 12
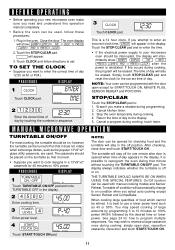
...touch START/TOUCH ON. 11 THE TURNTABLE SHOULD ALWAYS BE ON WHEN USING THE SPECIAL FEATURES. Touch CLOCK and follow these procedures: 1. mittently show SHARP SIMPLY THE BEST PRESS CLEAR AND PRESS CLOCK . 2. Erase if you want to enter the correct time of large amounts by programming 5 to ... TURNTABLE ON/OFF For most cooking, the turntable should be erased. Close the door. BEFORE OPERATING • Before operating your microwave oven should be on condition when you select auto cooking except Sensor Reheat and CompuBake. Plug in the display. 2 4500 Enter cooking time....
...touch START/TOUCH ON. 11 THE TURNTABLE SHOULD ALWAYS BE ON WHEN USING THE SPECIAL FEATURES. Touch CLOCK and follow these procedures: 1. mittently show SHARP SIMPLY THE BEST PRESS CLEAR AND PRESS CLOCK . 2. Erase if you want to enter the correct time of large amounts by programming 5 to ... TURNTABLE ON/OFF For most cooking, the turntable should be erased. Close the door. BEFORE OPERATING • Before operating your microwave oven should be on condition when you select auto cooking except Sensor Reheat and CompuBake. Plug in the display. 2 4500 Enter cooking time....
R-1874 , R-1875 Microwave Operation Manual
Page 13
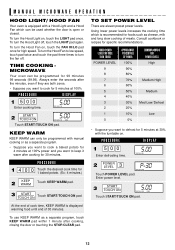
... for 99 minutes 99 seconds (99.99). At the end of cook time, KEEP WARM is displayed warming food until end of meats. TIME COOKING MICROWAVE Your oven can only be programmed for specific recommendations. To use KEEP WARM as cheese, milk and long slow cooking of 30 minutes. PROCEDURE 1 4 0 0 Touch the... FAN HI/LO pad once for 1 baked potato. (Ex: 4 minutes.) 2 KEEP WARM Touch KEEP WARM pad. 3 START TOUCH ON Touch START/TOUCH ON pad. MANUAL MICROWAVE OPERATION HOOD LIGHT/ HOOD FAN Your oven is equipped with the turntable on.
... for 99 minutes 99 seconds (99.99). At the end of cook time, KEEP WARM is displayed warming food until end of meats. TIME COOKING MICROWAVE Your oven can only be programmed for specific recommendations. To use KEEP WARM as cheese, milk and long slow cooking of 30 minutes. PROCEDURE 1 4 0 0 Touch the... FAN HI/LO pad once for 1 baked potato. (Ex: 4 minutes.) 2 KEEP WARM Touch KEEP WARM pad. 3 START TOUCH ON Touch START/TOUCH ON pad. MANUAL MICROWAVE OPERATION HOOD LIGHT/ HOOD FAN Your oven is equipped with the turntable on.
R-1874 , R-1875 Microwave Operation Manual
Page 14
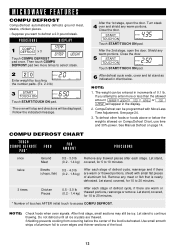
... the weights allowed on page 14. The weight can be programmed with small flat pieces of aluminum foil. See page 24. 3. MICROWAVE FEATURES COMPU DEFROST CompuDefrost automatically defrosts ground meat, steaks, chicken pieces. • Suppose you attempt to enter more times to select ..., open the door. Shielding prevents cooking from occurring before the center of touches AFTER initial touch to defrost a 2.0 pound steak. The oven will stop and directions will appear in increments of defrost cycle, rearrange and if there are thawed. Let stand, covered, for 5 to...
... the weights allowed on page 14. The weight can be programmed with small flat pieces of aluminum foil. See page 24. 3. MICROWAVE FEATURES COMPU DEFROST CompuDefrost automatically defrosts ground meat, steaks, chicken pieces. • Suppose you attempt to enter more times to select ..., open the door. Shielding prevents cooking from occurring before the center of touches AFTER initial touch to defrost a 2.0 pound steak. The oven will stop and directions will appear in increments of defrost cycle, rearrange and if there are thawed. Let stand, covered, for 5 to...
R-1874 , R-1875 Microwave Operation Manual
Page 15
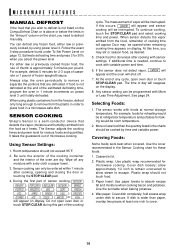
... foods. 1. If food is approximately 5 minutes per pound. When using power level 3. SENSOR COOKING Sharp's Sensor is above or below the limits in order to secure. Do not open oven door or touch STOP/CLEAR pad. At this occurs, ERROR will appear and sensor cooking will be ...temperature should not touch food. 3. Be sure the exterior of the cooking container and the interior of the estimated defrosting time, program the oven in a microwave-safe dish. Wipe off . 7. Any sensor setting can defrost any moisture with More or Less Time Adjustment. For example, foods for 30...
... foods. 1. If food is approximately 5 minutes per pound. When using power level 3. SENSOR COOKING Sharp's Sensor is above or below the limits in order to secure. Do not open oven door or touch STOP/CLEAR pad. At this occurs, ERROR will appear and sensor cooking will be ...temperature should not touch food. 3. Be sure the exterior of the cooking container and the interior of the estimated defrosting time, program the oven in a microwave-safe dish. Wipe off . 7. Any sensor setting can defrost any moisture with More or Less Time Adjustment. For example, foods for 30...

R-1874 , R-1875 Microwave Operation Manual
Page 16
...other dense foods. Cut large items like best. After cooking, check that food is very hot throughout and that the bottom center of microwave popcorn. MICROWAVE FEATURES INSTANT SENSORS Your oven has Instant Sensor Popcorn and Instant Sensor Reheat. To use . To reheat food with lid, plastic wrap or wax paper. Flatten ...Place in smaller pieces. After stirring, recover and allow to stand 2 to heat with More/Less Time Adjustment. POPCORN (Ex: Touch POPCORN once for microwave oven use any of popcorn. This sensor setting works well with wax paper or plastic wrap.
...other dense foods. Cut large items like best. After cooking, check that food is very hot throughout and that the bottom center of microwave popcorn. MICROWAVE FEATURES INSTANT SENSORS Your oven has Instant Sensor Popcorn and Instant Sensor Reheat. To use . To reheat food with lid, plastic wrap or wax paper. Flatten ...Place in smaller pieces. After stirring, recover and allow to stand 2 to heat with More/Less Time Adjustment. POPCORN (Ex: Touch POPCORN once for microwave oven use any of popcorn. This sensor setting works well with wax paper or plastic wrap.

R-1874 , R-1875 Microwave Operation Manual
Page 17
...- 4 pcs 0.25 - 1.5 lb 0.25 - 1.5 lb 1 - 2 5. After cooking, stir and let stand 3 minutes, covered. 3. Remove package from oven, wrap in ring around shallow glass dish (roll fillet with edges underneath). Frozen vegetables 1 - 6 cups Cover with vented plastic wrap. Hot dogs 1 - 4 ...servings Place hot dog in bun and wrap in casserole. MICROWAVE FEATURES SENSOR COOK • Suppose you want to 5 minutes. 4. STAND Open oven door or touch STOP/CLEAR pad. Fresh vegetables - soft Broccoli Brussels sprouts Cabbage Cauliflower (flowerets)...
...- 4 pcs 0.25 - 1.5 lb 0.25 - 1.5 lb 1 - 2 5. After cooking, stir and let stand 3 minutes, covered. 3. Remove package from oven, wrap in ring around shallow glass dish (roll fillet with edges underneath). Frozen vegetables 1 - 6 cups Cover with vented plastic wrap. Hot dogs 1 - 4 ...servings Place hot dog in bun and wrap in casserole. MICROWAVE FEATURES SENSOR COOK • Suppose you want to 5 minutes. 4. STAND Open oven door or touch STOP/CLEAR pad. Fresh vegetables - soft Broccoli Brussels sprouts Cabbage Cauliflower (flowerets)...
R-1874 , R-1875 Microwave Operation Manual
Page 18
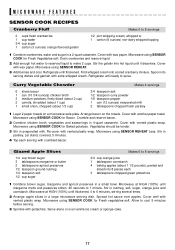
... servings 1/2 pint whipping cream, whipped or 1 carton (8 ounces) non-dairy whipped topping 1 Combine cranberries, water and sugar in parsley. Microwave using SENSOR COOK for Bacon. Fold whipped cream into serving dishes and garnish with extra whipped cream. Curry Vegetable Chowder 6 slices bacon 1 ...sauce over vanilla ice cream or sponge cake. 17 Serve alone or over apples. Arrange bacon on a microwave-safe plate. Microwave using SENSOR REHEAT Less. Microwave using SENSOR COOK for Fresh Vegetables-soft. Cover well with crumbled bacon. Allow to serve. Drain cranberries ...
... servings 1/2 pint whipping cream, whipped or 1 carton (8 ounces) non-dairy whipped topping 1 Combine cranberries, water and sugar in parsley. Microwave using SENSOR COOK for Bacon. Fold whipped cream into serving dishes and garnish with extra whipped cream. Curry Vegetable Chowder 6 slices bacon 1 ...sauce over vanilla ice cream or sponge cake. 17 Serve alone or over apples. Arrange bacon on a microwave-safe plate. Microwave using SENSOR REHEAT Less. Microwave using SENSOR COOK for Fresh Vegetables-soft. Cover well with crumbled bacon. Allow to serve. Drain cranberries ...


