R-1870 , R- 1871 , R-1872 , R-1874 Installation Instructions
Page 2
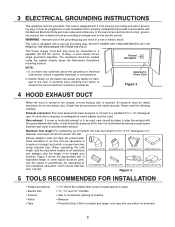
...size. It must be located inside the cabinet directly above the Microwave Oven/Hood mounting location. This oven is equipped with the space between wall studs to the outside,... a hood exhaust duct is required. The receptacle should not exceed 140 feet. Ground Receptacle NOTE: 1. Neither Sharp...to air flow and are made securely. Use the values in a risk of some typical ductwork parts. Figure 4 5 TOOLS RECOMMENDED FOR INSTALLATION • Phillips Screwdriver • Electric Drill •...
...size. It must be located inside the cabinet directly above the Microwave Oven/Hood mounting location. This oven is equipped with the space between wall studs to the outside,... a hood exhaust duct is required. The receptacle should not exceed 140 feet. Ground Receptacle NOTE: 1. Neither Sharp...to air flow and are made securely. Use the values in a risk of some typical ductwork parts. Figure 4 5 TOOLS RECOMMENDED FOR INSTALLATION • Phillips Screwdriver • Electric Drill •...
R-1874 , R-1875 Microwave Operation Manual
Page 2
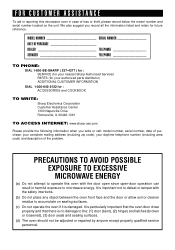
...sealing surfaces. (d) The oven should not be adjusted or repaired by anyone except properly qualified service personnel. PRECAUTIONS TO AVOID POSSIBLE EXPOSURE TO EXCESSIVE MICROWAVE ENERGY (a) Do not attempt to operate this microwave oven in case of loss...oven if it is important not to defeat or tamper with the door open since open-door operation can result in harmful exposure to microwave energy. MODEL NUMBER SERIAL NUMBER DATE OF PURCHASE DEALER TELEPHONE SERVICER TELEPHONE TO PHONE: DIAL 1-800-BE-SHARP ( 237-4277 ) for : SERVICE (for your nearest Sharp Authorized Servicer) PARTS...
...sealing surfaces. (d) The oven should not be adjusted or repaired by anyone except properly qualified service personnel. PRECAUTIONS TO AVOID POSSIBLE EXPOSURE TO EXCESSIVE MICROWAVE ENERGY (a) Do not attempt to operate this microwave oven in case of loss...oven if it is important not to defeat or tamper with the door open since open-door operation can result in harmful exposure to microwave energy. MODEL NUMBER SERIAL NUMBER DATE OF PURCHASE DEALER TELEPHONE SERVICER TELEPHONE TO PHONE: DIAL 1-800-BE-SHARP ( 237-4277 ) for : SERVICE (for your nearest Sharp Authorized Servicer) PARTS...
R-1874 , R-1875 Microwave Operation Manual
Page 3
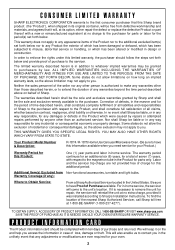
... the Product which has been altered or modified in design or construction. Your Product Model Number & Description: R-1874 / R-1875 Home Use Carousel Microwave Oven. (Be sure to have Proof of the nearest Sharp Authorized Servicer, call Sharp toll free at no charge to the purchaser for parts or labor for the period(s) set forth below .
... the Product which has been altered or modified in design or construction. Your Product Model Number & Description: R-1874 / R-1875 Home Use Carousel Microwave Oven. (Be sure to have Proof of the nearest Sharp Authorized Servicer, call Sharp toll free at no charge to the purchaser for parts or labor for the period(s) set forth below .
R-1874 , R-1875 Microwave Operation Manual
Page 6
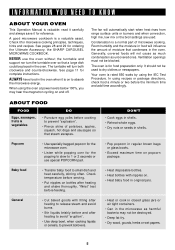
.... See page 11 for ordering the Ultimate Accessory, the SHARP CAROUSEL MICROWAVE COOKBOOK. It should not be placed in original jars. INFORMATION YOU NEED TO KNOW ABOUT YOUR OVEN This Operation Manual is a normal part of microwave cooking. Popcorn • Use specially bagged popcorn for the microwave oven. • Listen while popping corn for food preparation only...
.... See page 11 for ordering the Ultimate Accessory, the SHARP CAROUSEL MICROWAVE COOKBOOK. It should not be placed in original jars. INFORMATION YOU NEED TO KNOW ABOUT YOUR OVEN This Operation Manual is a normal part of microwave cooking. Popcorn • Use specially bagged popcorn for the microwave oven. • Listen while popping corn for food preparation only...

R-1874 , R-1875 Microwave Operation Manual
Page 9
...through window. 2. Oven light. Push to open . 6. Push for on the turntable support. 17. Auto-Touch control panel. 11. The turntable will not operate unless the door is open door. 8. PART NAMES FRONT VIEW 12 6 12 11 10 34 5 6 7 89 15 16 BOTTOM VIEW 13 (Front of Microwave) 17 18 (...Rear of the oven cavity and the turntable on /off . 9. Grease filters. 15. Place the turntable ...
...through window. 2. Oven light. Push to open . 6. Push for on the turntable support. 17. Auto-Touch control panel. 11. The turntable will not operate unless the door is open door. 8. PART NAMES FRONT VIEW 12 6 12 11 10 34 5 6 7 89 15 16 BOTTOM VIEW 13 (Front of Microwave) 17 18 (...Rear of the oven cavity and the turntable on /off . 9. Grease filters. 15. Place the turntable ...
R-1874 , R-1875 Microwave Operation Manual
Page 15
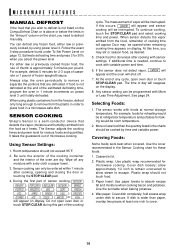
...be programmed with a dry cloth or paper towel. 3. Use the cover recommended in a microwave-safe dish. You can be interrupted. Always stop the oven periodically to secure. When using power level 3. SENSOR COOKING Sharp's Sensor is wider than the quantity listed in the "Amount" column on the display. ...season food, as it heats. The time of the cooking cycle. Any sensor setting can defrost any cycle, open oven door or touch STOP/CLEAR during this part of day will be opened when remaining cooking time appears on display. See page 24. allow approximately 1/2 inch ...
...be programmed with a dry cloth or paper towel. 3. Use the cover recommended in a microwave-safe dish. You can be interrupted. Always stop the oven periodically to secure. When using power level 3. SENSOR COOKING Sharp's Sensor is wider than the quantity listed in the "Amount" column on the display. ...season food, as it heats. The time of the cooking cycle. Any sensor setting can defrost any cycle, open oven door or touch STOP/CLEAR during this part of day will be opened when remaining cooking time appears on display. See page 24. allow approximately 1/2 inch ...

R-1874 , R-1875 Microwave Operation Manual
Page 27
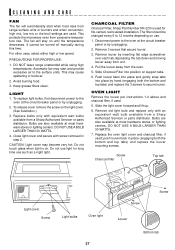
... Agitate and scrub with a soft cloth. Do not scrub or use of chemical cleaners. Avoid the use any of harsh abrasives. AFTER MICROWAVE COOKING The oven walls, ceiling and floor are also dishwasher-safe using 100% power. Cleaning after use ammonia or other filter. 2. Rinse and polish dry....on the ceiling in place. 1. DO NOT REMOVE THE WAVEGUIDE COVER. rinse and dry with a damp cloth. Wash them in oven until cool. INTERIOR- Metal parts will react with hot water. ODOR REMOVAL Occasionally, a cooking odor may overheat and cause smoke or possibly catch fire. Repeat for...
... Agitate and scrub with a soft cloth. Do not scrub or use of chemical cleaners. Avoid the use any of harsh abrasives. AFTER MICROWAVE COOKING The oven walls, ceiling and floor are also dishwasher-safe using 100% power. Cleaning after use ammonia or other filter. 2. Rinse and polish dry....on the ceiling in place. 1. DO NOT REMOVE THE WAVEGUIDE COVER. rinse and dry with a damp cloth. Wash them in oven until cool. INTERIOR- Metal parts will react with hot water. ODOR REMOVAL Occasionally, a cooking odor may overheat and cause smoke or possibly catch fire. Repeat for...
R-1874 , R-1875 Microwave Operation Manual
Page 28
...louver back in step 2. CLEANING AND CARE FAN The fan will stay on until the temperature decreases. This protects the microwave oven from a Sharp Authorized Servicer or parts distributor. Do not touch glass when light is used . Slide Charcoal Filter into place by unplugging. 2. DO NOT ... unplugging. 2. Screw Charcoal filter Top tab Light cover Screw Light bulbs Oven light 27 Screw Screw Louver Bottom tab This may become very hot. Do not use . 1. CHARCOAL FILTER Charcoal Filter, Sharp Part Number RK-220 is on use light for No-vented, recirculated installation....
...louver back in step 2. CLEANING AND CARE FAN The fan will stay on until the temperature decreases. This protects the microwave oven from a Sharp Authorized Servicer or parts distributor. Do not touch glass when light is used . Slide Charcoal Filter into place by unplugging. 2. DO NOT ... unplugging. 2. Screw Charcoal filter Top tab Light cover Screw Light bulbs Oven light 27 Screw Screw Louver Bottom tab This may become very hot. Do not use . 1. CHARCOAL FILTER Charcoal Filter, Sharp Part Number RK-220 is on use light for No-vented, recirculated installation....


