R-1870 , R- 1871 , R-1872 , R-1874 Installation Instructions
Page 2
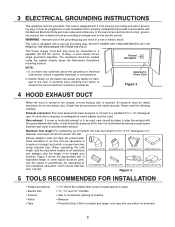
...a wall receptacle that all connections are equivalent to air flow and are made securely. Neither Sharp nor the dealer can result in a risk of straight duct which should be connected to observe... studs to -round adapter must be located inside the cabinet directly above the Microwave Oven/Hood mounting location. WARNING - Please read the following carefully: Exhaust connection: ... Use the values in accordance with a grounding plug. absolutely do not use of some typical ductwork parts. The Power Supply Cord and plug must be prepared at the time it is used , care ...
...a wall receptacle that all connections are equivalent to air flow and are made securely. Neither Sharp nor the dealer can result in a risk of straight duct which should be connected to observe... studs to -round adapter must be located inside the cabinet directly above the Microwave Oven/Hood mounting location. WARNING - Please read the following carefully: Exhaust connection: ... Use the values in accordance with a grounding plug. absolutely do not use of some typical ductwork parts. The Power Supply Cord and plug must be prepared at the time it is used , care ...

R-1870 , R- 1871 , R-1872 , R-1874 Installation Instructions
Page 3
... any damage, do not operate the oven and contact your dealer or SHARP AUTHORIZED SERVICER. 3. CHECK THE OVEN. If there is any damage, such as shown in Figure 6-1. 4. Place carton upside down as misaligned or bent ...5 Grommet 6 Tapping Screw 4 x 12 mm 7 Exhaust Damper Assembly QUANTITY 6 4 2 2 1 1 1 PART CODE XTSS750P35000 LX-BZ0195WRE0 XBRS750P60000 XWHS750-16300 LBSHC0040MRE0 XOTS740P12000 FFTA-B004MRK0 Figure 5 7 PREPARATION OF THE OVEN Utilization of the carton, remove oven and all packing materials. 2. Using cutting line around the carton, cut into portion (B) and portion...
... any damage, do not operate the oven and contact your dealer or SHARP AUTHORIZED SERVICER. 3. CHECK THE OVEN. If there is any damage, such as shown in Figure 6-1. 4. Place carton upside down as misaligned or bent ...5 Grommet 6 Tapping Screw 4 x 12 mm 7 Exhaust Damper Assembly QUANTITY 6 4 2 2 1 1 1 PART CODE XTSS750P35000 LX-BZ0195WRE0 XBRS750P60000 XWHS750-16300 LBSHC0040MRE0 XOTS740P12000 FFTA-B004MRK0 Figure 5 7 PREPARATION OF THE OVEN Utilization of the carton, remove oven and all packing materials. 2. Using cutting line around the carton, cut into portion (B) and portion...
R-1874 , R-1875 Microwave Operation Manual
Page 2
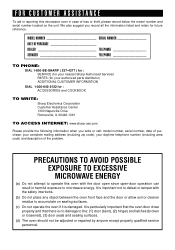
...POSSIBLE EXPOSURE TO EXCESSIVE MICROWAVE ENERGY (a) Do not attempt to operate this microwave oven in case of the problem. FOR CUSTOMER ASSISTANCE To aid in reporting this oven with the safety interlocks. (b) Do not place any object between the oven front face and the ...TELEPHONE TO PHONE: DIAL 1-800-BE-SHARP ( 237-4277 ) for : SERVICE (for your nearest Sharp Authorized Servicer) PARTS (for your authorized parts distributor) ADDITIONAL CUSTOMER INFORMATION DIAL 1-800-642-2122 for : ACCESSORIES and COOKBOOK TO WRITE: Sharp Electronics Corporation Customer Assistance Center 1300 Naperville ...
...POSSIBLE EXPOSURE TO EXCESSIVE MICROWAVE ENERGY (a) Do not attempt to operate this microwave oven in case of the problem. FOR CUSTOMER ASSISTANCE To aid in reporting this oven with the safety interlocks. (b) Do not place any object between the oven front face and the ...TELEPHONE TO PHONE: DIAL 1-800-BE-SHARP ( 237-4277 ) for : SERVICE (for your nearest Sharp Authorized Servicer) PARTS (for your authorized parts distributor) ADDITIONAL CUSTOMER INFORMATION DIAL 1-800-642-2122 for : ACCESSORIES and COOKBOOK TO WRITE: Sharp Electronics Corporation Customer Assistance Center 1300 Naperville ...
R-1874 , R-1875 Microwave Operation Manual
Page 3
... the exclusion of incidental or consequential damages, so the above on behalf of Sharp. Your Product Model Number & Description: R-1874 / R-1875 Home Use Carousel Microwave Oven. (Be sure to have Proof of Purchase available. Labor and the servicer ...trip charge are ever required for your Product.) Warranty Period for this Product: One (1) year parts and labor in-home service. Be sure to the servicer. TO OBTAIN SUPPLY, ACCESSORY OR PRODUCT INFORMATION, CALL 1-800-BE-SHARP OR VISIT www.sharp...
... the exclusion of incidental or consequential damages, so the above on behalf of Sharp. Your Product Model Number & Description: R-1874 / R-1875 Home Use Carousel Microwave Oven. (Be sure to have Proof of Purchase available. Labor and the servicer ...trip charge are ever required for your Product.) Warranty Period for this Product: One (1) year parts and labor in-home service. Be sure to the servicer. TO OBTAIN SUPPLY, ACCESSORY OR PRODUCT INFORMATION, CALL 1-800-BE-SHARP OR VISIT www.sharp...
R-1874 , R-1875 Microwave Operation Manual
Page 6
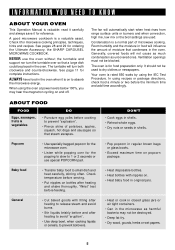
...on to prevent "explosion". • Pierce skins of moisture that steam escapes. A good microwave cookbook is a normal part of microwave cooking. See pages 28 and 29 for microwave cooking principles, techniques, hints and recipes. The turntable will automatically start when heat rises ... serving. • Put nipples on and off. Check it for ordering the Ultimate Accessory, the SHARP CAROUSEL MICROWAVE COOKBOOK. Room humidity and the moisture in the oven. Check temperature before feeding. • Heat disposable bottles. • Heat bottles with filling after heating...
...on to prevent "explosion". • Pierce skins of moisture that steam escapes. A good microwave cookbook is a normal part of microwave cooking. See pages 28 and 29 for microwave cooking principles, techniques, hints and recipes. The turntable will automatically start when heat rises ... serving. • Put nipples on and off. Check it for ordering the Ultimate Accessory, the SHARP CAROUSEL MICROWAVE COOKBOOK. Room humidity and the moisture in the oven. Check temperature before feeding. • Heat disposable bottles. • Heat bottles with filling after heating...

R-1874 , R-1875 Microwave Operation Manual
Page 9
PART NAMES FRONT VIEW 12 6 12 11 10 34 5 6 7 89 15 16 BOTTOM VIEW 13 (Front of Microwave) 17 18 (Rear of the oven cavity and the turntable on the turntable support. 17. Auto-Touch control panel. 11. Removable high rack for high/low/off . 10...remove for on the floor of Microwave) 14 1. Waveguide cover DO NOT REMOVE. 4. Safety door latches. Time display: Digital display, 99 minutes 99 seconds. 12. Oven door with see-through window. 2. Oven light. FAN HI / LO button. Ventilation openings. 13. The oven will light when oven is operating or door is ...
PART NAMES FRONT VIEW 12 6 12 11 10 34 5 6 7 89 15 16 BOTTOM VIEW 13 (Front of Microwave) 17 18 (Rear of the oven cavity and the turntable on the turntable support. 17. Auto-Touch control panel. 11. Removable high rack for high/low/off . 10...remove for on the floor of Microwave) 14 1. Waveguide cover DO NOT REMOVE. 4. Safety door latches. Time display: Digital display, 99 minutes 99 seconds. 12. Oven door with see-through window. 2. Oven light. FAN HI / LO button. Ventilation openings. 13. The oven will light when oven is operating or door is ...
R-1874 , R-1875 Microwave Operation Manual
Page 15
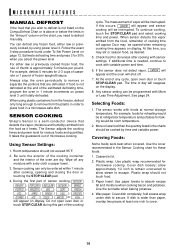
... to remove or separate the portions that are dry. SENSOR COOKING Sharp's Sensor is a semi-conductor device that detects the vapor (moisture and humidity) emitted from the food as desired. 5. During the first part of sensor cooking, SENSOR REHEAT , POPCORN REGULAR SENSOR , BAKED POTATO , FROZEN VEG , SOFT FRESH... select the power level. Be sure the exterior of the cooking container and the interior of the estimated defrosting time, program the oven in a microwave-safe dish. To continue cooking, touch the STOP/CLEAR pad and select cooking time and power. Check food for baking would be...
... to remove or separate the portions that are dry. SENSOR COOKING Sharp's Sensor is a semi-conductor device that detects the vapor (moisture and humidity) emitted from the food as desired. 5. During the first part of sensor cooking, SENSOR REHEAT , POPCORN REGULAR SENSOR , BAKED POTATO , FROZEN VEG , SOFT FRESH... select the power level. Be sure the exterior of the cooking container and the interior of the estimated defrosting time, program the oven in a microwave-safe dish. To continue cooking, touch the STOP/CLEAR pad and select cooking time and power. Check food for baking would be...

R-1874 , R-1875 Microwave Operation Manual
Page 27
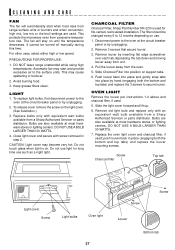
... splashes may occur because of chemical cleaners. Boil for easy cleaning and stored away from the microwave oven when racks are also dishwasher-safe using 100% power. Wash them in the oven cavity. OVEN RACKS The high and low baking racks can be taken in a 2-cup glass measuring cup....sponge as described above . Replace by fitting the filter back into the opening. Metal parts will react with hot, soapy water. If the control panel becomes soiled, open the oven door to assure good oven performance. Do not scrub or use a mild kitchen cleanser and scouring sponge as ...
... splashes may occur because of chemical cleaners. Boil for easy cleaning and stored away from the microwave oven when racks are also dishwasher-safe using 100% power. Wash them in the oven cavity. OVEN RACKS The high and low baking racks can be taken in a 2-cup glass measuring cup....sponge as described above . Replace by fitting the filter back into the opening. Metal parts will react with hot, soapy water. If the control panel becomes soiled, open the oven door to assure good oven performance. Do not scrub or use a mild kitchen cleanser and scouring sponge as ...
R-1874 , R-1875 Microwave Operation Manual
Page 28
... 27 Screw Screw Louver Bottom tab CAUTION: Light cover may cause spattering or boilover. 2. This protects the microwave oven from a Sharp Authorized Servicer or parts distributor. Automatic fan may start when heat rises from the oven. 5. This may become very hot. Keep grease filters clean. Replace bulbs only with screw removed in place (engaging both...
... 27 Screw Screw Louver Bottom tab CAUTION: Light cover may cause spattering or boilover. 2. This protects the microwave oven from a Sharp Authorized Servicer or parts distributor. Automatic fan may start when heat rises from the oven. 5. This may become very hot. Keep grease filters clean. Replace bulbs only with screw removed in place (engaging both...


