R-1870 , R- 1871 , R-1872 , R-1874 Installation Instructions
Page 1
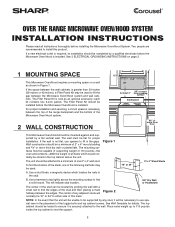
... the wall with a small nail to the wall. The mounting surfaces must be mounted against and supported by a flat vertical wall. OVER THE RANGE MICROWAVE OVEN/HOOD SYSTEM INSTALLATION INSTRUCTIONS Please read all items which locates the nails in Figure 1. If a new electrical outlet is securely attached to find a solid sound. See 3 ELECTRICAL GROUNDING...
... the wall with a small nail to the wall. The mounting surfaces must be mounted against and supported by a flat vertical wall. OVER THE RANGE MICROWAVE OVEN/HOOD SYSTEM INSTALLATION INSTRUCTIONS Please read all items which locates the nails in Figure 1. If a new electrical outlet is securely attached to find a solid sound. See 3 ELECTRICAL GROUNDING...
R-1870 , R- 1871 , R-1872 , R-1874 Installation Instructions
Page 2
If you may also use carton for protection 2 Neither Sharp nor the dealer can result in parentheses for the electric current. Check that is required, a rectangular-to a section of straight duct which should...above the Microwave Oven/Hood mounting location. If round duct is properly installed and grounded in accordance with a 3-prong grounding plug. When calculating the total length, add the equivalent lengths of all transitions and adapters plus the length of the grounding plug can accept any questions about the grounding or electrical instructions, consult ...
If you may also use carton for protection 2 Neither Sharp nor the dealer can result in parentheses for the electric current. Check that is required, a rectangular-to a section of straight duct which should...above the Microwave Oven/Hood mounting location. If round duct is properly installed and grounded in accordance with a 3-prong grounding plug. When calculating the total length, add the equivalent lengths of all transitions and adapters plus the length of the grounding plug can accept any questions about the grounding or electrical instructions, consult ...

R-1870 , R- 1871 , R-1872 , R-1874 Installation Instructions
Page 6
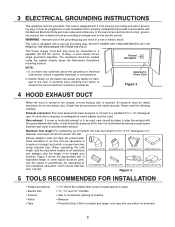
...in the correct position before insertion. 4. Align the Mounting Plate carefully and hold in Figure 21. 3. 10 OVEN INSTALLATION THIS OVEN CANNOT BE PROPERLY INSTALLED WITHOUT REFERRING TO THE MOUNTING INSTRUCTIONS FOUND ON BOTH TEMPLATES. READ AND FOLLOW MOUNTING INFORMATION ON BOTH TOP CABINET AND WALL TEMPLATES. Separate 4 ...the Microwave Oven/Hood to the holes of the wall. Place cut portion of carton (B) on the other side of the Wall Template) and put the Toggle Nuts onto the Toggle Bolts. Place carton portion (C) on the top of the Toggle Nuts (in the INSTALLATION HARDWARE,...
...in the correct position before insertion. 4. Align the Mounting Plate carefully and hold in Figure 21. 3. 10 OVEN INSTALLATION THIS OVEN CANNOT BE PROPERLY INSTALLED WITHOUT REFERRING TO THE MOUNTING INSTRUCTIONS FOUND ON BOTH TEMPLATES. READ AND FOLLOW MOUNTING INFORMATION ON BOTH TOP CABINET AND WALL TEMPLATES. Separate 4 ...the Microwave Oven/Hood to the holes of the wall. Place cut portion of carton (B) on the other side of the Wall Template) and put the Toggle Nuts onto the Toggle Bolts. Place carton portion (C) on the top of the Toggle Nuts (in the INSTALLATION HARDWARE,...
R-1870 , R- 1871 , R-1872 , R-1874 Installation Instructions
Page 8
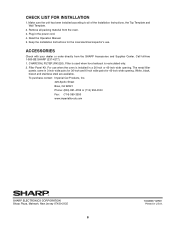
...steel are available. ACCESSORIES Check with your dealer or order directly from the oven. 3. Make sure the unit has been installed according to all packing material from the SHARP Accessories and Supplies Center. Read the Operation Manual. 5. The metal filler panels...) 990-3350 www.imperialhoods.com SHARP ELECTRONICS CORPORATION Sharp Plaza, Mahwah, New Jersey 07430-2135 8 TINSEB371MRR1 Printed in the power cord. 4. For use . Remove all of the Installation Instructions, the Top Template and Wall Template. 2. Keep the Installation Instructions for 42-inch wide opening ....
...steel are available. ACCESSORIES Check with your dealer or order directly from the oven. 3. Make sure the unit has been installed according to all packing material from the SHARP Accessories and Supplies Center. Read the Operation Manual. 5. The metal filler panels...) 990-3350 www.imperialhoods.com SHARP ELECTRONICS CORPORATION Sharp Plaza, Mahwah, New Jersey 07430-2135 8 TINSEB371MRR1 Printed in the power cord. 4. For use . Remove all of the Installation Instructions, the Top Template and Wall Template. 2. Keep the Installation Instructions for 42-inch wide opening ....
R-1874 , R-1875 Microwave Operation Manual
Page 3
...Warranty Period for this additional period. Your Product Model Number & Description: R-1874 / R-1875 Home Use Carousel Microwave Oven. (Be sure to have Proof of Sharp. Some states do not allow limitations on behalf of Purchase available. This warranty does not apply to any appearance ... PROOF OF PURCHASE AS IT IS NEEDED SHOULD YOUR OVEN EVER REQUIRE WARRANTY SERVICE. THIS WARRANTY GIVES YOU SPECIFIC LEGAL RIGHTS. In no extra charge, provided it was installed according to Sharp's Installation Instructions. Nor shall Sharp be liable or in any way responsible for any damages...
...Warranty Period for this additional period. Your Product Model Number & Description: R-1874 / R-1875 Home Use Carousel Microwave Oven. (Be sure to have Proof of Sharp. Some states do not allow limitations on behalf of Purchase available. This warranty does not apply to any appearance ... PROOF OF PURCHASE AS IT IS NEEDED SHOULD YOUR OVEN EVER REQUIRE WARRANTY SERVICE. THIS WARRANTY GIVES YOU SPECIFIC LEGAL RIGHTS. In no extra charge, provided it was installed according to Sharp's Installation Instructions. Nor shall Sharp be liable or in any way responsible for any damages...
R-1874 , R-1875 Microwave Operation Manual
Page 4
... AVOID POSSIBLE EXPOSURE TO EXCESSIVE MICROWAVE ENERGY" on . 21. This appliance must be serviced only by children. 9. Some products such as whole eggs and sealed containers -for examination, repair or adjustment. 11. As with the provided installation instructions. 5. If materials inside the oven should ignite, keep oven door closed glass jars - Install or locate this appliance...
... AVOID POSSIBLE EXPOSURE TO EXCESSIVE MICROWAVE ENERGY" on . 21. This appliance must be serviced only by children. 9. Some products such as whole eggs and sealed containers -for examination, repair or adjustment. 11. As with the provided installation instructions. 5. If materials inside the oven should ignite, keep oven door closed glass jars - Install or locate this appliance...
R-1874 , R-1875 Microwave Operation Manual
Page 5
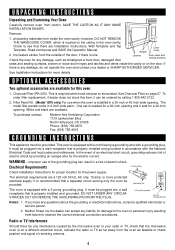
...microwave oven to observe the correct electrical connection procedures. Notes: 1. One set is recirculated. UNPACKING INSTRUCTIONS Unpacking and Examining Your Oven Carefully remove oven from inside the cavity or on the door. Read enclosures and SAVE the Operation Manual. the feature sticker from the oven as far away from the outside of electric shock. See Installation Instructions... for damage to the oven or personal injury resulting from failure to your dealer or SHARP AUTHORIZED ...
...microwave oven to observe the correct electrical connection procedures. Notes: 1. One set is recirculated. UNPACKING INSTRUCTIONS Unpacking and Examining Your Oven Carefully remove oven from inside the cavity or on the door. Read enclosures and SAVE the Operation Manual. the feature sticker from the oven as far away from the outside of electric shock. See Installation Instructions... for damage to the oven or personal injury resulting from failure to your dealer or SHARP AUTHORIZED ...
R-1874 , R-1875 Microwave Operation Manual
Page 28
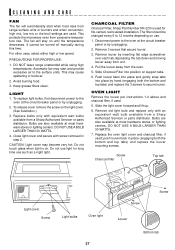
...bottom and top tabs) and replace the louver mounting screws. This protects the microwave oven from a Sharp Authorized Servicer or parts distributor. To replace light bulbs, first disconnect power to the oven at the circuit breaker panel or by unplugging. 2. Replace bulbs only with...(See illustration.) 3. LIGHT 1. CHARCOAL FILTER Charcoal Filter, Sharp Part Number RK-220 is on support tabs. 6. PRECAUTIONS FOR PROPER USE: 1. Do not use light for No-vented, recirculated installation. OVEN LIGHT Remove the louver per instructions 1-4 above and charcoal filter, if used ; Remove old...
...bottom and top tabs) and replace the louver mounting screws. This protects the microwave oven from a Sharp Authorized Servicer or parts distributor. To replace light bulbs, first disconnect power to the oven at the circuit breaker panel or by unplugging. 2. Replace bulbs only with...(See illustration.) 3. LIGHT 1. CHARCOAL FILTER Charcoal Filter, Sharp Part Number RK-220 is on support tabs. 6. PRECAUTIONS FOR PROPER USE: 1. Do not use light for No-vented, recirculated installation. OVEN LIGHT Remove the louver per instructions 1-4 above and charcoal filter, if used ; Remove old...


