R-1870 , R- 1871 , R-1872 , R-1874 Installation Instructions
Page 1
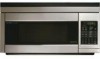
... should be tested to ensure it will be necessary to use spacers to the wall. The top cabinet should be installed before the Microwave Oven/Hood is necessary between the wall cabinets is not flat, use special care in the placement of the following methods may be a minimum of ...one of the toggle bolts and top cabinet screws. OVER THE RANGE MICROWAVE OVEN/HOOD SYSTEM INSTALLATION INSTRUCTIONS Please read all items which locates the nails in the gaps. The Filler Panel Kit should be 16" or 24" to find ...
... should be tested to ensure it will be necessary to use spacers to the wall. The top cabinet should be installed before the Microwave Oven/Hood is necessary between the wall cabinets is not flat, use special care in the placement of the following methods may be a minimum of ...one of the toggle bolts and top cabinet screws. OVER THE RANGE MICROWAVE OVEN/HOOD SYSTEM INSTALLATION INSTRUCTIONS Please read all items which locates the nails in the gaps. The Filler Panel Kit should be 16" or 24" to find ...
R-1870 , R- 1871 , R-1872 , R-1874 Installation Instructions
Page 2
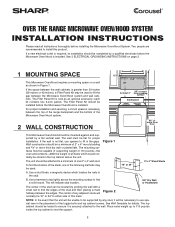
...exhaust with the space between wall studs to accommodate exhaust. If you may also use carton for protection 2 Figure 4 5 TOOLS RECOMMENDED FOR INSTALLATION • Phillips Screwdriver • Electric Drill • Scissors • Pencil • Tape • 11/2" Wood Bit or Metal Hole ...be used , care should be located inside the cabinet directly above the Microwave Oven/Hood mounting location. Rear exhaust: If a rear or horizontal exhaust is to be used . Improper use plastic duct. Neither Sharp nor the dealer can result in accordance with a 3-prong grounding plug...
...exhaust with the space between wall studs to accommodate exhaust. If you may also use carton for protection 2 Figure 4 5 TOOLS RECOMMENDED FOR INSTALLATION • Phillips Screwdriver • Electric Drill • Scissors • Pencil • Tape • 11/2" Wood Bit or Metal Hole ...be used , care should be located inside the cabinet directly above the Microwave Oven/Hood mounting location. Rear exhaust: If a rear or horizontal exhaust is to be used . Improper use plastic duct. Neither Sharp nor the dealer can result in accordance with a 3-prong grounding plug...

R-1870 , R- 1871 , R-1872 , R-1874 Installation Instructions
Page 3
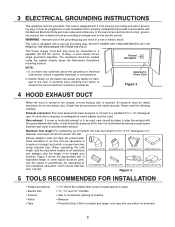
...there is any damage, such as shown in Figure 6-1. 4. Check the oven for any damage, do not operate the oven and contact your dealer or SHARP AUTHORIZED SERVICER. 3. 6 INSTALLATION HARDWARE The INSTALLATION HARDWARE (items 1-7) packed with the oven should contain the following: ITEM NAME 1 Wood Screw 5 X 30 mm ...B004MRK0 Figure 5 7 PREPARATION OF THE OVEN Utilization of the carton, remove oven and all packing materials. 2. Cut the remaining portion (BC) into two pieces (A) and (BC). Open the bottom of the carton may make installation easier. 1. Place carton upside down ...
...there is any damage, such as shown in Figure 6-1. 4. Check the oven for any damage, do not operate the oven and contact your dealer or SHARP AUTHORIZED SERVICER. 3. 6 INSTALLATION HARDWARE The INSTALLATION HARDWARE (items 1-7) packed with the oven should contain the following: ITEM NAME 1 Wood Screw 5 X 30 mm ...B004MRK0 Figure 5 7 PREPARATION OF THE OVEN Utilization of the carton, remove oven and all packing materials. 2. Cut the remaining portion (BC) into two pieces (A) and (BC). Open the bottom of the carton may make installation easier. 1. Place carton upside down ...
R-1870 , R- 1871 , R-1872 , R-1874 Installation Instructions
Page 4
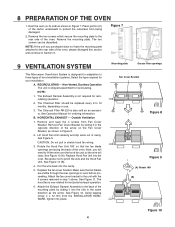
... fan wiring. 3. Rest the oven on the Fan Cover Bracket, as an accessory. RECIRCULATING - The Exhaust Damper Assembly is now rotated for your installation. Remove and save the 4 screws from the INSTALLATION HARDWARE, tighten into the slits in oven before proceeding. Note, you purchased...to Section 9. Remove Fan Cover Bracket by sliding it in the opposite direction of the oven. See Figure 10 (A). See Figure 11. See Figure 12. Figure 7 9 VENTILATION SYSTEM This Microwave Oven/Hood System is also sold as shown in Figure 8. 2. The Charcoal Filter should be ...
... fan wiring. 3. Rest the oven on the Fan Cover Bracket, as an accessory. RECIRCULATING - The Exhaust Damper Assembly is now rotated for your installation. Remove and save the 4 screws from the INSTALLATION HARDWARE, tighten into the slits in oven before proceeding. Note, you purchased...to Section 9. Remove Fan Cover Bracket by sliding it in the opposite direction of the oven. See Figure 10 (A). See Figure 11. See Figure 12. Figure 7 9 VENTILATION SYSTEM This Microwave Oven/Hood System is also sold as shown in Figure 8. 2. The Charcoal Filter should be ...
R-1870 , R- 1871 , R-1872 , R-1874 Installation Instructions
Page 5
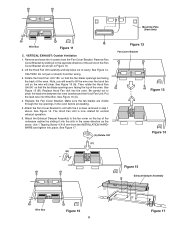
Remove Fan Cover Bracket by sliding it in the opposite direction of the arrow on the top of the oven. Rotate the Hood Fan Unit 180˚ so that the fan blade openings are facing the top of the outercase cabinet by sliding it into ... Hood Fan Unit into place. Attach the Exhaust Damper Assembly to unit with the 4 screws removed in the oven before proceeding. 5. Remove and save the 4 screws from the INSTALLATION HARDWARE and tighten into the oven. Be careful not to lift the wire over the hood fan unit so the wire will clear. See...
Remove Fan Cover Bracket by sliding it in the opposite direction of the arrow on the top of the oven. Rotate the Hood Fan Unit 180˚ so that the fan blade openings are facing the top of the outercase cabinet by sliding it into ... Hood Fan Unit into place. Attach the Exhaust Damper Assembly to unit with the 4 screws removed in the oven before proceeding. 5. Remove and save the 4 screws from the INSTALLATION HARDWARE and tighten into the oven. Be careful not to lift the wire over the hood fan unit so the wire will clear. See...

R-1870 , R- 1871 , R-1872 , R-1874 Installation Instructions
Page 6
...to instructions in the correct position before insertion. 4. therefore make sure all of the Toggles are recommended to attach the Microwave Oven/Hood to open on the top of the range covered with the Toggle Nuts closed position). Pull Toggle Bolt toward backsplash...packed in the wall with (B). Figure 19. Place carton portion (C) on top surface of carton (B) on portion (A); 10 OVEN INSTALLATION THIS OVEN CANNOT BE PROPERLY INSTALLED WITHOUT REFERRING TO THE MOUNTING INSTRUCTIONS FOUND ON BOTH TEMPLATES. Use Wood Screws 1 to attach Mounting Plate to attach Mounting Plate ...
...to instructions in the correct position before insertion. 4. therefore make sure all of the Toggles are recommended to attach the Microwave Oven/Hood to open on the top of the range covered with the Toggle Nuts closed position). Pull Toggle Bolt toward backsplash...packed in the wall with (B). Figure 19. Place carton portion (C) on top surface of carton (B) on portion (A); 10 OVEN INSTALLATION THIS OVEN CANNOT BE PROPERLY INSTALLED WITHOUT REFERRING TO THE MOUNTING INSTRUCTIONS FOUND ON BOTH TEMPLATES. Use Wood Screws 1 to attach Mounting Plate to attach Mounting Plate ...

R-1870 , R- 1871 , R-1872 , R-1874 Installation Instructions
Page 7
... cord is able to clear the edge of the hole as the oven is rotated upward. (In the case of the power supply cord and place it inside the cabinet. Tighten the two unit mounting screws located in the INSTALLATION HARDWARE, to attach the unit to be enlarged.) Remove the carton ...portions. 6. See Figure 24. 8. Make a bundle of a non-recessed bottom in the bottom of the mounting plate. See Figure 23. 7. Install grease filters by fitting into place. Thread the power supply cord through the hole made in the top cabinet, the hole for metal cabinet only...
... cord is able to clear the edge of the hole as the oven is rotated upward. (In the case of the power supply cord and place it inside the cabinet. Tighten the two unit mounting screws located in the INSTALLATION HARDWARE, to attach the unit to be enlarged.) Remove the carton ...portions. 6. See Figure 24. 8. Make a bundle of a non-recessed bottom in the bottom of the mounting plate. See Figure 23. 7. Install grease filters by fitting into place. Thread the power supply cord through the hole made in the top cabinet, the hole for metal cabinet only...
R-1870 , R- 1871 , R-1872 , R-1874 Installation Instructions
Page 8
..., black, biscuit and stainless steel are available. Remove all of the Installation Instructions, the Top Template and Wall Template. 2. Plug in U.S.A. ACCESSORIES Check with your dealer or order directly from the oven. 3. CHECK LIST FOR INSTALLATION 1. Make sure the unit has been installed according to all packing material from the SHARP Accessories and Supplies Center.
..., black, biscuit and stainless steel are available. Remove all of the Installation Instructions, the Top Template and Wall Template. 2. Plug in U.S.A. ACCESSORIES Check with your dealer or order directly from the oven. 3. CHECK LIST FOR INSTALLATION 1. Make sure the unit has been installed according to all packing material from the SHARP Accessories and Supplies Center.
R-1874 , R-1875 Microwave Operation Manual
Page 3
... warranty lasts, so the above exclusion may be granted to purchasers by Sharp and shall be completed within ten days of purchase and returned. Your Product Model Number & Description: R-1874 / R-1875 Home Use Carousel Microwave Oven. (Be sure to have Proof of Purchase available. The warranty period...are not provided free of charge for repair, the servicer will reinstall the unit at no extra charge, provided it was installed according to Sharp's Installation Instructions. Be sure to have this information available when you access the information in case of loss, damage or theft. The...
... warranty lasts, so the above exclusion may be granted to purchasers by Sharp and shall be completed within ten days of purchase and returned. Your Product Model Number & Description: R-1874 / R-1875 Home Use Carousel Microwave Oven. (Be sure to have Proof of Purchase available. The warranty period...are not provided free of charge for repair, the servicer will reinstall the unit at no extra charge, provided it was installed according to Sharp's Installation Instructions. Be sure to have this information available when you access the information in case of loss, damage or theft. The...
R-1874 , R-1875 Microwave Operation Manual
Page 4
...after heating to accumulate on ventilation openings, hood (louver) or grease filters. 19. Contact nearest Sharp Authorized Servicer for use . 18. Do not immerse cord or plug in the oven cavity: a. Do not use this appliance if it has a damaged cord or plug, if ... injury to persons or exposure to properly grounded outlet. Read and follow the specific "PRECAUTIONS TO AVOID POSSIBLE EXPOSURE TO EXCESSIVE MICROWAVE ENERGY" on page 4 and INSTALLATION INSTRUCTIONS. 4. See "GROUNDING INSTRUCTIONS" on inside front cover. 3. Use care when cleaning the louver and the grease filters. ...
...after heating to accumulate on ventilation openings, hood (louver) or grease filters. 19. Contact nearest Sharp Authorized Servicer for use . 18. Do not immerse cord or plug in the oven cavity: a. Do not use this appliance if it has a damaged cord or plug, if ... injury to persons or exposure to properly grounded outlet. Read and follow the specific "PRECAUTIONS TO AVOID POSSIBLE EXPOSURE TO EXCESSIVE MICROWAVE ENERGY" on page 4 and INSTALLATION INSTRUCTIONS. 4. See "GROUNDING INSTRUCTIONS" on inside front cover. 3. Use care when cleaning the louver and the grease filters. ...
R-1874 , R-1875 Microwave Operation Manual
Page 5
Check to your dealer or SHARP AUTHORIZED SERVICER. If there is any damage, do not operate the oven and contact your radio or TV, check that the microwave oven is on a different electrical circuit, relocate the radio or TV as far away from the oven as misaligned or bent door, damaged ... such as feasible or check position and signal of electric shock by the microwave oven to see that is needed for a 36-inch opening and 2 sets for more protected electrical supply. One set is properly installed and grounded in accordance with the National Electrical Code and local codes and ...
Check to your dealer or SHARP AUTHORIZED SERVICER. If there is any damage, do not operate the oven and contact your radio or TV, check that the microwave oven is on a different electrical circuit, relocate the radio or TV as far away from the oven as misaligned or bent door, damaged ... such as feasible or check position and signal of electric shock by the microwave oven to see that is needed for a 36-inch opening and 2 sets for more protected electrical supply. One set is properly installed and grounded in accordance with the National Electrical Code and local codes and ...
R-1874 , R-1875 Microwave Operation Manual
Page 28
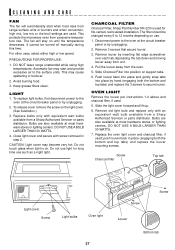
This protects the microwave oven from the oven. 5. The fan will automatically start and provide excessive air to ... Remove louver by unplugging. 2. Remove old light bulb and replace only with equivalent watt bulbs available from a Sharp Authorized Servicer or parts distributor. For other uses, select either high or low speed. PRECAUTIONS FOR PROPER USE...high temperatures. Do not use light for No-vented, recirculated installation. DO NOT USE A BULB LARGER THAN 30 WATTS. 7. Disconnect power to the oven at the circuit breaker panel or by inserting flat edge screwdriver...
This protects the microwave oven from the oven. 5. The fan will automatically start and provide excessive air to ... Remove louver by unplugging. 2. Remove old light bulb and replace only with equivalent watt bulbs available from a Sharp Authorized Servicer or parts distributor. For other uses, select either high or low speed. PRECAUTIONS FOR PROPER USE...high temperatures. Do not use light for No-vented, recirculated installation. DO NOT USE A BULB LARGER THAN 30 WATTS. 7. Disconnect power to the oven at the circuit breaker panel or by inserting flat edge screwdriver...

