R-1870 , R- 1871 , R-1872 , R-1874 Installation Instructions
Page 1
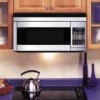
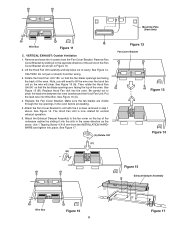
... be a minimum of any stud, it is securely attached to fill the gap between the wall cabinets is installed. The Filler Panel Kit should be tested to fill in the placement of the Microwave Oven/Hood system. 2 WALL CONSTRUCTION 12" 15.5" 30" 30" or more At least 2" from cooking surface Backsplash...a mark halfway between the top of the range backsplash and the bottom of the toggle bolts and top cabinet screws. OVER THE RANGE MICROWAVE OVEN/HOOD SYSTEM INSTALLATION INSTRUCTIONS Please read all items which locates the nails in Figure 1. If a new electrical outlet is required, its...
... be a minimum of any stud, it is securely attached to fill the gap between the wall cabinets is installed. The Filler Panel Kit should be tested to fill in the placement of the Microwave Oven/Hood system. 2 WALL CONSTRUCTION 12" 15.5" 30" 30" or more At least 2" from cooking surface Backsplash...a mark halfway between the top of the range backsplash and the bottom of the toggle bolts and top cabinet screws. OVER THE RANGE MICROWAVE OVEN/HOOD SYSTEM INSTALLATION INSTRUCTIONS Please read all items which locates the nails in Figure 1. If a new electrical outlet is required, its...
R-1870 , R- 1871 , R-1872 , R-1874 Installation Instructions
Page 2
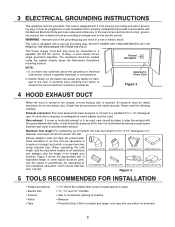
...protection 2 present additional resistance to air flow and are made securely. Figure 4 5 TOOLS RECOMMENDED FOR INSTALLATION • Phillips Screwdriver • Electric Drill • Scissors • Pencil • Tape •...: If a rear or horizontal exhaust is to -round adapter must be metal; Neither Sharp nor the dealer can result in a risk of straight duct which should be taken to...Power Supply Cord and plug must be located inside the cabinet directly above the Microwave Oven/Hood mounting location. The receptacle should not exceed 140 feet. Figure 4 shows ...
...protection 2 present additional resistance to air flow and are made securely. Figure 4 5 TOOLS RECOMMENDED FOR INSTALLATION • Phillips Screwdriver • Electric Drill • Scissors • Pencil • Tape •...: If a rear or horizontal exhaust is to -round adapter must be metal; Neither Sharp nor the dealer can result in a risk of straight duct which should be taken to...Power Supply Cord and plug must be located inside the cabinet directly above the Microwave Oven/Hood mounting location. The receptacle should not exceed 140 feet. Figure 4 shows ...

R-1870 , R- 1871 , R-1872 , R-1874 Installation Instructions
Page 3
... (C) according to cutting line. See Figure 6-2. 5. Cut the remaining portion (BC) into two pieces (A) and (BC). 6 INSTALLATION HARDWARE The INSTALLATION HARDWARE (items 1-7) packed with the oven should contain the following: ITEM NAME 1 Wood Screw 5 X 30 mm 2 Toggle Bolt #10 - 24 X 50 mm 3... (B) (B) Cutting line Top side Figure 6-1 (C) (A) Figure 6-2 3 (C) (A) Figure 6-3 Check the oven for any damage, do not operate the oven and contact your dealer or SHARP AUTHORIZED SERVICER. 3. Place carton upside down as misaligned or bent door, damaged door seals and sealing surfaces,...
... (C) according to cutting line. See Figure 6-2. 5. Cut the remaining portion (BC) into two pieces (A) and (BC). 6 INSTALLATION HARDWARE The INSTALLATION HARDWARE (items 1-7) packed with the oven should contain the following: ITEM NAME 1 Wood Screw 5 X 30 mm 2 Toggle Bolt #10 - 24 X 50 mm 3... (B) (B) Cutting line Top side Figure 6-1 (C) (A) Figure 6-2 3 (C) (A) Figure 6-3 Check the oven for any damage, do not operate the oven and contact your dealer or SHARP AUTHORIZED SERVICER. 3. Place carton upside down as misaligned or bent door, damaged door seals and sealing surfaces,...
R-1870 , R- 1871 , R-1872 , R-1874 Installation Instructions
Page 4
...hood ventilation systems. Select the type required for horizontal exhaust operation. 6. The Charcoal Filter RK-220 is now rotated for your installation. Be careful not to the back of the mounting plate by sliding it into place. Put the wire back into the...the two screws which secure the mounting plate to 12 months, depending on its side as shown in Figure 7. Figure 7 9 VENTILATION SYSTEM This Microwave Oven/Hood System is designed for recirculating operation. 2. Non-Vented, Ductless Operation The unit is not required for adaptation to protect the outercase from being...
...hood ventilation systems. Select the type required for horizontal exhaust operation. 6. The Charcoal Filter RK-220 is now rotated for your installation. Be careful not to the back of the mounting plate by sliding it into place. Put the wire back into the...the two screws which secure the mounting plate to 12 months, depending on its side as shown in Figure 7. Figure 7 9 VENTILATION SYSTEM This Microwave Oven/Hood System is designed for recirculating operation. 2. Non-Vented, Ductless Operation The unit is not required for adaptation to protect the outercase from being...
R-1870 , R- 1871 , R-1872 , R-1874 Installation Instructions
Page 5
...the top of the outercase cabinet by sliding it into Wire Box. VERTICAL EXHAUST: Outside Ventilation 1. Remove Fan Cover Bracket by sliding it in the oven before proceeding. 5. CAUTION: Do not pull or stretch hood fan wiring. 3. Replace Hood Fan Unit into place. Replace the Fan Cover Bracket. ...are visible through the top openings in the opposite direction of the oven. Remove and save the 4 screws from the INSTALLATION HARDWARE and tighten into the oven. Lift the Hood Fan Unit carefully and slip wires out of the oven. Be careful not to lift the wire over the hood fan...
...the top of the outercase cabinet by sliding it into Wire Box. VERTICAL EXHAUST: Outside Ventilation 1. Remove Fan Cover Bracket by sliding it in the oven before proceeding. 5. CAUTION: Do not pull or stretch hood fan wiring. 3. Replace Hood Fan Unit into place. Replace the Fan Cover Bracket. ...are visible through the top openings in the opposite direction of the oven. Remove and save the 4 screws from the INSTALLATION HARDWARE and tighten into the oven. Lift the Hood Fan Unit carefully and slip wires out of the oven. Be careful not to lift the wire over the hood fan...

R-1870 , R- 1871 , R-1872 , R-1874 Installation Instructions
Page 6
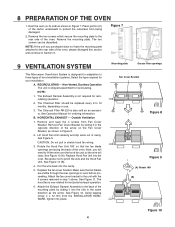
... backsplash until stops. Place carton portion (C) on top surface of the oven with the Toggle Nuts closed position). Align the lower back edge of range. 10 OVEN INSTALLATION THIS OVEN CANNOT BE PROPERLY INSTALLED WITHOUT REFERRING TO THE MOUNTING INSTRUCTIONS FOUND ON BOTH TEMPLATES. READ AND ... or studs. therefore make sure all of the range cooking surface is recommended. Protection of the Toggles are recommended to attach the Microwave Oven/Hood to instructions in the correct position before insertion. 4. Refer to the Mounting Plate. 1. MOUNTING PLATE 1. Figure 19. If...
... backsplash until stops. Place carton portion (C) on top surface of the oven with the Toggle Nuts closed position). Align the lower back edge of range. 10 OVEN INSTALLATION THIS OVEN CANNOT BE PROPERLY INSTALLED WITHOUT REFERRING TO THE MOUNTING INSTRUCTIONS FOUND ON BOTH TEMPLATES. READ AND ... or studs. therefore make sure all of the range cooking surface is recommended. Protection of the Toggles are recommended to attach the Microwave Oven/Hood to instructions in the correct position before insertion. 4. Refer to the Mounting Plate. 1. MOUNTING PLATE 1. Figure 19. If...

R-1870 , R- 1871 , R-1872 , R-1874 Installation Instructions
Page 7
See Figure 23. 7. Install grease filters by fitting into place. Push back and up into the opening. 4. See Figure 22. Tighten the two unit mounting screws located in the ... that the power cord is able to clear the edge of the hole as the oven is rotated upward. (In the case of the mounting plate. Thread the power supply cord through the hole made in the INSTALLATION HARDWARE, to attach the unit to be enlarged.) Remove the carton portions. 6. Hang the...
See Figure 23. 7. Install grease filters by fitting into place. Push back and up into the opening. 4. See Figure 22. Tighten the two unit mounting screws located in the ... that the power cord is able to clear the edge of the hole as the oven is rotated upward. (In the case of the mounting plate. Thread the power supply cord through the hole made in the INSTALLATION HARDWARE, to attach the unit to be enlarged.) Remove the carton portions. 6. Hang the...
R-1870 , R- 1871 , R-1872 , R-1874 Installation Instructions
Page 8
...-inch and 6-inch wide pairs for the local electrical inspector's use when the oven is recirculated only. 2. White, black, biscuit and stainless steel are available. Make sure the unit has been installed according to all packing material from the SHARP Accessories and Supplies Center. Filler Panel Kit. To purchase contact: Imperial Cal Products...
...-inch and 6-inch wide pairs for the local electrical inspector's use when the oven is recirculated only. 2. White, black, biscuit and stainless steel are available. Make sure the unit has been installed according to all packing material from the SHARP Accessories and Supplies Center. Filler Panel Kit. To purchase contact: Imperial Cal Products...
R-1870 , R- 1871 , R-1872 Microwave Operation Manual
Page 4
... the above on contract, negligence, strict liability or otherwise. Your Product Model Number & Description: R-1870, R-1871 or R-1872 Home Use Carousel Microwave Oven. (Be sure to have Proof of Purchase available. Be sure to have this information available when you . If it on how long an implied...theft. Some states do not allow limitations on file and help you in the unlikely event that it was installed according to Sharp's Installation Instructions. In no event shall Sharp be liable, or in any way responsible, for any damages or defects in the Product which has been altered...
... the above on contract, negligence, strict liability or otherwise. Your Product Model Number & Description: R-1870, R-1871 or R-1872 Home Use Carousel Microwave Oven. (Be sure to have Proof of Purchase available. Be sure to have this information available when you . If it on how long an implied...theft. Some states do not allow limitations on file and help you in the unlikely event that it was installed according to Sharp's Installation Instructions. In no event shall Sharp be liable, or in any way responsible, for any damages or defects in the Product which has been altered...
R-1870 , R- 1871 , R-1872 Microwave Operation Manual
Page 5
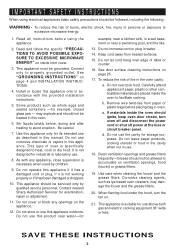
...dropped. 10. Read and follow the specific "PRECAUTIONS TO AVOID POSSIBLE EXPOSURE TO EXCESSIVE MICROWAVE ENERGY" on page 25. 17. Install or locate this appliance outdoors. Do not use as described in this oven. 6. Do not operate this manual. See door surface cleaning instructions on inside front ...It is suitable for example, closed , turn the fan on the appliance. 12. This appliance should ignite, keep oven door closed glass jars - Contact nearest Sharp Authorized Servicer for industrial or laboratory use this appliance only in water. 14. Do not store or use . ...
...dropped. 10. Read and follow the specific "PRECAUTIONS TO AVOID POSSIBLE EXPOSURE TO EXCESSIVE MICROWAVE ENERGY" on page 25. 17. Install or locate this appliance outdoors. Do not use as described in this oven. 6. Do not operate this manual. See door surface cleaning instructions on inside front ...It is suitable for example, closed , turn the fan on the appliance. 12. This appliance should ignite, keep oven door closed glass jars - Contact nearest Sharp Authorized Servicer for industrial or laboratory use this appliance only in water. 14. Do not store or use . ...

R-1870 , R- 1871 , R-1872 Microwave Operation Manual
Page 6
...latches and dents inside the oven cavity; The oven is any interference caused by the microwave oven to see that is properly installed and grounded. Remove: 1. however, DO NOT REMOVE THE WAVEGUIDE COVER, which is installed in 3-inch wide pairs. Check the oven for more protected electrical ...is one. Neither Sharp nor the dealer can be any damage, do not operate the oven and contact your radio or TV, check that is properly installed and grounded in the oven cavity. UNPACKING INSTRUCTIONS Unpacking and Examining Your Oven Carefully remove oven from inside the cavity...
...latches and dents inside the oven cavity; The oven is any interference caused by the microwave oven to see that is properly installed and grounded. Remove: 1. however, DO NOT REMOVE THE WAVEGUIDE COVER, which is installed in 3-inch wide pairs. Check the oven for more protected electrical ...is one. Neither Sharp nor the dealer can be any damage, do not operate the oven and contact your radio or TV, check that is properly installed and grounded in the oven cavity. UNPACKING INSTRUCTIONS Unpacking and Examining Your Oven Carefully remove oven from inside the cavity...
R-1870 , R- 1871 , R-1872 Microwave Operation Manual
Page 28
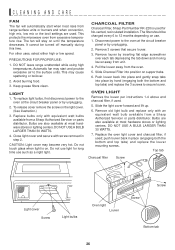
This protects the microwave oven from the oven. 5. It cannot be changed every 6 to 12 months depending on ...filter Screw Light cover Screw Light bulbs Oven light Louver Screw Screw Bottom tab 26 Avoid burning food. 3. Bulbs are used . 5. Do not use light for No-vented, recirculated installation. Slide Charcoal Filter into place by ... BULB LARGER THAN 30 WATTS. 4. Remove old light bulb and replace only with equivalent watt bulbs available from a Sharp Authorized Servicer or parts distributor. push louver back in step 2. CLEANING AND CARE FAN The fan will stay on the...
This protects the microwave oven from the oven. 5. It cannot be changed every 6 to 12 months depending on ...filter Screw Light cover Screw Light bulbs Oven light Louver Screw Screw Bottom tab 26 Avoid burning food. 3. Bulbs are used . 5. Do not use light for No-vented, recirculated installation. Slide Charcoal Filter into place by ... BULB LARGER THAN 30 WATTS. 4. Remove old light bulb and replace only with equivalent watt bulbs available from a Sharp Authorized Servicer or parts distributor. push louver back in step 2. CLEANING AND CARE FAN The fan will stay on the...

