R-1514 , R-1520LK/LW Operation Manual
Page 2
... SERVICER TELEPHONE TO PHONE: DIAL 1-800-BE-SHARP ( 237-4277 ) for : SERVICE (for your nearest Sharp Authorized Servicer) PARTS (for your authorized parts distributor) ADDITIONAL CUSTOMER INFORMATION DIAL 1-800-642-2122 for future reference. It is important not to microwave energy. PRECAUTIONS TO AVOID POSSIBLE EXPOSURE TO EXCESSIVE MICROWAVE ENERGY (a) Do not attempt to operate this...
... SERVICER TELEPHONE TO PHONE: DIAL 1-800-BE-SHARP ( 237-4277 ) for : SERVICE (for your nearest Sharp Authorized Servicer) PARTS (for your authorized parts distributor) ADDITIONAL CUSTOMER INFORMATION DIAL 1-800-642-2122 for future reference. It is important not to microwave energy. PRECAUTIONS TO AVOID POSSIBLE EXPOSURE TO EXCESSIVE MICROWAVE ENERGY (a) Do not attempt to operate this...
R-1514 , R-1520LK/LW Operation Manual
Page 3
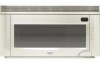
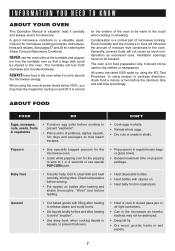
...Information You Need to Know 7-9 About Your Oven 7 About Food 7 About Utensils And Coverings 8 Do Not Use 8 About Children And The Microwave .......... 8 About Microwave Cooking 9 About Safety 9 Part Names 10 Before Operating 12 To Set the Clock 12 STOP/CLEAR 12 Manual Operation 13 Time Cooking 13 To Set Power Level... 22 More or Less Time Adjustment 22 Minute Plus 22 Light Hi/lo 22 Fan Hi/lo 22 Cleaning And Care 23 Replacing Parts 24 Service Call Check 25 Specifications 25 Vegetable Cooking Chart 26-27 Cookbook Information 27 Cookbook Order Form 28 Reheating Chart...
...Information You Need to Know 7-9 About Your Oven 7 About Food 7 About Utensils And Coverings 8 Do Not Use 8 About Children And The Microwave .......... 8 About Microwave Cooking 9 About Safety 9 Part Names 10 Before Operating 12 To Set the Clock 12 STOP/CLEAR 12 Manual Operation 13 Time Cooking 13 To Set Power Level... 22 More or Less Time Adjustment 22 Minute Plus 22 Light Hi/lo 22 Fan Hi/lo 22 Cleaning And Care 23 Replacing Parts 24 Service Call Check 25 Specifications 25 Vegetable Cooking Chart 26-27 Cookbook Information 27 Cookbook Order Form 28 Reheating Chart...
R-1514 , R-1520LK/LW Operation Manual
Page 4
... and returned. Some states do not allow the exclusion of the nearest Sharp Authorized Servicer, call Sharp toll free at 1-800-BE-SHARP (1-800-237-4277). Your Product Model Number & Description: R-1520L or R-1514 Home Use Carousel™ Microwave Oven. (Be sure to have Proof of purchase to the servicer.... been altered or modified in design or construction. Correction of defects, in the manner and for this Product: One (1) year parts and labor in-home service. THIS WARRANTY GIVES YOU SPECIFIC LEGAL RIGHTS. Be sure to have this information available when you need service for...
... and returned. Some states do not allow the exclusion of the nearest Sharp Authorized Servicer, call Sharp toll free at 1-800-BE-SHARP (1-800-237-4277). Your Product Model Number & Description: R-1520L or R-1514 Home Use Carousel™ Microwave Oven. (Be sure to have Proof of purchase to the servicer.... been altered or modified in design or construction. Correction of defects, in the manner and for this Product: One (1) year parts and labor in-home service. THIS WARRANTY GIVES YOU SPECIFIC LEGAL RIGHTS. Be sure to have this information available when you need service for...
R-1514 , R-1520LK/LW Operation Manual
Page 7
... the oven at power levels below 100%, you may not be blocked. The turntable will in the microwave as uncovered ones. ALWAYS have food in the oven. The oven is a normal part of moisture that condenses in the oven when it for food preparation only. Room humidity and the moisture... is normal for the popping to slow to small dish and heat carefully, stirring often. Check it for ordering the Sharp Carousel Microwave Cookbook. When using the IEC Test Procedure. It is a valuable asset. Generally, covered foods will not cause as much condensation as harmful bacteria may...
... the oven at power levels below 100%, you may not be blocked. The turntable will in the microwave as uncovered ones. ALWAYS have food in the oven. The oven is a normal part of moisture that condenses in the oven when it for food preparation only. Room humidity and the moisture... is normal for the popping to slow to small dish and heat carefully, stirring often. Check it for ordering the Sharp Carousel Microwave Cookbook. When using the IEC Test Procedure. It is a valuable asset. Generally, covered foods will not cause as much condensation as harmful bacteria may...
R-1514 , R-1520LK/LW Operation Manual
Page 10
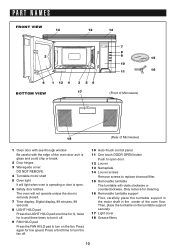
PART NAMES FRONT VIEW 14 12 14 2 6 1 13 4 BOTTOM VIEW 3 56 17 7 8 9 15 10 11 16 (Front of Microwave) 18 (Rear of Microwave) 1 Oven door with see-through window Be careful with the edge of the oven floor. Only remove for cleaning. 16 Removable turntable support First, ...
PART NAMES FRONT VIEW 14 12 14 2 6 1 13 4 BOTTOM VIEW 3 56 17 7 8 9 15 10 11 16 (Front of Microwave) 18 (Rear of Microwave) 1 Oven door with see-through window Be careful with the edge of the oven floor. Only remove for cleaning. 16 Removable turntable support First, ...

R-1514 , R-1520LK/LW Operation Manual
Page 11
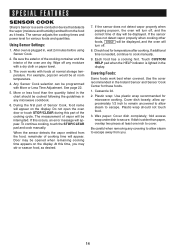
PART NAMES CONTROL PANEL Words in the lower portion of the display will light to indicate what function is in progress. 20 20 21 15 22 16 22 12 18 22 19 22 13 12 Number next to the control panel illustration indicates pages on which there are feature descriptions and usage information. 11
PART NAMES CONTROL PANEL Words in the lower portion of the display will light to indicate what function is in progress. 20 20 21 15 22 16 22 12 18 22 19 22 13 12 Number next to the control panel illustration indicates pages on which there are feature descriptions and usage information. 11
R-1514 , R-1520LK/LW Operation Manual
Page 14
...Instant Sensor and Sensor Cook Center for temperature after cooking. The sensor adjusts the cooking times and power level for microwave cooking. During the first part of cooking time will appear on the display. If this time, you . 14 At this occurs, an error... food than paper, overlap two pieces at room temperature. 4. Be careful when removing any microwave cookbook. 6. To continue cooking, touch the STOP/CLEAR pad and cook manually. SPECIAL FEATURES SENSOR COOK Sharp's Sensor is a semi-conductor device that detects the vapor (moisture and humidity) emitted from...
...Instant Sensor and Sensor Cook Center for temperature after cooking. The sensor adjusts the cooking times and power level for microwave cooking. During the first part of cooking time will appear on the display. If this time, you . 14 At this occurs, an error... food than paper, overlap two pieces at room temperature. 4. Be careful when removing any microwave cookbook. 6. To continue cooking, touch the STOP/CLEAR pad and cook manually. SPECIAL FEATURES SENSOR COOK Sharp's Sensor is a semi-conductor device that detects the vapor (moisture and humidity) emitted from...
R-1514 , R-1520LK/LW Operation Manual
Page 23
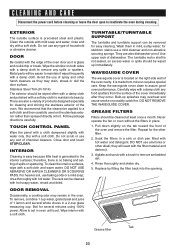
... a mild soap; Agitate and scrub with a damp cloth. Tab Grease filter 23 Do not use of 1 lemon and several minutes using 100% power. Metal parts will react with the edge of chemical cleaners. Keep the waveguide cover clean to inactivate the oven during cleaning. therefore, there is located on both...
... a mild soap; Agitate and scrub with a damp cloth. Tab Grease filter 23 Do not use of 1 lemon and several minutes using 100% power. Metal parts will react with the edge of chemical cleaners. Keep the waveguide cover clean to inactivate the oven during cleaning. therefore, there is located on both...
R-1514 , R-1520LK/LW Operation Manual
Page 24
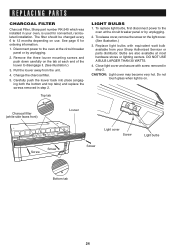
... circuit breaker panel or by unplugging. 2. Do not touch glass when light is used for ordering information. 1. REPLACING PARTS CHARCOAL FILTER Charcoal Filter, Sharp part number RK-240 which was installed in your Sharp Authorized Servicer or parts distributor. Replace light bulbs with screw removed in step 2. See page 6 for nonvented, recirculated installation. Close light...
... circuit breaker panel or by unplugging. 2. Do not touch glass when light is used for ordering information. 1. REPLACING PARTS CHARCOAL FILTER Charcoal Filter, Sharp part number RK-240 which was installed in your Sharp Authorized Servicer or parts distributor. Replace light bulbs with screw removed in step 2. See page 6 for nonvented, recirculated installation. Close light...


