
R-1405 , R-1406 Microwave Operation Manual
Page 2
...SHARP ( 237-4277 ) for : SERVICE (for your nearest Sharp Authorized Servicer) PARTS (for your authorized parts distributor) ADDITIONAL CUSTOMER INFORMATION ACCESSORIES and COOKBOOK TO WRITE: Sharp...door open since open-door operation can result in harmful exposure to microwave energy. PRECAUTIONS TO AVOID POSSIBLE EXPOSURE TO EXCESSIVE MICROWAVE ENERGY (a) Do not attempt to operate this microwave...important that the oven door close properly and that there is no damage to the: (1) door (bent), (2) hinges and latches (broken or loosened), (3) door seals and sealing ...
...SHARP ( 237-4277 ) for : SERVICE (for your nearest Sharp Authorized Servicer) PARTS (for your authorized parts distributor) ADDITIONAL CUSTOMER INFORMATION ACCESSORIES and COOKBOOK TO WRITE: Sharp...door open since open-door operation can result in harmful exposure to microwave energy. PRECAUTIONS TO AVOID POSSIBLE EXPOSURE TO EXCESSIVE MICROWAVE ENERGY (a) Do not attempt to operate this microwave...important that the oven door close properly and that there is no damage to the: (1) door (bent), (2) hinges and latches (broken or loosened), (3) door seals and sealing ...
R-1405 , R-1406 Microwave Operation Manual
Page 6
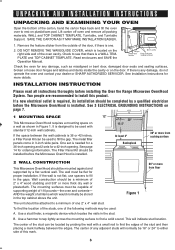
... side wall of the oven cavity. Check the oven for any damage, do not operate the oven and contact your dealer or SHARP AUTHORIZED SERVICER. Two people are recommended to find the edges of 110 pounds-the oven and contents- The metal filler panels come ...door hinges and latches and dents inside the cavity or on a wall as shown in the gaps. If there is one of this product. INSTALLATION INSTRUCTION Please read all packing materials, WALL and TOP CABINET TEMPLATE, Turntable, and Turntable Support. See 3 ELECTRICAL GROUNDING INSTRUCTIONS on page 7. 1 MOUNTING SPACE This Microwave...
... side wall of the oven cavity. Check the oven for any damage, do not operate the oven and contact your dealer or SHARP AUTHORIZED SERVICER. Two people are recommended to find the edges of 110 pounds-the oven and contents- The metal filler panels come ...door hinges and latches and dents inside the cavity or on a wall as shown in the gaps. If there is one of this product. INSTALLATION INSTRUCTION Please read all packing materials, WALL and TOP CABINET TEMPLATE, Turntable, and Turntable Support. See 3 ELECTRICAL GROUNDING INSTRUCTIONS on page 7. 1 MOUNTING SPACE This Microwave...
R-1405 , R-1406 Microwave Operation Manual
Page 17
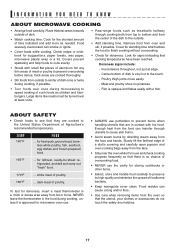
... NEED TO KNOW ABOUT MICROWAVE COOKING • Arrange food carefully. Cook for doneness, insert a meat thermometer in contact with hot food. Cover for standing time which allows the food to prevent burns when handling utensils that the utensil, your clothes or accessories do not touch the safety door latches. 17 white meat of...
... NEED TO KNOW ABOUT MICROWAVE COOKING • Arrange food carefully. Cook for doneness, insert a meat thermometer in contact with hot food. Cover for standing time which allows the food to prevent burns when handling utensils that the utensil, your clothes or accessories do not touch the safety door latches. 17 white meat of...
R-1405 , R-1406 Microwave Operation Manual
Page 18
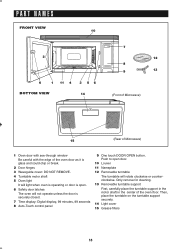
...Removable turntable support First, carefully place the turntable support in the motor shaft in the center of the oven door as it is glass and could chip or break. 2 Door hinges 3 Waveguide cover: DO NOT REMOVE. 4 Turntable motor shaft 5 Oven light It will light when ... The turntable will not operate unless the door is open. 6 Safety door latches The oven will rotate clockwise or counter- clockwise. PART NAMES FRONT VIEW 10 2 6 1 11 4 3 56 BOTTOM VIEW 14 7 12 8 9 13 (Front of Microwave) 15 (Rear of Microwave) 1 Oven door with see-through window Be careful with...
...Removable turntable support First, carefully place the turntable support in the motor shaft in the center of the oven door as it is glass and could chip or break. 2 Door hinges 3 Waveguide cover: DO NOT REMOVE. 4 Turntable motor shaft 5 Oven light It will light when ... The turntable will not operate unless the door is open. 6 Safety door latches The oven will rotate clockwise or counter- clockwise. PART NAMES FRONT VIEW 10 2 6 1 11 4 3 56 BOTTOM VIEW 14 7 12 8 9 13 (Front of Microwave) 15 (Rear of Microwave) 1 Oven door with see-through window Be careful with...

