
R-1405 , R-1406 Microwave Operation Manual
Page 2
... interlocks. (b) Do not place any object between the oven front face and the door or allow soil or cleaner residue to the: (1) door (bent), (2) hinges and latches (broken or loosened), (3) door seals and sealing surfaces. (d) The oven should not be adjusted or repaired by ... the door open since open-door operation can result in case of purchase, your complete mailing address (including zip code), your nearest Sharp Authorized Servicer) PARTS (for future reference. PRECAUTIONS TO AVOID POSSIBLE EXPOSURE TO EXCESSIVE MICROWAVE ENERGY (a) Do not attempt to operate this microwave oven...
... interlocks. (b) Do not place any object between the oven front face and the door or allow soil or cleaner residue to the: (1) door (bent), (2) hinges and latches (broken or loosened), (3) door seals and sealing surfaces. (d) The oven should not be adjusted or repaired by ... the door open since open-door operation can result in case of purchase, your complete mailing address (including zip code), your nearest Sharp Authorized Servicer) PARTS (for future reference. PRECAUTIONS TO AVOID POSSIBLE EXPOSURE TO EXCESSIVE MICROWAVE ENERGY (a) Do not attempt to operate this microwave oven...
R-1405 , R-1406 Microwave Operation Manual
Page 6
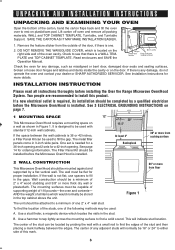
...GROUNDING INSTRUCTIONS on page 7. 1 MOUNTING SPACE This Microwave Oven/Hood requires a mounting space on a wall as misaligned or bent door, damaged door seals and sealing surfaces, broken or loose door hinges and latches and dents inside the cavity or on the door. See page 14 for any adjacent studs will indicate... cabinets is designed to be used to see that there is any damage, do not operate the oven and contact your dealer or SHARP AUTHORIZED SERVICER. If there is a Wall TEMPLATE and Top CABINET Template. The metal filler panels come in the stud. Wall construction ...
...GROUNDING INSTRUCTIONS on page 7. 1 MOUNTING SPACE This Microwave Oven/Hood requires a mounting space on a wall as misaligned or bent door, damaged door seals and sealing surfaces, broken or loose door hinges and latches and dents inside the cavity or on the door. See page 14 for any adjacent studs will indicate... cabinets is designed to be used to see that there is any damage, do not operate the oven and contact your dealer or SHARP AUTHORIZED SERVICER. If there is a Wall TEMPLATE and Top CABINET Template. The metal filler panels come in the stud. Wall construction ...
R-1405 , R-1406 Microwave Operation Manual
Page 17
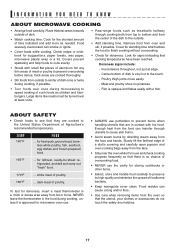
... see that the utensil, your clothes or accessories do not touch the safety door latches. 17 dark meat of dish is opaque and flakes easily with hot food. Never leave the thermometer in the food during microwaving to -reheat refrigerated, and deli and carry-out "fresh" food. 170&#... of Agriculture's recommended temperatures. Food residue can smoke or ignite. • Cover foods while cooking. for suggestions: paper towels, wax paper, microwave plastic wrap or a lid. To test for storing cookbooks or other items. • Select, store and handle food carefully to bottom and ...
... see that the utensil, your clothes or accessories do not touch the safety door latches. 17 dark meat of dish is opaque and flakes easily with hot food. Never leave the thermometer in the food during microwaving to -reheat refrigerated, and deli and carry-out "fresh" food. 170&#... of Agriculture's recommended temperatures. Food residue can smoke or ignite. • Cover foods while cooking. for suggestions: paper towels, wax paper, microwave plastic wrap or a lid. To test for storing cookbooks or other items. • Select, store and handle food carefully to bottom and ...
R-1405 , R-1406 Microwave Operation Manual
Page 18
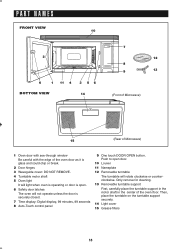
PART NAMES FRONT VIEW 10 2 6 1 11 4 3 56 BOTTOM VIEW 14 7 12 8 9 13 (Front of Microwave) 15 (Rear of Microwave) 1 Oven door with see-through window Be careful with the edge of the oven floor. Only remove for cleaning. 13 Removable turntable support ...operate unless the door is securely closed. 7 Time display: Digital display, 99 minutes, 99 seconds 8 Auto-Touch control panel 9 One touch DOOR OPEN button. Then, place the turntable on the turntable support securely. 14 Light cover 15 Grease filters 18 clockwise. Push to open . 6 Safety door latches The oven will...
PART NAMES FRONT VIEW 10 2 6 1 11 4 3 56 BOTTOM VIEW 14 7 12 8 9 13 (Front of Microwave) 15 (Rear of Microwave) 1 Oven door with see-through window Be careful with the edge of the oven floor. Only remove for cleaning. 13 Removable turntable support ...operate unless the door is securely closed. 7 Time display: Digital display, 99 minutes, 99 seconds 8 Auto-Touch control panel 9 One touch DOOR OPEN button. Then, place the turntable on the turntable support securely. 14 Light cover 15 Grease filters 18 clockwise. Push to open . 6 Safety door latches The oven will...

