Operation Manual
Page 2
... door open since open-door operation can result in reporting this oven with the safety interlocks. (b) Do not place any object between the oven front face and the door or allow soil or cleaner residue to accumulate on the unit. MODEL NUMBER SERIAL NUMBER DATE OF PURCHASE DEALER TELEPHONE SERVICER TELEPHONE TO PHONE: DIAL 1-800-BE-SHARP ( 237-4277 ) for : SERVICE (for your nearest Sharp Authorized Servicer) PARTS...
... door open since open-door operation can result in reporting this oven with the safety interlocks. (b) Do not place any object between the oven front face and the door or allow soil or cleaner residue to accumulate on the unit. MODEL NUMBER SERIAL NUMBER DATE OF PURCHASE DEALER TELEPHONE SERVICER TELEPHONE TO PHONE: DIAL 1-800-BE-SHARP ( 237-4277 ) for : SERVICE (for your nearest Sharp Authorized Servicer) PARTS...
Operation Manual
Page 3
... subjected to improper voltage or other misuse, abnormal service or handling, or which were caused by repairs or attempted repairs performed by law. Some states do not allow the exclusion of purchase to the servicer. Your Product Model Number & Description: R-409Y Home Use Carousel Microwave Oven. (Be sure to have Proof of Sharp. The warranty period continues for an additional four (4) years, for...
... subjected to improper voltage or other misuse, abnormal service or handling, or which were caused by repairs or attempted repairs performed by law. Some states do not allow the exclusion of purchase to the servicer. Your Product Model Number & Description: R-409Y Home Use Carousel Microwave Oven. (Be sure to have Proof of Sharp. The warranty period continues for an additional four (4) years, for...
Operation Manual
Page 4
.... b) Remove wire twist-ties from the microwave oven is not working properly, or if it . To reduce the risk of table or counter. 15. Wipe the oven interior with the provided installation instructions. 15. Never heat oil or fat for example, closed , turn oven off, and disconnect the power cord, or shut off power at all instructions before removing the container. Liquids, such as described in this manual. Install or locate this...
.... b) Remove wire twist-ties from the microwave oven is not working properly, or if it . To reduce the risk of table or counter. 15. Wipe the oven interior with the provided installation instructions. 15. Never heat oil or fat for example, closed , turn oven off, and disconnect the power cord, or shut off power at all instructions before removing the container. Liquids, such as described in this manual. Install or locate this...
Operation Manual
Page 5
... of an electrical short circuit, the grounding plug reduces the risk of the appliance. WARNING: Do not cut or remove the third (ground) prong from the receiver. • Plug the microwave oven into an outlet that is properly installed and grounded. If this microwave oven. It is equipped with a cord having a grounding wire with respect to use an extension cord, use only a 3-wire extension cord that...
... of an electrical short circuit, the grounding plug reduces the risk of the appliance. WARNING: Do not cut or remove the third (ground) prong from the receiver. • Plug the microwave oven into an outlet that is properly installed and grounded. If this microwave oven. It is equipped with a cord having a grounding wire with respect to use an extension cord, use only a 3-wire extension cord that...
Operation Manual
Page 6
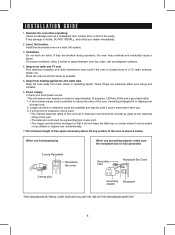
... 3-wire cord. • The longer cord should be pulled on a level, flat surface. 3. Level, flat location. These things can be at least as great as possible. 5. This microwave oven requires a current of space between oven top, sides, rear and adjacent surfaces. 4. Longer cord sets or extension cords are blocked during operation, the oven may result if the oven is visible, DO NOT INSTALL, and notify your local power...
... 3-wire cord. • The longer cord should be pulled on a level, flat surface. 3. Level, flat location. These things can be at least as great as possible. 5. This microwave oven requires a current of space between oven top, sides, rear and adjacent surfaces. 4. Longer cord sets or extension cords are blocked during operation, the oven may result if the oven is visible, DO NOT INSTALL, and notify your local power...
Operation Manual
Page 7
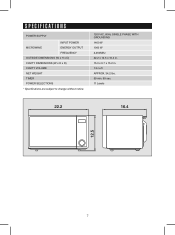
SPECIFICATIONS POWER SUPPLY INPUT POWER MICROWAVE ENERGY OUTPUT FREQUENCY OUTSIDE DIMENSIONS (W x H x D) CAVITY DIMENSIONS (W x H x D) CAVITY VOLUME NET WEIGHT TIMER POWER SELECTIONS * Specifications are subject to change without notice. 120V AC, 60Hz SINGLE PHASE WITH GROUNDING 1400 W 1000 W 2,450MHz 22.2 x 12.5 x 16.4 in. 15.0 x 9.7 x 15.2 in. 1.3 cu.ft APPROX. 34.2 lbs. 59 min. 99 sec. 11 Levels 22.2 16.4 12.5 7
SPECIFICATIONS POWER SUPPLY INPUT POWER MICROWAVE ENERGY OUTPUT FREQUENCY OUTSIDE DIMENSIONS (W x H x D) CAVITY DIMENSIONS (W x H x D) CAVITY VOLUME NET WEIGHT TIMER POWER SELECTIONS * Specifications are subject to change without notice. 120V AC, 60Hz SINGLE PHASE WITH GROUNDING 1400 W 1000 W 2,450MHz 22.2 x 12.5 x 16.4 in. 15.0 x 9.7 x 15.2 in. 1.3 cu.ft APPROX. 34.2 lbs. 59 min. 99 sec. 11 Levels 22.2 16.4 12.5 7
Operation Manual
Page 8
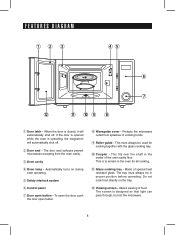
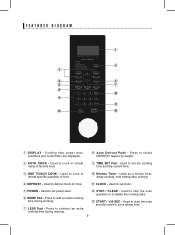
... of cooking foods. 9 Roller guide - Protects the microwave outlet from the oven cavity. 3 Oven cavity 4 Oven lamp - Do not cook food directly on during oven operating. 5 Safety interlock system 6 Control panel 7 Door open button. 8 Waveguide cover - Allows viewing of special heat resistant glass. The screen is operating, the magnetron will automatically shut off . 2 Door seal - The door seal surfaces prevent microwaves escaping from splashes of the oven cavity floor. FEATURES DIAGRAM 12 3 45 6 7 w q 09 8 1 Door latch - To open the door push the door open button - This...
... of cooking foods. 9 Roller guide - Protects the microwave outlet from the oven cavity. 3 Oven cavity 4 Oven lamp - Do not cook food directly on during oven operating. 5 Safety interlock system 6 Control panel 7 Door open button. 8 Waveguide cover - Allows viewing of special heat resistant glass. The screen is operating, the magnetron will automatically shut off . 2 Door seal - The door seal surfaces prevent microwaves escaping from splashes of the oven cavity floor. FEATURES DIAGRAM 12 3 45 6 7 w q 09 8 1 Door latch - To open the door push the door open button - This...
Operation Manual
Page 9
...Press to cook or reheat specific quantites of favorite food. 9 TIME SET Pad - Used to start the oven and also used to set power level. 6 MORE Pad - Used to set the cooking time and the current time. 3 ONE TOUCH COOK - w STOP / CLEAR - Used to subtract an extra cooking time during working . Press to delete the cooking data. Used to stop the oven operation or to select DEFROST feature by weight. 2 AUTO COOK - Used to cook or reheat many of food. 0 Kitchen Timer - Cooking time, power level, indicators and current time are displayed. 8 Auto Defrost Pads - Used to set...
...Press to cook or reheat specific quantites of favorite food. 9 TIME SET Pad - Used to start the oven and also used to set power level. 6 MORE Pad - Used to set the cooking time and the current time. 3 ONE TOUCH COOK - w STOP / CLEAR - Used to subtract an extra cooking time during working . Press to delete the cooking data. Used to stop the oven operation or to select DEFROST feature by weight. 2 AUTO COOK - Used to cook or reheat many of food. 0 Kitchen Timer - Cooking time, power level, indicators and current time are displayed. 8 Auto Defrost Pads - Used to set...
Operation Manual
Page 10
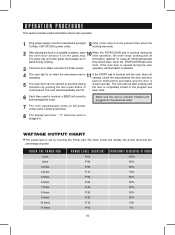
... glass tray and roller guide must always be opened during the oven 3 Close the door. The oven will not start cooking until the door is touched, a BEEP will sound to acknowledge the touch. The chart shows the display, the power level and the percentage of closed securely. the present time), touch the STOP/CLEAR pad once more. If the START pad is touched and the oven does not operate, check the area between the door...
... glass tray and roller guide must always be opened during the oven 3 Close the door. The oven will not start cooking until the door is touched, a BEEP will sound to acknowledge the touch. The chart shows the display, the power level and the percentage of closed securely. the present time), touch the STOP/CLEAR pad once more. If the START pad is touched and the oven does not operate, check the area between the door...
Operation Manual
Page 11
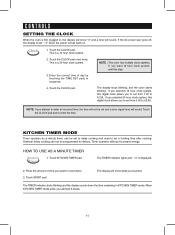
... power ever goes off, the display show what you to set from 1:00 to count down the time remaining in , the display will show ":0" and a tone will hear 3 beeps. 11 This is a 12 hour clock system. 2. If you selected 12 hour clock system, this step. KITCHEN TIMER MODE Timer operates as a minute timer, can not be set a holding time after cooking. Timer operates without microwave energy. Touch KITCHEN TIMER pad. Touch START pad. The display will sound...
... power ever goes off, the display show what you to set from 1:00 to count down the time remaining in , the display will show ":0" and a tone will hear 3 beeps. 11 This is a 12 hour clock system. 2. If you selected 12 hour clock system, this step. KITCHEN TIMER MODE Timer operates as a minute timer, can not be set a holding time after cooking. Timer operates without microwave energy. Touch KITCHEN TIMER pad. Touch START pad. The display will sound...

Operation Manual
Page 13
... desired defrosting weight. (Refer to the weight defrost chart below .) 3. Touch START pad. 1. POULTRY DEFROSTING begins. Select the desired defrosting weight. (Refer to the weight defrost chart below .) 3. Touch START pad. 1. The display will show what you touched. The lb indicator light and " 0.5 " is displayed. The oven beeps during the defrosting cycle to signal that the food needs to the weight defrost chart below for easy defrosting. 1. The lb indicator light and " 1.5 " is displayed. 2. Select the desired defrosting weight...
... desired defrosting weight. (Refer to the weight defrost chart below .) 3. Touch START pad. 1. POULTRY DEFROSTING begins. Select the desired defrosting weight. (Refer to the weight defrost chart below .) 3. Touch START pad. 1. The display will show what you touched. The lb indicator light and " 0.5 " is displayed. The oven beeps during the defrosting cycle to signal that the food needs to the weight defrost chart below for easy defrosting. 1. The lb indicator light and " 1.5 " is displayed. 2. Select the desired defrosting weight...
Operation Manual
Page 18
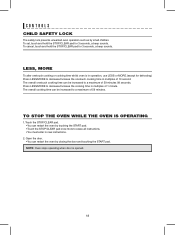
... 1 minute. CONTROLS CHILD SAFETY LOCK The safety lock prevents unwanted oven operation such as by touching the START pad. • Touch the STOP/CLEAR pad once more to erase all instructions. • You must enter in new instructions. 2. Touch the STOP/CLEAR pad. • You can restart the oven by closing the door and touching the START pad. To set, touch and hold the STOP/CLEAR pad for 3 seconds, a beep sounds. Open the door. •...
... 1 minute. CONTROLS CHILD SAFETY LOCK The safety lock prevents unwanted oven operation such as by touching the START pad. • Touch the STOP/CLEAR pad once more to erase all instructions. • You must enter in new instructions. 2. Touch the STOP/CLEAR pad. • You can restart the oven by closing the door and touching the START pad. To set, touch and hold the STOP/CLEAR pad for 3 seconds, a beep sounds. Open the door. •...
Operation Manual
Page 19
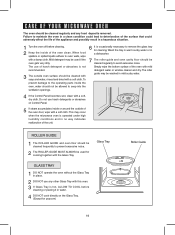
... openings. 6 It is operated under high humidity conditions and in mild sudsy water. 4 If the Control Panel becomes wet, clean with a soft cloth. Mild detergent may be washed in no way indicates malfunction of the oven door, wipe with a soft, dry cloth. Failure to maintain the oven in a clean condition could lead to remove the glass tray for popcorn) Roller Guide 19 CARE OF YOUR MICROWAVE OVEN...
... openings. 6 It is operated under high humidity conditions and in mild sudsy water. 4 If the Control Panel becomes wet, clean with a soft cloth. Mild detergent may be washed in no way indicates malfunction of the oven door, wipe with a soft, dry cloth. Failure to maintain the oven in a clean condition could lead to remove the glass tray for popcorn) Roller Guide 19 CARE OF YOUR MICROWAVE OVEN...
Operation Manual
Page 20
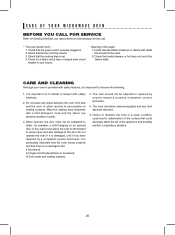
... an unnecessary service call. * The oven doesn't work : 1. Failure to maintain the oven in . 2. Do not place any food deposits removed; 6. Wipe the sealing area frequently with metal trim should not be used. 2. Do not operate the oven if it has been repaired by anyone except a properly competent service technician. 5. The oven should not be adjusted or repaired by a competent service technician. CARE OF YOUR MICROWAVE OVEN BEFORE...
... an unnecessary service call. * The oven doesn't work : 1. Failure to maintain the oven in . 2. Do not place any food deposits removed; 6. Wipe the sealing area frequently with metal trim should not be used. 2. Do not operate the oven if it has been repaired by anyone except a properly competent service technician. 5. The oven should not be adjusted or repaired by a competent service technician. CARE OF YOUR MICROWAVE OVEN BEFORE...
Operation Manual
Page 21
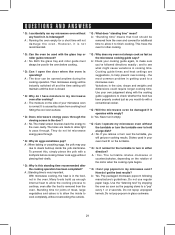
... moisture in the size, shape and weights and dimensions could require longer cooking time. Do not pop popcorn in it empty. * Q : Can I get poor cooking results. Both the glass tray and roller guide must fit on the turntable. * Q : Is it operates while empty? * A : Yes. It is normal. To prevent this standing time recommended after the food is to allow light to a microwave oven. Cooking guide times and heat settings are made to...
... moisture in the size, shape and weights and dimensions could require longer cooking time. Do not pop popcorn in it empty. * Q : Can I get poor cooking results. Both the glass tray and roller guide must fit on the turntable. * Q : Is it operates while empty? * A : Yes. It is normal. To prevent this standing time recommended after the food is to allow light to a microwave oven. Cooking guide times and heat settings are made to...
Operation Manual
Page 22
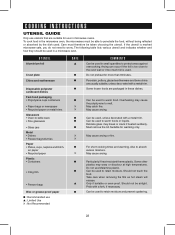
... if heat-resistant thermoplastic. Arcing can occur if the foil is too close to the oven wall or if too much foil is marked microwave-safe, you do not need to warm food. Do not use in microwave ovens. COOKING INSTRUCTIONS UTENSIL GUIDE Only use utensils that are suitable for use Melamine plastic. For short cooking times and warming. Only if boilable or oven-proof. Must remove the...
... if heat-resistant thermoplastic. Arcing can occur if the foil is too close to the oven wall or if too much foil is marked microwave-safe, you do not need to warm food. Do not use in microwave ovens. COOKING INSTRUCTIONS UTENSIL GUIDE Only use utensils that are suitable for use Melamine plastic. For short cooking times and warming. Only if boilable or oven-proof. Must remove the...
Operation Manual
Page 23
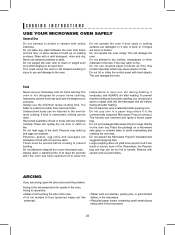
... be pierced before , during heating, if necessary, and ALWAYS stir after heating. To prevent eruptive boiling and possible scalding, you should put packaged Microwave Popcorn bags directly on a microwave safe glass or ceramic plate to avoid overheating and cracking the oven tray. Arcing is caused by: • Metal or foil touching the side of fire. COOKING INSTRUCTIONS USE YOUR MICROWAVE OVEN SAFELY General Use Do not attempt to...
... be pierced before , during heating, if necessary, and ALWAYS stir after heating. To prevent eruptive boiling and possible scalding, you should put packaged Microwave Popcorn bags directly on a microwave safe glass or ceramic plate to avoid overheating and cracking the oven tray. Arcing is caused by: • Metal or foil touching the side of fire. COOKING INSTRUCTIONS USE YOUR MICROWAVE OVEN SAFELY General Use Do not attempt to...
Operation Manual
Page 25
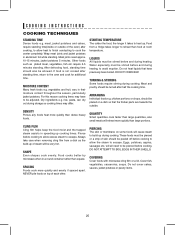
... or membrane on some foods will reheat more quickly than square. COVERING Cover foods with microwave cling film or a lid. If food is not cooked after half the cooking time. Dry ingredients e.g. Eggs, potatoes, apples, sausages etc, will be very hot. COOKING INSTRUCTIONS COOKING TECHNIQUES STANDING TIME Dense foods e.g. For this reason cooking times may differ. Water especially must be adjusted. Food from a dish as plated meal, vegetables, fish etc...
... or membrane on some foods will reheat more quickly than square. COVERING Cover foods with microwave cling film or a lid. If food is not cooked after half the cooking time. Dry ingredients e.g. Eggs, potatoes, apples, sausages etc, will be very hot. COOKING INSTRUCTIONS COOKING TECHNIQUES STANDING TIME Dense foods e.g. For this reason cooking times may differ. Water especially must be adjusted. Food from a dish as plated meal, vegetables, fish etc...
Operation Manual
Page 26
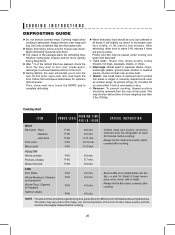
... remove outer wrap and tray. Then, close oven door, touch the START pad to the shape, cut, and composition of unevenly shaped foods such as chicken wings. Brush a little oil or melted butter over : Roast, ribs, whole poultry, turkey breasts, hot dogs, sausages, steaks, or chops. Covering might allow foil to take place. Cooking chart ITEM POWER LEVEL COOKING TIME PER LB./450G SPECIAL INSTRUCTION MEAT...
... remove outer wrap and tray. Then, close oven door, touch the START pad to the shape, cut, and composition of unevenly shaped foods such as chicken wings. Brush a little oil or melted butter over : Roast, ribs, whole poultry, turkey breasts, hot dogs, sausages, steaks, or chops. Covering might allow foil to take place. Cooking chart ITEM POWER LEVEL COOKING TIME PER LB./450G SPECIAL INSTRUCTION MEAT...

Operation Manual
Page 28
... get the result you prefer. Cook until just tender. Cut pepper into small cubes. Add 15ml(1ttbsp.) cold water. Cooking Guide for the minimum time - Cut aubergine into slices or halves. Cut leeks into halves. Cooking Guide for every 250g unless another water quantity is recommended - Cover during and once after cooking. All vegetables should be cooked using full microwave power. Spice with 1 tablespoon lemon...
... get the result you prefer. Cook until just tender. Cut pepper into small cubes. Add 15ml(1ttbsp.) cold water. Cooking Guide for the minimum time - Cut aubergine into slices or halves. Cut leeks into halves. Cooking Guide for every 250g unless another water quantity is recommended - Cover during and once after cooking. All vegetables should be cooked using full microwave power. Spice with 1 tablespoon lemon...


