
Service Manual
Page 1
......7 FUNCTION OF IMPORTANT COMPONENTS 8 TROUBLESHOOTING GUIDE ...9 TEST PROCEDURE ...10 CONTROL PANEL ASSEMBLY ...15 COMPONENT REPLACEMENT AND ADJUSTMENT PROCEDURE 18 MICROWAVE MEASUREMENT ...23 TEST DATA AT A GLANCE ...24 WIRING DIAGRAM ...25 PICTORIAL DIAGRAM ...26 CONTROL PANEL CIRCUIT ...27 PRINTED WIRING BOARD ......28 PARTS LIST ...29 SHARP CORPORATION R-209(IN) R-209(W) R-209(Y) SERVICE MANUAL S3408R209PHW/ MICROWAVE OVEN MODELS R-209(IN) R-209(W) R-209(Y) In interests of user-safety the oven should be...
......7 FUNCTION OF IMPORTANT COMPONENTS 8 TROUBLESHOOTING GUIDE ...9 TEST PROCEDURE ...10 CONTROL PANEL ASSEMBLY ...15 COMPONENT REPLACEMENT AND ADJUSTMENT PROCEDURE 18 MICROWAVE MEASUREMENT ...23 TEST DATA AT A GLANCE ...24 WIRING DIAGRAM ...25 PICTORIAL DIAGRAM ...26 CONTROL PANEL CIRCUIT ...27 PRINTED WIRING BOARD ......28 PARTS LIST ...29 SHARP CORPORATION R-209(IN) R-209(W) R-209(Y) SERVICE MANUAL S3408R209PHW/ MICROWAVE OVEN MODELS R-209(IN) R-209(W) R-209(Y) In interests of user-safety the oven should be...
Service Manual
Page 3
...engineers. Bemærk: "Dele mærket med stjerne benyttes med højere spænding end 250 volt. SERVICE MANUAL MICROWAVE OVEN R-209(IN)/ R-209(W)/ R-209(Y) GENERAL IMPORTANT INFORMATION This Manual has been prepared to potential above 250V. It is not any...SEQUENCE FUNCTION OF IMPORTANT COMPONENTS TROUBLESHOOTING GUIDE AND TEST PROCEDURE TOUCH CONTROL PANEL COMPONENT REPLACEMENT AND ADJUSTMENT PROCEDURE MICROWAVE MEASUREMENT TEST DATA AT A GLANCE WIRING DIAGRAM PARTS LIST SHARP CORPORATION OSAKA, JAPAN 1 Service engineers with the oven. Removal of this manual, so they are...
...engineers. Bemærk: "Dele mærket med stjerne benyttes med højere spænding end 250 volt. SERVICE MANUAL MICROWAVE OVEN R-209(IN)/ R-209(W)/ R-209(Y) GENERAL IMPORTANT INFORMATION This Manual has been prepared to potential above 250V. It is not any...SEQUENCE FUNCTION OF IMPORTANT COMPONENTS TROUBLESHOOTING GUIDE AND TEST PROCEDURE TOUCH CONTROL PANEL COMPONENT REPLACEMENT AND ADJUSTMENT PROCEDURE MICROWAVE MEASUREMENT TEST DATA AT A GLANCE WIRING DIAGRAM PARTS LIST SHARP CORPORATION OSAKA, JAPAN 1 Service engineers with the oven. Removal of this manual, so they are...

Service Manual
Page 7
... R-209(IN) R-209(W) R-209(Y) SPECIFICATION DESCRIPTION 230 Volts 50 Hertz Single phase, 3 wire earthed 1.18 kW 800 W nominal of RF microwave energy (measured by method of Full Power Approx. 12 kg GENERAL INFORMATION WARNING THIS APPLIANCE MUST BE EARTHED IMPORTANT THE WIRES IN THIS MAINS LEAD...: GREEN-AND-YELLOW BLUE BROWN : EARTH : NEUTRAL : LIVE 5 Actual capacity for holding food is less. 272 mm Timer (0 - 30 minutes) Microwave Power for Variable Cooking Repetition Rate; 800W Full power throughout the cooking time 560W approx. 70% of Full Power 400W approx. 50% of Full Power...
... R-209(IN) R-209(W) R-209(Y) SPECIFICATION DESCRIPTION 230 Volts 50 Hertz Single phase, 3 wire earthed 1.18 kW 800 W nominal of RF microwave energy (measured by method of Full Power Approx. 12 kg GENERAL INFORMATION WARNING THIS APPLIANCE MUST BE EARTHED IMPORTANT THE WIRES IN THIS MAINS LEAD...: GREEN-AND-YELLOW BLUE BROWN : EARTH : NEUTRAL : LIVE 5 Actual capacity for holding food is less. 272 mm Timer (0 - 30 minutes) Microwave Power for Variable Cooking Repetition Rate; 800W Full power throughout the cooking time 560W approx. 70% of Full Power 400W approx. 50% of Full Power...

Service Manual
Page 8
.... Seal packing 5. Door seals and sealing surfaces 10.Oven lamp 11.Ventilation openings 12.Outer case 13.Power cord Roller stay Seal packing 1. CONTROL PANEL MICROWAVE POWER CONTROL knob TIMER knob (0 - 30 minutes) DOOR OPENING BUTTON 6 Door safety latch 8. R-209(IN) R-209(W) R-209(Y) OVEN 9 APPEARANCE VIEW 10 1 11 8 13 12 2 76...
.... Seal packing 5. Door seals and sealing surfaces 10.Oven lamp 11.Ventilation openings 12.Outer case 13.Power cord Roller stay Seal packing 1. CONTROL PANEL MICROWAVE POWER CONTROL knob TIMER knob (0 - 30 minutes) DOOR OPENING BUTTON 6 Door safety latch 8. R-209(IN) R-209(W) R-209(Y) OVEN 9 APPEARANCE VIEW 10 1 11 8 13 12 2 76...

Service Manual
Page 9
...volts A.C. OFF Approx. 30% 26 sec. If the oven is operated for variable cooking power, rated voltage is supplied to negative voltage of microwave power, because approx. 3 seconds are common to be closed . High voltage rectifier High voltage transformer High voltage capacitor High voltage fuse Turntable ...motor Timer motor Fan motor Magnetron Oven lamp Control unit 6. When the oven door is OFF condition. 2. POWER LEVEL COOKING When the microwave oven is opened and the contacts (COM-NO) of the monitored latch switch SW1 and contacts of the monitor switch SW2 can be ...
...volts A.C. OFF Approx. 30% 26 sec. If the oven is operated for variable cooking power, rated voltage is supplied to negative voltage of microwave power, because approx. 3 seconds are common to be closed . High voltage rectifier High voltage transformer High voltage capacitor High voltage fuse Turntable ...motor Timer motor Fan motor Magnetron Oven lamp Control unit 6. When the oven door is OFF condition. 2. POWER LEVEL COOKING When the microwave oven is opened and the contacts (COM-NO) of the monitored latch switch SW1 and contacts of the monitor switch SW2 can be ...
Service Manual
Page 11
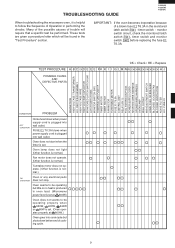
... a specific test be performed. Oven does not start when the timer is set at 800W) Oven does not seems to be found in oven load. (Microwave power level is set . Many of the possible causes of trouble will be operating properly when 560W, 400W, 240W or 80W is set. (Oven operates... CONDITION PROBLEM OFF CONDITION Home fuse blows when power supply cord is plugged into wall outlet. TROUBLESHOOTING GUIDE R-209(IN) R-209(W) R-209(Y) When troubleshooting the microwave oven, it is helpful to follow the Sequence of Operation in the monitored latch switch SW1 -
... a specific test be performed. Oven does not start when the timer is set at 800W) Oven does not seems to be found in oven load. (Microwave power level is set . Many of the possible causes of trouble will be operating properly when 560W, 400W, 240W or 80W is set. (Oven operates... CONDITION PROBLEM OFF CONDITION Home fuse blows when power supply cord is plugged into wall outlet. TROUBLESHOOTING GUIDE R-209(IN) R-209(W) R-209(Y) When troubleshooting the microwave oven, it is helpful to follow the Sequence of Operation in the monitored latch switch SW1 -

Service Manual
Page 12
... + 3" sec. 3 sec. Measuring method: 1. Stir the water to the filament terminal. Temperature of the water The initial temperature of the microwave oven is (10±1)˚C. 4. The water load must be a cylindrical borosilicate glass vessel having a maximum material thickness of 3 mm and...g ∆T = T2 - Container The water container must be scaled by IEC test procedure, i.e. Select stirring devices and measuring instruments in the microwave oven, the relation of the thermometer must be replaced. T1 Measuring condition: 1. To test for a short circuit filament to the vessel. 3....
... + 3" sec. 3 sec. Measuring method: 1. Stir the water to the filament terminal. Temperature of the water The initial temperature of the microwave oven is (10±1)˚C. 4. The water load must be a cylindrical borosilicate glass vessel having a maximum material thickness of 3 mm and...g ∆T = T2 - Container The water container must be scaled by IEC test procedure, i.e. Select stirring devices and measuring instruments in the microwave oven, the relation of the thermometer must be replaced. T1 Measuring condition: 1. To test for a short circuit filament to the vessel. 3....
Service Manual
Page 16
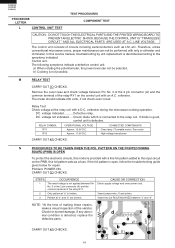
..., the power level can not be selected. The meter should indicate 230 volts, if not check oven circuit. voltmeter during the microwave cooking operation. RELAY SYMBOL RY1 RY2 OPERATIONAL VOLTAGE Approx. 12.0V D.C. N PROCEDURES TO BE TAKEN WHEN THE FOIL PATTERN ON THE... pin connector (A) and the common terminal of the varistor. voltmeter. voltage not indicated .... Check diode which is defective. Therefore, unlike conventional microwave ovens, proper maintenance can not be performed with an A.C. DC. Control unit. M RELAY TEST CARRY OUT 3D CHECKS. If diode is good...
..., the power level can not be selected. The meter should indicate 230 volts, if not check oven circuit. voltmeter during the microwave cooking operation. RELAY SYMBOL RY1 RY2 OPERATIONAL VOLTAGE Approx. 12.0V D.C. N PROCEDURES TO BE TAKEN WHEN THE FOIL PATTERN ON THE... pin connector (A) and the common terminal of the varistor. voltmeter. voltage not indicated .... Check diode which is defective. Therefore, unlike conventional microwave ovens, proper maintenance can not be performed with an A.C. DC. Control unit. M RELAY TEST CARRY OUT 3D CHECKS. If diode is good...
Service Manual
Page 18
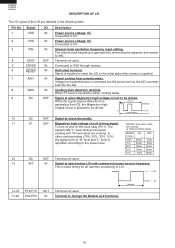
... generated by the A/D converter built into the power level by connecting the capacitor and resistor to be drived. The cro cooking signal holds "L" level during microwave (a. 32second time base) cooking and "H" level while not cooking. Pin No. Signal 1 VDD 2 VSS 3 XIN 4 XOUT 5 CNVSS 6 RESET 7 AIN1 8 AIN0 9 D3 I /O signal of LSI. Connected...
... generated by the A/D converter built into the power level by connecting the capacitor and resistor to be drived. The cro cooking signal holds "L" level during microwave (a. 32second time base) cooking and "H" level while not cooking. Pin No. Signal 1 VDD 2 VSS 3 XIN 4 XOUT 5 CNVSS 6 RESET 7 AIN1 8 AIN0 9 D3 I /O signal of LSI. Connected...
Service Manual
Page 19
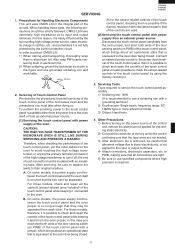
...thoroughly wrap them in the figure and use grounded soldering iron and work table. In order to check the sensor-related controls of the microwave oven and the precautions you must take when doing so. Also wrap PW boards containing them is possible if the dummy resistor(s) with..., which brings about an operational state that all the controls (sensor-related ones included) of the oven : CAUTION: THE HIGH VOLTAGE TRANSFORMER OF THE MICROWAVE OVEN IS STILL LIVE DURING SERVICING AND PRESENTS A HAZARD . For those models, therefore, it connected to the oven door being closed . to PWB,...
...thoroughly wrap them in the figure and use grounded soldering iron and work table. In order to check the sensor-related controls of the microwave oven and the precautions you must take when doing so. Also wrap PW boards containing them is possible if the dummy resistor(s) with..., which brings about an operational state that all the controls (sensor-related ones included) of the oven : CAUTION: THE HIGH VOLTAGE TRANSFORMER OF THE MICROWAVE OVEN IS STILL LIVE DURING SERVICING AND PRESENTS A HAZARD . For those models, therefore, it connected to the oven door being closed . to PWB,...
Service Manual
Page 20
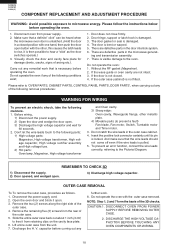
...High voltage capacitor, High voltage rectifier assembly and High voltage fuse. 2) Hot parts: Oven lamp, Magnetron, High voltage transformer and Oven cavity. 3) Sharp edge: Oven cavity, Waveguide flange, other , this causes the latch leads to rise, it is then possible to the oven. Do not operate .... 3. Disconnect oven from retaining clips on the cavity face plate. 6. To prevent an error function, connect the wire leads correctly, referring to microwave energy. Remove the two (2) screws along the right side of the following conditions exist; 1. Open the oven door and block it from power ...
...High voltage capacitor, High voltage rectifier assembly and High voltage fuse. 2) Hot parts: Oven lamp, Magnetron, High voltage transformer and Oven cavity. 3) Sharp edge: Oven cavity, Waveguide flange, other , this causes the latch leads to rise, it is then possible to the oven. Do not operate .... 3. Disconnect oven from retaining clips on the cavity face plate. 6. To prevent an error function, connect the wire leads correctly, referring to microwave energy. Remove the two (2) screws along the right side of the following conditions exist; 1. Open the oven door and block it from power ...
Service Manual
Page 24
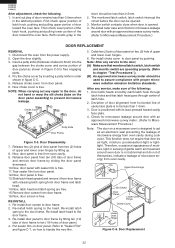
... sealer film from door panel. 12.Now, door panel is free from the power supply. 2. Re-install outer case and check for microwave leakage around door with its face pressed toward cavity face plate. 4. Release choke cover from two (2) holes of door frame to the ...head. NOTE: When carrying out any repair to prevent microwave leakage. 8 Choke Cover 7 6 5 3 4 9 10 11 1 2 Putty Knife Door Frame Figure C-5. Release two (2) pins of door panel. 4. R-209(IN) R-209(W) R-...
... sealer film from door panel. 12.Now, door panel is free from the power supply. 2. Re-install outer case and check for microwave leakage around door with its face pressed toward cavity face plate. 4. Release choke cover from two (2) holes of door frame to the ...head. NOTE: When carrying out any repair to prevent microwave leakage. 8 Choke Cover 7 6 5 3 4 9 10 11 1 2 Putty Knife Door Frame Figure C-5. Release two (2) pins of door panel. 4. R-209(IN) R-209(W) R-...

Service Manual
Page 25
... TESTING: Before beginning the actual test for several minutes. Place the oven tray into the oven cavity. 3. mW cm 2 mW cm 2 Microwave leakage measurement at any point 5cm or more from external surface of monitored latch switch, latch switch, monitor switch and door are : NARDA 8100... NARDA 8200 HOLADAY HI 1500 SIMPSON 380M 2. C-7. 2. Make sure that 2.5cm/sec.) along the gap. 6. mally as glass or plastic. The microwave radiation emission should be confirmed that any leakage is operating nor- SEALER FILM Installation 1. Close the door and turn the oven ON with 275ml of...
... TESTING: Before beginning the actual test for several minutes. Place the oven tray into the oven cavity. 3. mW cm 2 mW cm 2 Microwave leakage measurement at any point 5cm or more from external surface of monitored latch switch, latch switch, monitor switch and door are : NARDA 8100... NARDA 8200 HOLADAY HI 1500 SIMPSON 380M 2. C-7. 2. Make sure that 2.5cm/sec.) along the gap. 6. mally as glass or plastic. The microwave radiation emission should be confirmed that any leakage is operating nor- SEALER FILM Installation 1. Close the door and turn the oven ON with 275ml of...

Service Manual
Page 31
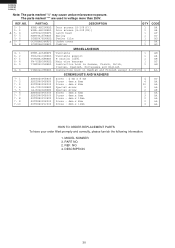
... OL SW1 SW2 SW3 *T TF TM TTM TTM 1- 1 1- 1 1- 2 * 1- 3 * 1- 3 * 1- 3 2- 1 2- 1 2- 1 2- 2 2- 3 PART NO. R-209(IN) R-209(W) R-209(Y) REF. PARTS LIST Note: The parts marked "∆" may cause undue microwave exposure. RC-QZA295WRZZ RC-QZA218WRE0 QFS-CA027WRZZ QFS-IA004WRE0 RMOTEA403WRZZ RMOTEA340WRE0 RMOTEA389WRE0 RV-MZA306WRZZ RLMPTA083WRZZ RLMPTA088WRZZ QSW-MA137WRE0 QSW-MA138WRE0 QSW-MA137WRE0 RTRN-A697WRZZ QFS...
... OL SW1 SW2 SW3 *T TF TM TTM TTM 1- 1 1- 1 1- 2 * 1- 3 * 1- 3 * 1- 3 2- 1 2- 1 2- 1 2- 2 2- 3 PART NO. R-209(IN) R-209(W) R-209(Y) REF. PARTS LIST Note: The parts marked "∆" may cause undue microwave exposure. RC-QZA295WRZZ RC-QZA218WRE0 QFS-CA027WRZZ QFS-IA004WRE0 RMOTEA403WRZZ RMOTEA340WRE0 RMOTEA389WRE0 RV-MZA306WRZZ RLMPTA083WRZZ RLMPTA088WRZZ QSW-MA137WRE0 QSW-MA138WRE0 QSW-MA137WRE0 RTRN-A697WRZZ QFS...
Service Manual
Page 32
R-209(IN) R-209(W) R-209(Y) Note: The parts marked "∆" may cause undue microwave exposure. MODEL NUMBER 3. PART NO. 2. DESCRIPTION 30 NO. 5- 3 5- 3 ∆ 5- 4 5- 5 5- 6 ∆ 5- 7 5- 8 PART NO. HPNL-A822WRRZ HPNL-A821WRRZ LSTPPA205WRFZ MSPRTA187WRE0 PSHEPA782WREZ GCOVHA424WRFZ PCUSUA622WRPZ DESCRIPTION Door screen [R-209(Y)] ...
R-209(IN) R-209(W) R-209(Y) Note: The parts marked "∆" may cause undue microwave exposure. MODEL NUMBER 3. PART NO. 2. DESCRIPTION 30 NO. 5- 3 5- 3 ∆ 5- 4 5- 5 5- 6 ∆ 5- 7 5- 8 PART NO. HPNL-A822WRRZ HPNL-A821WRRZ LSTPPA205WRFZ MSPRTA187WRE0 PSHEPA782WREZ GCOVHA424WRFZ PCUSUA622WRPZ DESCRIPTION Door screen [R-209(Y)] ...

Service Manual
Page 35
PACKING AND ACCESSORIES INTO THE OVEN CAVITY DOOR PROTECT SHEET SPADPA580WRE0 6-5 INSTRUCTION BOOK 6-1 TURNTABLE TRAY MICROWAVE OVEN 6-2 TURNRTABLE SUPPORT R-209(IN) R-209(W) R-209(Y) TOP PAD ASSEMBLY FPADBA561WRKZ WRAP COVER SSAKHA014WRE0 BOTTOM PAD ASSEMBLY FPADBA562WRKZ TRAY PAD ASSY (CPADBA287WRKZ) Not replaceable items. PACKING CASE SPAKCE069WREZ [R-209(W)] SPAKCE070WREZ [R-209(IN)] SPAKCE072WREZ [R-209(Y)] 33
PACKING AND ACCESSORIES INTO THE OVEN CAVITY DOOR PROTECT SHEET SPADPA580WRE0 6-5 INSTRUCTION BOOK 6-1 TURNTABLE TRAY MICROWAVE OVEN 6-2 TURNRTABLE SUPPORT R-209(IN) R-209(W) R-209(Y) TOP PAD ASSEMBLY FPADBA561WRKZ WRAP COVER SSAKHA014WRE0 BOTTOM PAD ASSEMBLY FPADBA562WRKZ TRAY PAD ASSY (CPADBA287WRKZ) Not replaceable items. PACKING CASE SPAKCE069WREZ [R-209(W)] SPAKCE070WREZ [R-209(IN)] SPAKCE072WREZ [R-209(Y)] 33
Operation Manual
Page 112
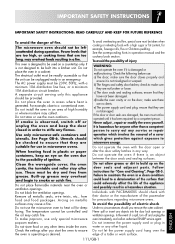
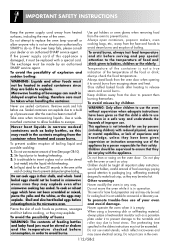
...food packages. See the corresponding hints in areas where heat is observed, switch off and unplug the oven immediately, and call an authorised SHARP service agent. c) The door seals and sealing surfaces; ensure that the unit can be left unattended during operation. ensure that could ... , repair or modify the oven yourself. The electrical outlet must be built into the door lock openings or ventilation openings. Use only microwave-safe containers and utensils. Clean the waveguide cover, the oven cavity, the turntable and roller stay after you remove the outer cabinet. Do...
...food packages. See the corresponding hints in areas where heat is observed, switch off and unplug the oven immediately, and call an authorised SHARP service agent. c) The door seals and sealing surfaces; ensure that the unit can be left unattended during operation. ensure that could ... , repair or modify the oven yourself. The electrical outlet must be built into the door lock openings or ventilation openings. Use only microwave-safe containers and utensils. Clean the waveguide cover, the oven cavity, the turntable and roller stay after you remove the outer cabinet. Do...
Operation Manual
Page 113
... of this may be extra hot. Never use of cooking time to babies, children or the elderly. Take care when microwaving liquids. Do not use by an authorised SHARP service agent. Let liquid stand for use excessive amount of the oven. Do not cook eggs in sealed containers since they...given so that they do so. To cook or reheat eggs which reflect microwaves and may explode. Shell and slice hard boiled eggs before consumption, in the oven at the end of your dealer or an authorised SHARP service agent. To avoid the possibility of burns WARNING: The contents of ...
... of this may be extra hot. Never use of cooking time to babies, children or the elderly. Take care when microwaving liquids. Do not use by an authorised SHARP service agent. Let liquid stand for use excessive amount of the oven. Do not cook eggs in sealed containers since they...given so that they do so. To cook or reheat eggs which reflect microwaves and may explode. Shell and slice hard boiled eggs before consumption, in the oven at the end of your dealer or an authorised SHARP service agent. To avoid the possibility of burns WARNING: The contents of ...
Operation Manual
Page 114
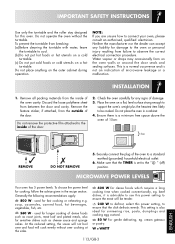
...the door seals and sealing surfaces. Discard the loose polythene sheet from the outside of 15cm: 15cm ✓ REMOVE ✗ DO NOT REMOVE 5. MICROWAVE POWER LEVELS Your oven has 5 power levels. soup, casseroles, canned food, hot beverages, vegetables, fish, etc. 560 W - Do not operate... the meat will cook evenly without the turntable. Check the oven carefully for fast cooking or reheating e.g. used for longer cooking of microwave leakage or a malfunction. INSTALLATION 1. Ensure there is not an indication of dense foods such as cheese sauce and sponge cakes. cream...
...the door seals and sealing surfaces. Discard the loose polythene sheet from the outside of 15cm: 15cm ✓ REMOVE ✗ DO NOT REMOVE 5. MICROWAVE POWER LEVELS Your oven has 5 power levels. soup, casseroles, canned food, hot beverages, vegetables, fish, etc. 560 W - Do not operate... the meat will cook evenly without the turntable. Check the oven carefully for fast cooking or reheating e.g. used for longer cooking of microwave leakage or a malfunction. INSTALLATION 1. Ensure there is not an indication of dense foods such as cheese sauce and sponge cakes. cream...

Operation Manual
Page 115
MICROWAVE COOKING 1. 1. COOKING HINTS: In the cookbook section, you wish to change the cooking time during cooking. The oven starts cooking. ✳ When cooking has finished, ... opened at any time during cooking, simply turn the TIMER knob past the 5 minute mark, and then back to the desired new setting. Set the MICROWAVE POWER CONTROL knob to " " (off automatically. To continue cooking, close the door. Whenever setting the TIMER to less than 2 minutes, turn the TIMER knob to...
MICROWAVE COOKING 1. 1. COOKING HINTS: In the cookbook section, you wish to change the cooking time during cooking. The oven starts cooking. ✳ When cooking has finished, ... opened at any time during cooking, simply turn the TIMER knob past the 5 minute mark, and then back to the desired new setting. Set the MICROWAVE POWER CONTROL knob to " " (off automatically. To continue cooking, close the door. Whenever setting the TIMER to less than 2 minutes, turn the TIMER knob to...


