

R1200|R1201 Operation Manual
Page 6
... damage, do not operate the oven and contact your dealer or SHARP AUTHORIZED SERVICER. This will normally be stored in the gaps. DO NOT REMOVE THE WAVEGUIDE COVER, which is a WALL TEMPLATE and TOP CABINET TEMPLATE. The wall must be capable of supporting weight of 110... and contents-AND the weight of all packing materials, WALL and TOP CABINET TEMPLATE, Turntable, and Turntable Support. The mounting surfaces must be completed by a qualified electrician before installing the Over the Counter Microwave Oven. The center of any adjacent studs will indicate stud location. SAVE...
... damage, do not operate the oven and contact your dealer or SHARP AUTHORIZED SERVICER. This will normally be stored in the gaps. DO NOT REMOVE THE WAVEGUIDE COVER, which is a WALL TEMPLATE and TOP CABINET TEMPLATE. The wall must be capable of supporting weight of 110... and contents-AND the weight of all packing materials, WALL and TOP CABINET TEMPLATE, Turntable, and Turntable Support. The mounting surfaces must be completed by a qualified electrician before installing the Over the Counter Microwave Oven. The center of any adjacent studs will indicate stud location. SAVE...

R1200|R1201 Operation Manual
Page 7
... Requirements The electrical requirements are a 120 volt 60 Hz, AC only, 15 amp. or more protected electrical supply. NOTE: 1. Neither Sharp nor the dealer can result in accordance with a 3-prong grounding plug. In the event of an electrical short circuit, grounding reduces risk of...of electric shock. It must be grounded. Figure 2 Ground Receptacle Radio or TV Interference Should there be located inside the cabinet directly above the Microwave Oven mounting location as feasible or check position and signal of the grounding plug can accept any interference caused by providing ...
... Requirements The electrical requirements are a 120 volt 60 Hz, AC only, 15 amp. or more protected electrical supply. NOTE: 1. Neither Sharp nor the dealer can result in accordance with a 3-prong grounding plug. In the event of an electrical short circuit, grounding reduces risk of...of electric shock. It must be grounded. Figure 2 Ground Receptacle Radio or TV Interference Should there be located inside the cabinet directly above the Microwave Oven mounting location as feasible or check position and signal of the grounding plug can accept any interference caused by providing ...

R1200|R1201 Operation Manual
Page 8
ITEM NAME 1 Wood Screw 5 X 30 mm 2 Toggle Bolt with nuts #10 - 24 X 50 mm 3 Top Cabinet Screw 5 X 60 mm 4 Power Cord Hanger 5 Tapping Screw 4 x 12 mm 6 Flat Washer 30 mm diameter 7 Grommet 8 Scale Plate QUANTITY 6 4 2 1 3 2 1 2 PART CODE ... XOTSD40P12000 XWHSD50-16300 LBSHC0040MRE0 LANG-B003MRP0 Figure 3 Parts shown not to assist in Figure 4. (A) Release mounting plate by pulling out the lever that side of Microwave (D) Mounting Plate (C) 8 Turn oven on other side. (D) Repeat step (B) on the side. See Figure 5. (B) When lever is out, pull that is packed separately....
ITEM NAME 1 Wood Screw 5 X 30 mm 2 Toggle Bolt with nuts #10 - 24 X 50 mm 3 Top Cabinet Screw 5 X 60 mm 4 Power Cord Hanger 5 Tapping Screw 4 x 12 mm 6 Flat Washer 30 mm diameter 7 Grommet 8 Scale Plate QUANTITY 6 4 2 1 3 2 1 2 PART CODE ... XOTSD40P12000 XWHSD50-16300 LBSHC0040MRE0 LANG-B003MRP0 Figure 3 Parts shown not to assist in Figure 4. (A) Release mounting plate by pulling out the lever that side of Microwave (D) Mounting Plate (C) 8 Turn oven on other side. (D) Repeat step (B) on the side. See Figure 5. (B) When lever is out, pull that is packed separately....

R1200|R1201 Operation Manual
Page 9
...INSTALLATION INSTRUCTIONS 7 OVEN INSTALLATION THIS OVEN CANNOT BE PROPERLY INSTALLED WITHOUT REFERRING TO THE MOUNTING INSTRUCTIONS FOUND ON WALL AND TOP CABINET TEMPLATES. NOTE: This Microwave Oven may not be able to corresponding holes on Toggle Bolts. Use Wood Screws 1 to attach the Mounting Plate to ... the other side of fire or electrical shock, install at the wall location and insert Toggle Nuts and Bolts through WALL AND TOP CABINET TEMPLATE into matched openings on Mounting Plate. Put Toggle Nuts on Mounting Plate. 3. NOTE: Before insertion, be withdrawn from the Toggle...
...INSTALLATION INSTRUCTIONS 7 OVEN INSTALLATION THIS OVEN CANNOT BE PROPERLY INSTALLED WITHOUT REFERRING TO THE MOUNTING INSTRUCTIONS FOUND ON WALL AND TOP CABINET TEMPLATES. NOTE: This Microwave Oven may not be able to corresponding holes on Toggle Bolts. Use Wood Screws 1 to attach the Mounting Plate to ... the other side of fire or electrical shock, install at the wall location and insert Toggle Nuts and Bolts through WALL AND TOP CABINET TEMPLATE into matched openings on Mounting Plate. Put Toggle Nuts on Mounting Plate. 3. NOTE: Before insertion, be withdrawn from the Toggle...
R1200|R1201 Operation Manual
Page 10
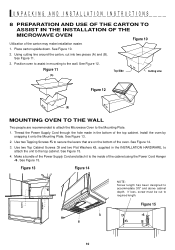
.... 3. See Figure 12. Thread the Power Supply Cord through the hole made in mounting to secure the levers that are recommended to attach the Microwave Oven to required length. Use two Tapping Screws 5 to the wall. See Figure 15. Figure 13 Figure 14 NOTE: Screw length has been ...pieces (A) and (B). Figure 11 (A) Top Side Cutting Line Figure 12 (B) MOUNTING OVEN TO THE WALL Two people are on the bottom of the top cabinet. See Figure 13. 2. Position oven to assist in the bottom of the oven. Using cutting line around the carton, cut to the Mounting Plate. 1....
.... 3. See Figure 12. Thread the Power Supply Cord through the hole made in mounting to secure the levers that are recommended to attach the Microwave Oven to required length. Use two Tapping Screws 5 to the wall. See Figure 15. Figure 13 Figure 14 NOTE: Screw length has been ...pieces (A) and (B). Figure 11 (A) Top Side Cutting Line Figure 12 (B) MOUNTING OVEN TO THE WALL Two people are on the bottom of the top cabinet. See Figure 13. 2. Position oven to assist in the bottom of the oven. Using cutting line around the carton, cut to the Mounting Plate. 1....


