
PG-F211X , PG-F261X Operation Manual
Page 3
...recall that SHARP may be required to give under the 1972 Consumer Product Safety Act, PLEASE READ CAREFULLY THE IMPORTANT "LIMITED WARRANTY" CLAUSE. The lightning flash with the projector. 1. The...full benefit of the parts, service and labor warranty applicable to your new SHARP Projector, using the projector, please read this equipment. Be especially careful that children do not expose this...voltage" within a triangle is intended to alert the user to the presence of projector. Introduction ENGLISH There are two important reasons for prompt warranty registration of fire or ...
...recall that SHARP may be required to give under the 1972 Consumer Product Safety Act, PLEASE READ CAREFULLY THE IMPORTANT "LIMITED WARRANTY" CLAUSE. The lightning flash with the projector. 1. The...full benefit of the parts, service and labor warranty applicable to your new SHARP Projector, using the projector, please read this equipment. Be especially careful that children do not expose this...voltage" within a triangle is intended to alert the user to the presence of projector. Introduction ENGLISH There are two important reasons for prompt warranty registration of fire or ...
PG-F211X , PG-F261X Operation Manual
Page 4
..., pursuant to Part 15 of mercury. U.S.A. In a domestic environment this equipment in a residential area is a Class A product. Caution Concerning Lamp Replacement See "Replacing the Lamp" on the picture screen. ONLY The enclosed computer cable must conform to. For disposal or recycling information, please contact your local authorities or...has some inactive pixels within acceptable tolerances which case the user may be used in inactive dots on page 50. This SHARP projector uses a DLP® chip. Disposal of America, the Electronic Industries Alliance: www.eiae.org.
..., pursuant to Part 15 of mercury. U.S.A. In a domestic environment this equipment in a residential area is a Class A product. Caution Concerning Lamp Replacement See "Replacing the Lamp" on the picture screen. ONLY The enclosed computer cable must conform to. For disposal or recycling information, please contact your local authorities or...has some inactive pixels within acceptable tolerances which case the user may be used in inactive dots on page 50. This SHARP projector uses a DLP® chip. Disposal of America, the Electronic Industries Alliance: www.eiae.org.
PG-F211X , PG-F261X Operation Manual
Page 5
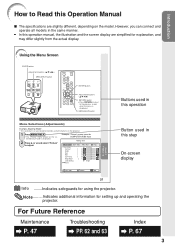
... manual, the illustration and the screen display are slightly different, depending on the projector. 1 Press MENU/HELP. • The "Picture" menu screen for using the ...slightly from the actual display. However, you can also be performed by using the projector. Using the Menu Screen ENTER button Adjustment buttons (P/R/O/Q) MENU/HELP button ENTER button...Picture" to Read this Operation Manual ■ The specifications are simplified for setting up and operating the projector. For Future Reference Maintenance P. 47 Troubleshooting PP. 62 and 63 Index P. 67 3 Example: ...
... manual, the illustration and the screen display are slightly different, depending on the projector. 1 Press MENU/HELP. • The "Picture" menu screen for using the ...slightly from the actual display. However, you can also be performed by using the projector. Using the Menu Screen ENTER button Adjustment buttons (P/R/O/Q) MENU/HELP button ENTER button...Picture" to Read this Operation Manual ■ The specifications are simplified for setting up and operating the projector. For Future Reference Maintenance P. 47 Troubleshooting PP. 62 and 63 Index P. 67 3 Example: ...

PG-F211X , PG-F261X Operation Manual
Page 6
... ........ 42 Selecting the Setup Guide 42 Reversing/Inverting Projected Images 42 Selecting the On-screen Display Language 42 Adjusting the Projector Function ("PRJ - ADJ" Menu 43 Auto Power Off Function 43 Auto Restart Function 43 STANDBY Mode 43 Setting the ...Picture Adjustment ("Picture" Menu) .. 39 Selecting the Picture Mode 39 Adjusting the Image 40 Adjusting the Color Temperature ......... 40 Progressive 40 Lamp Setting 40 Adjusting the Projected Image ("SCR - Contents Preparing Introduction How to Read this Operation Manual .... 3 Contents 4 IMPORTANT SAFEGUARDS 6...
... ........ 42 Selecting the Setup Guide 42 Reversing/Inverting Projected Images 42 Selecting the On-screen Display Language 42 Adjusting the Projector Function ("PRJ - ADJ" Menu 43 Auto Power Off Function 43 Auto Restart Function 43 STANDBY Mode 43 Setting the ...Picture Adjustment ("Picture" Menu) .. 39 Selecting the Picture Mode 39 Adjusting the Image 40 Adjusting the Color Temperature ......... 40 Progressive 40 Lamp Setting 40 Adjusting the Projected Image ("SCR - Contents Preparing Introduction How to Read this Operation Manual .... 3 Contents 4 IMPORTANT SAFEGUARDS 6...

PG-F211X , PG-F261X Operation Manual
Page 7
Introduction Reference Appendix Maintenance 47 Maintenance Indicators 48 Regarding the Lamp 50 Lamp 50 Caution Concerning the Lamp 50 Replacing the Lamp 50 Removing and Installing the Lamp Unit 51 Resetting the Lamp Timer 52 Storing the Projector 53 How to Use the Storage Case 53 Connecting Pin Assignments 54 RS-232C Specifications and Command Settings 56 Computer Compatibility Chart 61 Troubleshooting 62 For SHARP Assistance 64 Specifications 65 Dimensions 66 Index 67 5
Introduction Reference Appendix Maintenance 47 Maintenance Indicators 48 Regarding the Lamp 50 Lamp 50 Caution Concerning the Lamp 50 Replacing the Lamp 50 Removing and Installing the Lamp Unit 51 Resetting the Lamp Timer 52 Storing the Projector 53 How to Use the Storage Case 53 Connecting Pin Assignments 54 RS-232C Specifications and Command Settings 56 Computer Compatibility Chart 61 Troubleshooting 62 For SHARP Assistance 64 Specifications 65 Dimensions 66 Index 67 5
PG-F211X , PG-F261X Operation Manual
Page 10
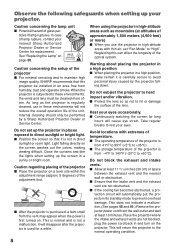
... to the normal operating condition. 8 Observe the following safeguards when setting up your nearest Sharp Authorized Projector Dealer or Service Center for a while. See "Replacing the Lamp" on the screen washes out the colors, making viewing difficult. When the projector is from the wall outlet and wait at least 11 13/16 inches (30...
... to the normal operating condition. 8 Observe the following safeguards when setting up your nearest Sharp Authorized Projector Dealer or Service Center for a while. See "Replacing the Lamp" on the screen washes out the colors, making viewing difficult. When the projector is from the wall outlet and wait at least 11 13/16 inches (30...
PG-F211X , PG-F261X Operation Manual
Page 11
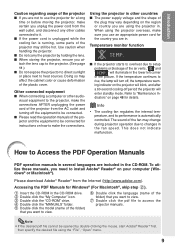
... unplugged while the cooling fan is automatically controlled. Refer to use an appropriate power cord for a long time or before moving the projector, make the connections. Please download Adobe® Reader® from the wall outlet, and disconnect any other cables connected to make ... continues to Access the PDF Operation Manuals PDF operation manuals in . This does not indicate malfunction. How to rise, the lamp will turn off period the projector will illuminate in . dicators" on the region or country you need to setup problems or blockage of the plastic cover.
... unplugged while the cooling fan is automatically controlled. Refer to use an appropriate power cord for a long time or before moving the projector, make the connections. Please download Adobe® Reader® from the wall outlet, and disconnect any other cables connected to make ... continues to Access the PDF Operation Manuals PDF operation manuals in . This does not indicate malfunction. How to rise, the lamp will turn off period the projector will illuminate in . dicators" on the region or country you need to setup problems or blockage of the plastic cover.
PG-F211X , PG-F261X Operation Manual
Page 12
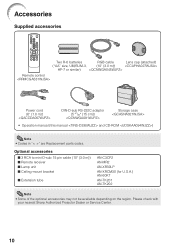
...; Remote receiver ■ Lamp unit ■ Ceiling-mount bracket ■ Extension tube AN-C3CP2 AN-MR2 AN-XR30LP AN-XRCM30 (for U.S.A.) AN-60KT AN-TK201 AN-TK202 Note • Some of the optional accessories may not be available depending on the region. Please check with your nearest Sharp Authorized Projector Dealer or Service...
...; Remote receiver ■ Lamp unit ■ Ceiling-mount bracket ■ Extension tube AN-C3CP2 AN-MR2 AN-XR30LP AN-XRCM30 (for U.S.A.) AN-60KT AN-TK201 AN-TK202 Note • Some of the optional accessories may not be available depending on the region. Please check with your nearest Sharp Authorized Projector Dealer or Service...
PG-F211X , PG-F261X Operation Manual
Page 13
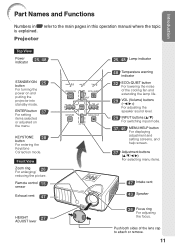
ENTER button For setting 37 items selected or adjusted on and putting the projector into standby mode. Remote control 15 sensor Exhaust vent 47 25, 48 Lamp indicator 48 Temperature warning indicator 32 ECO+QUIET button For lowering the noise of the lens cap to the main pages in this ...HEIGHT 27 ADJUST lever 26 Focus ring For adjusting the focus. Introduction Part Names and Functions Numbers in Z refer to attach or remove. 11 Projector Top View Power indicator 25, 48 STANDBY/ON 25 button For turning the power on the menu. KEYSTONE 28 button For entering the Keystone ...
ENTER button For setting 37 items selected or adjusted on and putting the projector into standby mode. Remote control 15 sensor Exhaust vent 47 25, 48 Lamp indicator 48 Temperature warning indicator 32 ECO+QUIET button For lowering the noise of the lens cap to the main pages in this ...HEIGHT 27 ADJUST lever 26 Focus ring For adjusting the focus. Introduction Part Names and Functions Numbers in Z refer to attach or remove. 11 Projector Top View Power indicator 25, 48 STANDBY/ON 25 button For turning the power on the menu. KEYSTONE 28 button For entering the Keystone ...

PG-F211X , PG-F261X Operation Manual
Page 15
POINTER button 32 For displaying the pointer. KEYSTONE button 28 For entering the Keystone Correction mode. STANDBY button 25 For putting the projector into the standby mode. MOUSE/Adjustment 34 buttons (P/R/O/Q) 37 • For moving the computer cursor when with the USB connection (using a ...optional remote receiver). • For returning to a computer. ECO+QUIET button 32 For lowering the noise of the cooling fan and extending the lamp life. 25 ON button For turning the power on. 33 FREEZE button For freezing images. 29 AV MUTE button For temporarily displaying a black ...
POINTER button 32 For displaying the pointer. KEYSTONE button 28 For entering the Keystone Correction mode. STANDBY button 25 For putting the projector into the standby mode. MOUSE/Adjustment 34 buttons (P/R/O/Q) 37 • For moving the computer cursor when with the USB connection (using a ...optional remote receiver). • For returning to a computer. ECO+QUIET button 32 For lowering the noise of the cooling fan and extending the lamp life. 25 ON button For turning the power on. 33 FREEZE button For freezing images. 29 AV MUTE button For temporarily displaying a black ...

PG-F211X , PG-F261X Operation Manual
Page 17
... effective distance of the signal may malfunction under a fluorescent lamp. In this case, move the projector away from the remote control can be re- When using the remote control • Ensure that you do not drop it or expose it to control the projector within the ranges shown in the illustration. Introduction Usable...
... effective distance of the signal may malfunction under a fluorescent lamp. In this case, move the projector away from the remote control can be re- When using the remote control • Ensure that you do not drop it or expose it to control the projector within the ranges shown in the illustration. Introduction Usable...

PG-F211X , PG-F261X Operation Manual
Page 27
... breaker switch is turned on. (See page 43.) • English is shut down abnormally or the lamp should be replaced. • When switching on the projector, a slight flickering of the lamp. Power indicator STANDBY/ON button STANDBY button ON button Basic Operation Turning the Power off when the...to indicate the status of the image may be experienced within the first minute after the lamp has been illuminated. See page 44 for details. Turning the Projector On/Off Turning the Projector on Note that the connections to external equipment and power outlet should be done before ...
... breaker switch is turned on. (See page 43.) • English is shut down abnormally or the lamp should be replaced. • When switching on the projector, a slight flickering of the lamp. Power indicator STANDBY/ON button STANDBY button ON button Basic Operation Turning the Power off when the...to indicate the status of the image may be experienced within the first minute after the lamp has been illuminated. See page 44 for details. Turning the Projector On/Off Turning the Projector on Note that the connections to external equipment and power outlet should be done before ...

PG-F211X , PG-F261X Operation Manual
Page 34
... set in units of one minute (up to 60 minutes). Switching the Eco+Quiet Mode Press ECO+QUIET on the remote control or on the projector to switch the Eco+Quiet mode between on the remote control to move the spot area. 2 Press SPOT again. • The spot area will disappear... Break Timer Using the Spot Function 1 Press SPOT and press P/R/O/Q on page 40 for details of the cooling fan will extend. Note • Refer to "Lamp Setting" on the remote control to count down , the power consumption will decrease, and the...
... set in units of one minute (up to 60 minutes). Switching the Eco+Quiet Mode Press ECO+QUIET on the remote control or on the projector to switch the Eco+Quiet mode between on the remote control to move the spot area. 2 Press SPOT again. • The spot area will disappear... Break Timer Using the Spot Function 1 Press SPOT and press P/R/O/Q on page 40 for details of the cooling fan will extend. Note • Refer to "Lamp Setting" on the remote control to count down , the power consumption will decrease, and the...

PG-F211X , PG-F261X Operation Manual
Page 37
...only when PAL or SECAM signals are input (including when forcibly changed to adjust "Tone", but you can be set in the projector. There is basically no need to those input signals). ADJ Help Main menu Picture Page 39 Picture Mode Page 39 Sub menu Standard... *1 Blue -30 +30 *1 Color -30 +30 *2 Tint -30 +30 *2*3 Sharp -30 +30 *2 Page 40 SEL./ADJ. ADJ Help Standard 0 0 0 0 0 0 1 3D Progressive Bright CLR Temp -2 2 Page 40 Bright Boost [0/1/2] Page 40 Progressive Page 40 Lamp Setting Page 40 Reset *2 2D Progressive 3D Progressive Film Mode Bright Eco + Quiet SEL...
...only when PAL or SECAM signals are input (including when forcibly changed to adjust "Tone", but you can be set in the projector. There is basically no need to those input signals). ADJ Help Main menu Picture Page 39 Picture Mode Page 39 Sub menu Standard... *1 Blue -30 +30 *1 Color -30 +30 *2 Tint -30 +30 *2*3 Sharp -30 +30 *2 Page 40 SEL./ADJ. ADJ Help Standard 0 0 0 0 0 0 1 3D Progressive Bright CLR Temp -2 2 Page 40 Bright Boost [0/1/2] Page 40 Progressive Page 40 Lamp Setting Page 40 Reset *2 2D Progressive 3D Progressive Film Mode Bright Eco + Quiet SEL...

PG-F211X , PG-F261X Operation Manual
Page 38
ADJ On On Standard On On Audio 1 9600bps Normal Disable Help Lamp Timer(Life) 0h 0 min 100% SEL./ADJ. ADJ There is no picture or audio Vertical stripes or flickering image appear Data image is not centered ... 43 RS-232C Page 44 Fan Mode Page 44 System Lock [Enable/Disable] Page 44 Lamp Timer(Life) Page 44 Sub menu Standard Eco Audio 1 Audio 2 9600bps 115200bps Normal High "Help" menu Picture SCR - Menu Items (Continued) "Projector adjustment (PRJ-ADJ)" menu Picture SCR - ENTER END Main menu PRJ - ENTER END 36...
ADJ On On Standard On On Audio 1 9600bps Normal Disable Help Lamp Timer(Life) 0h 0 min 100% SEL./ADJ. ADJ There is no picture or audio Vertical stripes or flickering image appear Data image is not centered ... 43 RS-232C Page 44 Fan Mode Page 44 System Lock [Enable/Disable] Page 44 Lamp Timer(Life) Page 44 Sub menu Standard Eco Audio 1 Audio 2 9600bps 115200bps Normal High "Help" menu Picture SCR - Menu Items (Continued) "Projector adjustment (PRJ-ADJ)" menu Picture SCR - ENTER END Main menu PRJ - ENTER END 36...

PG-F211X , PG-F261X Operation Manual
Page 39
... previous screen when the menu is displayed. 2 Press Q or O and select "Picture" to adjust. ADJ Picture Mode Contrast Bright Red Blue CLR Temp Bright Boost Lamp Setting Reset PRJ - MENU/HELP button Useful Features Menu Selections (Adjustments) Example: Adjusting "Bright". • This operation can also be performed by using the buttons...
... previous screen when the menu is displayed. 2 Press Q or O and select "Picture" to adjust. ADJ Picture Mode Contrast Bright Red Blue CLR Temp Bright Boost Lamp Setting Reset PRJ - MENU/HELP button Useful Features Menu Selections (Adjustments) Example: Adjusting "Bright". • This operation can also be performed by using the buttons...

PG-F211X , PG-F261X Operation Manual
Page 40
ADJ Picture Mode Contrast Bright Red Blue CLR Temp Bright Boost Lamp Setting Reset PRJ - Note • Press ENTER again to return to be displayed. Single ADJ END Note • Menu buttons do not function while the projector is highlighted. ADJ Border 0 0 On Help Press ENTER. ...functions. 38 ADJ Standard 0 0 0 0 0 1 Bright Help SEL./ADJ. ADJ PRJ - ADJ Picture Mode Contrast Bright Red Blue CLR Temp Bright Boost Lamp Setting Reset Standard 0 15 0 0 0 1 Bright Help 5 Press MENU/HELP. • The menu screen will be adjusted To adjust the projected image while...
ADJ Picture Mode Contrast Bright Red Blue CLR Temp Bright Boost Lamp Setting Reset PRJ - Note • Press ENTER again to return to be displayed. Single ADJ END Note • Menu buttons do not function while the projector is highlighted. ADJ Border 0 0 On Help Press ENTER. ...functions. 38 ADJ Standard 0 0 0 0 0 1 Bright Help SEL./ADJ. ADJ PRJ - ADJ Picture Mode Contrast Bright Red Blue CLR Temp Bright Boost Lamp Setting Reset Standard 0 15 0 0 0 1 Bright Help 5 Press MENU/HELP. • The menu screen will be adjusted To adjust the projected image while...

PG-F211X , PG-F261X Operation Manual
Page 42
...more brightness. Note • "Bright Boost" and "CLR Temp" cannot be approximately 3,000 hours (approximately 2,000 hours in the chart.) The lamp life will appear on "CLR Temp" are input (including when forcibly changed to display relatively slow- For less brightness. For stronger blue. For... such as drama and documentary more contrast. For more sharpness. For making skin tones purplish. Film Mode Reproduces the image of film transformed with the original encoded as shown in the Bright mode). The projector can adjust the picture tone with this film source to...
...more brightness. Note • "Bright Boost" and "CLR Temp" cannot be approximately 3,000 hours (approximately 2,000 hours in the chart.) The lamp life will appear on "CLR Temp" are input (including when forcibly changed to display relatively slow- For less brightness. For stronger blue. For... such as drama and documentary more contrast. For more sharpness. For making skin tones purplish. Film Mode Reproduces the image of film transformed with the original encoded as shown in the Bright mode). The projector can adjust the picture tone with this film source to...

PG-F211X , PG-F261X Operation Manual
Page 45
...switch is used as an audio input terminal. ADJ On On Standard On On Audio 1 9600 bps Normal Disable Help Lamp Timer(Life) 0h 0 min 100% SEL./ADJ. The projector does not turn on automatically when the power cord is plugged into the AC outlet or the breaker switch is used...input terminal is turned off in standby mode. 1 Auto Power Off Function Selectable items On Off Description When no input signal is made when the projector turns on . ADJ Auto Power Off Auto Restart STANDBY Mode System Sound Speaker Audio Input RS-232C Fan Mode System Lock PRJ - will automatically ...
...switch is used as an audio input terminal. ADJ On On Standard On On Audio 1 9600 bps Normal Disable Help Lamp Timer(Life) 0h 0 min 100% SEL./ADJ. The projector does not turn on automatically when the power cord is plugged into the AC outlet or the breaker switch is used...input terminal is turned off in standby mode. 1 Auto Power Off Function Selectable items On Off Description When no input signal is made when the projector turns on . ADJ Auto Power Off Auto Restart STANDBY Mode System Sound Speaker Audio Input RS-232C Fan Mode System Lock PRJ - will automatically ...

PG-F211X , PG-F261X Operation Manual
Page 54
... installed, the power will not turn on the lamp unit cover (1) and place it while pressing the tab (2) to the projector. Securing screws Resetting the Lamp Timer Reset the lamp timer after replacing the lamp. Fasten the securing screws. 6 Replace the lamp unit cover. • Align the tab on... not tilt it in the direction of the projector. 2 52 Reset the lamp timer. • While simultaneously holding down MENU/HELP, ENTER and R on the projector, press STANDBY/ON on the projector. • "LAMP 0000H" is displayed, indicating that the lamp timer is connected to close it. Info &#...
... installed, the power will not turn on the lamp unit cover (1) and place it while pressing the tab (2) to the projector. Securing screws Resetting the Lamp Timer Reset the lamp timer after replacing the lamp. Fasten the securing screws. 6 Replace the lamp unit cover. • Align the tab on... not tilt it in the direction of the projector. 2 52 Reset the lamp timer. • While simultaneously holding down MENU/HELP, ENTER and R on the projector, press STANDBY/ON on the projector. • "LAMP 0000H" is displayed, indicating that the lamp timer is connected to close it. Info &#...


