Sharp LL-S242A-W Support and Manuals
Get Help and Manuals for this Sharp item

View All Support Options Below
Free Sharp LL-S242A-W manuals!
Problems with Sharp LL-S242A-W?
Ask a Question
Free Sharp LL-S242A-W manuals!
Problems with Sharp LL-S242A-W?
Ask a Question
Sharp LL-S242A-W Videos

IL-P202V / LL-S242A-W TOUCHSCREEN LCD MONITOR
Duration: 3:32
Total Views: 490
Duration: 3:32
Total Views: 490
Popular Sharp LL-S242A-W Manual Pages
Operation Manual - Page 1
LL-S242A-W LL-P202V
LCD MONITOR
OPERATION MANUAL
Operation Manual - Page 4

... useful functions, but it can cause electric shock and/or short internal parts. SAFETY PRECAUTIONS
Electricity is operated. 2. Keep this manual in accidents. 7. Water and moisture - In order to perform repairs. Follow instructions - Do
not use the product near water. Do not install the product in the cabinet are followed. 9. Power cord protection - The vents...
Operation Manual - Page 6

...manual is English by an authorized Sharp servicing dealer or service center. * Please contact your health, observe the following : Incorrect handling may lead to fire as this could cause a residual image.
- Input may lead to LCD monitor malfunctions.
- It contains high voltage parts...installed ... may be upgraded without advance notice...replace...TIPS AND SAFETY INSTRUCTIONS
- However, ...
Operation Manual - Page 7
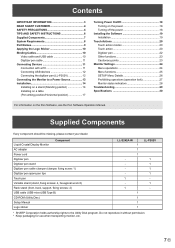
...hexagonal wrench)
Rack stand (front, back, support, fixing screws: 2)
USB cable (USB-microUSB Type B)
CD-ROM (Utility Disc)
Setup Manual
Logo sticker
LL-S242A-W 1 1 1
1 1
1 1 1 1
LL-P202V
1 1 1 1 1 -
* SHARP Corporation holds authorship rights to a Power Source 13 Installation 14 Installing on a stand (Standing position 14 Installing on a table (Pen writing position/Horizontal position...
Operation Manual - Page 11

...the necessary software must be connected.
• Do not forcibly bend or apply force to be installed on PC HDMI input terminal
Check the orientation of the clamper. 2. Also, read the manual of 500mA or lower. D B
A 12mm B 38mm A C 8mm D 17mm
C
TIPS... horizontally as far as it will go .
11 E This product supports MHL 1. Attach the clamper using the supplied clamper and fixing screw. 1.
Operation Manual - Page 15

...
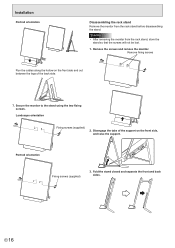
Back
4. Fold down the support, inserting the tabs into the holes on the supplied rack stand. 1. Run the cables out...of the back side.
15 E
Front
Back hinge part
Tape Back Support
5. nLL-S242A-W
Placement on the rack stand Place the unit on the front side.
Front hinge part
Installation
3. Peel off the adhesive tape securing the support to the front.
Attach the back of the stand...
Operation Manual - Page 16
... fixing screws
Run the cables along the hollow on the front side and out between the legs of the support on the front side, and raise the support. Portrait orientation
Fixing screws (supplied)
3.
Installation
Portrait orientation
Disassembling the rack stand Remove the monitor from the rack stand, store the
stand so that the...
Operation Manual - Page 19
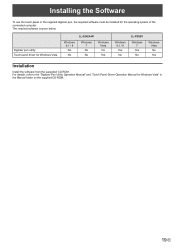
... to the "Digitizer Pen Utility Operation Manual" and "Touch Panel Driver Operation Manual for Windows Vista
LL-S242A-W
Windows 8.1 / 8
No
No
Windows 7
No
No
Windows Vista
No
Yes
Windows 8.1 / 8
Yes
No
LL-P202V
Windows 7
Yes No
Windows Vista
No
Yes
Installation
Install the software from the suppolied CD-ROM. Installing the Software
To use the touch panel...
Operation Manual - Page 20
When the digitizer pen is set to operating system and application. You cannot touch the ...Yes Yes No
Yes No No Yes No No No
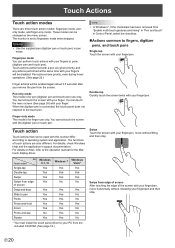
* You must install the touch panel driver to the operation manual for the Mac touch display driver. OS Touch action
Single-tap Double-tap Swipe Swipe from the screen. Caution...only. For details, check Windows Help and the application's support documentation.
Operation Manual - Page 22
... Start screen or on the screen.
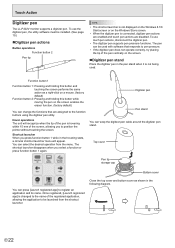
To use the digitizer pen, the utility software must be installed. (See page 19.)
nDigitizer pen actions
Button operations Function button 2
Pen tip
TIPS
•...launcher.
To use touch pen actions, disconnect the digitizer pen.
• The digitizer pen supports pen pressure functions.
Hover operations The unit will appear. Digitizer pen
Pen stand You can...
Operation Manual - Page 24
... operation
Operations on this page are not
possible other than those for around 10 seconds, the screen returns to the level above.
2. Monitor Settings
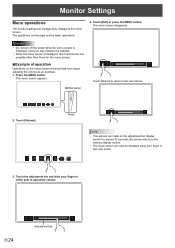
Menu operations
The monitor settings are made on the adjustment bar display screen for the menu screen.
Touch [Exit] or press the MENU button. Doing so may initialize...
Operation Manual - Page 25
The touch mark (see page 26.
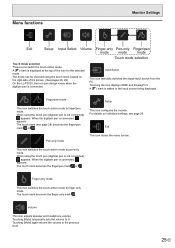
Menu functions
Monitor Settings
Exit
Setup Input Select Volume Finger-only Pen-only Finger/pen
mode
mode
mode
Touch ...the touch mark located on individual settings, see page 28) becomes the finger/pen
mark or .
Input Select
This icon manually switches the signal input source from the PC. Finger/pen mode
Setup
This icon switches the touch action ...
Operation Manual - Page 26
... menu screen to the bottom of the menu at startup to "Bottom in "Auto", adjust to match the video.
Language Language
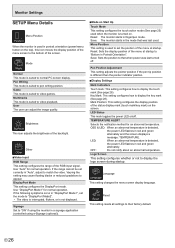
This setting changes the menu screen display language. Monitor Settings
SETUP Menu Details
Menu Position Position
When the monitor is used in a signage application (controlled using e-Signage (optional)).
Mode on Start...
Operation Manual - Page 29
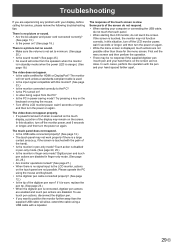
... Some parts of...starting your display, before calling for service, please review the following troubleshooting tips. In this situation, turn off...in finger-only mode? If it is worn, replace the pen tip. (See page 23.) &#...not work unless a standards-compliant cable is not set to the PC? • Is the PC turned... • If you are experiencing any problem with your computer or connecting the USB ...
Operation Manual - Page 30
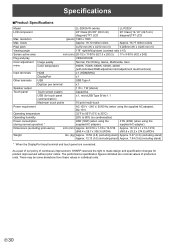
... in individual units. The performance specification figures indicated are connected. As a part of our policy of continuous improvement, SHARP reserves the right to 80% ...176;C)
Operating humidity
20% to make design and specification changes for product improvement without prior notice.
Specifications
nProduct Specifications
Model
LL-S242A-W (white)
LL-P202V
LCD component
24" ...
Sharp LL-S242A-W Reviews
We have not received any reviews for Sharp yet.