

CD-ES66 | CD-ES600 Operation Manual
Page 7
... or Repeat, Tape Play Button 16, 19, 23 17. Extra Bass/Demo Mode Button 12, 14 21. Game/Video Button 31 General Information CD-ES600 CD-ES66 7 Controls and indicators 13 1 14 2 15 3 16 4 5 17 6 18 7 19 8 20 9 21 10 22 11 23 24 25 26 12 ! Tape 1 Cassette Compartment 23... 11. Tuner (Band) Button 21 24. CD or Tape Stop Button 17, 24 20. CD Direct Play Button 18 15. Memory/Set Button 15, 20, 22, 27, 30 18. Disc Number Select Buttons 16 14. Disc Trays 16 2. Game/Video Input Jacks 31 13. CD Track Down or Fast Reverse, Tape 2 Rewind, ...
... or Repeat, Tape Play Button 16, 19, 23 17. Extra Bass/Demo Mode Button 12, 14 21. Game/Video Button 31 General Information CD-ES600 CD-ES66 7 Controls and indicators 13 1 14 2 15 3 16 4 5 17 6 18 7 19 8 20 9 21 10 22 11 23 24 25 26 12 ! Tape 1 Cassette Compartment 23... 11. Tuner (Band) Button 21 24. CD or Tape Stop Button 17, 24 20. CD Direct Play Button 18 15. Memory/Set Button 15, 20, 22, 27, 30 18. Disc Number Select Buttons 16 14. Disc Trays 16 2. Game/Video Input Jacks 31 13. CD Track Down or Fast Reverse, Tape 2 Rewind, ...

CD-ES66 | CD-ES600 Operation Manual
Page 8
CD-ES600 CD-ES66 Controls and indicators (continued) 1 234 5 67 8 12 13 14 15 9 10 11 General Information 3 4 5 6 1 7 2 8 ! FM Stereo Receiving Indicator 21 12. Timer Play Indicator 28 15. AC Power Cord 12 3. FM 75 Ohms Antenna Terminal 11 4. FM Antenna Ground Terminal 11 5. Speaker Terminals 11 ! Woofer 1 4. CD... Tape 2 Record Indicator 25 13. CD Indicator 16 7. Speaker system 1. Timer Recording Indicator 28 ! Sleep Indicator 30 14. Passive Radiator 3. AM Loop Aerial Jack 11 6. Cooling Fan 12 2. Disc Number Indicators 18 2. FM Stereo Mode...
CD-ES600 CD-ES66 Controls and indicators (continued) 1 234 5 67 8 12 13 14 15 9 10 11 General Information 3 4 5 6 1 7 2 8 ! FM Stereo Receiving Indicator 21 12. Timer Play Indicator 28 15. AC Power Cord 12 3. FM 75 Ohms Antenna Terminal 11 4. FM Antenna Ground Terminal 11 5. Speaker Terminals 11 ! Woofer 1 4. CD... Tape 2 Record Indicator 25 13. CD Indicator 16 7. Speaker system 1. Timer Recording Indicator 28 ! Sleep Indicator 30 14. Passive Radiator 3. AM Loop Aerial Jack 11 6. Cooling Fan 12 2. Disc Number Indicators 18 2. FM Stereo Mode...

CD-ES66 | CD-ES600 Operation Manual
Page 9
...Reverse, Tape 2 Rewind, 2 Tuner Preset Down, Time Down Button 15, 17, 22, 24 7. CD Button 16 11. Disc Direct Search Buttons 18 15. Equalizer Mode Select Button 14 3 14 9. Extra Bass Button 14 6 7 15 13. CD Track Up or Fast Forward, Tape 2 Fast Forward, 8 9 10 18 Tuner Preset Up, Time... 13 2. CD Clear/Dimmer Button 14, 20 4. Clock/Timer Button 15, 27, 30 16 14. Tape (1 2) Button 23 21 21. Game/Video Button 31 11 20. Memory/Set Button 15, 20, 22, 27, 30 5. Power On/Stand-by Button 14 5 12. CD Pause Button 17 17 16. CD-ES600 CD-ES66 General ...
...Reverse, Tape 2 Rewind, 2 Tuner Preset Down, Time Down Button 15, 17, 22, 24 7. CD Button 16 11. Disc Direct Search Buttons 18 15. Equalizer Mode Select Button 14 3 14 9. Extra Bass Button 14 6 7 15 13. CD Track Up or Fast Forward, Tape 2 Fast Forward, 8 9 10 18 Tuner Preset Up, Time... 13 2. CD Clear/Dimmer Button 14, 20 4. Clock/Timer Button 15, 27, 30 16 14. Tape (1 2) Button 23 21 21. Game/Video Button 31 11 20. Memory/Set Button 15, 20, 22, 27, 30 5. Power On/Stand-by Button 14 5 12. CD Pause Button 17 17 16. CD-ES600 CD-ES66 General ...

CD-ES66 | CD-ES600 Operation Manual
Page 16
CD-ES600 CD-ES66 Listening to a CD (CDs) This system can place discs on the trays 2 - 5 by following steps 3 - 5. 7 Press the / button to start playback. Be sure to place 3" (8 cm) CD in the middle of the CD whose number is flashing " " will appear. 6 You can also play indicator 16 CD play audio CD-R and CD-RW discs, but cannot record. CD playback 1 Press the...
CD-ES600 CD-ES66 Listening to a CD (CDs) This system can place discs on the trays 2 - 5 by following steps 3 - 5. 7 Press the / button to start playback. Be sure to place 3" (8 cm) CD in the middle of the CD whose number is flashing " " will appear. 6 You can also play indicator 16 CD play audio CD-R and CD-RW discs, but cannot record. CD playback 1 Press the...
CD-ES66 | CD-ES600 Operation Manual
Page 17
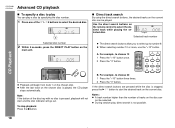
...display for the stopped disc and within 5 seconds, press the OPEN/CLOSE button. Press and hold down , the disc will enter the playback mode. ( : Last track number) CD Playback CD-ES600 CD-ES66 17 To remove the CDs: In the stop mode. Caution: " Do not place two CDs in the playback mode.... or octagon- It may cause malfunctions. " If the disc tray is moving. Press the...
...display for the stopped disc and within 5 seconds, press the OPEN/CLOSE button. Press and hold down , the disc will enter the playback mode. ( : Last track number) CD Playback CD-ES600 CD-ES66 17 To remove the CDs: In the stop mode. Caution: " Do not place two CDs in the playback mode.... or octagon- It may cause malfunctions. " If the disc tray is moving. Press the...
CD-ES66 | CD-ES600 Operation Manual
Page 18
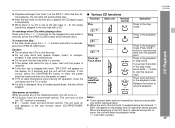
... out. Note: If the button of the disc tray with no disc is stopped, press the / button to start and the disc indicator will begin from track 1 on the chosen disc. CD-ES600 CD-ES66 Advanced CD playback ! " During random play a disc by specifying the disc number. 1 Press one of tracks on the chosen disc is not possible. 18 Notes: " A track...
... out. Note: If the button of the disc tray with no disc is stopped, press the / button to start and the disc indicator will begin from track 1 on the chosen disc. CD-ES600 CD-ES66 Advanced CD playback ! " During random play a disc by specifying the disc number. 1 Press one of tracks on the chosen disc is not possible. 18 Notes: " A track...

CD-ES66 | CD-ES600 Operation Manual
Page 19
.... To random play The tracks on the remote control. ! Repeat play Repeat play can move to the track selected next by the random operation. CD-ES600 CD-ES66 To repeat desired tracks: Perform steps 1 - 6 in random order automatically. To repeat all tracks on page 20 and then press the /... button twice. To cancel random play all 5 discs, all tracks on the chosen disc: 1 Press one of the tracks.) Caution: After performing repeat or random play , you to move to the previous track.
.... To random play The tracks on the remote control. ! Repeat play Repeat play can move to the track selected next by the random operation. CD-ES600 CD-ES66 To repeat desired tracks: Perform steps 1 - 6 in random order automatically. To repeat all tracks on page 20 and then press the /... button twice. To cancel random play all 5 discs, all tracks on the chosen disc: 1 Press one of the tracks.) Caution: After performing repeat or random play , you to move to the previous track.

CD-ES66 | CD-ES600 Operation Manual
Page 20
...programmed selections: Press the CLEAR/DIMMER button on the remote control to select the desired disc. Notes: " When a disc with the last track programmed. Adding tracks to 32 tracks can choose up to ...2 - 4 for other tracks. Selected disc number Selected track number You can be cleared. The total number of the 1 - 5 buttons to select the desired track. CD Playback 3 Press the direct search buttons ...the ON/STAND-BY button to enter the stand-by mode or change the function from CD to save mode. 2 Press one track will not be cleared by pressing the or button...
...programmed selections: Press the CLEAR/DIMMER button on the remote control to select the desired disc. Notes: " When a disc with the last track programmed. Adding tracks to 32 tracks can choose up to ...2 - 4 for other tracks. Selected disc number Selected track number You can be cleared. The total number of the 1 - 5 buttons to select the desired track. CD Playback 3 Press the direct search buttons ...the ON/STAND-BY button to enter the stand-by mode or change the function from CD to save mode. 2 Press one track will not be cleared by pressing the or button...

CD-ES66 | CD-ES600 Operation Manual
Page 25
... compartment with the side to start approximately 7 seconds after the tape starts. The CD and tape will stop automatically. CD-ES600 CD-ES66 Tape Recording 5 Press one of the tape is finished or the end of the 1 - 5 buttons to select the desired disc. 6 Within 5 seconds, press the DIRECT PLAY button to be recorded on which...
... compartment with the side to start approximately 7 seconds after the tape starts. The CD and tape will stop automatically. CD-ES600 CD-ES66 Tape Recording 5 Press one of the tape is finished or the end of the 1 - 5 buttons to select the desired disc. 6 Within 5 seconds, press the DIRECT PLAY button to be recorded on which...

CD-ES66 | CD-ES600 Operation Manual
Page 26
... display. 3 Press the button. 4 Press the / button to start erasing. Recording will stop recording: Press the button. CD-ES600 CD-ES66 Recording on a cassette tape (continued) Tape Recording Recording from several CDs continuously: 1 Perform steps 1 - 5 in to the desired station. (See page 21.) 2 Load a cassette into the...discs and tracks. (See page 20.) 2 Press the button. 3 Press the / . Wind past the leader of the tape, on page 25. 2 Within 5 seconds, press the / . Note: Make sure that the recording tape is not in use. 26 To resume recording, press the / button. The CD...
... display. 3 Press the button. 4 Press the / button to start erasing. Recording will stop recording: Press the button. CD-ES600 CD-ES66 Recording on a cassette tape (continued) Tape Recording Recording from several CDs continuously: 1 Perform steps 1 - 5 in to the desired station. (See page 21.) 2 Load a cassette into the...discs and tracks. (See page 20.) 2 Press the button. 3 Press the / . Wind past the leader of the tape, on page 25. 2 Within 5 seconds, press the / . Note: Make sure that the recording tape is not in use. 26 To resume recording, press the / button. The CD...

CD-ES66 | CD-ES600 Operation Manual
Page 27
... in combination: For example, use the once timer to record a radio program, and use the timer function. 2 For timer playback: Load a cassette or discs to record a program on a radio station. Set the unit to the next page 27 Advanced Features Once timer: Once timer play and daily timer recording... works at the same preset time everyday. CD-ES600 CD-ES66 This unit has 2 types of at the preset time. Continued to the correct time if "ONCE" or "DAILY" does not appear. Timer ...
... in combination: For example, use the once timer to record a radio program, and use the timer function. 2 For timer playback: Load a cassette or discs to record a program on a radio station. Set the unit to the next page 27 Advanced Features Once timer: Once timer play and daily timer recording... works at the same preset time everyday. CD-ES600 CD-ES66 This unit has 2 types of at the preset time. Continued to the correct time if "ONCE" or "DAILY" does not appear. Timer ...

CD-ES66 | CD-ES600 Operation Manual
Page 30
... the sleep operation without setting the unit to select "SLEEP OFF", and press the MEMORY/SET button. ! Sleep operation The radio, compact disc and cassette tape can change the remaining sleep time while it is displayed by mode, proceed as follows. 1 While "SLEEP" is shorter ...pressing the MEMORY/SET button (steps 4 - 5). The volume will enter the power stand-by mode automatically after the preset time has elapsed. CD-ES600 CD-ES66 Timer and sleep operation (continued) Advanced Features ! To use timer and sleep operation together Sleep and timer playback: For example, you can...
... the sleep operation without setting the unit to select "SLEEP OFF", and press the MEMORY/SET button. ! Sleep operation The radio, compact disc and cassette tape can change the remaining sleep time while it is displayed by mode, proceed as follows. 1 While "SLEEP" is shorter ...pressing the MEMORY/SET button (steps 4 - 5). The volume will enter the power stand-by mode automatically after the preset time has elapsed. CD-ES600 CD-ES66 Timer and sleep operation (continued) Advanced Features ! To use timer and sleep operation together Sleep and timer playback: For example, you can...

CD-ES66 | CD-ES600 Operation Manual
Page 32
...unit does not respond. by the owner without calling a service technician. " Are the headphones connected? " Is the disc loaded upside down? dle or is 32 ohms. " Plugging in the vibrations? " Be sure your authorized SHARP dealer or service center. ! If something is pressed, " Set the unit to "0"? the clock. (Refer to...turn it . (Refer to the " Did a power failure occur? " Are the speaker wires disconnected? " Playback sounds are between 16 ohms and 50 ohms impedance. CD player Symptom Possible cause " Playback does not start. middle of a track. CD-ES600 CD-ES66 !
...unit does not respond. by the owner without calling a service technician. " Are the headphones connected? " Is the disc loaded upside down? dle or is 32 ohms. " Plugging in the vibrations? " Be sure your authorized SHARP dealer or service center. ! If something is pressed, " Set the unit to "0"? the clock. (Refer to...turn it . (Refer to the " Did a power failure occur? " Are the speaker wires disconnected? " Playback sounds are between 16 ohms and 50 ohms impedance. CD player Symptom Possible cause " Playback does not start. middle of a track. CD-ES600 CD-ES66 !

CD-ES66 | CD-ES600 Operation Manual
Page 34
... with a dry cloth. CD-ES600 CD-ES66 ! Then, set the unit to the power stand-by the edges. Cleaning the CD pickup lens In order to malfunction. " Always hold the CDs by mode. Fingerprints, dirt, or water on the remote control. Contact your discs away from the center, ...the tape-handling parts " Dirty heads, capstans or pinch rollers can cause the unit to ensure proper operation of the CD player, preventative maintenance (cleaning of compact discs Compact discs are read. Demagnetize these parts with a cotton swab moistened with a soft, dry cloth, wiping straight out from ...
... with a dry cloth. CD-ES600 CD-ES66 ! Then, set the unit to the power stand-by the edges. Cleaning the CD pickup lens In order to malfunction. " Always hold the CDs by mode. Fingerprints, dirt, or water on the remote control. Contact your discs away from the center, ...the tape-handling parts " Dirty heads, capstans or pinch rollers can cause the unit to ensure proper operation of the CD player, preventative maintenance (cleaning of compact discs Compact discs are read. Demagnetize these parts with a cotton swab moistened with a soft, dry cloth, wiping straight out from ...

CD-ES66 | CD-ES600 Operation Manual
Page 35
... playback) 50 dB (TAPE-2 recording/playback) 0.3 % (WRMS) ! The performance specification figures indicated are nominal values of continuous improvement, SHARP reserves the right to 20 kHz, 10% total harmonic distortion Speakers: 6 ohms Headphones: 16 - 50 ohms (recommended: 32 ohms) ...Height: 13" (330 mm) Depth: 9-13/16" (249 mm) 7.9 lbs. (3.6 kg)/each References CD-ES600 CD-ES66 35 CD player Type Signal readout D/A converter Frequency response Dynamic range 5-disc multi-play compact disc player Non-contact, 3-beam semiconductor laser pickup 1-bit D/A converter 20 - 20,000 Hz 90 dB (1...
... playback) 50 dB (TAPE-2 recording/playback) 0.3 % (WRMS) ! The performance specification figures indicated are nominal values of continuous improvement, SHARP reserves the right to 20 kHz, 10% total harmonic distortion Speakers: 6 ohms Headphones: 16 - 50 ohms (recommended: 32 ohms) ...Height: 13" (330 mm) Depth: 9-13/16" (249 mm) 7.9 lbs. (3.6 kg)/each References CD-ES600 CD-ES66 35 CD player Type Signal readout D/A converter Frequency response Dynamic range 5-disc multi-play compact disc player Non-contact, 3-beam semiconductor laser pickup 1-bit D/A converter 20 - 20,000 Hz 90 dB (1...


