
AR-M550 | AR-M620 | AR-M700 Operation Manual
Page 1
MODEL AR-M550U AR-M620U AR-M700U AR-M550N AR-M620N AR-M700N (Option) Saddle stitch finisher + Punch module + Inserter + Large capacity tray DIGITAL LASER COPIER/PRINTER DIGITAL MULTIFUNCTIONAL SYSTEM OPERATION MANUAL (for general information and copier operation) Page PART 1: GENERAL INFORMATION • BEFORE USING THE PRODUCT 1-1 • MANAGING THE MACHINE 2-1 • PERIPHERAL DEVICES 3-1 PART 2: COPIER OPERATION &#...
MODEL AR-M550U AR-M620U AR-M700U AR-M550N AR-M620N AR-M700N (Option) Saddle stitch finisher + Punch module + Inserter + Large capacity tray DIGITAL LASER COPIER/PRINTER DIGITAL MULTIFUNCTIONAL SYSTEM OPERATION MANUAL (for general information and copier operation) Page PART 1: GENERAL INFORMATION • BEFORE USING THE PRODUCT 1-1 • MANAGING THE MACHINE 2-1 • PERIPHERAL DEVICES 3-1 PART 2: COPIER OPERATION &#...
AR-M550 | AR-M620 | AR-M700 Operation Manual
Page 5
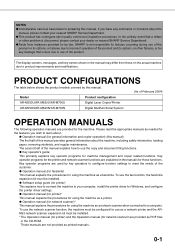
...covered by key operators to configure function settings to meet the needs of the manual explains how to your nearest SHARP Service Department. G Operation manual (for facsimile) This manual explains the procedures for printer) This explains how to connect the machine to ... kit must be configured for use of February 2004) Model Product configuration AR-M550U/AR-M620U/AR-M700U Digital Laser Copier/Printer AR-M550N/AR-M620N/AR-M700N Digital Multifunctional System OPERATION MANUALS The following operation manuals are not provided as a facsimile. G Key operator's guide: This...
...covered by key operators to configure function settings to meet the needs of the manual explains how to your nearest SHARP Service Department. G Operation manual (for facsimile) This manual explains the procedures for printer) This explains how to connect the machine to ... kit must be configured for use of February 2004) Model Product configuration AR-M550U/AR-M620U/AR-M700U Digital Laser Copier/Printer AR-M550N/AR-M620N/AR-M700N Digital Multifunctional System OPERATION MANUALS The following operation manuals are not provided as a facsimile. G Key operator's guide: This...
AR-M550 | AR-M620 | AR-M700 Operation Manual
Page 9
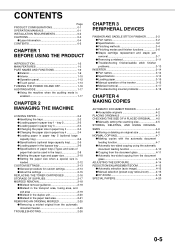
...Troubleshooting finisher/saddle stitch finisher problems 3-13 INSERTER 3-14 G Part names 3-14 G Specifications 3-14 G Loading paper 3-15 G Manual operation of the inserter 3-15 G Misfeed removal 3-17 G Troubleshooting inserter problems 3-18 CHAPTER 4 MAKING COPIES AUTOMATIC DOCUMENT FEEDER 4-2... G Acceptable originals 4-2 PLACING ORIGINALS 4-3 CHECKING THE SIZE OF A PLACED ORIGINAL ......4-5 G Manually setting the scanning size 4-5 STORING, DELETING, AND USING ORIGINAL SIZES 4-6 G Storing or deleting an original size 4-6 NORMAL COPYING...
...Troubleshooting finisher/saddle stitch finisher problems 3-13 INSERTER 3-14 G Part names 3-14 G Specifications 3-14 G Loading paper 3-15 G Manual operation of the inserter 3-15 G Misfeed removal 3-17 G Troubleshooting inserter problems 3-18 CHAPTER 4 MAKING COPIES AUTOMATIC DOCUMENT FEEDER 4-2... G Acceptable originals 4-2 PLACING ORIGINALS 4-3 CHECKING THE SIZE OF A PLACED ORIGINAL ......4-5 G Manually setting the scanning size 4-5 STORING, DELETING, AND USING ORIGINAL SIZES 4-6 G Storing or deleting an original size 4-6 NORMAL COPYING...
AR-M550 | AR-M620 | AR-M700 Operation Manual
Page 12
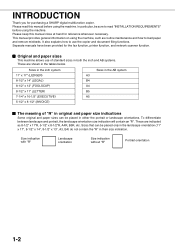
In particular, be sure to read this manual close at hand for reference whenever necessary. To differentiate between landscape and portrait, the landscape orientation size indication will contain an "R". Size indication... the machine, such as 8-1/2" x 11"R, 5-1/2" x 8-1/2"R, A4R, B5R, etc. This manual provides general information on using the machine. These are shown in their size indication. Separate manuals have been provided for purchasing a SHARP digital multifunction copier. Please keep this manual before using the machine. It also explains how to load paper and...
In particular, be sure to read this manual close at hand for reference whenever necessary. To differentiate between landscape and portrait, the landscape orientation size indication will contain an "R". Size indication... the machine, such as 8-1/2" x 11"R, 5-1/2" x 8-1/2"R, A4R, B5R, etc. This manual provides general information on using the machine. These are shown in their size indication. Separate manuals have been provided for purchasing a SHARP digital multifunction copier. Please keep this manual before using the machine. It also explains how to load paper and...
AR-M550 | AR-M620 | AR-M700 Operation Manual
Page 19
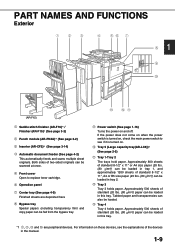
...on and off. For information on these devices, see if it is turned on . 10 Tray 5 (Large capacity tray(AR-LC6))*1 (See page 2-5) 11 Tray 1-Tray 2 The trays hold paper. If the power does not come on when ...(See page 4-9) Finished sheets are peripheral devices. PART NAMES AND FUNCTIONS Exterior 1 (AR-F15) 1 Saddle stitch finisher (AR-F16)*1 / Finisher (AR-F15)*1 (See page 3-2) 2 Punch module (AR-PN4A)*1 (See page 3-2) 3 Inserter (AR-CF2)*1 (See page 3-14) 4 Automatic document feeder (See page 4-2) This automatically...or A4 size paper (20 lbs. (80 g/m2)) can be loaded in the manual. 1-9
...on and off. For information on these devices, see if it is turned on . 10 Tray 5 (Large capacity tray(AR-LC6))*1 (See page 2-5) 11 Tray 1-Tray 2 The trays hold paper. If the power does not come on when ...(See page 4-9) Finished sheets are peripheral devices. PART NAMES AND FUNCTIONS Exterior 1 (AR-F15) 1 Saddle stitch finisher (AR-F16)*1 / Finisher (AR-F15)*1 (See page 3-2) 2 Punch module (AR-PN4A)*1 (See page 3-2) 3 Inserter (AR-CF2)*1 (See page 3-14) 4 Automatic document feeder (See page 4-2) This automatically...or A4 size paper (20 lbs. (80 g/m2)) can be loaded in the manual. 1-9
AR-M550 | AR-M620 | AR-M700 Operation Manual
Page 22
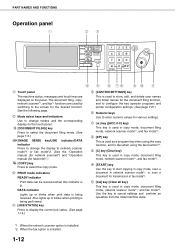
... the following page. 2 Mode select keys and indicators Use to change the display to network scanner mode*1 or fax mode*2. (See the "Operation manual (for network scanner)") and "Operation manual (for facsimile)".) [COPY] key Press to cancel settings and perform an operation from the initial machine state. *1 When the network scanner option...
... the following page. 2 Mode select keys and indicators Use to change the display to network scanner mode*1 or fax mode*2. (See the "Operation manual (for network scanner)") and "Operation manual (for facsimile)".) [COPY] key Press to cancel settings and perform an operation from the initial machine state. *1 When the network scanner option...
AR-M550 | AR-M620 | AR-M700 Operation Manual
Page 23
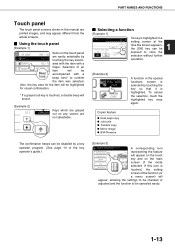
... 2] 1/13 COMPLETE Keys which are grayed out on any screen are not selectable. To cancel the selection, touch the highlighted key once again. If this manual are easily selectable by 003 / 000 touching the key associ- I Selecting a function [Example 1] OCK ONTO 0 OK PRINT ON INSERT SHEETS YES NO CANCEL OK PAPER...
... 2] 1/13 COMPLETE Keys which are grayed out on any screen are not selectable. To cancel the selection, touch the highlighted key once again. If this manual are easily selectable by 003 / 000 touching the key associ- I Selecting a function [Example 1] OCK ONTO 0 OK PRINT ON INSERT SHEETS YES NO CANCEL OK PAPER...

AR-M550 | AR-M620 | AR-M700 Operation Manual
Page 41
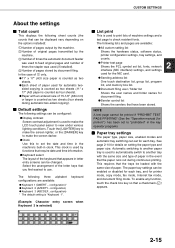
... between trays loaded with the custom settings are shown below , see the fax, network scanner, and printer manuals. G Printer condition*4 Used to display its setting screen. For information on these settings, see the Operation manual (for these settings in a system where the facsimile function is available. G Address control*2 Used to store information...
... between trays loaded with the custom settings are shown below , see the fax, network scanner, and printer manuals. G Printer condition*4 Used to display its setting screen. For information on these settings, see the Operation manual (for these settings in a system where the facsimile function is available. G Address control*2 Used to store information...
AR-M550 | AR-M620 | AR-M700 Operation Manual
Page 43
... layout of machine settings and a test page to check resident fonts. NOTE A test page cannot be printed if "PROHIBIT TEST PAGE PRINTING" (See the "Operation manual (for printer)".) has been set the date and time in the machine's built-in letter entry screens can be changed. Automatic switching to "prohibited" in...
... layout of machine settings and a test page to check resident fonts. NOTE A test page cannot be printed if "PROHIBIT TEST PAGE PRINTING" (See the "Operation manual (for printer)".) has been set the date and time in the machine's built-in letter entry screens can be changed. Automatic switching to "prohibited" in...
AR-M550 | AR-M620 | AR-M700 Operation Manual
Page 54
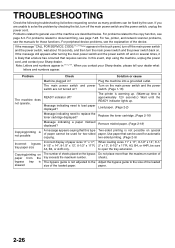
... the following troubleshooting list before requesting service as many problems can be sure to open the tray extension. If you contact your Sharp dealer, please tell your Sharp dealer. If the message "CALL FOR SERVICE. In this type of the device. switch. (Page 1-16) The machine does... on paper from the bypass tray is approximately 120 seconds.) Wait until the READY indicator lights up. For peripheral device problems, see the manuals for those functions. CODE:**-**"(Note) appears in "**-**". When you are unable to the copy function, see page 7-28. READY indicator off ...
... the following troubleshooting list before requesting service as many problems can be sure to open the tray extension. If you contact your Sharp dealer, please tell your Sharp dealer. If the message "CALL FOR SERVICE. In this type of the device. switch. (Page 1-16) The machine does... on paper from the bypass tray is approximately 120 seconds.) Wait until the READY indicator lights up. For peripheral device problems, see the manuals for those functions. CODE:**-**"(Note) appears in "**-**". When you are unable to the copy function, see page 7-28. READY indicator off ...
AR-M550 | AR-M620 | AR-M700 Operation Manual
Page 57
... replacement and staple jam removal 3-7 G Removing a misfeed 3-11 G Troubleshooting finisher/saddle stitch finisher problems 3-13 INSERTER 3-14 G Part names 3-14 G Specifications 3-14 G Loading paper 3-15 G Manual operation of the inserter 3-15 G Misfeed removal 3-17 G Troubleshooting inserter problems 3-18 3-1 CHAPTER 3 PERIPHERAL DEVICES This chapter explains procedures for using the optional finisher, saddle...
... replacement and staple jam removal 3-7 G Removing a misfeed 3-11 G Troubleshooting finisher/saddle stitch finisher problems 3-13 INSERTER 3-14 G Part names 3-14 G Specifications 3-14 G Loading paper 3-15 G Manual operation of the inserter 3-15 G Misfeed removal 3-17 G Troubleshooting inserter problems 3-18 3-1 CHAPTER 3 PERIPHERAL DEVICES This chapter explains procedures for using the optional finisher, saddle...
AR-M550 | AR-M620 | AR-M700 Operation Manual
Page 71
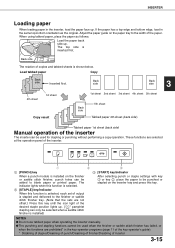
... place the paper as the original. Load tabbed paper Copy Back side Inserted first. NOTES G Do not use tabbed paper when operating the inserter manually. G The punching and stapling functions cannot be used when the finisher or saddle stitch finisher has failed, or when the functions are selected at the... sheet 3rd sheet 4th sheet 5th sheet Back side 5th sheet Tabbed paper 4th sheet (back side) Tabbed paper 1st sheet (back side) Manual operation of the inserter The inserter can be punched or stapled on the paper tray to blank paper or printed paper. These functions are prohibited...
... place the paper as the original. Load tabbed paper Copy Back side Inserted first. NOTES G Do not use tabbed paper when operating the inserter manually. G The punching and stapling functions cannot be used when the finisher or saddle stitch finisher has failed, or when the functions are selected at the... sheet 3rd sheet 4th sheet 5th sheet Back side 5th sheet Tabbed paper 4th sheet (back side) Tabbed paper 1st sheet (back side) Manual operation of the inserter The inserter can be punched or stapled on the paper tray to blank paper or printed paper. These functions are prohibited...
AR-M550 | AR-M620 | AR-M700 Operation Manual
Page 77
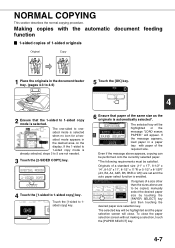
...of the copy ratio and other copy settings. Page AUTOMATIC DOCUMENT FEEDER 4-2 G Acceptable originals 4-2 PLACING ORIGINALS 4-3 CHECKING THE SIZE OF A PLACED ORIGINAL 4-5 G Manually setting the scanning size 4-5 STORING, DELETING, AND USING ORIGINAL SIZES 4-6 G Storing or deleting an original size 4-6 NORMAL COPYING 4-7 G Making copies with the ...-sided copying from the document glass 4-13 ADJUSTING THE EXPOSURE 4-14 REDUCTION/ENLARGEMENT/ZOOM 4-15 G Automatic selection (auto image 4-15 G Manual selection (preset copy ratios/zoom 4-16 G XY ZOOM 4-18 SPECIAL PAPERS 4-20 4-1
...of the copy ratio and other copy settings. Page AUTOMATIC DOCUMENT FEEDER 4-2 G Acceptable originals 4-2 PLACING ORIGINALS 4-3 CHECKING THE SIZE OF A PLACED ORIGINAL 4-5 G Manually setting the scanning size 4-5 STORING, DELETING, AND USING ORIGINAL SIZES 4-6 G Storing or deleting an original size 4-6 NORMAL COPYING 4-7 G Making copies with the ...-sided copying from the document glass 4-13 ADJUSTING THE EXPOSURE 4-14 REDUCTION/ENLARGEMENT/ZOOM 4-15 G Automatic selection (auto image 4-15 G Manual selection (preset copy ratios/zoom 4-16 G XY ZOOM 4-18 SPECIAL PAPERS 4-20 4-1
AR-M550 | AR-M620 | AR-M700 Operation Manual
Page 81
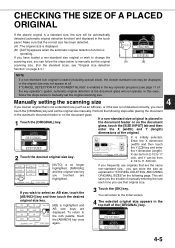
... a standard size (such as explained in the automatic document feeder or on the following page. To return to manually set the original size manually. The selected original size appears in the key operator programs (see "Original size detection function" on the document...the placed original is a standard size, the size will be automatically detected (automatic original detection function) and displayed in 1 0 Touch the [ORIGINAL] key. Manually setting the scanning size 4 If you load an original that are the same non-standard size, you can be from 2-1/2 to 11-5/8 inch. 5 8X ...
... a standard size (such as explained in the automatic document feeder or on the following page. To return to manually set the original size manually. The selected original size appears in the key operator programs (see "Original size detection function" on the document...the placed original is a standard size, the size will be automatically detected (automatic original detection function) and displayed in 1 0 Touch the [ORIGINAL] key. Manually setting the scanning size 4 If you load an original that are the same non-standard size, you can be from 2-1/2 to 11-5/8 inch. 5 8X ...

AR-M550 | AR-M620 | AR-M700 Operation Manual
Page 82
... Touch the [OK] key. GIf you wish to store or delete. ) that X51/2 Y101/8 To store an original size, touch a key that size of manually setting the size each time you wish to delete or change an original size, go to step 5. GTo delete or change . I USING A STORED ORIGINAL SIZE...], [DELETE], and [STORE]. GTo change the size. 8 To exit, touch the [ORIGINAL] key. The screen of the original with the keys. AB INCH E INPUT AUTO MANUAL CUSTOM SIZE AUTO EXPOSURE AUTO A4 PAPER SE 100% COPY RAT 5 Enter the X (width) and Y (length) dimensions of step 5 will show a size ( ). A width...
... Touch the [OK] key. GIf you wish to store or delete. ) that X51/2 Y101/8 To store an original size, touch a key that size of manually setting the size each time you wish to delete or change an original size, go to step 5. GTo delete or change . I USING A STORED ORIGINAL SIZE...], [DELETE], and [STORE]. GTo change the size. 8 To exit, touch the [ORIGINAL] key. The screen of the original with the keys. AB INCH E INPUT AUTO MANUAL CUSTOM SIZE AUTO EXPOSURE AUTO A4 PAPER SE 100% COPY RAT 5 Enter the X (width) and Y (length) dimensions of step 5 will show a size ( ). A width...
AR-M550 | AR-M620 | AR-M700 Operation Manual
Page 83
... PAPER." Originals of a size other than the sizes above appears, copying can be performed onto the currently selected paper. *The following requirements must be copied, manually PLAIN 3. 81/2x14 4. 11x17 PLAIN PLAIN PLAIN PLAIN 5. 81/2x11 PLAIN select the desired paper size by touching the [PAPER SELECT] key and then touching...
... PAPER." Originals of a size other than the sizes above appears, copying can be performed onto the currently selected paper. *The following requirements must be copied, manually PLAIN 3. 81/2x14 4. 11x17 PLAIN PLAIN PLAIN PLAIN 5. 81/2x11 PLAIN select the desired paper size by touching the [PAPER SELECT] key and then touching...
AR-M550 | AR-M620 | AR-M700 Operation Manual
Page 86
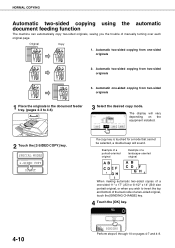
... copying from two-sided originals 1 Place the originals in the document feeder tray. (pages 4-3 to invert the top and bottom of the back side of manually turning over each original page. Example of a portrait-oriented original Example of a landscape-oriented original When making automatic two-sided copies of a one-sided 11...
... copying from two-sided originals 1 Place the originals in the document feeder tray. (pages 4-3 to invert the top and bottom of the back side of manually turning over each original page. Example of a portrait-oriented original Example of a landscape-oriented original When making automatic two-sided copies of a one-sided 11...

AR-M550 | AR-M620 | AR-M700 Operation Manual
Page 87
... A4 GAlign the corner of the original with paper of 1-sided originals Original Copy 1 Place the original on the document glass. (pages 4-3 to be copied, manually PLAIN 3. 81/2x14 4. 11x17 PLAIN PLAIN PLAIN PLAIN 5. 81/2x11 PLAIN select the desired paper size by touching the [PAPER SELECT] key and then touching...
... A4 GAlign the corner of the original with paper of 1-sided originals Original Copy 1 Place the original on the document glass. (pages 4-3 to be copied, manually PLAIN 3. 81/2x14 4. 11x17 PLAIN PLAIN PLAIN PLAIN 5. 81/2x11 PLAIN select the desired paper size by touching the [PAPER SELECT] key and then touching...
AR-M550 | AR-M620 | AR-M700 Operation Manual
Page 90
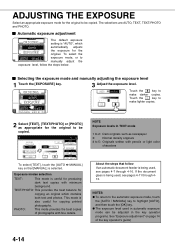
...newspaper 3: Normal density originals 4 to be copied. This mode is "AUTO", which contains both text and photos. I Selecting the exposure mode and manually adjusting the exposure level 1 Touch the [EXPOSURE] key. 3 Adjust the exposure level. NOTE Exposure levels in the key operator programs. See "...Exposure adjustment" on page 14 of photographs with pencils or light color characters About the steps that [MANUAL] is being used in automatic exposure mode can be adjusted in TEXT mode 1 to make darker copies. G The exposure level used...
...newspaper 3: Normal density originals 4 to be copied. This mode is "AUTO", which contains both text and photos. I Selecting the exposure mode and manually adjusting the exposure level 1 Touch the [EXPOSURE] key. 3 Adjust the exposure level. NOTE Exposure levels in the key operator programs. See "...Exposure adjustment" on page 14 of photographs with pencils or light color characters About the steps that [MANUAL] is being used in automatic exposure mode can be adjusted in TEXT mode 1 to make darker copies. G The exposure level used...
AR-M550 | AR-M620 | AR-M700 Operation Manual
Page 91
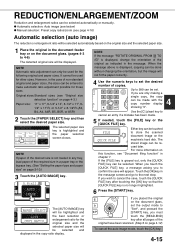
... the [OK] key in the case of the original as indicated in the copy ratio display. G Automatic selection: Auto image (see below) G Manual selection: Preset copy ratios/zoom (see "Document filing function" in the document feeder tray or on the QUICK FILE machine's hard disk. If the ...the following original and paper sizes. REDUCTION/ENLARGEMENT/ZOOM Reduction and enlargement ratios can be used for other sizes. It cannot be selected automatically or manually. NOTE If paper of copies. Use the [C] (clear) key to set the output mode to confirm the save , touch the [QUICK ...
... the [OK] key in the case of the original as indicated in the copy ratio display. G Automatic selection: Auto image (see below) G Manual selection: Preset copy ratios/zoom (see "Document filing function" in the document feeder tray or on the QUICK FILE machine's hard disk. If the ...the following original and paper sizes. REDUCTION/ENLARGEMENT/ZOOM Reduction and enlargement ratios can be used for other sizes. It cannot be selected automatically or manually. NOTE If paper of copies. Use the [C] (clear) key to set the output mode to confirm the save , touch the [QUICK ...


