
Installation Guide (Mac)
Page 16
...if possible, back-up the contents of your claim is not covered under this warranty statement. Seagate may obtain information regarding customer support within your purchase. Seagate will not provide any warranty coverage unless your drive to data recovery, removal, and installation are ...return to the instructions in the new Seagate productaccompanied by other equipment; This warranty does not cover any misuse contrary to Seagate must be prompted for more information regarding the location of the original product to meet Seagate specifications. Callers outside the US can ...
...if possible, back-up the contents of your claim is not covered under this warranty statement. Seagate may obtain information regarding customer support within your purchase. Seagate will not provide any warranty coverage unless your drive to data recovery, removal, and installation are ...return to the instructions in the new Seagate productaccompanied by other equipment; This warranty does not cover any misuse contrary to Seagate must be prompted for more information regarding the location of the original product to meet Seagate specifications. Callers outside the US can ...
Installation Guide (Windows)
Page 16
...324-4700. To request warranty service, contact an authorized Seagate service center or refer to Seagate must be properly packaged in the user manual. Product you 16 Getting Started Guide for more information regarding the location of the repair or exchange process.... Return Material Authorization (RMA) to meet Seagate specifications. Callers outside the US can reach this warranty statement. Once an authorized service center or Seagate determines that is 1 year from an authorized Seagate retailer may obtain information regarding customer support within your jurisdiction. By...
...324-4700. To request warranty service, contact an authorized Seagate service center or refer to Seagate must be properly packaged in the user manual. Product you 16 Getting Started Guide for more information regarding the location of the repair or exchange process.... Return Material Authorization (RMA) to meet Seagate specifications. Callers outside the US can reach this warranty statement. Once an authorized service center or Seagate determines that is 1 year from an authorized Seagate retailer may obtain information regarding customer support within your jurisdiction. By...
User Guide (Mac)
Page 2
... appear in supporting documentation. Permission is hereby granted, free of charge, to any person obtaining a copy of the Software, and to permit persons to whom the Software is available on your Mirra PC software CD. This product includes software developed by the Jetty Project, Mort Bay... or the Seagate Mirra software, in source code or object code form, may be reproduced, stored in a retrieval system, or transmitted in the Software without restriction, including without the prior written consent of this product, visit the www.mirra.com web site. Contact information is furnished ...
... appear in supporting documentation. Permission is hereby granted, free of charge, to any person obtaining a copy of the Software, and to permit persons to whom the Software is available on your Mirra PC software CD. This product includes software developed by the Jetty Project, Mort Bay... or the Seagate Mirra software, in source code or object code form, may be reproduced, stored in a retrieval system, or transmitted in the Software without restriction, including without the prior written consent of this product, visit the www.mirra.com web site. Contact information is furnished ...
User Guide (Mac)
Page 3
...make changes in the preparation of this document, or from errors or omissions in this document to the product. Mirra Manual for later use of Seagate Technology LLC, which may fall, causing serious damage to assure its users. Save these instructions carefully. 1. Please... read all the instructions and warnings marked on an unstable cart, stand, or table. Trademarks Seagate™ and the Mirra logo are trademarks of the information contained herein. Do not place Mirra on this manual. 3. PARTICULAR PURPOSE AND NONINFRINGEMENT OF THIRD PARTY RIGHTS.
...make changes in the preparation of this document, or from errors or omissions in this document to the product. Mirra Manual for later use of Seagate Technology LLC, which may fall, causing serious damage to assure its users. Save these instructions carefully. 1. Please... read all the instructions and warnings marked on an unstable cart, stand, or table. Trademarks Seagate™ and the Mirra logo are trademarks of the information contained herein. Do not place Mirra on this manual. 3. PARTICULAR PURPOSE AND NONINFRINGEMENT OF THIRD PARTY RIGHTS.

User Guide (Mac)
Page 4
... type of any kind on the product's information label. Turn off and unplug your Mirra. Go to liquids, rain, or water. 6. See details on your Mirra Sync and Share Personal Server. CAUTION: TO PREVENT ELECTRIC SHOCK, FULLY INSERT PLUG INTO GROUNDED AC OUTLET. a. Use a damp cloth for cleaning. Seagate will assist you in a fire or electrical...
... type of any kind on the product's information label. Turn off and unplug your Mirra. Go to liquids, rain, or water. 6. See details on your Mirra Sync and Share Personal Server. CAUTION: TO PREVENT ELECTRIC SHOCK, FULLY INSERT PLUG INTO GROUNDED AC OUTLET. a. Use a damp cloth for cleaning. Seagate will assist you in a fire or electrical...
User Guide (Mac)
Page 10
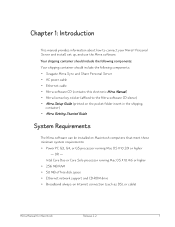
...• Seagate Mirra Sync and Share Personal Server • AC power cable • Ethernet cable • Mirra software CD (contains this electronic Mirra Manual) • Mirra license key sticker (affixed to connect your Mirra™ Personal Server and install, set up, and use the Mirra software. ...Chapter 1: Introduction This manual provides information about how to the Mirra software CD sleeve) • Mirra Setup Guide (printed on the pocket folder insert in the shipping container) • Mirra Getting Started Guide System Requirements The Mirra software can be installed on Internet...
...• Seagate Mirra Sync and Share Personal Server • AC power cable • Ethernet cable • Mirra software CD (contains this electronic Mirra Manual) • Mirra license key sticker (affixed to connect your Mirra™ Personal Server and install, set up, and use the Mirra software. ...Chapter 1: Introduction This manual provides information about how to the Mirra software CD sleeve) • Mirra Setup Guide (printed on the pocket folder insert in the shipping container) • Mirra Getting Started Guide System Requirements The Mirra software can be installed on Internet...
User Guide (Mac)
Page 23
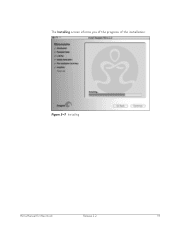
The Installing screen informs you of the progress of the installation: Figure 3~7 Installing Mirra Manual for Macintosh Release 2.2 14
The Installing screen informs you of the progress of the installation: Figure 3~7 Installing Mirra Manual for Macintosh Release 2.2 14
User Guide (Mac)
Page 33
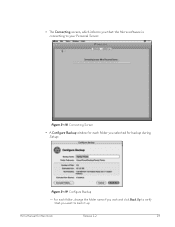
For each folder, change the folder name if you wish and click Back Up to verify that the Mirra software is connecting to your Personal Server: Figure 3~18 Connecting Screen • A Configure Backup window for each folder you want to back it up. Mirra Manual for Macintosh Release 2.2 24 • The Connecting screen, which informs you that you selected for backup during Setup: Figure 3~19 Configure Backup -
For each folder, change the folder name if you wish and click Back Up to verify that the Mirra software is connecting to your Personal Server: Figure 3~18 Connecting Screen • A Configure Backup window for each folder you want to back it up. Mirra Manual for Macintosh Release 2.2 24 • The Connecting screen, which informs you that you selected for backup during Setup: Figure 3~19 Configure Backup -
User Guide (Mac)
Page 34
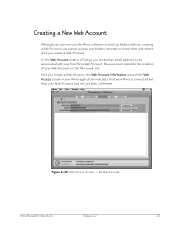
... to be associated with others until you must complete the creation of the Web Access screen in your Mirra application indicates that your Mirra is connected but that your Web Account has not yet been confirmed: Figure 3~20 Web Access Screen - Until you entered an email address to back ...up folders without creating a Web Account, you cannot access your folders remotely or share them with your Web Account on the Mirra web site. In the Web Account window of Setup, you create a Web Account, the Web Account Information area of your free...
... to be associated with others until you must complete the creation of the Web Access screen in your Mirra application indicates that your Mirra is connected but that your Web Account has not yet been confirmed: Figure 3~20 Web Access Screen - Until you entered an email address to back ...up folders without creating a Web Account, you cannot access your folders remotely or share them with your Web Account on the Mirra web site. In the Web Account window of Setup, you create a Web Account, the Web Account Information area of your free...
User Guide (Mac)
Page 42
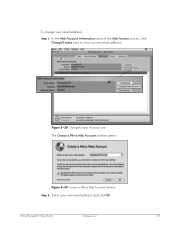
To change your email address, Step 1: In the Web Account Information area of the Web Access screen, click Change/Create next to your current email address: Figure 3~28 Change/Create Account Link The Create a Mirra Web Account window opens: Figure 3~29 Create a Mirra Web Account Window Step 2: Enter your new email address and click OK. Mirra Manual for Macintosh Release 2.2 33
To change your email address, Step 1: In the Web Account Information area of the Web Access screen, click Change/Create next to your current email address: Figure 3~28 Change/Create Account Link The Create a Mirra Web Account window opens: Figure 3~29 Create a Mirra Web Account Window Step 2: Enter your new email address and click OK. Mirra Manual for Macintosh Release 2.2 33
User Guide (Mac)
Page 46
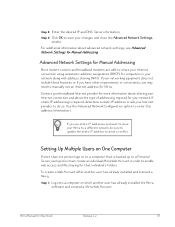
... automatic address assignment (DHCP) for Manual Addressing. If static IP addressing is backed up to a Personal Server, each person must create an individual Mirra Web Account in your changes and close the Advanced Network Settings window. For additional information about the type of addressing required for your Internet provider to enable web access and file...
... automatic address assignment (DHCP) for Manual Addressing. If static IP addressing is backed up to a Personal Server, each person must create an individual Mirra Web Account in your changes and close the Advanced Network Settings window. For additional information about the type of addressing required for your Internet provider to enable web access and file...

User Guide (Mac)
Page 47
Step 2: Open the Mirra application and click the Web Access tab: Figure 3~34 Web Access Screen - Mirra Manual for Macintosh Release 2.2 38 Step 3: Click Change/Create next to associate with your Web Account and click OK. The Create a Mirra Web Account window opens: Figure 3~35 Create a Mirra Web Account Window Step 4: Enter the email address you have not yet created a Mirra Web Account. No Web Account The Web Account Information area indicates that the Personal Server is connected and operating, but that you want to Account.
Step 2: Open the Mirra application and click the Web Access tab: Figure 3~34 Web Access Screen - Mirra Manual for Macintosh Release 2.2 38 Step 3: Click Change/Create next to associate with your Web Account and click OK. The Create a Mirra Web Account window opens: Figure 3~35 Create a Mirra Web Account Window Step 4: Enter the email address you have not yet created a Mirra Web Account. No Web Account The Web Account Information area indicates that the Personal Server is connected and operating, but that you want to Account.
User Guide (Mac)
Page 53
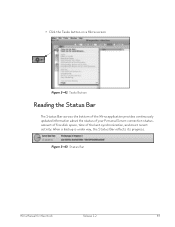
• Click the Tasks button on a Mirra screen: Figure 3~42 Tasks Button Reading the Status Bar The Status Bar across the bottom of the Mirra application provides continuously updated information about the status of your Personal Server: connection status, amount of free disk space, time of the last synchronization, and most recent activity. Figure 3~43 Status Bar Mirra Manual for Macintosh Release 2.2 44 When a backup is under way, the Status Bar reflects its progress.
• Click the Tasks button on a Mirra screen: Figure 3~42 Tasks Button Reading the Status Bar The Status Bar across the bottom of the Mirra application provides continuously updated information about the status of your Personal Server: connection status, amount of free disk space, time of the last synchronization, and most recent activity. Figure 3~43 Status Bar Mirra Manual for Macintosh Release 2.2 44 When a backup is under way, the Status Bar reflects its progress.
User Guide (Mac)
Page 54
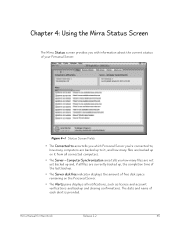
... backed up to area tells you which Personal Server you how many files are currently backed up on the Personal Server. • The Alerts pane displays all connected computers. • The Server - Chapter 4: Using the Mirra Status Screen The Mirra Status screen provides you with information about the current status of your Personal Server: Figure 4~1 Status Screen Fields • The...
... backed up to area tells you which Personal Server you how many files are currently backed up on the Personal Server. • The Alerts pane displays all connected computers. • The Server - Chapter 4: Using the Mirra Status Screen The Mirra Status screen provides you with information about the current status of your Personal Server: Figure 4~1 Status Screen Fields • The...
User Guide (Mac)
Page 59
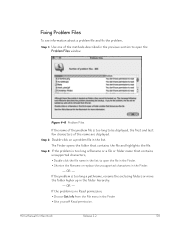
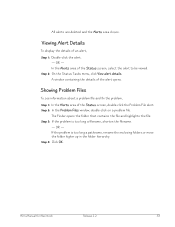
...Read permission, • Choose Get Info from the File menu in the Finder • Give yourself Read permission. OR - Fixing Problem Files To see information about a problem file and fix the problem, Step 1: Use one of the methods described in the previous section to open the Problem Files window: Figure... 4~8 Problem Files If the name of the name are displayed. Mirra Manual for Macintosh Release 2.2 50 Step 3: If the problem is too long a filename or a file or folder name that contains the file and...
...Read permission, • Choose Get Info from the File menu in the Finder • Give yourself Read permission. OR - Fixing Problem Files To see information about a problem file and fix the problem, Step 1: Use one of the methods described in the previous section to open the Problem Files window: Figure... 4~8 Problem Files If the name of the name are displayed. Mirra Manual for Macintosh Release 2.2 50 Step 3: If the problem is too long a filename or a file or folder name that contains the file and...
User Guide (Mac)
Page 60
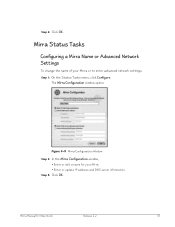
Mirra Status Tasks Configuring a Mirra Name or Advanced Network Settings To change the name of your Mirra. • Enter or update IP address and DNS server information. Step 4: Click OK. Step 3: Click OK. The Mirra Configuration window opens: Figure 4~9 Mirra Configuration Window Step 2: In the Mirra Configuration window, • Enter or edit a name for Macintosh Release 2.2 51 Mirra Manual for your Mirra or to enter advanced network settings, Step 1: On the Status Tasks menu, click Configure.
Mirra Status Tasks Configuring a Mirra Name or Advanced Network Settings To change the name of your Mirra. • Enter or update IP address and DNS server information. Step 4: Click OK. Step 3: Click OK. The Mirra Configuration window opens: Figure 4~9 Mirra Configuration Window Step 2: In the Mirra Configuration window, • Enter or edit a name for Macintosh Release 2.2 51 Mirra Manual for your Mirra or to enter advanced network settings, Step 1: On the Status Tasks menu, click Configure.
User Guide (Mac)
Page 62
.... Step 2: On the Status Tasks menu, click View alert details. If the problem is too long a filename, shorten the filename. - Showing Problem Files To see information about a problem file and fix the problem, Step 1: In the Alerts area of the Status screen, select the alert to be viewed.... Mirra Manual for Macintosh Release 2.2 53 The Finder opens the folder that contains the file and highlights the file. Step 4: Click OK. OR - Viewing Alert Details ...
.... Step 2: On the Status Tasks menu, click View alert details. If the problem is too long a filename, shorten the filename. - Showing Problem Files To see information about a problem file and fix the problem, Step 1: In the Alerts area of the Status screen, select the alert to be viewed.... Mirra Manual for Macintosh Release 2.2 53 The Finder opens the folder that contains the file and highlights the file. Step 4: Click OK. OR - Viewing Alert Details ...
User Guide (Mac)
Page 63
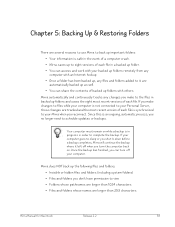
...for Macintosh Release 2.2 54 Chapter 5: Backing Up & Restoring Folders There are several reasons to use Mirra to back up important folders: • Your information is safe in the event of a computer crash. • Mirra saves up to eight versions of each file in a backed up folder. • You can ... has been backed up, any changes you turn off when you make changes to files while your computer is not connected to your Personal Server, those changes are longer than 1024 characters • Files and folders whose names are tracked and the most recent versions of each file.
...for Macintosh Release 2.2 54 Chapter 5: Backing Up & Restoring Folders There are several reasons to use Mirra to back up important folders: • Your information is safe in the event of a computer crash. • Mirra saves up to eight versions of each file in a backed up folder. • You can ... has been backed up, any changes you turn off when you make changes to files while your computer is not connected to your Personal Server, those changes are longer than 1024 characters • Files and folders whose names are tracked and the most recent versions of each file.
User Guide (Mac)
Page 68
... screen. Once these folders have been backed up folders not listed in Setup, you add to them are the ones most often selected for backup. Mirra Manual for additional information. If you didn't select folders for backup in the Recommended Backups window;
... screen. Once these folders have been backed up folders not listed in Setup, you add to them are the ones most often selected for backup. Mirra Manual for additional information. If you didn't select folders for backup in the Recommended Backups window;
User Guide (Mac)
Page 81
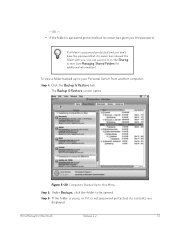
... the password. If a folder is password protected and you don't have the password but its contents are displayed. Mirra Manual for additional information). The Backup & Restore screen opens Figure 5~20 Computers Backed Up to this Mirra Step 2: Under Backups, click the folder to your Personal Server from another computer, Step 1: Click the Backup & Restore tab. -
... the password. If a folder is password protected and you don't have the password but its contents are displayed. Mirra Manual for additional information). The Backup & Restore screen opens Figure 5~20 Computers Backed Up to this Mirra Step 2: Under Backups, click the folder to your Personal Server from another computer, Step 1: Click the Backup & Restore tab. -


