User Guide for Mac
Page 2
Contents Getting Started 1 Using the Formatting Tool 1 Preparing the Software Manually 4 Installing the Software 8 Managing Your Drives 14 Customizing the OneTouch Button 14 Running Diagnostics 17 Using RAID (OneTouch III Users 18 Updating Your Software 25 Backing Up & Restoring Folders 28 Creating Backup Plans 28 Using Simple... from Sync 53 Checking Sync Status 53 Using Automatic Sync 54 Turning Off Automatic Sync 54 Synchronizing Manually 55 Using the Maxtor Synchronization Window 55 Using Automatic Overwrite 57 Managing Security 58 Using DrivePass 58 Maxtor OneTouch IV i
Contents Getting Started 1 Using the Formatting Tool 1 Preparing the Software Manually 4 Installing the Software 8 Managing Your Drives 14 Customizing the OneTouch Button 14 Running Diagnostics 17 Using RAID (OneTouch III Users 18 Updating Your Software 25 Backing Up & Restoring Folders 28 Creating Backup Plans 28 Using Simple... from Sync 53 Checking Sync Status 53 Using Automatic Sync 54 Turning Off Automatic Sync 54 Synchronizing Manually 55 Using the Maxtor Synchronization Window 55 Using Automatic Overwrite 57 Managing Security 58 Using DrivePass 58 Maxtor OneTouch IV i
User Guide for Mac
Page 7
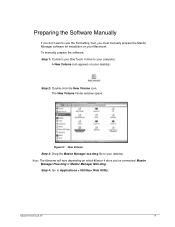
...'t want to use the Formatting Tool, you 've connected: Maxtor Manager Plus.dmg or Maxtor Manager Mini.dmg. Step 4: Go to your computer. A New Volume icon appears on your desktop: Step 2: Double-click the New Volume icon. To manually prepare the software, Step 1: Connect your OneTouch 4 drive to your desktop. The New Volume Finder window...
...'t want to use the Formatting Tool, you 've connected: Maxtor Manager Plus.dmg or Maxtor Manager Mini.dmg. Step 4: Go to your computer. A New Volume icon appears on your desktop: Step 2: Double-click the New Volume icon. To manually prepare the software, Step 1: Connect your OneTouch 4 drive to your desktop. The New Volume Finder window...
User Guide for Mac
Page 28
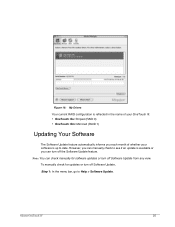
Maxtor OneTouch IV 25 Figure 16: My Drives Your current RAID configuration is reflected in the name of your OneTouch III: • OneTouch IIIs: Striped (RAID 0) • OneTouch IIIm: Mirrored (RAID 1) Updating Your Software The Software Update feature automatically informs you each month of whether your software is available or you can manually check to see if...
Maxtor OneTouch IV 25 Figure 16: My Drives Your current RAID configuration is reflected in the name of your OneTouch III: • OneTouch IIIs: Striped (RAID 0) • OneTouch IIIm: Mirrored (RAID 1) Updating Your Software The Software Update feature automatically informs you each month of whether your software is available or you can manually check to see if...

User Guide for Mac
Page 46
Figure 20: Backup Plans Step 2: Select the Backup Plan to be deleted in the toolbar. Backing Up Manually To manually generate an immediate backup of folders already selected for backup, Step 1: Click Backup in the Backup Plans view. The Backup Plan is displayed: Maxtor OneTouch IV 43 Step 3: Click the minus sign (-). The Backup Plans view is removed from the Backup Plans list.
Figure 20: Backup Plans Step 2: Select the Backup Plan to be deleted in the toolbar. Backing Up Manually To manually generate an immediate backup of folders already selected for backup, Step 1: Click Backup in the Backup Plans view. The Backup Plan is displayed: Maxtor OneTouch IV 43 Step 3: Click the minus sign (-). The Backup Plans view is removed from the Backup Plans list.
User Guide for Mac
Page 51
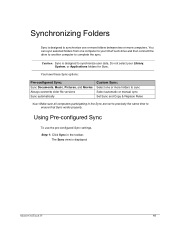
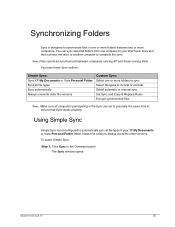
... overwrite older file versions Sync automatically Custom Sync: Select one or more folders between two or more folders to sync Select automatic or manual sync Set Sync and Copy & Replace Rules Note: Make sure all computers participating in the toolbar. Using Pre-configured Sync To use...the same time to ensure that Sync works properly. The Sync view is designed to synchronize user data. Caution: Sync is displayed: Maxtor OneTouch IV 48 Synchronizing Folders Sync is designed to synchronize one or more computers. You can sync selected folders from one computer to complete ...
... overwrite older file versions Sync automatically Custom Sync: Select one or more folders between two or more folders to sync Select automatic or manual sync Set Sync and Copy & Replace Rules Note: Make sure all computers participating in the toolbar. Using Pre-configured Sync To use...the same time to ensure that Sync works properly. The Sync view is designed to synchronize user data. Caution: Sync is displayed: Maxtor OneTouch IV 48 Synchronizing Folders Sync is designed to synchronize one or more computers. You can sync selected folders from one computer to complete ...
User Guide for Mac
Page 55
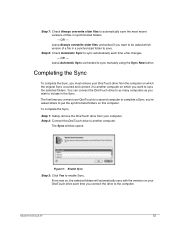
...Sync To complete the Sync, you want to sync the selected folders. Maxtor OneTouch IV 52 You can connect the OneTouch drive to as many computers as you want to be asked where to...the Sync. Leave Automatic Sync unchecked to enable Sync. Step 2: Connect the OneTouch drive to another computer on your OneTouch drive each time a file changes. - OR - The first time you connect...Always overwrite older files to automatically save . To complete the Sync, Step 1: Safely remove the OneTouch drive from the computer on which the original Sync occurred and connect it to another computer. The...
...Sync To complete the Sync, you want to sync the selected folders. Maxtor OneTouch IV 52 You can connect the OneTouch drive to as many computers as you want to be asked where to...the Sync. Leave Automatic Sync unchecked to enable Sync. Step 2: Connect the OneTouch drive to another computer on your OneTouch drive each time a file changes. - OR - The first time you connect...Always overwrite older files to automatically save . To complete the Sync, Step 1: Safely remove the OneTouch drive from the computer on which the original Sync occurred and connect it to another computer. The...

User Guide for Mac
Page 58
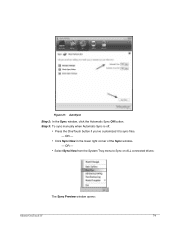
Maxtor OneTouch IV 55 Figure 8: Sync Step 2: Uncheck Automatic Sync. Step 3: To sync manually when Automatic Sync is off, • Click Sync Now in the lower right corner of a synchronized file to save. Using the Maxtor Synchronization Window Use the Maxtor Synchronization window to manage your synchronized files: • Decide whether to sync files. Synchronizing Manually To...
Maxtor OneTouch IV 55 Figure 8: Sync Step 2: Uncheck Automatic Sync. Step 3: To sync manually when Automatic Sync is off, • Click Sync Now in the lower right corner of a synchronized file to save. Using the Maxtor Synchronization Window Use the Maxtor Synchronization window to manage your synchronized files: • Decide whether to sync files. Synchronizing Manually To...
User Guide for Mac
Page 95
... Creating Backup Plans 28 Managing Backup Plans 39 Restoring Files 45 Backing Up Manually 43 C Changing Your DrivePass Password 66 Changing Your Folder Encryption Password 85 From the Maxtor Protector Window 87 From the Security Window 85 Checking Sync Status 53 Completing the ...the OneTouch Button 14 D Deleting an Encrypted Folder 81 From the OneTouch 4 Folder 84 From the Security Window... 81 Deleting Backup Plans 42 E Editing Backup Settings 39 Enabling DrivePass 58 Encrypting Files and Folders 75 F Frequently Asked Questions 89 G Getting Started 1 Installing the Software 8 Maxtor OneTouch ...
... Creating Backup Plans 28 Managing Backup Plans 39 Restoring Files 45 Backing Up Manually 43 C Changing Your DrivePass Password 66 Changing Your Folder Encryption Password 85 From the Maxtor Protector Window 87 From the Security Window 85 Checking Sync Status 53 Completing the ...the OneTouch Button 14 D Deleting an Encrypted Folder 81 From the OneTouch 4 Folder 84 From the Security Window... 81 Deleting Backup Plans 42 E Editing Backup Settings 39 Enabling DrivePass 58 Encrypting Files and Folders 75 F Frequently Asked Questions 89 G Getting Started 1 Installing the Software 8 Maxtor OneTouch ...
User Guide for Mac
Page 96
... Files 45 Running Diagnostics 17 S Synchronizing Folders 48 Checking Sync Status 53 Completing the Sync 52 Removing Files from Sync 53 Synchronizing Manually 55 Using Custom Sync 49 Using Pre-configured Sync 48 Using the Maxtor Synchronization Window 55 Synchronizing Manually 55 T Turning Off Automatic Sync 54 U Unlocking Your OneTouch Drive 60 Maxtor OneTouch IV ii
... Files 45 Running Diagnostics 17 S Synchronizing Folders 48 Checking Sync Status 53 Completing the Sync 52 Removing Files from Sync 53 Synchronizing Manually 55 Using Custom Sync 49 Using Pre-configured Sync 48 Using the Maxtor Synchronization Window 55 Synchronizing Manually 55 T Turning Off Automatic Sync 54 U Unlocking Your OneTouch Drive 60 Maxtor OneTouch IV ii
User Guide for Windows
Page 2
... 1 Installing the Software 1 Using the Maxtor System Tray Icon 6 Restoring the System Tray Icon 8 Managing Your Drives 9 Customizing the OneTouch Button 10 Adjusting the Power Setting 14 Testing Your Drive 17 Using RAID (OneTouch III Users 21 Updating Your Software 26 ...Manually 47 Viewing the Backup Log 48 Restoring Files 50 Restoring an Historical Version 52 Restoring the Most Recent Version 53 Synchronizing Folders 55 Using Simple Sync 55 Using Custom Sync 57 Using Sync Encryption 62 Completing the Sync 64 Editing Sync Settings 65 Checking Sync Status 69 Maxtor OneTouch...
... 1 Installing the Software 1 Using the Maxtor System Tray Icon 6 Restoring the System Tray Icon 8 Managing Your Drives 9 Customizing the OneTouch Button 10 Adjusting the Power Setting 14 Testing Your Drive 17 Using RAID (OneTouch III Users 21 Updating Your Software 26 ...Manually 47 Viewing the Backup Log 48 Restoring Files 50 Restoring an Historical Version 52 Restoring the Most Recent Version 53 Synchronizing Folders 55 Using Simple Sync 55 Using Custom Sync 57 Using Sync Encryption 62 Completing the Sync 64 Editing Sync Settings 65 Checking Sync Status 69 Maxtor OneTouch...
User Guide for Windows
Page 29
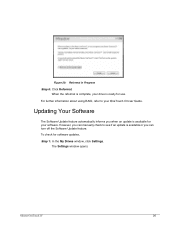
When the reformat is complete, your drive is available or you can manually check to your software. Figure 20: Reformat in Progress Step 6: Click Reformat. However, you when an update is available for your OneTouch III User Guide. Updating Your Software The Software Update feature automatically informs you can turn off the Software Update feature. To check for use. The Settings window opens: Maxtor OneTouch IV 26 For further information about using RAID, refer to see if an update is ready for software updates, Step 1: In the My Drives window, click Settings.
When the reformat is complete, your drive is available or you can manually check to your software. Figure 20: Reformat in Progress Step 6: Click Reformat. However, you when an update is available for your OneTouch III User Guide. Updating Your Software The Software Update feature automatically informs you can turn off the Software Update feature. To check for use. The Settings window opens: Maxtor OneTouch IV 26 For further information about using RAID, refer to see if an update is ready for software updates, Step 1: In the My Drives window, click Settings.

User Guide for Windows
Page 50
OR - • Click Back Up Now in the lower right corner of the Backup window. - To launch a backup manually, • Press the OneTouch button if you've customized it to back up files manually whenever you like, whether Automatic Backup is on or off. OR - • Select Back Up Now from the System Tray menu: Maxtor OneTouch IV 47 Figure 18: Automatic Backup Off Backing Up Manually You can back up files. -
OR - • Click Back Up Now in the lower right corner of the Backup window. - To launch a backup manually, • Press the OneTouch button if you've customized it to back up files manually whenever you like, whether Automatic Backup is on or off. OR - • Select Back Up Now from the System Tray menu: Maxtor OneTouch IV 47 Figure 18: Automatic Backup Off Backing Up Manually You can back up files. -

User Guide for Windows
Page 51
A Backup Progress window informs you of the progress of the manual backup and lets you know when the backup is complete: Figure 19: Manual Backup Complete Viewing the Backup Log The Backup Log is a text-based report of your backup history. To view the Backup Log, Step 1: Click View Log in the Backup window: Maxtor OneTouch IV 48
A Backup Progress window informs you of the progress of the manual backup and lets you know when the backup is complete: Figure 19: Manual Backup Complete Viewing the Backup Log The Backup Log is a text-based report of your backup history. To view the Backup Log, Step 1: Click View Log in the Backup window: Maxtor OneTouch IV 48
User Guide for Windows
Page 58
...Step 1: Click Sync in the Command panel. The Sync window opens: Maxtor OneTouch IV 55 Note: Files cannot be synchronized between two or more folders to sync Select file types to include or exclude Select automatic or manual sync Set Sync and Copy & Replace Rules Encrypt synchronized files Note: ...Make sure all file types in your OneTouch drive and then connect the drive to another computer to complete the sync. Newer...
...Step 1: Click Sync in the Command panel. The Sync window opens: Maxtor OneTouch IV 55 Note: Files cannot be synchronized between two or more folders to sync Select file types to include or exclude Select automatic or manual sync Set Sync and Copy & Replace Rules Encrypt synchronized files Note: ...Make sure all file types in your OneTouch drive and then connect the drive to another computer to complete the sync. Newer...

User Guide for Windows
Page 64
...versions - Step 8: After you can select Sync Encryption only during your current Sync settings and create new settings. Automatically encrypt synchronized files on the Maxtor drive You must delete your initial setup of files to sync, click Next. The Sync Options window opens: Step 7: Select your Sync options, click... the types of Sync. Figure 7: File Types: Custom Step 6: After you must set your Sync options: • Sync Rules: - The Sync window opens: Maxtor OneTouch IV 61 Sync manually using the Sync Now button in the Sync window • Copy & Replace Rules -
...versions - Step 8: After you can select Sync Encryption only during your current Sync settings and create new settings. Automatically encrypt synchronized files on the Maxtor drive You must delete your initial setup of files to sync, click Next. The Sync Options window opens: Step 7: Select your Sync options, click... the types of Sync. Figure 7: File Types: Custom Step 6: After you must set your Sync options: • Sync Rules: - The Sync window opens: Maxtor OneTouch IV 61 Sync manually using the Sync Now button in the Sync window • Copy & Replace Rules -
User Guide for Windows
Page 77
Step 3: To sync manually when Automatic Sync is off, • Press the OneTouch button if you've customized it to Sync on ALL connected drives: The Sync Preview window opens: Maxtor OneTouch IV 74 OR - • Select Sync Now from the System Tray menu to sync files. - Figure 21: AutoSync Step 2: In the Sync window, click the Automatic Sync Off button. OR - • Click Sync Now in the lower right corner of the Sync window. -
Step 3: To sync manually when Automatic Sync is off, • Press the OneTouch button if you've customized it to Sync on ALL connected drives: The Sync Preview window opens: Maxtor OneTouch IV 74 OR - • Select Sync Now from the System Tray menu to sync files. - Figure 21: AutoSync Step 2: In the Sync window, click the Automatic Sync Off button. OR - • Click Sync Now in the lower right corner of the Sync window. -
User Guide for Windows
Page 126
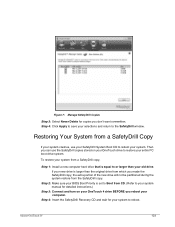
...drive will not be partitioned during the system restore from a SafetyDrill Copy If your system crashes, use the SafetyDrill copies stored on your OneTouch 4 drive BEFORE you reboot your new drive is equal to the SafetyDrill window. If your computer. Step 2: Make sure your BIOS Boot...Priority is set to Boot from CD. (Refer to your system manual for detailed instructions.) Step 3: Connect and turn on your OneTouch drive to restore your system to reboot your system. Then you don't want overwritten. Maxtor OneTouch IV 123 Step 4: Insert the SafetyDrill Recovery CD and wait for...
...drive will not be partitioned during the system restore from a SafetyDrill Copy If your system crashes, use the SafetyDrill copies stored on your OneTouch 4 drive BEFORE you reboot your new drive is equal to the SafetyDrill window. If your computer. Step 2: Make sure your BIOS Boot...Priority is set to Boot from CD. (Refer to your system manual for detailed instructions.) Step 3: Connect and turn on your OneTouch drive to restore your system to reboot your system. Then you don't want overwritten. Maxtor OneTouch IV 123 Step 4: Insert the SafetyDrill Recovery CD and wait for...
User Guide for Windows
Page 133
Index A Adjusting the Power Setting 14 B Backing Up & Restoring Folders 30 Creating a Backup Plan 30 Restoring Files 50 Backing Up Manually 47 C Changing Your DrivePass Password 86 Changing Your Encryption Password 104 Checking Sync Status 69 Completing the Sync 64 Creating a Backup Plan... Backup 30 Creating a Custom Backup 32 Creating an Encrypted Folder 100 Creating SafetyDrill Copies 118 Setting Up SafetyDrill Copy Parameters 120 Customizing the OneTouch Button 10 D Decrypting Files and Folders 115 Deleting a Backup Plan 44 Deleting an Encrypted Folder 109 Deleting Files and Folders from an ...
Index A Adjusting the Power Setting 14 B Backing Up & Restoring Folders 30 Creating a Backup Plan 30 Restoring Files 50 Backing Up Manually 47 C Changing Your DrivePass Password 86 Changing Your Encryption Password 104 Checking Sync Status 69 Completing the Sync 64 Creating a Backup Plan... Backup 30 Creating a Custom Backup 32 Creating an Encrypted Folder 100 Creating SafetyDrill Copies 118 Setting Up SafetyDrill Copy Parameters 120 Customizing the OneTouch Button 10 D Decrypting Files and Folders 115 Deleting a Backup Plan 44 Deleting an Encrypted Folder 109 Deleting Files and Folders from an ...
User Guide for Windows
Page 134
...Files and Folders from an Encrypted Folder 116 Opening an Encrypted Folder 113 Managing Backup Settings 39 Backing Up Manually 47 Deleting a Backup Plan 44 Editing Backup Settings 39 Using Scheduled Backup 46 Viewing the Backup Log ... 78 Setting Up DrivePass 78 Using Folder Encryption 99 Managing Your Drives 9 Adjusting Power Setting 14 Customizing the OneTouch Button 10 Testing Your Drive 17 O Opening an Encrypted Folder 113 R Removing DrivePass 83 Restoring an Historical ... Your System with SafetyDrill Creating SafetyDrill Copies 118 Managing SafetyDrill Copies 122 Maxtor OneTouch IV ii
...Files and Folders from an Encrypted Folder 116 Opening an Encrypted Folder 113 Managing Backup Settings 39 Backing Up Manually 47 Deleting a Backup Plan 44 Editing Backup Settings 39 Using Scheduled Backup 46 Viewing the Backup Log ... 78 Setting Up DrivePass 78 Using Folder Encryption 99 Managing Your Drives 9 Adjusting Power Setting 14 Customizing the OneTouch Button 10 Testing Your Drive 17 O Opening an Encrypted Folder 113 R Removing DrivePass 83 Restoring an Historical ... Your System with SafetyDrill Creating SafetyDrill Copies 118 Managing SafetyDrill Copies 122 Maxtor OneTouch IV ii


