Owner's Manual
Page 5
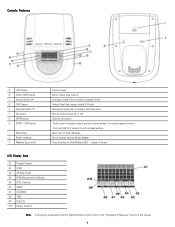
... seconds to install batteries. Port to the "Changing Unit Measures" section in this manual. 5 Open cover to end a paused workout. Console Features A LCD Display B QUICK START button C Increase button (▲) D CHR Sensors E Decrease button (▼) F ...workout Increases a value (time or workout resistance level) Contact Heart Rate sensors (model A10 only) Decreases a value (time or workout resistance level) Push to control the fan (on or off) Confirms information · Push to start a Program workout, pause an active workout, or resume a paused workout. · Push and hold for Bike...
... seconds to install batteries. Port to the "Changing Unit Measures" section in this manual. 5 Open cover to end a paused workout. Console Features A LCD Display B QUICK START button C Increase button (▲) D CHR Sensors E Decrease button (▼) F ...workout Increases a value (time or workout resistance level) Contact Heart Rate sensors (model A10 only) Decreases a value (time or workout resistance level) Push to control the fan (on or off) Confirms information · Push to start a Program workout, pause an active workout, or resume a paused workout. · Push and hold for Bike...

Owner's Manual
Page 6
...is 99:59. The display shows the total time count for the workout, then the time count for that you feel faint. Note: The A10 bike has the CHR sensors on when the Console shows the workout data results. This fall in maximum heart rate. Distance The DISTANCE display... field shows the distance count (miles or km) in the workout. The Console will automatically turn off your...
...is 99:59. The display shows the total time count for the workout, then the time count for that you feel faint. Note: The A10 bike has the CHR sensors on when the Console shows the workout data results. This fall in maximum heart rate. Distance The DISTANCE display... field shows the distance count (miles or km) in the workout. The Console will automatically turn off your...
Owner's Manual
Page 9
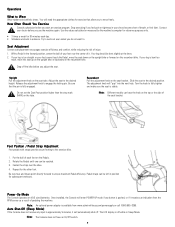
... adjustment knob to ensure maximum Pedal efficiency. Be sure that allow you do not want to move the seat down on the upright bike or forward on the recumbent bike. Turn the knob to fully tighten and make sure the seat is too straight or your leg is stable. You will enter POWER... next hole. Rotate the Pedals until one can be bent slightly at the knee. 2. Fasten the strap over the center of each day. • Schedule workouts in Sleep Mode. Be sure toes and knees point directly forward to engage the locking pin. Pedal straps can have an On/Off switch. 9 Power...
... adjustment knob to ensure maximum Pedal efficiency. Be sure that allow you do not want to move the seat down on the upright bike or forward on the recumbent bike. Turn the knob to fully tighten and make sure the seat is too straight or your leg is stable. You will enter POWER... next hole. Rotate the Pedals until one can be bent slightly at the knee. 2. Fasten the strap over the center of each day. • Schedule workouts in Sleep Mode. Be sure toes and knees point directly forward to engage the locking pin. Pedal straps can have an On/Off switch. 9 Power...
Owner's Manual
Page 10
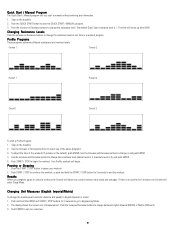
... (English Imperial/Metric) To change the resistance level (default level is 3, maximum level is 1. Push the Increase/Decrease buttons to end the workout. Your Profile workout will count up from 00:00. Pausing or Stopping 1. Push START / STOP to English Imperial or metric: 1. Push and hold the START... The display shows the current unit of the above programs. 3. Step on the machine. 2. To adjust the time of the workout (15 minutes is no activity for 3 seconds to go to pause your selection. 10 Push ENTER to select one of measurement. Use the Increase or Decrease ...
... (English Imperial/Metric) To change the resistance level (default level is 3, maximum level is 1. Push the Increase/Decrease buttons to end the workout. Your Profile workout will count up from 00:00. Pausing or Stopping 1. Push START / STOP to English Imperial or metric: 1. Push and hold the START... The display shows the current unit of the above programs. 3. Step on the machine. 2. To adjust the time of the workout (15 minutes is no activity for 3 seconds to go to pause your selection. 10 Push ENTER to select one of measurement. Use the Increase or Decrease ...
Owner's Manual
Page 11
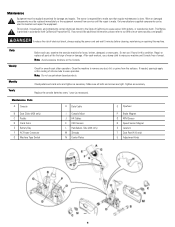
..., or grime from service until the repair is made. Tighten as necessary. Note: Avoid excessive moisture on the Console. Daily Weekly Monthly Yearly Before each workout, use if found in accordance with California's Proposition 65. The owner is responsible to wipe your machine and Console free of electrical shock, always unplug...
..., or grime from service until the repair is made. Tighten as necessary. Note: Avoid excessive moisture on the Console. Daily Weekly Monthly Yearly Before each workout, use if found in accordance with California's Proposition 65. The owner is responsible to wipe your machine and Console free of electrical shock, always unplug...

