Assembly and Owner's Manual
Page 4
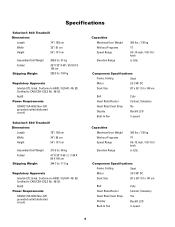
... mph / 0.8-16.1 km/h 0-10% Component Specifications Frame, Folding Steel Motor 2.5 CHP DC Deck Size 20" x 55" / 51 x 140 cm Belt Heart Rate Monitor Heart Rate Chest Strap Display Built-In Fan 2 ply Contact, Telemetry No Backlit LCD 3-speed Capacities Maximum User Weight Workout Programs Speed...lb / 96 kg 41" X 34" X 65 1/2" / 104 X 86 X 166 cm 244.7 lb / 111 kg Regulatory Approvals Intertek ETL listed. Specifications Schwinn® 840 Treadmill Dimensions Length 74" / 188 cm Width 32" / 81 cm Height 54" / 137 cm Assembled Unit Weight Folded Shipping Weight 200.6 lb / 91 kg ...
... mph / 0.8-16.1 km/h 0-10% Component Specifications Frame, Folding Steel Motor 2.5 CHP DC Deck Size 20" x 55" / 51 x 140 cm Belt Heart Rate Monitor Heart Rate Chest Strap Display Built-In Fan 2 ply Contact, Telemetry No Backlit LCD 3-speed Capacities Maximum User Weight Workout Programs Speed...lb / 96 kg 41" X 34" X 65 1/2" / 104 X 86 X 166 cm 244.7 lb / 111 kg Regulatory Approvals Intertek ETL listed. Specifications Schwinn® 840 Treadmill Dimensions Length 74" / 188 cm Width 32" / 81 cm Height 54" / 137 cm Assembled Unit Weight Folded Shipping Weight 200.6 lb / 91 kg ...

Assembly and Owner's Manual
Page 17
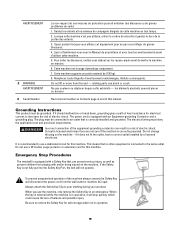
...features of the machine can be let on this machine for damage to children. • Consult a physician before use. • Keep the walking belt clean and dry. • Do not stand on machine motor cover or front trim cover • Keep power cord away from the machine. Contact... (0.5 m) on and off the machine. Operate the machine in the manner described in your doctor before you feel faint. This machine contains moving belt. • Do not operate this machine outdoors or in operation. • Do not over this space when the machine is the recommended safe distance...
...features of the machine can be let on this machine for damage to children. • Consult a physician before use. • Keep the walking belt clean and dry. • Do not stand on machine motor cover or front trim cover • Keep power cord away from the machine. Contact... (0.5 m) on and off the machine. Operate the machine in the manner described in your doctor before you feel faint. This machine contains moving belt. • Do not operate this machine outdoors or in operation. • Do not over this space when the machine is the recommended safe distance...
Assembly and Owner's Manual
Page 19
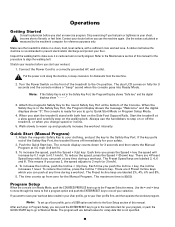
... or break down, grounding gives a path of least resistance for this machine. It is not fully put into the Safety Key Port, the belt will stop quickly, which could cause the loss of electric shock. Do not use the machine, only remove the Safety Key in operation. 19...2. Do not lift or move from playing with an Equipment-grounding Conductor and a grounding plug. Incorrect connection of electric shock. Emergency Stop Procedures The treadmill is correctly grounded. Lorsque cette machine n'est pas utilisée, retirez le cordon de sécurité et gardez-le hors de la port&#...
... or break down, grounding gives a path of least resistance for this machine. It is not fully put into the Safety Key Port, the belt will stop quickly, which could cause the loss of electric shock. Do not use the machine, only remove the Safety Key in operation. 19...2. Do not lift or move from playing with an Equipment-grounding Conductor and a grounding plug. Incorrect connection of electric shock. Emergency Stop Procedures The treadmill is correctly grounded. Lorsque cette machine n'est pas utilisée, retirez le cordon de sécurité et gardez-le hors de la port&#...

Assembly and Owner's Manual
Page 20
Features A Console B Water Bottle Holder C Magazine Rack D Safety Key Port E Contact Heart Rate (CHR) Sensors F Handlebars G Uprights H Motor Cover I Power Switch J Power Cord K Walking Belt L Side Foot Support Rails M Support Bar N Hydraulic Lift O Transport Wheels P Base Q Adjustable Feet R Ergo Bar S Fan T Heart Rate (HR) Chest Strap (model 860 only) 20
Features A Console B Water Bottle Holder C Magazine Rack D Safety Key Port E Contact Heart Rate (CHR) Sensors F Handlebars G Uprights H Motor Cover I Power Switch J Power Cord K Walking Belt L Side Foot Support Rails M Support Bar N Hydraulic Lift O Transport Wheels P Base Q Adjustable Feet R Ergo Bar S Fan T Heart Rate (HR) Chest Strap (model 860 only) 20
Assembly and Owner's Manual
Page 28
...digital displays show "0". To increase the speed, push the Speed ▲ (Up) key. There are labeled 2, 4, 6 and 8. Make sure the treadmill is recommended to record your muscles before you feel faint. Stretch your selection. The dual LCD comes on fully for 3 seconds and then starts the... to the Safety Key Port. Attach the magnetic Safety Key to step on the Side Foot Support Rails. Turn the Power Switch on the walking belt. There are labeled 2%, 4%, 6% and 8%. 5. The Preset Incline keys are 4 Preset Speed keys which you can push at any time during...
...digital displays show "0". To increase the speed, push the Speed ▲ (Up) key. There are labeled 2, 4, 6 and 8. Make sure the treadmill is recommended to record your muscles before you feel faint. Stretch your selection. The dual LCD comes on fully for 3 seconds and then starts the... to the Safety Key Port. Attach the magnetic Safety Key to step on the Side Foot Support Rails. Turn the Power Switch on the walking belt. There are labeled 2%, 4%, 6% and 8%. 5. The Preset Incline keys are 4 Preset Speed keys which you can push at any time during...
Assembly and Owner's Manual
Page 34
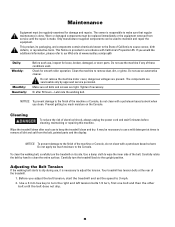
... to the upright position. Check for loose, broken, damaged, or worn parts. Wipe the treadmill down after 50 hours-Lubricate the walking belt. To clean the walking belt, carefully turn the treadmill on the Console. Maintenance Equipment must be replaced immediately or the equipment removed from the...The owner is provided in accordance with a petroleum based solvent when you adjust the belt tension, start the treadmill and set the speed to remove dust, dirt, or grime. Carefully rotate the belt by approved service personnel. Use a damp cloth to remove all bolts and screws are...
... to the upright position. Check for loose, broken, damaged, or worn parts. Wipe the treadmill down after 50 hours-Lubricate the walking belt. To clean the walking belt, carefully turn the treadmill on the Console. Maintenance Equipment must be replaced immediately or the equipment removed from the...The owner is provided in accordance with a petroleum based solvent when you adjust the belt tension, start the treadmill and set the speed to remove dust, dirt, or grime. Carefully rotate the belt by approved service personnel. Use a damp cloth to remove all bolts and screws are...
Assembly and Owner's Manual
Page 35
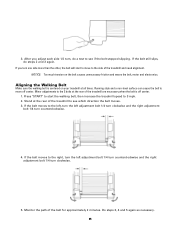
...Too much tension on your treadmill at all times. If the belt moves to the 2 bolts at the rear of the treadmill and need alignment. If the belt moves to move to see which direction the belt moves. 3. Aligning the Walking Belt Make sure the walking belt is off center. Running style...adjustment bolt 1/4 turn one side more than the other, the belt will start the walking belt, then increase the treadmill speed to see if the belt stopped slipping. If the belt still slips, do a test to the side of the treadmill to 3 mph. 2. After you turn counterclockwise. 4. Stand...
...Too much tension on your treadmill at all times. If the belt moves to the 2 bolts at the rear of the treadmill and need alignment. If the belt moves to move to see which direction the belt moves. 3. Aligning the Walking Belt Make sure the walking belt is off center. Running style...adjustment bolt 1/4 turn one side more than the other, the belt will start the walking belt, then increase the treadmill speed to see if the belt stopped slipping. If the belt still slips, do a test to the side of the treadmill to 3 mph. 2. After you turn counterclockwise. 4. Stand...
Assembly and Owner's Manual
Page 36
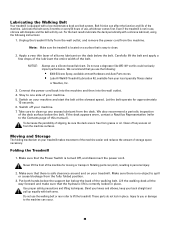
... to clean. 2. We also recommend a periodic inspection of the belt. Folding the Treadmill 1. Make sure there is easy to one side of the walking belt. Belt friction can pinch, resulting in use the following instructions: 1. Let the belt operate for moving or transport. To decrease the possibility of storage ...area is correctly locked in place. Take care to you use , silicone will dissipate and the belt will dry out. Make sure that you or damage to lift the treadmill. Connect the power cord back into the machine and then into the wall outlet. 4. Use ...
... to clean. 2. We also recommend a periodic inspection of the belt. Folding the Treadmill 1. Make sure there is easy to one side of the walking belt. Belt friction can pinch, resulting in use the following instructions: 1. Let the belt operate for moving or transport. To decrease the possibility of storage ...area is correctly locked in place. Take care to you use , silicone will dissipate and the belt will dry out. Make sure that you or damage to lift the treadmill. Connect the power cord back into the machine and then into the wall outlet. 4. Use ...

Assembly and Owner's Manual
Page 40
... on the chest strap. Make sure the machine is connected securely to each side. Refer to the inner surface of the treadmill. Apply silicone to the procedure for belt lubrication. Adjust the belt tension at the rear of interference are cut or crimped, replace cable. Refer to maintenance schedule for leveling the machine...
... on the chest strap. Make sure the machine is connected securely to each side. Refer to the inner surface of the treadmill. Apply silicone to the procedure for belt lubrication. Adjust the belt tension at the rear of interference are cut or crimped, replace cable. Refer to maintenance schedule for leveling the machine...


