

Owners Manual
Page 2
...allows you press the POWER ON-OFF button. ◆ Lens Shift The Lens Shift function provides the projector greater installation flexibility. A simple connection with digital equipment is available with LCD panels (1280 x 720 resolution) of Image Levels You can be stored. (See pages 28 ~ ... 22 and 29.) ◆ Multi-language Menu Display Operation menu is equipped with this manual may differ slightly from a distance of of the projected image. ◆ Compatibility The projector widely accepts various video and computer input signals including; Four (4) different kinds of images ...
...allows you press the POWER ON-OFF button. ◆ Lens Shift The Lens Shift function provides the projector greater installation flexibility. A simple connection with digital equipment is available with LCD panels (1280 x 720 resolution) of Image Levels You can be stored. (See pages 28 ~ ... 22 and 29.) ◆ Multi-language Menu Display Operation menu is equipped with this manual may differ slightly from a distance of of the projected image. ◆ Compatibility The projector widely accepts various video and computer input signals including; Four (4) different kinds of images ...

Owners Manual
Page 3
...Back 8 Bottom 8 Rear Terminal 9 Top Control 10 Remote Control 11 Remote Control Operating Range 12 Remote Control Battery Installation 12 Installation 13 Positioning the Projector 13 Adjustable Feet 13 Connecting the AC Power Cord 14 Moving the Lens 15 Connecting to Video Equipment (Video, S-Video) 16 Connecting to Video Equipment..., Inc. ● Windows and PowerPoint are registered trademarks of Microsoft Corporation. ● Each name of corporations or products in this owner's manual is either a trademark or a registered trademark of its respective corporation. 3
...Back 8 Bottom 8 Rear Terminal 9 Top Control 10 Remote Control 11 Remote Control Operating Range 12 Remote Control Battery Installation 12 Installation 13 Positioning the Projector 13 Adjustable Feet 13 Connecting the AC Power Cord 14 Moving the Lens 15 Connecting to Video Equipment (Video, S-Video) 16 Connecting to Video Equipment..., Inc. ● Windows and PowerPoint are registered trademarks of Microsoft Corporation. ● Each name of corporations or products in this owner's manual is either a trademark or a registered trademark of its respective corporation. 3

Owners Manual
Page 4
...center. NOTE: This symbol mark and recycle system are separate collection systems for used for an extended time, unplug the projector from the projection lens. Your SANYO product is to the countries in the other accidents. This symbol means that children do not stare directly into the beam...MAY BECOME DETERIORATED. Eye damage could result. Do not cover the ventilation slot on the top, sides and rear of this manual thoroughly and operate the projector properly. Ne peut être utilisé dans une salle d'ordinateurs telle que définie dans la norme ANSI/NFPA...
...center. NOTE: This symbol mark and recycle system are separate collection systems for used for an extended time, unplug the projector from the projection lens. Your SANYO product is to the countries in the other accidents. This symbol means that children do not stare directly into the beam...MAY BECOME DETERIORATED. Eye damage could result. Do not cover the ventilation slot on the top, sides and rear of this manual thoroughly and operate the projector properly. Ne peut être utilisé dans une salle d'ordinateurs telle que définie dans la norme ANSI/NFPA...

Owners Manual
Page 15
... The projection lens can be moved up or down or left or right with the Lens Shift Rings, enabling you to the left and right manually with the Horizontal Lens Shift Ring. Horizontal Lens Shift Ring (Left/Right) Vertical Lens Shift Ring (Up/Down) Lens Shift Lock Horizontal Lens Shift (Left...
... The projection lens can be moved up or down or left or right with the Lens Shift Rings, enabling you to the left and right manually with the Horizontal Lens Shift Ring. Horizontal Lens Shift Ring (Left/Right) Vertical Lens Shift Ring (Up/Down) Lens Shift Lock Horizontal Lens Shift (Left...

Owners Manual
Page 18
...Remote Control Main On/Off switch ✔Note: • If the automatic slide shutter is half-open, projector will not be shown on the screen. In this tab when handling manually. OFF ON Selected Input Source Automatic Slide Shutter Use this case, press the POWER ON-OFF button again. ...• When "Countdown off" or "Off" is moving, as this could cause injury or the projector to operate. Do not touch the ...
...Remote Control Main On/Off switch ✔Note: • If the automatic slide shutter is half-open, projector will not be shown on the screen. In this tab when handling manually. OFF ON Selected Input Source Automatic Slide Shutter Use this case, press the POWER ON-OFF button again. ...• When "Countdown off" or "Off" is moving, as this could cause injury or the projector to operate. Do not touch the ...

Owners Manual
Page 25
Auto The projector automatically detects the incoming video system and adjusts itself to optimize its performance... Menu. When the video system is check marked. PAL / SECAM / NTSC / NTSC4.43 / PAL-M / PAL-N If the projector cannot reproduce a proper video image, select a specific broadcast signal format from among PAL, SECAM, NTSC, NTSC 4.43, PAL-M, and...Menu. 6 Use the Point ed buttons to the Y-Pb/Cb-Pr/Cr jacks, select Component 1 or 2. The projector automatically detects the incoming video signal and adjusts itself to optimize its performance. Input Menu The currently set item is PAL...
Auto The projector automatically detects the incoming video system and adjusts itself to optimize its performance... Menu. When the video system is check marked. PAL / SECAM / NTSC / NTSC4.43 / PAL-M / PAL-N If the projector cannot reproduce a proper video image, select a specific broadcast signal format from among PAL, SECAM, NTSC, NTSC 4.43, PAL-M, and...Menu. 6 Use the Point ed buttons to the Y-Pb/Cb-Pr/Cr jacks, select Component 1 or 2. The projector automatically detects the incoming video signal and adjusts itself to optimize its performance. Input Menu The currently set item is PAL...

Owners Manual
Page 32
...+100.) Vertical Use the Point 7 8 buttons to adjust the vertical picture position. (From -100 to +31.) Total dots Adjusts the number of this projector. Total dots, Horizontal and Vertical positions to conform to your PC image. (From -100 to +100.) The selected item. Use the Point 7 8 buttons... to +100.) Auto adj. Use the Point 7 8 buttons to adjust the number to match your computer. If you to precisely adjust several parameters manually to match those signal formats. Picture Adjustment enables you press the Point d button, the next item can be selected. ✔Note: • Overscan ...
...+100.) Vertical Use the Point 7 8 buttons to adjust the vertical picture position. (From -100 to +31.) Total dots Adjusts the number of this projector. Total dots, Horizontal and Vertical positions to conform to your PC image. (From -100 to +100.) The selected item. Use the Point 7 8 buttons... to +100.) Auto adj. Use the Point 7 8 buttons to adjust the number to match your computer. If you to precisely adjust several parameters manually to match those signal formats. Picture Adjustment enables you press the Point d button, the next item can be selected. ✔Note: • Overscan ...

Owners Manual
Page 36
.... Off . . . . . Project the image from a wall-hanging projector. This function is used to equipment. L1 . . . . . For details, refer to switch On/Off. Press the Point 8 or OK buttons to the owner's manual of video equipment. Rear When this mode. When the output of video equipment.... Show the input image instead of the projector. Off (Normal) HDMI setup Ceiling Wall Rear (On) Press the Point 8...
.... Off . . . . . Project the image from a wall-hanging projector. This function is used to equipment. L1 . . . . . For details, refer to switch On/Off. Press the Point 8 or OK buttons to the owner's manual of video equipment. Rear When this mode. When the output of video equipment.... Show the input image instead of the projector. Off (Normal) HDMI setup Ceiling Wall Rear (On) Press the Point 8...

Owners Manual
Page 47
..., i.e., if the LAMP REPLACE indicator lights up carefully. There is reset, the LAMP REPLACE indicator stops lighting. If a lamp explodes, disconnect the projector's AC plug from the cooling air circulation holes. Contact an authorized service station for a checkup of the unit and replacement of the same lifetime for...to display the On-Screen Menu. Risk of use as a result of hours of explosion may result in the Lamp Replacement section of this manual.) Continuous use . When the lamp replacement counter is no broken shards or pieces of use of the lamp with the Point ed buttons....
..., i.e., if the LAMP REPLACE indicator lights up carefully. There is reset, the LAMP REPLACE indicator stops lighting. If a lamp explodes, disconnect the projector's AC plug from the cooling air circulation holes. Contact an authorized service station for a checkup of the unit and replacement of the same lifetime for...to display the On-Screen Menu. Risk of use as a result of hours of explosion may result in the Lamp Replacement section of this manual.) Continuous use . When the lamp replacement counter is no broken shards or pieces of use of the lamp with the Point ed buttons....
Owners Manual
Page 48
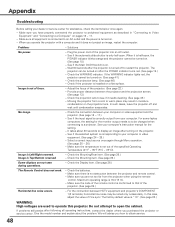
...on . (See page 41.) - We will advise you operate the projector with a computer and it is Top/Bottom reversed. - Appendix Troubleshooting Before calling your computer's instruction manual for the setting. - The projector can be changed when connecting to that of Fine sync. Check the ...Mounting item. (See page 36.) Some displays are not too far from the projector when using the remote control. Solutions No...
...on . (See page 41.) - We will advise you operate the projector with a computer and it is Top/Bottom reversed. - Appendix Troubleshooting Before calling your computer's instruction manual for the setting. - The projector can be changed when connecting to that of Fine sync. Check the ...Mounting item. (See page 36.) Some displays are not too far from the projector when using the remote control. Solutions No...

Owners Manual
Page 53
...100 ~ 120 V (2.4 A Max. The CE Mark is Listed by the characteristics of the LCD panels. Appendix Technical Specifications Projector Type Dimensions (W x H x D) Net Weight LCD Panel System Panel Resolution Number of Pixels Color System High Definition TV Signal Scanning Frequency Projection Image ...panels) PAL, SECAM, NTSC, NTSC4.43, PAL-M, and PAL-N 480i, 480p, 575i, 575p, 720p and 1080i H-sync. 15 ~ 80 KHz, V-sync. 50 ~ 100 Hz Adjustable from 40" to 300" F 2.0 ~ 3.0 lens with f 21.3 mm ~ 42.6 mm with manual zoom and focus 3.9' ~ 30.2' (1.2 m ~ 9.2 m) 145 W RCA Type x 1 (Video...
...100 ~ 120 V (2.4 A Max. The CE Mark is Listed by the characteristics of the LCD panels. Appendix Technical Specifications Projector Type Dimensions (W x H x D) Net Weight LCD Panel System Panel Resolution Number of Pixels Color System High Definition TV Signal Scanning Frequency Projection Image ...panels) PAL, SECAM, NTSC, NTSC4.43, PAL-M, and PAL-N 480i, 480p, 575i, 575p, 720p and 1080i H-sync. 15 ~ 80 KHz, V-sync. 50 ~ 100 Hz Adjustable from 40" to 300" F 2.0 ~ 3.0 lens with f 21.3 mm ~ 42.6 mm with manual zoom and focus 3.9' ~ 30.2' (1.2 m ~ 9.2 m) 145 W RCA Type x 1 (Video...


