
Owners Manual
Page 3
...9 Top Control 10 Remote Control 11 Remote Control Operating Range 12 Remote Control Battery Installation 12 Installation 13 Positioning the Projector 13 Adjustable Feet 13 Connecting the AC Power Cord 14 Moving the Lens 15 Connecting to Video Equipment (Video, S-Video... Cleaning the Air Filters 44 Cleaning the Projection Lens 45 Cleaning the Projector Cabinet 45 Lamp Replacement 46 Lamp Replacement Counter 47 Appendix 48 Troubleshooting 48 Indicators and Projector Condition 49 Menu Tree 50 Compatible Computer Specifications 52 Technical Specifications 53...
...9 Top Control 10 Remote Control 11 Remote Control Operating Range 12 Remote Control Battery Installation 12 Installation 13 Positioning the Projector 13 Adjustable Feet 13 Connecting the AC Power Cord 14 Moving the Lens 15 Connecting to Video Equipment (Video, S-Video... Cleaning the Air Filters 44 Cleaning the Projection Lens 45 Cleaning the Projector Cabinet 45 Lamp Replacement 46 Lamp Replacement Counter 47 Appendix 48 Troubleshooting 48 Indicators and Projector Condition 49 Menu Tree 50 Compatible Computer Specifications 52 Technical Specifications 53...

Owners Manual
Page 4
...and top of the projector periodically with high quality materials and components which can also be used electrical and electronic products. THIS SYMBOL INDICATES THAT DANGEROUS VOLTAGE CONSTITUTING A RISK OF ELECTRIC SHOCK IS PRESENT WITHIN THIS UNIT. Your SANYO product is designed and... Minimum clearances must be recycled and reused. If the projector is to the countries in the other accidents. NO USER-SERVICEABLE PARTS INSIDE EXCEPT LAMP REPLACEMENT. Install the projector in a fire hazard. - If the projector is not to operate improperly, read this equipment at their...
...and top of the projector periodically with high quality materials and components which can also be used electrical and electronic products. THIS SYMBOL INDICATES THAT DANGEROUS VOLTAGE CONSTITUTING A RISK OF ELECTRIC SHOCK IS PRESENT WITHIN THIS UNIT. Your SANYO product is designed and... Minimum clearances must be recycled and reused. If the projector is to the countries in the other accidents. NO USER-SERVICEABLE PARTS INSIDE EXCEPT LAMP REPLACEMENT. Install the projector in a fire hazard. - If the projector is not to operate improperly, read this equipment at their...

Owners Manual
Page 10
.... - i INPUT button Select an input source (p.24). 10 When the automatic slide shutter is in the Power management mode (p.37). r LAMP REPLACE indicator Emits a yellow light when the life of the projector exceeds the operating range (p.41, 49). y OK button Execute the item selected or use them to an end (p.46, 49). It...
.... - i INPUT button Select an input source (p.24). 10 When the automatic slide shutter is in the Power management mode (p.37). r LAMP REPLACE indicator Emits a yellow light when the life of the projector exceeds the operating range (p.41, 49). y OK button Execute the item selected or use them to an end (p.46, 49). It...

Owners Manual
Page 38
...or not an input source is used at the same time. The automatic slide shutter closes once with the lamp being turned on the remote control for checking the operation of the projector. Using a blower as well is more than 10 seconds to switch between Code 1 and Code 2. This...and will open up again. Setting Remote control Two different remote control codes are replaced, the remote control code automatically returns to the initial code (Code 1). To change the code of the remote control are assigned to this projector: the factory-set code (Code 1) and the secondary code (Code 2).
...or not an input source is used at the same time. The automatic slide shutter closes once with the lamp being turned on the remote control for checking the operation of the projector. Using a blower as well is more than 10 seconds to switch between Code 1 and Code 2. This...and will open up again. Setting Remote control Two different remote control codes are replaced, the remote control code automatically returns to the initial code (Code 1). To change the code of the remote control are assigned to this projector: the factory-set code (Code 1) and the secondary code (Code 2).
Owners Manual
Page 39
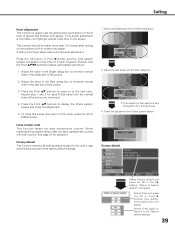
...projector with the Bright dialog box. 2. Adjust the value in the Dark dialog box to move on the screen. Press the Point ed buttons to minimize vertical lines in the bright part of the R (red), G (green) and B (blue) LCD panels. When replacing the projection lamp, reset the lamp replacement... counter with Check pattern screen. See page 47 for the user's logo and the lamp counter to adjust each R,G,B panel until the vertical lines of the picture. 3. ...
...projector with the Bright dialog box. 2. Adjust the value in the Dark dialog box to move on the screen. Press the Point ed buttons to minimize vertical lines in the bright part of the R (red), G (green) and B (blue) LCD panels. When replacing the projection lamp, reset the lamp replacement... counter with Check pattern screen. See page 47 for the user's logo and the lamp counter to adjust each R,G,B panel until the vertical lines of the picture. 3. ...

Owners Manual
Page 46
The inside of the projector can be ordered through your projector : ● Replacement Lamp Type No. : PLV-Z4 POA-LMP94 (Service Parts No. 610 323 5998) 46 Make sure that secures the lamp cover, and then open the lamp cover. This indicator lights yellow when the life of your dealer. Top Control CAUTION Allow the projector to cool, for at...
The inside of the projector can be ordered through your projector : ● Replacement Lamp Type No. : PLV-Z4 POA-LMP94 (Service Parts No. 610 323 5998) 46 Make sure that secures the lamp cover, and then open the lamp cover. This indicator lights yellow when the life of your dealer. Top Control CAUTION Allow the projector to cool, for at...

Owners Manual
Page 47
.... (Follow carefully the instructions in which must be cleaned up carefully. Additionally, check carefully to ensure that the lamp should be replaced, i.e., if the LAMP REPLACE indicator lights up, replace the lamp with projector service. "Lamp replacement counter reset" will appear. Some lamps may result in an accident or injury caused by pieces of broken glass. 47 Maintenance and Cleaning...
.... (Follow carefully the instructions in which must be cleaned up carefully. Additionally, check carefully to ensure that the lamp should be replaced, i.e., if the LAMP REPLACE indicator lights up, replace the lamp with projector service. "Lamp replacement counter reset" will appear. Some lamps may result in an accident or injury caused by pieces of broken glass. 47 Maintenance and Cleaning...

Owners Manual
Page 49
... WARNING indicator keeps blinking.) Check and clean the air filters. The lamp does not turn on the lamp mode. If the ✽ projector is cooled down . Reset the Lamp replacement counter after replacing the lamp. Do not leave the projector on . Check and clean the air filters. When the projector is turned off * When the life of the projection...
... WARNING indicator keeps blinking.) Check and clean the air filters. The lamp does not turn on the lamp mode. If the ✽ projector is cooled down . Reset the Lamp replacement counter after replacing the lamp. Do not leave the projector on . Check and clean the air filters. When the projector is turned off * When the life of the projection...


