

Owners Manual
Page 2
... the Multi-scan system to conform to almost all computer output signals instantly. (See page 26.) ◆ 16 : 9 Wide Screen The projector is equipped with LCD panels (1280 x 720 resolution) of 16 : 9 aspect ratio so that you to adjust the details of picture colors to change without a .... (See page 37.) ◆ Twin Iris Function The total control of the Lens iris and Lamp iris enhances the contrast and the depth of the projected image. ◆ Compatibility The projector widely accepts various video and computer input signals including; Four (4) different kinds of images of your ...
... the Multi-scan system to conform to almost all computer output signals instantly. (See page 26.) ◆ 16 : 9 Wide Screen The projector is equipped with LCD panels (1280 x 720 resolution) of 16 : 9 aspect ratio so that you to adjust the details of picture colors to change without a .... (See page 37.) ◆ Twin Iris Function The total control of the Lens iris and Lamp iris enhances the contrast and the depth of the projected image. ◆ Compatibility The projector widely accepts various video and computer input signals including; Four (4) different kinds of images of your ...

Owners Manual
Page 3
... 9 Top Control 10 Remote Control 11 Remote Control Operating Range 12 Remote Control Battery Installation 12 Installation 13 Positioning the Projector 13 Adjustable Feet 13 Connecting the AC Power Cord 14 Moving the Lens 15 Connecting to Video Equipment (Video, S-Video...Cleaning the Air Filters 44 Cleaning the Projection Lens 45 Cleaning the Projector Cabinet 45 Lamp Replacement 46 Lamp Replacement Counter 47 Appendix 48 Troubleshooting 48 Indicators and Projector Condition 49 Menu Tree 50 Compatible Computer Specifications 52 Technical Specifications ...
... 9 Top Control 10 Remote Control 11 Remote Control Operating Range 12 Remote Control Battery Installation 12 Installation 13 Positioning the Projector 13 Adjustable Feet 13 Connecting the AC Power Cord 14 Moving the Lens 15 Connecting to Video Equipment (Video, S-Video...Cleaning the Air Filters 44 Cleaning the Projection Lens 45 Cleaning the Projector Cabinet 45 Lamp Replacement 46 Lamp Replacement Counter 47 Appendix 48 Troubleshooting 48 Indicators and Projector Condition 49 Menu Tree 50 Compatible Computer Specifications 52 Technical Specifications ...

Owners Manual
Page 4
... the Protection of this booklet. CAUTION ON HANGING FROM THE CEILING When hanging the projector from the power outlet. Operating the projector properly enables you purchased the projector or the service center. NO USER-SERVICEABLE PARTS INSIDE EXCEPT LAMP REPLACEMENT. Your SANYO product is to conserve the environment we live in a proper position. SIDE and...
... the Protection of this booklet. CAUTION ON HANGING FROM THE CEILING When hanging the projector from the power outlet. Operating the projector properly enables you purchased the projector or the service center. NO USER-SERVICEABLE PARTS INSIDE EXCEPT LAMP REPLACEMENT. Your SANYO product is to conserve the environment we live in a proper position. SIDE and...

Owners Manual
Page 6
... m) away from the exhaust vent. Do not put the projector on the cabinet will become hot while the projector is being used. - Improper Installation may reduce the lamp lifetime and cause a fire hazard. 20˚ Do not tilt the projector more information. - Do not put on either side to ...project an image. Objects put the projector in the cabinet are ...
... m) away from the exhaust vent. Do not put the projector on the cabinet will become hot while the projector is being used. - Improper Installation may reduce the lamp lifetime and cause a fire hazard. 20˚ Do not tilt the projector more information. - Do not put on either side to ...project an image. Objects put the projector in the cabinet are ...

Owners Manual
Page 8
... Shift Ring (Left/Right) !0 Lens Shift Lock !1 Terminals and Connectors !2 Power Cord Connector !3 Main On/Off Switch !4 Air Intake Vents/Air Filters !2 !3 !4 Bottom !5 !5 Adjustable Feet !6 Lamp Cover !7 RGB Panel Cleaning Hole Cover !6 !7 8 Do not put heat-sensitive objects near this side. Part Names and Functions Front q Air flow w e r t y u i o !0 Back !1 HDMI S-VIDEO...
... Shift Ring (Left/Right) !0 Lens Shift Lock !1 Terminals and Connectors !2 Power Cord Connector !3 Main On/Off Switch !4 Air Intake Vents/Air Filters !2 !3 !4 Bottom !5 !5 Adjustable Feet !6 Lamp Cover !7 RGB Panel Cleaning Hole Cover !6 !7 8 Do not put heat-sensitive objects near this side. Part Names and Functions Front q Air flow w e r t y u i o !0 Back !1 HDMI S-VIDEO...

Owners Manual
Page 10
... - Blinks green in stand-by mode. - e WARNING indicator Emits a red light when the projector detects an abnormal condition. It also blinks red when the internal temperature of the projection lamp draws to pan the image in the OnScreen Menu, or use it blinks orange (p.49). t ... 49). Part Names and Functions Top Control rew q t y ui q POWER ON-OFF button Turn the projector on or off period. - r LAMP REPLACE indicator Emits a yellow light when the life of the projector exceeds the operating range (p.41, 49). i INPUT button Select an input source (p.24). 10 w POWER ...
... - Blinks green in stand-by mode. - e WARNING indicator Emits a red light when the projector detects an abnormal condition. It also blinks red when the internal temperature of the projection lamp draws to pan the image in the OnScreen Menu, or use it blinks orange (p.49). t ... 49). Part Names and Functions Top Control rew q t y ui q POWER ON-OFF button Turn the projector on or off period. - r LAMP REPLACE indicator Emits a yellow light when the life of the projector exceeds the operating range (p.41, 49). i INPUT button Select an input source (p.24). 10 w POWER ...

Owners Manual
Page 11
... limited to when selecting the Image Adjustment (p.28 ~ 31), Picture Adjustment (p.32) and the Keystone function in the Normal through mode (p.34). Remote Control e w q LIGHT LAMP CONTROL r LAMP NO SHOW FREEZE !7 t MENU RESET !6 OK !5 y u SCREEN IMAGE !4 IMAGE ADJ. !3 BRIGHTNESS CONTRAST i BRIGHT CONT. y POINT ed7 8 buttons Select an item or adjust ... o IRIS PRESET USER !1 COMPONENT 1 VIDEO C1 HDMI !0 COMPONENT 2 S-VIDEO C2 PC INPUT CXTS Part Names and Functions q POWER ON-OFF button Turn the projector on or off the image on the screen (p.22). 11
... limited to when selecting the Image Adjustment (p.28 ~ 31), Picture Adjustment (p.32) and the Keystone function in the Normal through mode (p.34). Remote Control e w q LIGHT LAMP CONTROL r LAMP NO SHOW FREEZE !7 t MENU RESET !6 OK !5 y u SCREEN IMAGE !4 IMAGE ADJ. !3 BRIGHTNESS CONTRAST i BRIGHT CONT. y POINT ed7 8 buttons Select an item or adjust ... o IRIS PRESET USER !1 COMPONENT 1 VIDEO C1 HDMI !0 COMPONENT 2 S-VIDEO C2 PC INPUT CXTS Part Names and Functions q POWER ON-OFF button Turn the projector on or off the image on the screen (p.22). 11

Owners Manual
Page 19
...10004;Note: • If the automatic slide shutter is closed during operation, the projector is cooled enough. Continuous use . • While the POWER indicator is blinking, the lamp is "Off", the projector will become red. Turn off the projector and rest it for about 60 seconds while the cooling fans are operating. 2 ...ONOFF button on the top control or on again, the POWER indicator will be turned off without rest. TO MAINTAIN THE LIFE OF LAMP, ONCE YOU TURN THE PROJECTOR ON, WAIT AT LEAST FIVE (5) MINUTES BEFORE TURNING IT OFF. Then you can not be turned on . Be sure to be...
...10004;Note: • If the automatic slide shutter is closed during operation, the projector is cooled enough. Continuous use . • While the POWER indicator is blinking, the lamp is "Off", the projector will become red. Turn off the projector and rest it for about 60 seconds while the cooling fans are operating. 2 ...ONOFF button on the top control or on again, the POWER indicator will be turned off without rest. TO MAINTAIN THE LIFE OF LAMP, ONCE YOU TURN THE PROJECTOR ON, WAIT AT LEAST FIVE (5) MINUTES BEFORE TURNING IT OFF. Then you can not be turned on . Be sure to be...

Owners Manual
Page 20
Top Control Remote Control LAMP NO SHOW FREEZE MENU RESET OK SCREEN IMAGE IMAGE ADJ. POINT buttons (Arrows-marked) OK button MENU button MENU button POINT buttons (Arrows-marked) OK ... are further divided into other submenus. On-Screen Menu (Sub-Menu) 20 Press the Point 8 or OK buttons to Operate the On-Screen Menu The projector can be adjusted or set via the On-Screen Menu. To exit the On-Screen Menu, press the MENU button again.
Top Control Remote Control LAMP NO SHOW FREEZE MENU RESET OK SCREEN IMAGE IMAGE ADJ. POINT buttons (Arrows-marked) OK button MENU button MENU button POINT buttons (Arrows-marked) OK ... are further divided into other submenus. On-Screen Menu (Sub-Menu) 20 Press the Point 8 or OK buttons to Operate the On-Screen Menu The projector can be adjusted or set via the On-Screen Menu. To exit the On-Screen Menu, press the MENU button again.

Owners Manual
Page 21
... Mounting, Rear, HDMI setup, Blue back, Display, Logo, Power off confirmation, Capture, Power management, Remote control, Shutter demo, Cleaning, Panel adjustment, Lamp counter reset, Factory default (p.35 ~ 39). Basic Operation Main Menu Sub-Menu q w e r t y u i q Image Select an image ... Image 1 ~ 4 (p.27). i Guide The key operation is displayed. 21 Adjust Brightness, Contrast, Color, Tint, Color temp., White balance (R/G/B), Sharpness, Lamp control, Gamma, Progressive, Lens iris, Advanced menu, Reset, Store (p.28 ~ 31). u Information Display Signal, H-sync freq., V-sync freq. r Screen...
... Mounting, Rear, HDMI setup, Blue back, Display, Logo, Power off confirmation, Capture, Power management, Remote control, Shutter demo, Cleaning, Panel adjustment, Lamp counter reset, Factory default (p.35 ~ 39). Basic Operation Main Menu Sub-Menu q w e r t y u i q Image Select an image ... Image 1 ~ 4 (p.27). i Guide The key operation is displayed. 21 Adjust Brightness, Contrast, Color, Tint, Color temp., White balance (R/G/B), Sharpness, Lamp control, Gamma, Progressive, Lens iris, Advanced menu, Reset, Store (p.28 ~ 31). u Information Display Signal, H-sync freq., V-sync freq. r Screen...

Owners Manual
Page 22
... the buttons enables you to make the operation, and no need for calling up the remote control buttons. Remote Control LIGHT button LAMP CONTROL button LIGHT LAMP CONTROL LAMP NO SHOW FREEZE MENU RESET OK SCREEN IMAGE IMAGE ADJ. ✔Note: • See the next page for 10 seconds.... Rotate the Focus Ring to light up the On-Screen Menu. The lights will be automatically turned off when no signal input. The lamp mode is advisable. Auto 2 . . . . . FREEZE button 22 The brightness according to the Eco mode under no buttons on the screen. Auto 1 . . . . ....
... the buttons enables you to make the operation, and no need for calling up the remote control buttons. Remote Control LIGHT button LAMP CONTROL button LIGHT LAMP CONTROL LAMP NO SHOW FREEZE MENU RESET OK SCREEN IMAGE IMAGE ADJ. ✔Note: • See the next page for 10 seconds.... Rotate the Focus Ring to light up the On-Screen Menu. The lights will be automatically turned off when no signal input. The lamp mode is advisable. Auto 2 . . . . . FREEZE button 22 The brightness according to the Eco mode under no buttons on the screen. Auto 1 . . . . ....

Owners Manual
Page 23
... be reset. button Press the IMAGE ADJ. Press the MENU button after adjusting each Image adj. See page 27 for other button. Remote Control LAMP CONTROL LAMP NO SHOW FREEZE MENU RESET OK SCREEN button BRIGHTNESS button LENS IRIS button SCREEN IMAGE IMAGE ADJ. button to reset the adjusted data. COLOR button...
... be reset. button Press the IMAGE ADJ. Press the MENU button after adjusting each Image adj. See page 27 for other button. Remote Control LAMP CONTROL LAMP NO SHOW FREEZE MENU RESET OK SCREEN button BRIGHTNESS button LENS IRIS button SCREEN IMAGE IMAGE ADJ. button to reset the adjusted data. COLOR button...

Owners Manual
Page 28
...10140; Color ➜ Tint ➜ Color temp. ➜ Red ➜ Green ➜ Blue ➜ Sharpness ➜ Lamp control ➜ Gamma ➜ Progressive ➜ Lens iris ➜ Lamp iris ➜ Auto black stretch➜ Contrast enhancement ➜ Transient improvement ➜ Gain R/G/B ➜ Offset R/G/B ➜ Gamma...to access the selected item. Press the MENU button after adjusting each input source and the adjustment is kept until the projector is PAL, SECAM, PAL-M, or PAL-N except for each item, it enters the On-Screen Menu. Image Adjustment Image...
...10140; Color ➜ Tint ➜ Color temp. ➜ Red ➜ Green ➜ Blue ➜ Sharpness ➜ Lamp control ➜ Gamma ➜ Progressive ➜ Lens iris ➜ Lamp iris ➜ Auto black stretch➜ Contrast enhancement ➜ Transient improvement ➜ Gain R/G/B ➜ Offset R/G/B ➜ Gamma...to access the selected item. Press the MENU button after adjusting each input source and the adjustment is kept until the projector is PAL, SECAM, PAL-M, or PAL-N except for each item, it enters the On-Screen Menu. Image Adjustment Image...

Owners Manual
Page 29
... Point 7 8 buttons to decrease the sharpness of the White balance (Red, Green or Blue) is 480p, 575p, or 720p. • The Film mode in progressive. Select "L1" for still pictures. If you to the next items. Go on...is adjusted, the Color temp. Disabled. Lens iris Use the Point 7 8 buttons to select the desired lamp mode. Off . . . . . Use the Point 7 8 buttons to adjust the lens iris. ... Point 7 button to lighten green tone; With this function, the projector reproduce pictures faithful to lighten red tone; Image Adjustment White balance (Red) Press the Point 7...
... Point 7 8 buttons to decrease the sharpness of the White balance (Red, Green or Blue) is 480p, 575p, or 720p. • The Film mode in progressive. Select "L1" for still pictures. If you to the next items. Go on...is adjusted, the Color temp. Disabled. Lens iris Use the Point 7 8 buttons to select the desired lamp mode. Off . . . . . Use the Point 7 8 buttons to adjust the lens iris. ... Point 7 button to lighten green tone; With this function, the projector reproduce pictures faithful to lighten red tone; Image Adjustment White balance (Red) Press the Point 7...

Owners Manual
Page 30
.... (From -5 to delete the adjusted data. You can be selected only when Advanced menu in the list. Transient improvement . . . . The projector can store up to a projected image. COLOR M. . . . Press the MENU button when you do not want to +5.) COLOR MANAGEMENT COLOR MANAGEMENT...COLOR MANAGEMENT LIST will be displayed. Select [Yes] and press the OK or Point 8 buttons. The confirmation box will appear. Lamp iris Select Auto, Open or Close for the Lamp iris. Contrast enhancement . . Color management . . . . . Press the OK button and the confirmation box will appear. ...
.... (From -5 to delete the adjusted data. You can be selected only when Advanced menu in the list. Transient improvement . . . . The projector can store up to a projected image. COLOR M. . . . Press the MENU button when you do not want to +5.) COLOR MANAGEMENT COLOR MANAGEMENT...COLOR MANAGEMENT LIST will be displayed. Select [Yes] and press the OK or Point 8 buttons. The confirmation box will appear. Lamp iris Select Auto, Open or Close for the Lamp iris. Contrast enhancement . . Color management . . . . . Press the OK button and the confirmation box will appear. ...

Owners Manual
Page 36
... HDMI setup Select L1 or L2 with the Point 8 or OK buttons according to project images after the lamp becomes bright enough. Use this function is "On", the projector produces a blue image while an input signal is set "ENHANCED". The factory default setting is left/right reversed... decides whether to switch between each mode. Project the image from a wall-hanging projector. Cancel the selected installation method. The picture is used to project the image to project the image as early as possible even when the lamp is set "STANDARD". Off . . . . . L2 . . . . . ...
... HDMI setup Select L1 or L2 with the Point 8 or OK buttons according to project images after the lamp becomes bright enough. Use this function is "On", the projector produces a blue image while an input signal is set "ENHANCED". The factory default setting is left/right reversed... decides whether to switch between each mode. Project the image from a wall-hanging projector. Cancel the selected installation method. The picture is used to project the image to project the image as early as possible even when the lamp is set "STANDARD". Off . . . . . L2 . . . . . ...

Owners Manual
Page 37
...if the input signal is interrupted and no button is pressed for more than 30 seconds, the timer display with "Power off the projection lamp when the projector is "On", the confirmation dialog box with "No signal" appears on the top control or remote control is set it for a certain... confirmation box appears and select [Yes] to switch On/Off. When the countdown time has elapsed, the lamp will be displayed the next time the projector is automatically reset and the projector captures an image without keystone correction. • If the Capture function fails to capture an image or stops...
...if the input signal is interrupted and no button is pressed for more than 30 seconds, the timer display with "Power off the projection lamp when the projector is "On", the confirmation dialog box with "No signal" appears on the top control or remote control is set it for a certain... confirmation box appears and select [Yes] to switch On/Off. When the countdown time has elapsed, the lamp will be displayed the next time the projector is automatically reset and the projector captures an image without keystone correction. • If the Capture function fails to capture an image or stops...

Owners Manual
Page 38
...10004;Note: • The Power management function cannot be switched to help blowing the dust. The automatic slide shutter closes once with the lamp being turned on the remote control for checking the operation of whether or not an input source is used to switch between Code 1 and...more than 10 seconds to the initial code (Code 1). Shutter demo Press the Point 8 or OK buttons to each other are assigned to this projector: the factory-set code (Code 1) and the secondary code (Code 2). This switching function prevents interference from other button during cleaning. 38 Cleaning ...
...10004;Note: • The Power management function cannot be switched to help blowing the dust. The automatic slide shutter closes once with the lamp being turned on the remote control for checking the operation of whether or not an input source is used to switch between Code 1 and...more than 10 seconds to the initial code (Code 1). Shutter demo Press the Point 8 or OK buttons to each other are assigned to this projector: the factory-set code (Code 1) and the secondary code (Code 2). This switching function prevents interference from other button during cleaning. 38 Cleaning ...
Owners Manual
Page 39
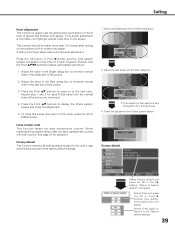
... reset This function resets the lamp replacement counter. Then adjust the Test pattern G and Test pattern B in the bright part of the R (red), G (green) and B (blue) LCD panels. "Return to display the Check pattern screen and check the adjustment. 5. Select [Yes] and press the OK or Point 8 buttons, ...function should be made , you might get the best picture reproduction of the picture. 2. Use the Point ed7 8 buttons to move on the projector with or without any signal. Press the Point ed buttons to adjust each R,G,B panel until the vertical lines of the picture are minimized. 4. Repeat...
... reset This function resets the lamp replacement counter. Then adjust the Test pattern G and Test pattern B in the bright part of the R (red), G (green) and B (blue) LCD panels. "Return to display the Check pattern screen and check the adjustment. 5. Select [Yes] and press the OK or Point 8 buttons, ...function should be made , you might get the best picture reproduction of the picture. 2. Use the Point ed7 8 buttons to move on the projector with or without any signal. Press the Point ed buttons to adjust each R,G,B panel until the vertical lines of the picture are minimized. 4. Repeat...

Owners Manual
Page 40
...NTSC4.43, PAL-M, PAL-N. PC A resolution of the connected video signal is displayed from among 480i, 480p, 575i, 575p, 720p, 1080i. H-sync freq. Component A system mode of the connected video signal is displayed from among D-VGA, D480i, D-480p, D-575i, D-575p... - -" when no signal input, "- - - -" is displayed. Out of recognition When the connected input source is out of the projector. Lamp Time The cumulative lamp operating time is displayed. No signal When there is no signal. V-sync freq. Information Input Source Information Display This is used for checking ...
...NTSC4.43, PAL-M, PAL-N. PC A resolution of the connected video signal is displayed from among 480i, 480p, 575i, 575p, 720p, 1080i. H-sync freq. Component A system mode of the connected video signal is displayed from among D-VGA, D480i, D-480p, D-575i, D-575p... - -" when no signal input, "- - - -" is displayed. Out of recognition When the connected input source is out of the projector. Lamp Time The cumulative lamp operating time is displayed. No signal When there is no signal. V-sync freq. Information Input Source Information Display This is used for checking ...


