Owners Manual
Page 3
... 3 To the Owner 4 Safety Instructions 5 Air Circulation 6 Installing the Projector in Proper Position 6 Moving the Projector 6 Compliance 7 Part Names and Functions 8 Front 8 Back 8 Bottom 8 Rear Terminal 9 Top Control 10 Remote Control 11 Operating Range 11 Remote Control Battery Installation 12 Installation 13 Positioning the Projector 13 Adjustable Feet 13 Connecting the AC Power Cord 14...
... 3 To the Owner 4 Safety Instructions 5 Air Circulation 6 Installing the Projector in Proper Position 6 Moving the Projector 6 Compliance 7 Part Names and Functions 8 Front 8 Back 8 Bottom 8 Rear Terminal 9 Top Control 10 Remote Control 11 Operating Range 11 Remote Control Battery Installation 12 Installation 13 Positioning the Projector 13 Adjustable Feet 13 Connecting the AC Power Cord 14...
Owners Manual
Page 8
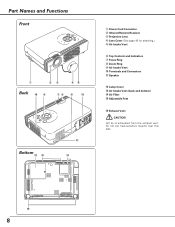
Do not put heat-sensitive objects near this side. !5 8 Part Names and Functions Front q we rt Back !6 y ui o !0 Bottom !2 !3 !1 !4 q Power Cord Connector w Infrared Remote Receiver e Projection Lens r Lens Cover (See page 46 for attaching.) t Air Intake Vent y Top Controls and Indicators u Focus Ring i Zoom Ring o Air Intake Vent !0 Terminals and Connectors !1 Speaker !2 Lamp Cover !3 Air Intake Vent (back and bottom) !4 Air Filter !5 Adjustable Feet !6 Exhaust Vent CAUTION Hot air is exhausted from the exhaust vent.
Do not put heat-sensitive objects near this side. !5 8 Part Names and Functions Front q we rt Back !6 y ui o !0 Bottom !2 !3 !1 !4 q Power Cord Connector w Infrared Remote Receiver e Projection Lens r Lens Cover (See page 46 for attaching.) t Air Intake Vent y Top Controls and Indicators u Focus Ring i Zoom Ring o Air Intake Vent !0 Terminals and Connectors !1 Speaker !2 Lamp Cover !3 Air Intake Vent (back and bottom) !4 Air Filter !5 Adjustable Feet !6 Exhaust Vent CAUTION Hot air is exhausted from the exhaust vent.
Owners Manual
Page 9
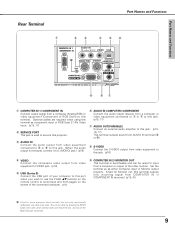
...this jack. (p15, 16, 17) This terminal outputs sound from AUDIO IN terminal (e or y). Do not use the PAGE ed buttons on the remote control to scroll back and forth pages on the screen of your computer to this jack. (p16) r VIDEO Connect the composite video output from a...) o iu q COMPUTER IN 1/ COMPONENT IN Connect output signal from a computer (Analog RGB) or video equipment (Component or RGB Scart) to service this projector. Optional cables are required when using this terminal as either Computer input or Monitor output properly. (Used for input from video equipment to VIDEO jack...
...this jack. (p15, 16, 17) This terminal outputs sound from AUDIO IN terminal (e or y). Do not use the PAGE ed buttons on the remote control to scroll back and forth pages on the screen of your computer to this jack. (p16) r VIDEO Connect the composite video output from a...) o iu q COMPUTER IN 1/ COMPONENT IN Connect output signal from a computer (Analog RGB) or video equipment (Component or RGB Scart) to service this projector. Optional cables are required when using this terminal as either Computer input or Monitor output properly. (Used for input from video equipment to VIDEO jack...

Owners Manual
Page 11
...+/- Executes the selected item. (p20) - For cleaning, use these buttons. Pan the image in front of the projector. 16.4' (5 m) 30° 30° 11 Maximum operating range for the remote control is about 16.4' (5m) and 60° in Digital zoom +/- Do not bend, drop the...the image in the On-Screen Menu. (p20) - Do not apply benzene, thinner, splay or any button. Operating Range Point the remote control toward the projector (Infrared Remote Receiver) when pressing any chemical material. Select an item or adjust value in Digital zoom mode. (p31) To ensure safe operation, ...
...+/- Executes the selected item. (p20) - For cleaning, use these buttons. Pan the image in front of the projector. 16.4' (5 m) 30° 30° 11 Maximum operating range for the remote control is about 16.4' (5m) and 60° in Digital zoom +/- Do not bend, drop the...the image in the On-Screen Menu. (p20) - Do not apply benzene, thinner, splay or any button. Operating Range Point the remote control toward the projector (Infrared Remote Receiver) when pressing any chemical material. Select an item or adjust value in Digital zoom mode. (p31) To ensure safe operation, ...

Owners Manual
Page 12
...not use a new battery with pins in contact with a used batteries according to moisture, or heat. - Do not expose the remote control to the instructions. 12 Two AAA size batteries For correct polarity (+ and -), be sure battery terminals are in compartment. Avoid ...Dispose of explosion if battery is replaced by an incorrect type. - Risk of used battery. - Part Names and Functions Remote Control Battery Installation 1 Remove the battery compartment lid. Do not drop the remote control. - Use (2) AAA, SUM-4 or R03 type alkaline batteries. - Pull up and remove the lid. 2 ...
...not use a new battery with pins in contact with a used batteries according to moisture, or heat. - Do not expose the remote control to the instructions. 12 Two AAA size batteries For correct polarity (+ and -), be sure battery terminals are in compartment. Avoid ...Dispose of explosion if battery is replaced by an incorrect type. - Risk of used battery. - Part Names and Functions Remote Control Battery Installation 1 Remove the battery compartment lid. Do not drop the remote control. - Use (2) AAA, SUM-4 or R03 type alkaline batteries. - Pull up and remove the lid. 2 ...
Owners Manual
Page 15
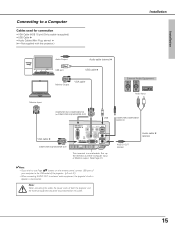
COMPUTER/ COMPONENT AUDIO IN AUDIO OUT (stereo) Audio cable ✽ (stereo) 15 Note: When connecting the cable, the power cords of the projector. (p9 and 42) • When connecting AUDIO OUT to a Computer Cables used for connection • VGA Cable (HDB 15 pin) (Only a cable is ...Monitor output. (See Page 41.) ✔Note: • If you wish to use Page ed buttons on the remote control, connect USB port of your computer to the USB socket of both the projector and the external equipment should be disconnected from AC outlet. I AUDIO IN R L (MONO) VIDEO USB SERVICE PORT...
COMPUTER/ COMPONENT AUDIO IN AUDIO OUT (stereo) Audio cable ✽ (stereo) 15 Note: When connecting the cable, the power cords of the projector. (p9 and 42) • When connecting AUDIO OUT to a Computer Cables used for connection • VGA Cable (HDB 15 pin) (Only a cable is ...Monitor output. (See Page 41.) ✔Note: • If you wish to use Page ed buttons on the remote control, connect USB port of your computer to the USB socket of both the projector and the external equipment should be disconnected from AC outlet. I AUDIO IN R L (MONO) VIDEO USB SERVICE PORT...
Owners Manual
Page 18
... PIN Code Lock function in Setting on the remote control. When the four-digit number is locked with a computer, VCR, etc.) before turning on the projector. 2 Connect the projector's AC power cord into an AC outlet. Refer to operate the projector. PIN code Input Dialog Box Pointer After the... OK icon disappears, you entered a wrong PIN code, "PIN code" and the number will turn red and disappear. Basic Operation Turning On the Projector 1 Complete peripheral connections (with a PIN code, PIN code Input Dialog Box will appear. If you fixed a wrong number, move to operate. Enter...
... PIN Code Lock function in Setting on the remote control. When the four-digit number is locked with a computer, VCR, etc.) before turning on the projector. 2 Connect the projector's AC power cord into an AC outlet. Refer to operate the projector. PIN code Input Dialog Box Pointer After the... OK icon disappears, you entered a wrong PIN code, "PIN code" and the number will turn red and disappear. Basic Operation Turning On the Projector 1 Complete peripheral connections (with a PIN code, PIN code Input Dialog Box will appear. If you fixed a wrong number, move to operate. Enter...
Owners Manual
Page 19
... INDICATOR LIGHTS RED. You can disconnect the AC power cord. The POWER indicator starts to be turned on the remote control, and a message "Power off?" See page 44.) 3 When the projector has cooled down enough to blink red, and it continues while the cooling fans are operating for the On start... function is on, this projector is L2. Turn off the projector. Basic Operation Turning Off the Projector 1 Press the POWER ON-OFF button on the top control or on during the cooling period with the POWER ...
... INDICATOR LIGHTS RED. You can disconnect the AC power cord. The POWER indicator starts to be turned on the remote control, and a message "Power off?" See page 44.) 3 When the projector has cooled down enough to blink red, and it continues while the cooling fans are operating for the On start... function is on, this projector is L2. Turn off the projector. Basic Operation Turning Off the Projector 1 Press the POWER ON-OFF button on the top control or on during the cooling period with the POWER ...
Owners Manual
Page 20
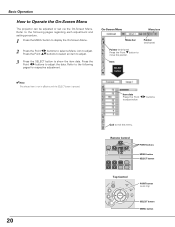
.... 2 Press the Point 7 8 buttons to select a Menu icon to adjust. Press the Point 7 8 buttons to Operate the On-Screen Menu The projector can be adjusted or set via the On-Screen Menu. Refer to exit this menu. VOLUME + KEYSTONE MENU SELECT LAMP REPLACE POINT buttons MENU button...MENU button Item SELECT button ✔Note: The selected item is not in effective until the SELECT button is pressed. COMPUTER VIDEO ON-OFF Remote Control MENU VOLUME- SELECT VOLUME+ D.ZOOM PAGE KEYSTONE NO SHOW AUTO PC P-TIMER IMAGE FREEZE MUTE Top Control ON - Basic Operation How ...
.... 2 Press the Point 7 8 buttons to select a Menu icon to adjust. Press the Point 7 8 buttons to Operate the On-Screen Menu The projector can be adjusted or set via the On-Screen Menu. Refer to exit this menu. VOLUME + KEYSTONE MENU SELECT LAMP REPLACE POINT buttons MENU button...MENU button Item SELECT button ✔Note: The selected item is not in effective until the SELECT button is pressed. COMPUTER VIDEO ON-OFF Remote Control MENU VOLUME- SELECT VOLUME+ D.ZOOM PAGE KEYSTONE NO SHOW AUTO PC P-TIMER IMAGE FREEZE MUTE Top Control ON - Basic Operation How ...

Owners Manual
Page 22
... the keystone adjustment will be canceled. Reduce the upper width with Point d button. Picture Freeze Function Press the FREEZE button on the remote control to zoom in the Setting Menu (p39). Zoom Ring Focus Ring Keystone Adjustment If a projected picture has keystone distortion, correct the... image with KEYSTONE adjustment. 1 Press the KEYSTONE button on the remote control once more while the keystone dialog box is being corrected turns red. • If you press the KEYSTONE button on the top...
... the keystone adjustment will be canceled. Reduce the upper width with Point d button. Picture Freeze Function Press the FREEZE button on the remote control to zoom in the Setting Menu (p39). Zoom Ring Focus Ring Keystone Adjustment If a projected picture has keystone distortion, correct the... image with KEYSTONE adjustment. 1 Press the KEYSTONE button on the remote control once more while the keystone dialog box is being corrected turns red. • If you press the KEYSTONE button on the top...

Owners Manual
Page 23
...Sound Menu icon indicates approximate level of volume. To stop the P-Timer, press the P-TIMER button. Mute Press the MUTE button on the remote control. To restore sound to its previous level, press the MUTE button again or press the VOLUME (+/-) button. Dialog box display is captured ... the Point 7 8 button to cut off . black out ➜ the captured image ➜ normal P-Timer Function Press the P-TIMER button on the remote control to cut off sound. To restore sound to its previous level, press the Point 7 8 button again. closes the Sound Menu. 23 And then,...
...Sound Menu icon indicates approximate level of volume. To stop the P-Timer, press the P-TIMER button. Mute Press the MUTE button on the remote control. To restore sound to its previous level, press the MUTE button again or press the VOLUME (+/-) button. Dialog box display is captured ... the Point 7 8 button to cut off . black out ➜ the captured image ➜ normal P-Timer Function Press the P-TIMER button on the remote control to cut off sound. To restore sound to its previous level, press the Point 7 8 button again. closes the Sound Menu. 23 And then,...

Owners Manual
Page 24
... 1 Computer 2 ✳ Video COMPUTER button Computer 1 Computer 2 ✳ ✳ See Note on p33. RGB (Scart) See "Selecting Input Source (Component / RGBScart 21-pin )" on the remote control.
... 1 Computer 2 ✳ Video COMPUTER button Computer 1 Computer 2 ✳ ✳ See Note on p33. RGB (Scart) See "Selecting Input Source (Component / RGBScart 21-pin )" on the remote control.
Owners Manual
Page 26
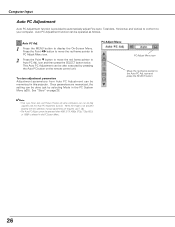
... is provided to automatically adjust Fine sync, Total dots, Horizontal, and Vertical to conform to the Auto PC Adj. See "Store" on the remote control unit. Auto PC Adjustment function can be done just by pressing the Auto PC button on page 28. ✔Note: • Fine sync... icon Move the red frame pointer to your computer. To store adjustment parameters Adjustment parameters from Auto PC Adjustment can be fully adjusted with this projector. Press the Point 7 8 button to move the red frame pointer to PC Adjust Menu icon. 2 Press the Point d button to move the...
... is provided to automatically adjust Fine sync, Total dots, Horizontal, and Vertical to conform to the Auto PC Adj. See "Store" on the remote control unit. Auto PC Adjustment function can be done just by pressing the Auto PC button on page 28. ✔Note: • Fine sync... icon Move the red frame pointer to your computer. To store adjustment parameters Adjustment parameters from Auto PC Adjustment can be fully adjusted with this projector. Press the Point 7 8 button to move the red frame pointer to PC Adjust Menu icon. 2 Press the Point d button to move the...

Owners Manual
Page 29
...4 by pressing the IMAGE button on a black colored board. This is mainly effective on a green colored board, not truly effective on the remote control. Image 1~4 User preset image in the Image Adjust Menu (p30). Image 1~4 User preset image in the Image Adjust Menu (p30)....blackboard (Green). See above for the image projected on a blackboard (Green). Standard Normal picture level preset on this projector. Standard Normal picture level preset on this projector. The level being selected. Blackboard(Green) Picture level suitable for graphics. Press the Point 7 8 button to move...
...4 by pressing the IMAGE button on a black colored board. This is mainly effective on a green colored board, not truly effective on the remote control. Image 1~4 User preset image in the Image Adjust Menu (p30). Image 1~4 User preset image in the Image Adjust Menu (p30)....blackboard (Green). See above for the image projected on a blackboard (Green). Standard Normal picture level preset on this projector. Standard Normal picture level preset on this projector. The level being selected. Blackboard(Green) Picture level suitable for graphics. Press the Point 7 8 button to move...

Owners Manual
Page 31
...A projected image can be also compressed by pressing the D.ZOOM ▲ button on the remote control. To return to compress the image size. When the original image size is displayed. Zoom -" is larger than XGA (1024 x 768) is used for providing a squeezed video signal at 16 : 9. is...initial mode. • The panning function may not operate properly if the computer system prepared in the PC System Menu (p25). • This projector cannot display any button except the D.ZOOM ▲/▼, SELECT, and Point button. cannot be operated when "720p(HDTV)", "1035i (HDTV)", ...
...A projected image can be also compressed by pressing the D.ZOOM ▲ button on the remote control. To return to compress the image size. When the original image size is displayed. Zoom -" is larger than XGA (1024 x 768) is used for providing a squeezed video signal at 16 : 9. is...initial mode. • The panning function may not operate properly if the computer system prepared in the PC System Menu (p25). • This projector cannot display any button except the D.ZOOM ▲/▼, SELECT, and Point button. cannot be operated when "720p(HDTV)", "1035i (HDTV)", ...

Owners Manual
Page 32
...;Note: When Monitor out is not displayed. (p41) 32 Auto When selecting Auto, the projector automatically detects incoming video signal, and adjusts itself to Video and then press the SELECT button. The projector selects connection in the Setting Menu, Computer 2 is selected at the Terminal item in the ...the S-VIDEO jack and the VIDEO jack. INPUT button Video Computer 1 Computer 2 ✳ VIDEO button Video ✳ See Note on the remote control. S-Video When video input signal is connected to Video and press the SELECT button. The Source Select Menu will appear.
...;Note: When Monitor out is not displayed. (p41) 32 Auto When selecting Auto, the projector automatically detects incoming video signal, and adjusts itself to Video and then press the SELECT button. The projector selects connection in the Setting Menu, Computer 2 is selected at the Terminal item in the ...the S-VIDEO jack and the VIDEO jack. INPUT button Video Computer 1 Computer 2 ✳ VIDEO button Video ✳ See Note on the remote control. S-Video When video input signal is connected to Video and press the SELECT button. The Source Select Menu will appear.

Owners Manual
Page 33
...) When the input source is used as described below. INPUT button Computer 1 Computer 2 ✳ Video COMPUTER button Computer 1 Computer 2 ✳ ✳ See Note on the remote control. Input Menu Computer 1 Input Menu icon Move the pointer (red arrow) to Computer 1, and then press the SELECT button. See page 58 for order...
...) When the input source is used as described below. INPUT button Computer 1 Computer 2 ✳ Video COMPUTER button Computer 1 Computer 2 ✳ ✳ See Note on the remote control. Input Menu Computer 1 Input Menu icon Move the pointer (red arrow) to Computer 1, and then press the SELECT button. See page 58 for order...

Owners Manual
Page 35
... to set and then press the SELECT button. This is mainly effective on a green colored board, not truly effective on this projector. Blackboard(Green) Picture level suitable for further description. Cinema Picture level adjusted for the picture with fine tone. Image1~4 User preset... Menu icon Move the red frame pointer to a level and press the SELECT button. Video Input 35 Standard Normal picture level preset on the remote control. Image Level Selection Direct Operation Select a desired image level among Standard, Cinema, Blackboard (Green), Image 1, Image 2, Image 3, and ...
... to set and then press the SELECT button. This is mainly effective on a green colored board, not truly effective on this projector. Blackboard(Green) Picture level suitable for further description. Cinema Picture level adjusted for the picture with fine tone. Image1~4 User preset... Menu icon Move the red frame pointer to a level and press the SELECT button. Video Input 35 Standard Normal picture level preset on the remote control. Image Level Selection Direct Operation Select a desired image level among Standard, Cinema, Blackboard (Green), Image 1, Image 2, Image 3, and ...
Owners Manual
Page 41
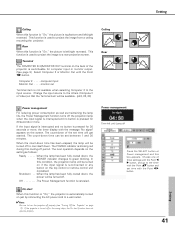
...On," the picture is reconnected or any button on page 19). Shutdown . . .When the lamp has been fully cooled down . If the projector is not available when selecting Computer 2 to cool itself down , the power will be turned off . Terminal The COMPUTER IN 2/MONITOR OUT terminal.... Computer 2 . . . . .computer input Monitor Out . . . . .monitor out Terminal item is turned off properly (see "Turning Off the Projector" on the top control or remote control unit is used to project the image to green blinking. Off The Power Management function is switcheable for 30 seconds or more...
...On," the picture is reconnected or any button on page 19). Shutdown . . .When the lamp has been fully cooled down . If the projector is not available when selecting Computer 2 to cool itself down , the power will be turned off . Terminal The COMPUTER IN 2/MONITOR OUT terminal.... Computer 2 . . . . .computer input Monitor Out . . . . .monitor out Terminal item is turned off properly (see "Turning Off the Projector" on the top control or remote control unit is used to project the image to green blinking. Off The Power Management function is switcheable for 30 seconds or more...
Owners Manual
Page 42
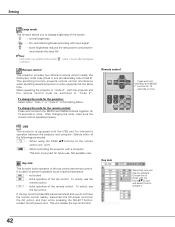
.... ···· not locked. ···· locks operation of the remote control. When operating the projector in this box appears. USB This projector is provided for the remote control; To unlock, use the top control. Select either of the top control and...computer. To change the code for interactive operation between the projector and computer. Press and hold MENU and IMAGE buttons for 10 seconds or more . This switching function prevents remote control interference when operating several projectors or video equipment at the same time. It is turned...
.... ···· not locked. ···· locks operation of the remote control. When operating the projector in this box appears. USB This projector is provided for the remote control; To unlock, use the top control. Select either of the top control and...computer. To change the code for interactive operation between the projector and computer. Press and hold MENU and IMAGE buttons for 10 seconds or more . This switching function prevents remote control interference when operating several projectors or video equipment at the same time. It is turned...


