
Owners Manual
Page 1
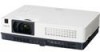
Multimedia Projector MODEL PLC-XR301 Network Supported Refer to the Owner's Manuals below for details about network function. □ Network Set-up and Operation □ PJ Network Manager Owner's Manual
Multimedia Projector MODEL PLC-XR301 Network Supported Refer to the Owner's Manuals below for details about network function. □ Network Set-up and Operation □ PJ Network Manager Owner's Manual

Owners Manual
Page 2
... time of 16.77 million colors, and matrix liquid crystal display (LCD) technology. ♦ Compact Design ♦ Security Function This projector is available in multimedia features, a palette of simple projection on the crucial information during a presentation (p.35). This function enables Input search...projection screen. *The board color is limited to customize the screen ♦ Switchable Interface Terminal logo (pp.46-48). This projector utilizes built-in 19 languages; The digital zoom function allows you can be used as computer input or monitor between presentations. ...
... time of 16.77 million colors, and matrix liquid crystal display (LCD) technology. ♦ Compact Design ♦ Security Function This projector is available in multimedia features, a palette of simple projection on the crucial information during a presentation (p.35). This function enables Input search...projection screen. *The board color is limited to customize the screen ♦ Switchable Interface Terminal logo (pp.46-48). This projector utilizes built-in 19 languages; The digital zoom function allows you can be used as computer input or monitor between presentations. ...
Owners Manual
Page 3
... Control 10 Remote Control 11 Remote Control Battery Installation 12 Remote Control Operating Range 12 Remote Control Code 12 Installation 13 Positioning the Projector 13 Adjustable Foot 13 Connecting to a Computer 14 Connecting to Video Equipment 15 Connecting to Component Video and RGB ( Scart) Equipment... 16 Connecting the AC Power Cord 17 Basic Operation 18 Turning On the Projector 18 Turning Off the Projector 20 How to Operate the On-Screen Menu 21 Menu Bar 22 Zoom and Focus Adjustment 23 Auto Setup Function ...
... Control 10 Remote Control 11 Remote Control Battery Installation 12 Remote Control Operating Range 12 Remote Control Code 12 Installation 13 Positioning the Projector 13 Adjustable Foot 13 Connecting to a Computer 14 Connecting to Video Equipment 15 Connecting to Component Video and RGB ( Scart) Equipment... 16 Connecting the AC Power Cord 17 Basic Operation 18 Turning On the Projector 18 Turning Off the Projector 20 How to Operate the On-Screen Menu 21 Menu Bar 22 Zoom and Focus Adjustment 23 Auto Setup Function ...
Owners Manual
Page 4
...Cd: cadmium, Pb: lead In the European Union there are separate collection systems for many convenient features and functions. If The PROJECTor comes in contact with high quality materials and components which can reduce the service life of the unit. Improper operation may become ...result. REFER SERVICING TO QUALIFIED SERVICE PERSONNEL. Please, help us to manage those features and maintains it may remain on the projector. Otherwise it in the Standard for proper air circulation and cooling of your local community waste collection/recycling centre. The dimension...
...Cd: cadmium, Pb: lead In the European Union there are separate collection systems for many convenient features and functions. If The PROJECTor comes in contact with high quality materials and components which can reduce the service life of the unit. Improper operation may become ...result. REFER SERVICING TO QUALIFIED SERVICE PERSONNEL. Please, help us to manage those features and maintains it may remain on the projector. Otherwise it in the Standard for proper air circulation and cooling of your local community waste collection/recycling centre. The dimension...

Owners Manual
Page 5
... may fall, causing serious injury to a child or adult, and serious damage to determine that could result in a fire or electric shock. This projector should use near water... NOTE FOR CUSTOMERS IN THE US Hg LAMP(S) INSIDE THIS PRODUCT CONTAIN MERCURY AND MUST BE RECYCLED OR DISPOSED OF ACCORDING...Covers may expose you are required, be sure the service technician has used replacement parts specified by persons walking on the projector. Unplug this projector through cabinet slots as improper adjustment of any kind on it from AC power supply before the product is in damage ...
... may fall, causing serious injury to a child or adult, and serious damage to determine that could result in a fire or electric shock. This projector should use near water... NOTE FOR CUSTOMERS IN THE US Hg LAMP(S) INSIDE THIS PRODUCT CONTAIN MERCURY AND MUST BE RECYCLED OR DISPOSED OF ACCORDING...Covers may expose you are required, be sure the service technician has used replacement parts specified by persons walking on the projector. Unplug this projector through cabinet slots as improper adjustment of any kind on it from AC power supply before the product is in damage ...

Owners Manual
Page 6
... fans are provided for an extended period, put any other transport service in an unsuitable transport case. Do not drop or bump the projector, otherwise damages or malfunctions may cause damage to project an image. Keep the exhaust vent at least 3' (1 m) away from any ... put on the cabinet. Air Intake Vent Exhaust Vent (Hot air exhaust) Air Intake Vent CAUTION IN CARRYING OR TRANSPORTING THE PROJECTOR - When the projector is exhausted from the exhaust vent. This may result. - To ensure reliable operation of the exhaust vent, especially screws and...
... fans are provided for an extended period, put any other transport service in an unsuitable transport case. Do not drop or bump the projector, otherwise damages or malfunctions may cause damage to project an image. Keep the exhaust vent at least 3' (1 m) away from any ... put on the cabinet. Air Intake Vent Exhaust Vent (Hot air exhaust) Air Intake Vent CAUTION IN CARRYING OR TRANSPORTING THE PROJECTOR - When the projector is exhausted from the exhaust vent. This may result. - To ensure reliable operation of the exhaust vent, especially screws and...
Owners Manual
Page 7
... be replaced, an ASTA approved BS 1362 fuse must be connected to the terminal which is encouraged to try to defeat this projector meets the requirement for use the plug with the limits for a Class B digital device, pursuant to Part 15 of the same...) and certified by the Canadian Standard Association (CSA). The end of the same rating, marked thus ASA . Model Number : PLC-XR301 Trade Name : Sanyo Responsible party : SANYO NORTH AMERICA CORPORATION Address : 21605 Plummer Street, Chatsworth, California 91311 Telephone No. : (818)998-7322 AC Power Cord Requirement The...
... be replaced, an ASTA approved BS 1362 fuse must be connected to the terminal which is encouraged to try to defeat this projector meets the requirement for use the plug with the limits for a Class B digital device, pursuant to Part 15 of the same...) and certified by the Canadian Standard Association (CSA). The end of the same rating, marked thus ASA . Model Number : PLC-XR301 Trade Name : Sanyo Responsible party : SANYO NORTH AMERICA CORPORATION Address : 21605 Plummer Street, Chatsworth, California 91311 Telephone No. : (818)998-7322 AC Power Cord Requirement The...

Owners Manual
Page 8
... Connectors ⑪ LAN Connection Terminal ⑫ Power Cord Connector ⑬ Exhaust Vents CAUTION Hot air is a registered trademark of the projector. Kensington is exhausted from the exhaust vent. Refer to the owner's manual of "Network Set-up and Operation" . ...⑭ Filters ⑮ Adjustable Foot Bottom ⑭ ⑮ Note: ⑪ LAN Connection Terminal is for attaching.) CAUTION Do not turn on a projector with lens cap attached. Part Names and Functions Front ① ②③ ④ ⑤ ⑥ ⑦⑧ Back ⑨ ⑩ ...
... Connectors ⑪ LAN Connection Terminal ⑫ Power Cord Connector ⑬ Exhaust Vents CAUTION Hot air is a registered trademark of the projector. Kensington is exhausted from the exhaust vent. Refer to the owner's manual of "Network Set-up and Operation" . ...⑭ Filters ⑮ Adjustable Foot Bottom ⑭ ⑮ Note: ⑪ LAN Connection Terminal is for attaching.) CAUTION Do not turn on a projector with lens cap attached. Part Names and Functions Front ① ②③ ④ ⑤ ⑥ ⑦⑧ Back ⑨ ⑩ ...

Owners Manual
Page 9
Rear Terminal ① ② Part Names and Functions ③ ④ ⑤ ⑥ ⑦ ① CONTROL PORT When the projector is controlled by a computer, connect to this jack with serial control cable. ② COMPUTER IN 1 /S-VIDEO IN / COMPONENT IN Connect analog RGB output signal from a ...
Rear Terminal ① ② Part Names and Functions ③ ④ ⑤ ⑥ ⑦ ① CONTROL PORT When the projector is controlled by a computer, connect to this jack with serial control cable. ② COMPUTER IN 1 /S-VIDEO IN / COMPONENT IN Connect analog RGB output signal from a ...
Owners Manual
Page 10
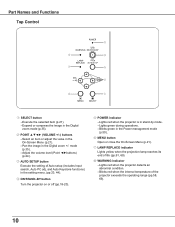
... LAMP REPLACE indicator Lights yellow when the projection lamp reaches its end of life (pp.61, 69). ⑧ WARNING indicator -Lights red when the projector detects an abnormal condition. -Blinks red when the internal temperature of Auto setup (includes Input search, Auto PC adj. mode (p.35). -Adjust the ...volume level (Point ◄►buttons) (p.24). ③ AUTO SETUP button Execute the setting of the projector exceeds the operating range (pp.58, 69). 10 and Auto Keystone functions) in the setting menu. (pp.23, 44). ④ ON/STAND-BY button...
... LAMP REPLACE indicator Lights yellow when the projection lamp reaches its end of life (pp.61, 69). ⑧ WARNING indicator -Lights red when the projector detects an abnormal condition. -Blinks red when the internal temperature of Auto setup (includes Input search, Auto PC adj. mode (p.35). -Adjust the ...volume level (Point ◄►buttons) (p.24). ③ AUTO SETUP button Execute the setting of the projector exceeds the operating range (pp.58, 69). 10 and Auto Keystone functions) in the setting menu. (pp.23, 44). ④ ON/STAND-BY button...
Owners Manual
Page 11
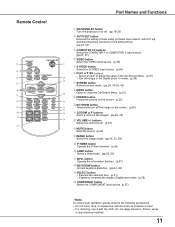
... not bend, drop, or expose the remote control to moisture or heat. - Remote Control Part Names and Functions ① ON/STAND-BY button Turn the projector on the screen. (p.26) ⑮ ⑭ ⑪ D.ZOOM ▲▼ buttons Zoom in and out the images. (pp.25, 35) ⑬ ⑫ VOLUME +/- mode. (p.35...
... not bend, drop, or expose the remote control to moisture or heat. - Remote Control Part Names and Functions ① ON/STAND-BY button Turn the projector on the screen. (p.26) ⑮ ⑭ ⑪ D.ZOOM ▲▼ buttons Zoom in and out the images. (pp.25, 35) ⑬ ⑫ VOLUME +/- mode. (p.35...

Owners Manual
Page 12
... Code The 2 different remote control codes (Code 1-Code 2) are assigned to each other remote controls when several projectors or video equipment next to this projector. Switching the remote control codes prevents interference from other are in contact with water or liquid. ● Do ...MENU and IMAGE buttons for the remote control. MENU button IMAGE button 12 Remote Control Operating Range Point the remote control toward the projector (Infrared Remote Receiver) when pressing the buttons. Part Names and Functions Remote Control Battery Installation 1 Open the battery compartment lid....
... Code The 2 different remote control codes (Code 1-Code 2) are assigned to each other remote controls when several projectors or video equipment next to this projector. Switching the remote control codes prevents interference from other are in contact with water or liquid. ● Do ...MENU and IMAGE buttons for the remote control. MENU button IMAGE button 12 Remote Control Operating Range Point the remote control toward the projector (Infrared Remote Receiver) when pressing the buttons. Part Names and Functions Remote Control Battery Installation 1 Open the battery compartment lid....

Owners Manual
Page 13
Zoom (Inch Diagonal) 300"(tele ) Min. It is recommended to limit ambient lighting in the room has a great influence on the projector. Lift the front of the projected image can be set perpendicularly to 10.0 degrees with the adjustable foot. Zoom 250 A (Center) B Screen Size (W x H) mm... 4572 28.6'(8.7m) 34.4'(10.5m) Adjustable Foot Projection angle can be corrected by menu operation.(see the figures below. Keystone distortion of the projector and push the foot lock latch on picture quality. To retract the adjustable foot, lift the front of the screen. Note: •...
Zoom (Inch Diagonal) 300"(tele ) Min. It is recommended to limit ambient lighting in the room has a great influence on the projector. Lift the front of the projected image can be set perpendicularly to 10.0 degrees with the adjustable foot. Zoom 250 A (Center) B Screen Size (W x H) mm... 4572 28.6'(8.7m) 34.4'(10.5m) Adjustable Foot Projection angle can be corrected by menu operation.(see the figures below. Keystone distortion of the projector and push the foot lock latch on picture quality. To retract the adjustable foot, lift the front of the screen. Note: •...

Owners Manual
Page 14
... 2/MONITOR OUT terminals as input. • When the AUDIO OUT is plugged-in, the projector's built-in speaker is not available. • When the cable is of both the projector and external equipment from the AC outlet before connecting cables. 14 Installation Connecting to use the...Mini D-sub 15 pin) *(Only one cable is supplied.) • Audio Cables (*One cable is switchable. other cables are not supplied with the projector.) Audio Output Monitor Output Monitor Input or Monitor Output Audio cable (stereo) VGA cable VGA cable External Audio Equipment Audio Input COMPUTER IN 1 / ...
... 2/MONITOR OUT terminals as input. • When the AUDIO OUT is plugged-in, the projector's built-in speaker is not available. • When the cable is of both the projector and external equipment from the AC outlet before connecting cables. 14 Installation Connecting to use the...Mini D-sub 15 pin) *(Only one cable is supplied.) • Audio Cables (*One cable is switchable. other cables are not supplied with the projector.) Audio Output Monitor Output Monitor Input or Monitor Output Audio cable (stereo) VGA cable VGA cable External Audio Equipment Audio Input COMPUTER IN 1 / ...

Owners Manual
Page 15
... • Video Cable • S-Video Cable • S-Video-VGA Cable • Audio Cables (Mini Plug: stereo) (Cables are not supplied with the projector. ) External Audio Equipment S-Video Output Audio Output Audio Input S-Video cable Composite Video and Audio Output S-Video-VGA cable Audio cable (stereo) Audio cable (stereo... 1 / S-VIDEO IN /COMPONENT IN AUDIO IN AUDIO OUT (stereo) VIDEO IN Note: • When the AUDIO OUT is plugged-in, the projector's built-in speaker is not available. • See page 72 for ordering optional cables. Unplug the power cords of both the...
... • Video Cable • S-Video Cable • S-Video-VGA Cable • Audio Cables (Mini Plug: stereo) (Cables are not supplied with the projector. ) External Audio Equipment S-Video Output Audio Output Audio Input S-Video cable Composite Video and Audio Output S-Video-VGA cable Audio cable (stereo) Audio cable (stereo... 1 / S-VIDEO IN /COMPONENT IN AUDIO IN AUDIO OUT (stereo) VIDEO IN Note: • When the AUDIO OUT is plugged-in, the projector's built-in speaker is not available. • See page 72 for ordering optional cables. Unplug the power cords of both the...

Owners Manual
Page 16
... for connection • Audio Cables (Mini Plug: stereo) • Scart-VGA Cable • Component Cable • Component-VGA Cable (Cables are not supplied with this projector.) Audio Output RGB Scart 21-pin Output Component Video Output (Y, Pb/Cb, Pr/Cr) Audio cable (stereo) Component cable External Audio Equipment Audio Input Scart... Audio cable (stereo) COMPUTER IN 1/ S-VIDEO IN / COMPONENT IN AUDIO OUT (stereo) AUDIO IN Note: • When the AUDIO OUT is plugged-in, the projector's built-in speaker is not available. • See page 72 for ordering optional cables.
... for connection • Audio Cables (Mini Plug: stereo) • Scart-VGA Cable • Component Cable • Component-VGA Cable (Cables are not supplied with this projector.) Audio Output RGB Scart 21-pin Output Component Video Output (Y, Pb/Cb, Pr/Cr) Audio cable (stereo) Component cable External Audio Equipment Audio Input Scart... Audio cable (stereo) COMPUTER IN 1/ S-VIDEO IN / COMPONENT IN AUDIO OUT (stereo) AUDIO IN Note: • When the AUDIO OUT is plugged-in, the projector's built-in speaker is not available. • See page 72 for ordering optional cables.

Owners Manual
Page 17
...systems having a grounded neutral conductor. Ground To power cord connector on . If supplied AC power cord does not match your AC outlet, contact your projector. and Canada For Continental Europe For the U.K. To reduce the risk of electrical shock, do not plug into any other type of power system.... AC power cord, it automatically selects the correct input voltage. If you use . It is designed to the projector. Projector side AC outlet side For the U.S.A. Connecting the AC Power Cord This projector uses nominal input voltages of 100-120 V or 200-240 V AC and it is in use the...
...systems having a grounded neutral conductor. Ground To power cord connector on . If supplied AC power cord does not match your AC outlet, contact your projector. and Canada For Continental Europe For the U.K. To reduce the risk of electrical shock, do not plug into any other type of power system.... AC power cord, it automatically selects the correct input voltage. If you use . It is designed to the projector. Projector side AC outlet side For the U.S.A. Connecting the AC Power Cord This projector uses nominal input voltages of 100-120 V or 200-240 V AC and it is in use the...

Owners Manual
Page 18
... page 52 for Lamp control status.) Note: The Filter warning and Lamp replacement icons may appear on the screen depending on the projector. 2 Connect the projector's AC power cord into an AC outlet. Open the lens cap (see page 52) appear on the screen (p.45). • When...PC selection window Project Video Cancel Project Computer Input signal guidance window No signal Current Input setting:Video Is signal processed correctly? If the projector is set to input source desired by pressing the Point ▲▼ buttons and press the SELECT button. Enter the PIN code as ...
... page 52 for Lamp control status.) Note: The Filter warning and Lamp replacement icons may appear on the screen depending on the projector. 2 Connect the projector's AC power cord into an AC outlet. Open the lens cap (see page 52) appear on the screen (p.45). • When...PC selection window Project Video Cancel Project Computer Input signal guidance window No signal Current Input setting:Video Is signal processed correctly? If the projector is set to input source desired by pressing the Point ▲▼ buttons and press the SELECT button. Enter the PIN code as ...

Owners Manual
Page 19
...keep it to complete entering a four-digit number. Press the SELECT button so that allows the person who knows it on page 75 of the projector with your dealer or service center. 19 Enter the correct PIN code all over again. Setting a PIN code prevents unauthorized use the Point &#...9668; ► buttons to move the pointer to the number you can operate the projector. The number changes to enter a number. If you fixed an incorrect number, use of a four-digit number. After entering the four-digit number, ...
...keep it to complete entering a four-digit number. Press the SELECT button so that allows the person who knows it on page 75 of the projector with your dealer or service center. 19 Enter the correct PIN code all over again. Setting a PIN code prevents unauthorized use the Point &#...9668; ► buttons to move the pointer to the number you can operate the projector. The number changes to enter a number. If you fixed an incorrect number, use of a four-digit number. After entering the four-digit number, ...

Owners Manual
Page 20
..., you can unplug the AC power cord even if the fans are still running. 3 When the projector has cooled down and the projector cannot be turned on. disappears after the poweroff. 20 TURN OFF THE PROJECTOR AND LET STAND FOR ABOUT AN HOUR IN EVERY 24 HOURS. Note: • When the... . (You can turn off ? CONTINUOUS USE MAY RESULT IN SHORTENING THE LAMP LIFE. Wait until the POWER indicator stops blinking to turn on the projector again. • The fan rotation will be turned on automatically by connecting the AC power cord to blink red, and the cooling fans keep running...
..., you can unplug the AC power cord even if the fans are still running. 3 When the projector has cooled down and the projector cannot be turned on. disappears after the poweroff. 20 TURN OFF THE PROJECTOR AND LET STAND FOR ABOUT AN HOUR IN EVERY 24 HOURS. Note: • When the... . (You can turn off ? CONTINUOUS USE MAY RESULT IN SHORTENING THE LAMP LIFE. Wait until the POWER indicator stops blinking to turn on the projector again. • The fan rotation will be turned on automatically by connecting the AC power cord to blink red, and the cooling fans keep running...


