Owners Manual
Page 2
... from Laser Light Window while pressing LASER button (for an extended time, unplug the projector from the power outlet. q This projector produces intense light from the ventilation holes. Operating the projector properly enables you purchased the projector or the service center. q Remote Control Unit, supplied to indicate laser emission). THIS SYMBOL INDICATES THAT DANGEROUS VOLTAGE...
... from Laser Light Window while pressing LASER button (for an extended time, unplug the projector from the power outlet. q This projector produces intense light from the ventilation holes. Operating the projector properly enables you purchased the projector or the service center. q Remote Control Unit, supplied to indicate laser emission). THIS SYMBOL INDICATES THAT DANGEROUS VOLTAGE...

Owners Manual
Page 5
...30 TERMINALS OF PROJECTOR 11 SELECTING VIDEO SYSTEM 31 CONNECTING TO COMPUTER 12 PICTURE IMAGE ADJUSTMENT 32 CONNECTING TO VIDEO EQUIPMENT 13 IMAGE LEVEL SELECT 32 IMAGE LEVEL ADJUSTMENT 33 PICTURE SCREEN ADJUSTMENT 34 BEFORE OPERATION 14 OPERATION OF REMOTE CONTROL 14 ... International Business Machines, Inc. INDICATOR 38 AIR FILTER CARE AND CLEANING 38 CLEANING PROJECTION LENS 38 TURNING ON / OFF PROJECTOR 19 LAMP REPLACEMENT 39 ADJUSTING SCREEN ZOOM ADJUSTMENT 20 LAMP REPLACE COUNTER 39 20 TROUBLESHOOTING 40 FOCUS ADJUSTMENT LENS SHIFT ADJUSTMENT ...
...30 TERMINALS OF PROJECTOR 11 SELECTING VIDEO SYSTEM 31 CONNECTING TO COMPUTER 12 PICTURE IMAGE ADJUSTMENT 32 CONNECTING TO VIDEO EQUIPMENT 13 IMAGE LEVEL SELECT 32 IMAGE LEVEL ADJUSTMENT 33 PICTURE SCREEN ADJUSTMENT 34 BEFORE OPERATION 14 OPERATION OF REMOTE CONTROL 14 ... International Business Machines, Inc. INDICATOR 38 AIR FILTER CARE AND CLEANING 38 CLEANING PROJECTION LENS 38 TURNING ON / OFF PROJECTOR 19 LAMP REPLACEMENT 39 ADJUSTING SCREEN ZOOM ADJUSTMENT 20 LAMP REPLACE COUNTER 39 20 TROUBLESHOOTING 40 FOCUS ADJUSTMENT LENS SHIFT ADJUSTMENT ...

Owners Manual
Page 6
...Italian, Spanish, Portuguese, Dutch, Swedish, Chinese, Korean or Japanese. x Compact Design This projector is not pressed over than 1280 x 1024, reset a computer output for connecting DVI output from a computer between XGA (1024 x 768) and SXGA (1280 x 1024) is compressed into 1024 x 768 ...and set up a projector via the network cable. x Power Management Power Management function is displayed in multimedia features, a palette of 16.77 million colors, and matrix liquid crystal display (LCD) technology. x Laser Pointer Function Remote Control Unit supplied with Remote Control Unit only....
...Italian, Spanish, Portuguese, Dutch, Swedish, Chinese, Korean or Japanese. x Compact Design This projector is not pressed over than 1280 x 1024, reset a computer output for connecting DVI output from a computer between XGA (1024 x 768) and SXGA (1280 x 1024) is compressed into 1024 x 768 ...and set up a projector via the network cable. x Power Management Power Management function is displayed in multimedia features, a palette of 16.77 million colors, and matrix liquid crystal display (LCD) technology. x Laser Pointer Function Remote Control Unit supplied with Remote Control Unit only....

Owners Manual
Page 7
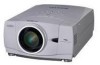
...PJ-Net organizer (optional part) to the projector, remove the these parts. PREPARATION NAME OF EACH PART OF PROJECTOR FRONT OF CABINET TOP CONTROLS AND INDICATORS PROJECTION LENS AIR INTAKE VENT LENS COVER SPEAKERS INFRARED REMOTE RECEIVER BACK OF CABINET EXHAUST VENT POWER ...CORD CONNECTOR TERMINALS AND CONNECTORS INFRARED REMOTE RECEIVER HOT AIR EXHAUSTED ! ADJUSTABLE FEET ...
...PJ-Net organizer (optional part) to the projector, remove the these parts. PREPARATION NAME OF EACH PART OF PROJECTOR FRONT OF CABINET TOP CONTROLS AND INDICATORS PROJECTION LENS AIR INTAKE VENT LENS COVER SPEAKERS INFRARED REMOTE RECEIVER BACK OF CABINET EXHAUST VENT POWER ...CORD CONNECTOR TERMINALS AND CONNECTORS INFRARED REMOTE RECEIVER HOT AIR EXHAUSTED ! ADJUSTABLE FEET ...

Owners Manual
Page 11
...terminals. (Refer to P12.) USB CONNECTOR (Series B) When controlling computer with Remote Control Unit of this projector, connect mouse port of your personal computer to this terminal. (Refer to P12.) RESET BUTTON This projector uses a micro processor to control this unit, and occasionally, this button. COMPUTER... output {5 BNC Type (Green, Blue, Red, Horiz. This can be reset. CONTROL PORT CONNECTOR When controlling computer with Remote Control Unit of this projector, connect mouse port of your personal computer to this connector. (Refer to P12.) ✽ Do not press this micro ...
...terminals. (Refer to P12.) USB CONNECTOR (Series B) When controlling computer with Remote Control Unit of this projector, connect mouse port of your personal computer to this terminal. (Refer to P12.) RESET BUTTON This projector uses a micro processor to control this unit, and occasionally, this button. COMPUTER... output {5 BNC Type (Green, Blue, Red, Horiz. This can be reset. CONTROL PORT CONNECTOR When controlling computer with Remote Control Unit of this projector, connect mouse port of your personal computer to this connector. (Refer to P12.) ✽ Do not press this micro ...

Owners Manual
Page 14
...(P17, 18) MUTE D.ZOOM INPUT MENU ALL-OFF SWITCH When using this button within 1 minute. IMAGE P-TIMER POWER ON-OFF BUTTON Used to turn projector on or off . mode. (P29) It is emitted from Laser Light Window. therefore, do not look into Laser Light Window or shine laser beam... off . (P19) INPUT BUTTON Used to select input source. (P22) POINT BUTTON Used to operate P-TIMER function. (P21) LASER POINTER FUNCTION This Remote Control Unit emits a laser beam as laser pointer function from Laser Light Window. RIGHT CLICK BUTTON Used as a PC mouse in DIGITAL ZOOM +/- When LASER...
...(P17, 18) MUTE D.ZOOM INPUT MENU ALL-OFF SWITCH When using this button within 1 minute. IMAGE P-TIMER POWER ON-OFF BUTTON Used to turn projector on or off . mode. (P29) It is emitted from Laser Light Window. therefore, do not look into Laser Light Window or shine laser beam... off . (P19) INPUT BUTTON Used to select input source. (P22) POINT BUTTON Used to operate P-TIMER function. (P21) LASER POINTER FUNCTION This Remote Control Unit emits a laser beam as laser pointer function from Laser Light Window. RIGHT CLICK BUTTON Used as a PC mouse in DIGITAL ZOOM +/- When LASER...

Owners Manual
Page 15
...heat. mode and resize image. (P29) Operating Range Point Remote Control Unit toward projector (Receiver Window) whenever pressing any button. BUTTON Use to select LENS 16.4' (5 m) SHIFT function. (P20) 60° Remote Control Batteries Installation 1 Remove battery compartment lid. Battery installation is... incorrectly replaced. q Do not drop Remote Control Unit. LENS SHIFT BUTTON Used to operate AUTO PC Adjustment function. (P23) AUTO PC ADJ. q Dispose of a projector. 60° KEYSTONE BUTTON Used to correct keystone distortion. (...
...heat. mode and resize image. (P29) Operating Range Point Remote Control Unit toward projector (Receiver Window) whenever pressing any button. BUTTON Use to select LENS 16.4' (5 m) SHIFT function. (P20) 60° Remote Control Batteries Installation 1 Remove battery compartment lid. Battery installation is... incorrectly replaced. q Do not drop Remote Control Unit. LENS SHIFT BUTTON Used to operate AUTO PC Adjustment function. (P23) AUTO PC ADJ. q Dispose of a projector. 60° KEYSTONE BUTTON Used to correct keystone distortion. (...

Owners Manual
Page 17
.... See figures on ON-SCREEN MENU. 1 DISPLAY MENU Press MENU button to display ON-SCREEN MENU. Control or adjust item through ON-SCREEN MENU. WIRELESS REMOTE CONTROL POINT BUTTON Used to move Pointer UP/ DOWN/ RIGHT/ LEFT. 2 MOVING POINTER Move pointer (✽ see below . MENU BAR Select Menu to... move Pointer UP/ DOWN/ RIGHT/ LEFT. BEFORE OPERATION OPERATING ON-SCREEN MENU HOW TO OPERATE ON-SCREEN MENU You can control and adjust this projector through ON-SCREEN MENU 3 Press POINT DOWN button and move POINTER (red frame or red arrow) to ITEM that you want to select by ...
.... See figures on ON-SCREEN MENU. 1 DISPLAY MENU Press MENU button to display ON-SCREEN MENU. Control or adjust item through ON-SCREEN MENU. WIRELESS REMOTE CONTROL POINT BUTTON Used to move Pointer UP/ DOWN/ RIGHT/ LEFT. 2 MOVING POINTER Move pointer (✽ see below . MENU BAR Select Menu to... move Pointer UP/ DOWN/ RIGHT/ LEFT. BEFORE OPERATION OPERATING ON-SCREEN MENU HOW TO OPERATE ON-SCREEN MENU You can control and adjust this projector through ON-SCREEN MENU 3 Press POINT DOWN button and move POINTER (red frame or red arrow) to ITEM that you want to select by ...

Owners Manual
Page 19
... off and disconnect AC Power Cord from PC or Video source appears after 4 seconds. Turn a projector on a screen and count-down completely, disconnect AC Power Cord. TURNING OFF PROJECTOR 1 Press POWER ON-OFF button on Top Control or on Remote Control Unit, and a message "Power off . Wait at least 5 minutes before turning on...
... off and disconnect AC Power Cord from PC or Video source appears after 4 seconds. Turn a projector on a screen and count-down completely, disconnect AC Power Cord. TURNING OFF PROJECTOR 1 Press POWER ON-OFF button on Top Control or on Remote Control Unit, and a message "Power off . Wait at least 5 minutes before turning on...

Owners Manual
Page 20
...ADJUSTING SCREEN ZOOM ADJUSTMENT 1 Press ZOOM button on Top Control or ZOOM v/w button on Remote Control Unit. FOCUS ADJUSTMENT 1 Press FOCUS button on Top Control or FOCUS v/w button on Remote Control Unit. Focus NOTE; Press POINT UP button to reduce the upper part of image ... FOCUS v/w button or POINT UP/DOWN button(s) . Reduce the lower width with KEYSTONE adjustment. 1 Press KEYSTONE button on Remote Control Unit or select Keystone on Remote Control Unit. Message "Focus" is corrected by pressing POINT UP/DOWN/LEFT/RIGHT button(s). Message disappears after 4 seconds. Message...
...ADJUSTING SCREEN ZOOM ADJUSTMENT 1 Press ZOOM button on Top Control or ZOOM v/w button on Remote Control Unit. FOCUS ADJUSTMENT 1 Press FOCUS button on Top Control or FOCUS v/w button on Remote Control Unit. Focus NOTE; Press POINT UP button to reduce the upper part of image ... FOCUS v/w button or POINT UP/DOWN button(s) . Reduce the lower width with KEYSTONE adjustment. 1 Press KEYSTONE button on Remote Control Unit or select Keystone on Remote Control Unit. Message "Focus" is corrected by pressing POINT UP/DOWN/LEFT/RIGHT button(s). Message disappears after 4 seconds. Message...

Owners Manual
Page 21
... to black out image. Press MUTE button to cancel P-TIMER function. BASIC OPERATION PICTURE FREEZE FUNCTION Press FREEZE button on Remote Control Unit to freeze picture on Remote Control Unit to adjust volume. To stop P-TIMER display, press P-TIMER button. Volume Press VOLUME (+/-) button(s) on Top...MUTE button again or press Volume (+/-) button(s). To restore to "On" and sound is cut off sound. Volume dialog box appears on Remote Control unit. Volume To increase volume, press POINT RIGHT button, and press POINT LEFT button for decreasing. Dialog box display is changed to...
... to black out image. Press MUTE button to cancel P-TIMER function. BASIC OPERATION PICTURE FREEZE FUNCTION Press FREEZE button on Remote Control Unit to freeze picture on Remote Control Unit to adjust volume. To stop P-TIMER display, press P-TIMER button. Volume Press VOLUME (+/-) button(s) on Top...MUTE button again or press Volume (+/-) button(s). To restore to "On" and sound is cut off sound. Volume dialog box appears on Remote Control unit. Volume To increase volume, press POINT RIGHT button, and press POINT LEFT button for decreasing. Dialog box display is changed to...

Owners Manual
Page 22
... to Input 2 and then press SELECT button. COMPUTER INPUT SELECTING INPUT SOURCE DIRECT OPERATION Choose Computer by pressing INPUT button on Top Control or on Remote Control Unit. Source Select Menu Move a pointer to Input 1 and press SELECT button. INPUT MENU Input 1 INPUT Menu icon Move a pointer (red arrow) to... Input and press SELECT button. WHEN SELECT INPUT 2 (5 BNC INPUT JACKS ) When connect a computer output [5 BNC Type (Green, Blue, Red, INPUT MENU Horiz. If projector cannot reproduce proper image, select correct input source through MENU OPERATION (see below).
... to Input 2 and then press SELECT button. COMPUTER INPUT SELECTING INPUT SOURCE DIRECT OPERATION Choose Computer by pressing INPUT button on Top Control or on Remote Control Unit. Source Select Menu Move a pointer to Input 1 and press SELECT button. INPUT MENU Input 1 INPUT Menu icon Move a pointer (red arrow) to... Input and press SELECT button. WHEN SELECT INPUT 2 (5 BNC INPUT JACKS ) When connect a computer output [5 BNC Type (Green, Blue, Red, INPUT MENU Horiz. If projector cannot reproduce proper image, select correct input source through MENU OPERATION (see below).
Owners Manual
Page 23
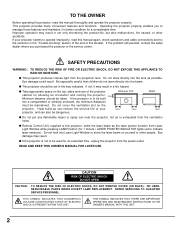
.... D-VGA, D-SVGA or D-XGA When digital computer signal is received on DVI terminal, above message is displayed on SYSTEM Menu icon. PC ADJUST MENU 2 Press POINT DOWN button to move a red frame pointer to adjust projector and message "Auto" is displayed on Remote Control Unit. This Auto PC.... 1 Press MENU button and ON-SCREEN MENU will appear. COMPUTER INPUT AUTOMATIC MULTI-SCAN SYSTEM This projector automatically tunes to most different types of computers based on VGA, SVGA, XGA or SXGA (refer to PC ADJUST Menu icon. Auto ---- SELECT COMPUTER SYSTEM MANUALLY PC SYSTEM MENU This...
.... D-VGA, D-SVGA or D-XGA When digital computer signal is received on DVI terminal, above message is displayed on SYSTEM Menu icon. PC ADJUST MENU 2 Press POINT DOWN button to move a red frame pointer to adjust projector and message "Auto" is displayed on Remote Control Unit. This Auto PC.... 1 Press MENU button and ON-SCREEN MENU will appear. COMPUTER INPUT AUTOMATIC MULTI-SCAN SYSTEM This projector automatically tunes to most different types of computers based on VGA, SVGA, XGA or SXGA (refer to PC ADJUST Menu icon. Auto ---- SELECT COMPUTER SYSTEM MANUALLY PC SYSTEM MENU This...

Owners Manual
Page 27
Standard Normal picture level preset on Remote Control Unit. IMAGE SELECT MENU IMAGE SELECT Menu icon Move a red frame icon to set and then press SELECT button. Real Picture level with improved ... IMAGE LEVEL SELECT (DIRECT) Select image level among Standard, Real, Image 1, Image 2, Image 3 and Image 4 by pressing IMAGE button on Top Control or on this projector. Standard Normal picture level preset on this projector. IMAGE 1~4 User preset picture adjustment in IMAGE ADJUST Menu (P28).
Standard Normal picture level preset on Remote Control Unit. IMAGE SELECT MENU IMAGE SELECT Menu icon Move a red frame icon to set and then press SELECT button. Real Picture level with improved ... IMAGE LEVEL SELECT (DIRECT) Select image level among Standard, Real, Image 1, Image 2, Image 3 and Image 4 by pressing IMAGE button on Top Control or on this projector. Standard Normal picture level preset on this projector. IMAGE 1~4 User preset picture adjustment in IMAGE ADJUST Menu (P28).

Owners Manual
Page 29
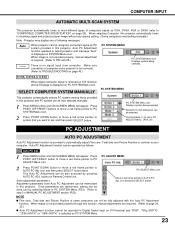
... function can be operated when "RGB", "1035i (HDTV)" or "1080i (HDTV)" is higher than screen size (1024 x 768), this projector enters "Digital zoom +" mode automatically. NOTE q True and Digital zoom +/- is displayed. mode, press any resolution higher than screen size....Image data in other than XGA (1024 x 768) is larger than 1280 X 1024, reset resolution to lower before connecting projector. q Panning function may not operate properly if computer system prepared on Remote Control Unit. COMPUTER INPUT PICTURE SCREEN ADJUSTMENT This projector has a picture screen resize...
... function can be operated when "RGB", "1035i (HDTV)" or "1080i (HDTV)" is higher than screen size (1024 x 768), this projector enters "Digital zoom +" mode automatically. NOTE q True and Digital zoom +/- is displayed. mode, press any resolution higher than screen size....Image data in other than XGA (1024 x 768) is larger than 1280 X 1024, reset resolution to lower before connecting projector. q Panning function may not operate properly if computer system prepared on Remote Control Unit. COMPUTER INPUT PICTURE SCREEN ADJUSTMENT This projector has a picture screen resize...

Owners Manual
Page 32
... 2 Image 3 Image 4 IMAGE LEVEL SELECT (MENU) 1 Press MENU button and ON-SCREEN MENU will appear. IMAGE SELECT MENU Standard Normal picture level preset on this projector. Press POINT LEFT/RIGHT button to move a red frame pointer to IMAGE SELECT Menu icon. 2 Press POINT DOWN button to move a red frame pointer to... ADJUSTMENTS IMAGE LEVEL SELECT (DIRECT) Select image level among Standard, Cinema, Image 1, Image 2, Image 3 and Image 4 by pressing IMAGE button on Top Control or on Remote Control Unit.
... 2 Image 3 Image 4 IMAGE LEVEL SELECT (MENU) 1 Press MENU button and ON-SCREEN MENU will appear. IMAGE SELECT MENU Standard Normal picture level preset on this projector. Press POINT LEFT/RIGHT button to move a red frame pointer to IMAGE SELECT Menu icon. 2 Press POINT DOWN button to move a red frame pointer to... ADJUSTMENTS IMAGE LEVEL SELECT (DIRECT) Select image level among Standard, Cinema, Image 1, Image 2, Image 3 and Image 4 by pressing IMAGE button on Top Control or on Remote Control Unit.

Owners Manual
Page 35
..."On," picture is interrupted, "No signal" and counting down for 5 minutes, projector lamp and READY indicator are turned off . message Logo When this function is "On," picture is automatically turned on Remote Control Unit again. Move a pointer to set and then press SELECT button. Rear...input signal is interrupted and any button on Top Control or on when input signal connected or projector is operated with this projector detects signal interruption and is "On," projector displays our logo when starting up. SETTING SETTING MENU 1 Press MENU button and ON-SCREEN MENU...
..."On," picture is interrupted, "No signal" and counting down for 5 minutes, projector lamp and READY indicator are turned off . message Logo When this function is "On," picture is automatically turned on Remote Control Unit again. Move a pointer to set and then press SELECT button. Rear...input signal is interrupted and any button on Top Control or on when input signal connected or projector is operated with this projector detects signal interruption and is "On," projector displays our logo when starting up. SETTING SETTING MENU 1 Press MENU button and ON-SCREEN MENU...
Owners Manual
Page 36
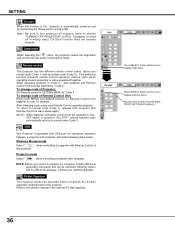
... automatically returns to a wall outlet. PJ-Net Organizer This function cannot be switched to "Code 2." Press both projector and Remote Control Unit must be adjusted when not attach the PJ-Net organizer (optional part) to item and then press .... Wireless Mouse mode Select " " when controlling a computer with Remote Control of Remote Control Unit; Contact your authorized dealer. Be sure to turn projector off in USB driver package. NOTE : When batteries of Projector; NOTE: Before you control a projector by connecting AC Power cord to normal code (Code 1). To...
... automatically returns to a wall outlet. PJ-Net Organizer This function cannot be switched to "Code 2." Press both projector and Remote Control Unit must be adjusted when not attach the PJ-Net organizer (optional part) to item and then press .... Wireless Mouse mode Select " " when controlling a computer with Remote Control of Remote Control Unit; Contact your authorized dealer. Be sure to turn projector off in USB driver package. NOTE : When batteries of Projector; NOTE: Before you control a projector by connecting AC Power cord to normal code (Code 1). To...

Owners Manual
Page 37
...PC mouse pointer. This Wireless Mouse function is available only when PC mouse pointer is displayed on screen instead of this projector. INSTALLATION To use Wireless Remote Control Unit as right button in a PC mouse. This button is required. When ONSCREEN MENU or any message / ...SELECT button (left button in a PC mouse. OPERATING WIRELESS MOUSE Wireless Remote Control Unit is activated. 1 Connect mouse port (or USB port) of mouse driver (not supplied) is not available for controlling this projector with POINT button, SELECT button, and RIGHT CLICK button on first, ...
...PC mouse pointer. This Wireless Mouse function is available only when PC mouse pointer is displayed on screen instead of this projector. INSTALLATION To use Wireless Remote Control Unit as right button in a PC mouse. This button is required. When ONSCREEN MENU or any message / ...SELECT button (left button in a PC mouse. OPERATING WIRELESS MOUSE Wireless Remote Control Unit is activated. 1 Connect mouse port (or USB port) of mouse driver (not supplied) is not available for controlling this projector with POINT button, SELECT button, and RIGHT CLICK button on first, ...
Owners Manual
Page 41
... is designed and manufactured to open cabinet. We will advise you purchased unit. q Check transmitted signal mode from a projector when using Remote Control Unit. You can often correct operating problems yourself. It is necessary, contact Sanyo Service Station or store where you how to work properly, see "TROUBLESHOOTING" section on page 36.) q Check...
... is designed and manufactured to open cabinet. We will advise you purchased unit. q Check transmitted signal mode from a projector when using Remote Control Unit. You can often correct operating problems yourself. It is necessary, contact Sanyo Service Station or store where you how to work properly, see "TROUBLESHOOTING" section on page 36.) q Check...


