
Owners Manual
Page 2
... loss of this LCD projector, please record the Model Number and Serial Number located on pages 55 - 56 and try out your authorized dealer regarding this projector, emits the laser beam as possible eye damage could have found that children do , we have been prevented, if the owner had followed the instructions in the way indicated. The Remote Control Unit, supplied to this product...
... loss of this LCD projector, please record the Model Number and Serial Number located on pages 55 - 56 and try out your authorized dealer regarding this projector, emits the laser beam as possible eye damage could have found that children do , we have been prevented, if the owner had followed the instructions in the way indicated. The Remote Control Unit, supplied to this product...

Owners Manual
Page 3
... be built into the projector. This projector should be read before cleaning. Never spill liquid of any service or repairs to this projector where the cord will prevent damage due to rest on the projector. Do not cover the ventilation slot on the projectors. IMPORTANT SAFETY INSTRUCTIONS All the safety and operating instructions should be operated only from the type of power source indicated on the marking...
... be built into the projector. This projector should be read before cleaning. Never spill liquid of any service or repairs to this projector where the cord will prevent damage due to rest on the projector. Do not cover the ventilation slot on the projectors. IMPORTANT SAFETY INSTRUCTIONS All the safety and operating instructions should be operated only from the type of power source indicated on the marking...
Owners Manual
Page 4
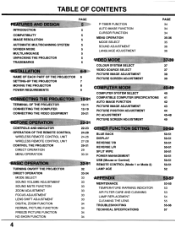
... COMPUTER SPECIFICATIONS AUTO IMAGE FUNCTION PICTURE IMAGE ADJUSTMENT PICTURE POSITION ADJUSTMENT PC ADJUSTMENT PICTURE SCREEN ADJUSTMENT 4,,1, *19 40 41 42 43 44 45-48 49 CONTROLS AND INDICATOR OPERATION OF THE REMOTE CONTROL WIRELESS REMOTE CONTROL UNIT WIRELESS REMOTE CONTROL UNIT CONTROL THE PROJECTOR DIRECT OPERATION MENU OPERATION . „k:.::o00tQo0t4i6 S'M TURNING ON/OFF THE PROJECTOR DIRECT OPERATION MODE SELECT SOUND VOLUME ADJUSTMENT SOUND MUTE FUNCTION ZOOM ADJUSTMENT FOCUS ADJUSTMENT LENS SHIFT ADJUSTMENT DIGITAL ZOOM FUNCTION NORMAL PICTURE FUNCTION FREEZE PICTURE FUNCTION...
... COMPUTER SPECIFICATIONS AUTO IMAGE FUNCTION PICTURE IMAGE ADJUSTMENT PICTURE POSITION ADJUSTMENT PC ADJUSTMENT PICTURE SCREEN ADJUSTMENT 4,,1, *19 40 41 42 43 44 45-48 49 CONTROLS AND INDICATOR OPERATION OF THE REMOTE CONTROL WIRELESS REMOTE CONTROL UNIT WIRELESS REMOTE CONTROL UNIT CONTROL THE PROJECTOR DIRECT OPERATION MENU OPERATION . „k:.::o00tQo0t4i6 S'M TURNING ON/OFF THE PROJECTOR DIRECT OPERATION MODE SELECT SOUND VOLUME ADJUSTMENT SOUND MUTE FUNCTION ZOOM ADJUSTMENT FOCUS ADJUSTMENT LENS SHIFT ADJUSTMENT DIGITAL ZOOM FUNCTION NORMAL PICTURE FUNCTION FREEZE PICTURE FUNCTION...

Owners Manual
Page 5
... dealer or service station. • Owner's Manual. • Wireless Remote Control Unit. • Remote Control Cable. • Graphic Accelerator Board and its Software. • VGA Cable. • Mouse Cable for serial port. • VGA/MAC Adapter. • Lens Cover. • AC Power Cord. • Wireless/Wired Remote Control Unit. • Batteries for Remote Control Units. • Digital Flat Panel Cable. • Mouse Cable for PS/2 port. • Mouse Cable for high-performance business, training and imaging applications that combines powerful and sophisticated features...
... dealer or service station. • Owner's Manual. • Wireless Remote Control Unit. • Remote Control Cable. • Graphic Accelerator Board and its Software. • VGA Cable. • Mouse Cable for serial port. • VGA/MAC Adapter. • Lens Cover. • AC Power Cord. • Wireless/Wired Remote Control Unit. • Batteries for Remote Control Units. • Digital Flat Panel Cable. • Mouse Cable for PS/2 port. • Mouse Cable for high-performance business, training and imaging applications that combines powerful and sophisticated features...

Owners Manual
Page 7
... light. INSTALLATION SETTING-UP THE PROJECTOR Mg" • This projector is basically designed to project on the 100" screen) by using lens shift function. (See page 33.) E E 0 a DOWN UP UP ADJUSTABLE FEET DOWN 100" SCREEN E E 0co 7 Zoom Distance 40" 1.5 m 100" 77" 4.0 m 150" 115" 6.1 m 200" 154" 8.2 m 300" 231" 12.2 m 400" 308" 16.4 m 600" 462" 24.6 m Picture tilt and projection angle can be adjusted by twisting ADJUSTABLE FEET. Zoom Size Min. Projection...
... light. INSTALLATION SETTING-UP THE PROJECTOR Mg" • This projector is basically designed to project on the 100" screen) by using lens shift function. (See page 33.) E E 0 a DOWN UP UP ADJUSTABLE FEET DOWN 100" SCREEN E E 0co 7 Zoom Distance 40" 1.5 m 100" 77" 4.0 m 150" 115" 6.1 m 200" 154" 8.2 m 300" 231" 12.2 m 400" 308" 16.4 m 600" 462" 24.6 m Picture tilt and projection angle can be adjusted by twisting ADJUSTABLE FEET. Zoom Size Min. Projection...
Owners Manual
Page 12
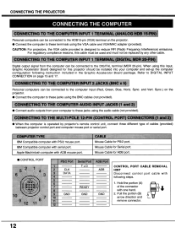
... Accelerator Board package. Digital output signal from your computer and set-up the computer configuration following steps. 1. Hold the portion (A) of cables (provided) between projector control port and computer mouse port or serial port. Refer to DIGITAL INPUT CONNECTION on the projector. • Connect the computer to these jacks using the VGA cable and VGA/MAC adapter (provided). CONNECTING THE PROJECTOR CONNECTING THE COMPUTER ar Personal computers can be connected to the computer input (Red, Green, Blue, Horiz. and...
... Accelerator Board package. Digital output signal from your computer and set-up the computer configuration following steps. 1. Hold the portion (A) of cables (provided) between projector control port and computer mouse port or serial port. Refer to DIGITAL INPUT CONNECTION on the projector. • Connect the computer to these jacks using the VGA cable and VGA/MAC adapter (provided). CONNECTING THE PROJECTOR CONNECTING THE COMPUTER ar Personal computers can be connected to the computer input (Red, Green, Blue, Horiz. and...
Owners Manual
Page 15
... CABLE (PROVIDED) SERIAL PORT PS/2 PORT INPUT INPUT COMPUTER AUDIO OUTPUT L COMPUTER AUDIO INPUT 1 R AUDIO CABLE (NOT PROVIDED) COMPUTER INPUT 1 O L (DIGITAL) US8 1 CONT 0 A L MOUSE CABLE FOR PS/2 PORT (PROVIDED) MOUSE CABLE FOR SERIAL PORT (PROVIDED) SERIAL PORT CABLE (NOT PROVIDED) CONTROL PORT OUTPUT 1 AUDIO INPUT L AUDIO CABLE (NOT PROVIDED) SPEAKER OUT L 0 0 0 0 0 0000 0 R Amp. Turn the projector and peripheral equipment on before the computer is switched on. 15 CONNECTING THE PROJECTOR "VIVNIO:;' Wit • NOTE: Before using with digital connection, install...
... CABLE (PROVIDED) SERIAL PORT PS/2 PORT INPUT INPUT COMPUTER AUDIO OUTPUT L COMPUTER AUDIO INPUT 1 R AUDIO CABLE (NOT PROVIDED) COMPUTER INPUT 1 O L (DIGITAL) US8 1 CONT 0 A L MOUSE CABLE FOR PS/2 PORT (PROVIDED) MOUSE CABLE FOR SERIAL PORT (PROVIDED) SERIAL PORT CABLE (NOT PROVIDED) CONTROL PORT OUTPUT 1 AUDIO INPUT L AUDIO CABLE (NOT PROVIDED) SPEAKER OUT L 0 0 0 0 0 0000 0 R Amp. Turn the projector and peripheral equipment on before the computer is switched on. 15 CONNECTING THE PROJECTOR "VIVNIO:;' Wit • NOTE: Before using with digital connection, install...
Owners Manual
Page 17
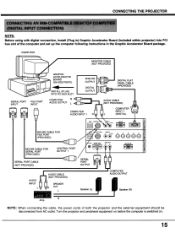
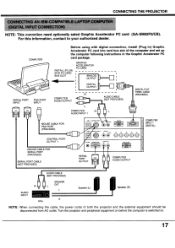
... COMPUTER AUDIO OUTPUT DIGITAL OUTPUT R U AUDIO CABLE (NOT PROVIDED) DIGITAL FLAT PANEL CABLE (PROVIDED) L COMPUTER L AUDIO INPUT 1 MOUSE CABLE FOR PS/2 PORT (PROVIDED) CONTROL PORT OUTPUT 1 MOUSE CABLE FOR SERIAL PORT (PROVIDED) SERIAL PORT CABLE (NOT PROVIDED) USA CONTROL PORT ANALOG COMPUTER 0 SERIAL PORT PS/2 PORT INPUT INPUT Before using with digital connection, install (Plug in) Graphic Accelerator PC card into card bus slot of the computer and set up the computer following instructions in the Graphic Accelerator PC card package. CONNECTING THE PROJECTOR...
... COMPUTER AUDIO OUTPUT DIGITAL OUTPUT R U AUDIO CABLE (NOT PROVIDED) DIGITAL FLAT PANEL CABLE (PROVIDED) L COMPUTER L AUDIO INPUT 1 MOUSE CABLE FOR PS/2 PORT (PROVIDED) CONTROL PORT OUTPUT 1 MOUSE CABLE FOR SERIAL PORT (PROVIDED) SERIAL PORT CABLE (NOT PROVIDED) USA CONTROL PORT ANALOG COMPUTER 0 SERIAL PORT PS/2 PORT INPUT INPUT Before using with digital connection, install (Plug in) Graphic Accelerator PC card into card bus slot of the computer and set up the computer following instructions in the Graphic Accelerator PC card package. CONNECTING THE PROJECTOR...
Owners Manual
Page 23
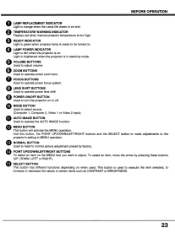
TEMPERATURE WARNING INDICATOR Flashes red when internal projector temperature is ready to turn the projector on . VOLUME BUTTONS Used to operate power focus system. Light is brightened when the projector is in MENU operation. FOCUS BUTTONS Used to adjust volume. MODE BUTTON Used to select source. (Computer 1, Computer 2, Video 1 or Video 2 Input) AUTO IMAGE BUTTON Used to increase or decrease the values in certain items such as CONTRAST or BRIGHTNESS. 23 Use this button, the POINT UP/DOWN/LEFT/RIGHT buttons and the SELECT button to make adjustments to...
TEMPERATURE WARNING INDICATOR Flashes red when internal projector temperature is ready to turn the projector on . VOLUME BUTTONS Used to operate power focus system. Light is brightened when the projector is in MENU operation. FOCUS BUTTONS Used to adjust volume. MODE BUTTON Used to select source. (Computer 1, Computer 2, Video 1 or Video 2 Input) AUTO IMAGE BUTTON Used to increase or decrease the values in certain items such as CONTRAST or BRIGHTNESS. 23 Use this button, the POINT UP/DOWN/LEFT/RIGHT buttons and the SELECT button to make adjustments to...

Owners Manual
Page 24
... to operate the projector but also usable as a wireless mouse for the connection.) EZ1,,zPae-z3 • LASER POINTER button This remote control emits a laser beam light as the Laser Pointer from the projector are transmitted to the PC, enabling the remote control unit of the projector to be used. Signals from the Laser Light Window. NOTE: To use of controls or adjustments or performance of the projector is displayed on...
... to operate the projector but also usable as a wireless mouse for the connection.) EZ1,,zPae-z3 • LASER POINTER button This remote control emits a laser beam light as the Laser Pointer from the projector are transmitted to the PC, enabling the remote control unit of the projector to be used. Signals from the Laser Light Window. NOTE: To use of controls or adjustments or performance of the projector is displayed on...

Owners Manual
Page 25
... use as the right button in D.ZOOM mode. Used to compress the image in a PC mouse. This button has different functions depending on ; FREEZE/NO SHOW BUTTON 0 Used to operate the AUTO IMAGE function. DIGITAL ZOOM BUTTON Used to mute sound. SOUND MUTE BUTTON Used to select digital zoom function. MENU BUTTON This button will activate the MENU operation. FRONT CLICK BUTTON When in use as a remote for the projector. ZOOM BUTTON 0 Used to display CURSOR on the MENU that you are pressing. CURSOR BUTTON Used to select power zoom lens adjust...
... use as the right button in D.ZOOM mode. Used to compress the image in a PC mouse. This button has different functions depending on ; FREEZE/NO SHOW BUTTON 0 Used to operate the AUTO IMAGE function. DIGITAL ZOOM BUTTON Used to mute sound. SOUND MUTE BUTTON Used to select digital zoom function. MENU BUTTON This button will activate the MENU operation. FRONT CLICK BUTTON When in use as a remote for the projector. ZOOM BUTTON 0 Used to display CURSOR on the MENU that you are pressing. CURSOR BUTTON Used to select power zoom lens adjust...

Owners Manual
Page 27
...;#####i 0 WIRED REMOTE JACK When using the wired remote control, connect the remote cable to this button, the POINT UP/DOWN/LEFT/RIGHT buttons and the SELECT button to make adjustments to the projector's setting in certain items such as CONTRAST or BRIGHTNESS. COMPUTER SELECT BUTTON Used to select computer mode. (Computer 1 or Computer 2 Input) VIDEO SELECT BUTTON Used to select video mode. (Video 1 or Video 2 Input) O POWER ON/OFF BUTTON Used to turn projector on -screen image or change the screen into black image. POINT...
...;#####i 0 WIRED REMOTE JACK When using the wired remote control, connect the remote cable to this button, the POINT UP/DOWN/LEFT/RIGHT buttons and the SELECT button to make adjustments to the projector's setting in certain items such as CONTRAST or BRIGHTNESS. COMPUTER SELECT BUTTON Used to select computer mode. (Computer 1 or Computer 2 Input) VIDEO SELECT BUTTON Used to select video mode. (Video 1 or Video 2 Input) O POWER ON/OFF BUTTON Used to turn projector on -screen image or change the screen into black image. POINT...

Owners Manual
Page 32
... position. 32 Connect the projector's AC power cord into a wall outlet and turn the MAIN ON/OFF switch (located on by pressing the POWER ON/OFF button. NOTE: TEMPERATURE WARNING INDICATOR flashes red, the projector will light GREEN. Remove dust with vacuum cleaner (See "AIR FILTER CARE AND CLEANING" section on the screen. To power down starts (30-29-28-...1). The LAMP POWER indicator will light RED, the READY indicator will automatically turn the MAIN ON/OFF switch (located on the screen and the...
... position. 32 Connect the projector's AC power cord into a wall outlet and turn the MAIN ON/OFF switch (located on by pressing the POWER ON/OFF button. NOTE: TEMPERATURE WARNING INDICATOR flashes red, the projector will light GREEN. Remove dust with vacuum cleaner (See "AIR FILTER CARE AND CLEANING" section on the screen. To power down starts (30-29-28-...1). The LAMP POWER indicator will light RED, the READY indicator will automatically turn the MAIN ON/OFF switch (located on the screen and the...

Owners Manual
Page 43
... below. 4. The settings changed remains effective until the MAIN ON/OFF switch is converted to SXGA (1280 x 1024) image by pressing the POINT UP/DOWN BUTTON(s). 6. is displayed for some lines and dots of the levels that you have reset the settings, "OK ?" Since UXGA (1600 x 1200) image is turned off . 9. Adjust the number to Reset and then press the SELECT (REAR CLICK) BUTTON. COMPUTER MODE " 5" 5 HIP...
... below. 4. The settings changed remains effective until the MAIN ON/OFF switch is converted to SXGA (1280 x 1024) image by pressing the POINT UP/DOWN BUTTON(s). 6. is displayed for some lines and dots of the levels that you have reset the settings, "OK ?" Since UXGA (1600 x 1200) image is turned off . 9. Adjust the number to Reset and then press the SELECT (REAR CLICK) BUTTON. COMPUTER MODE " 5" 5 HIP...

Owners Manual
Page 47
... CLICK) BUTTON. 21. You can adjust the settings again if needed. 22. MAIN MENU DISPLAY exf XGA 1 English PC ADJUSTMENT DISPLAY 2 • 1 1056 47 Adjust the display area, move the arrow to Stored and press the SELECT (REAR CLICK) BUTTON. To close dialog, move the arrow to Reset and then press the SELECT (REAR CLICK) BUTTON. COMPUTER MODE 17. Another dialog box "PC ADJUSTMENT DISPLAY 2" will...
... CLICK) BUTTON. 21. You can adjust the settings again if needed. 22. MAIN MENU DISPLAY exf XGA 1 English PC ADJUSTMENT DISPLAY 2 • 1 1056 47 Adjust the display area, move the arrow to Stored and press the SELECT (REAR CLICK) BUTTON. To close dialog, move the arrow to Reset and then press the SELECT (REAR CLICK) BUTTON. COMPUTER MODE 17. Another dialog box "PC ADJUSTMENT DISPLAY 2" will...

Owners Manual
Page 50
... curtains. 0'0 Power management will project a blue image without video noise on the screen when the video source is in the " wireless remote control unit. When this function is changed. T/B l\B '21 10,21.74 "SW :44444:, O4.= When this function is unplugged or turned off when the input signal is interrupted (Picture is in the SETTING menu "On". • This Projector is designed for connecting with USB Port of the computer used the projector's When...
... curtains. 0'0 Power management will project a blue image without video noise on the screen when the video source is in the " wireless remote control unit. When this function is changed. T/B l\B '21 10,21.74 "SW :44444:, O4.= When this function is unplugged or turned off when the input signal is interrupted (Picture is in the SETTING menu "On". • This Projector is designed for connecting with USB Port of the computer used the projector's When...
Owners Manual
Page 51
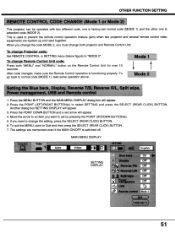
... code: Press both projector and Remote Control Unit. After code changed, make sure the Remote Control operation is switched off. Press the POINT LEFT/RIGHT BUTTON(s) to "MODE 2". MAIN MENU DISPLAY Auto Video SETTING DISPLAY English On Off Off Off Off Off Mode 1 AXiik= sxxxx.xxi 51 To change Projector code: Set REMOTE CONTROL in SETTING menu (below figure) to select SETTING and press the SELECT (REAR CLICK) BUTTON. If you want to set normal code (MODE 1) and the other one is factory-set...
... code: Press both projector and Remote Control Unit. After code changed, make sure the Remote Control operation is switched off. Press the POINT LEFT/RIGHT BUTTON(s) to "MODE 2". MAIN MENU DISPLAY Auto Video SETTING DISPLAY English On Off Off Off Off Off Mode 1 AXiik= sxxxx.xxi 51 To change Projector code: Set REMOTE CONTROL in SETTING menu (below figure) to select SETTING and press the SELECT (REAR CLICK) BUTTON. If you want to set normal code (MODE 1) and the other one is factory-set...

Owners Manual
Page 53
... projector so that air filter cover is clogged with the picture. Remove dust from the filter cover. 4. If temperature warning indicator remains on the surface of the projector. Should the air filter become clogged with water. To clean the air filter, follow the cleaning procedures below: 1. Turn the POWER ON/OFF button OFF. 2. Remove the air filter and sponge from the air filter by following instructions in internal heat build up and reduce the life of the projection lens and projection...
... projector so that air filter cover is clogged with the picture. Remove dust from the filter cover. 4. If temperature warning indicator remains on the surface of the projector. Should the air filter become clogged with water. To clean the air filter, follow the cleaning procedures below: 1. Turn the POWER ON/OFF button OFF. 2. Remove the air filter and sponge from the air filter by following instructions in internal heat build up and reduce the life of the projection lens and projection...

Owners Manual
Page 54
...) BUTTON. O Q \`' LAMP REPLACEMENT INDICATOR LAMP REPLACEMENT A • For continued safety, replace with a screwdriver and remove the lamp cover. 4. To terminate the warning message. Replace the Projection Lamp and reset the LAMP REPLACEMENT MONITOR TIMER (See "LAMP AGE" section on next time. The glass can become very hot. • Do not drop the lamp module or touch the glass bulb ! Follow these steps to the lamp assembly. 7. Turn off the projector and allow the projector to the projector. 8. Connect the...
...) BUTTON. O Q \`' LAMP REPLACEMENT INDICATOR LAMP REPLACEMENT A • For continued safety, replace with a screwdriver and remove the lamp cover. 4. To terminate the warning message. Replace the Projection Lamp and reset the LAMP REPLACEMENT MONITOR TIMER (See "LAMP AGE" section on next time. The glass can become very hot. • Do not drop the lamp module or touch the glass bulb ! Follow these steps to the lamp assembly. 7. Turn off the projector and allow the projector to the projector. 8. Connect the...

Owners Manual
Page 55
... turn the computer and monitor off before you don't use the projector, replace the lens cover. Verify that all computer, video and power cords are properly connected. 3. The problem may be with the projector. (When you reconnect the projector, remember to your equipment as described in order of cleaner. If the image still does not display, unplug the projector from the computer and check the computer monitor's display. TROUBLESHOOTING...
... turn the computer and monitor off before you don't use the projector, replace the lens cover. Verify that all computer, video and power cords are properly connected. 3. The problem may be with the projector. (When you reconnect the projector, remember to your equipment as described in order of cleaner. If the image still does not display, unplug the projector from the computer and check the computer monitor's display. TROUBLESHOOTING...


