Instruction Manual
Page 1
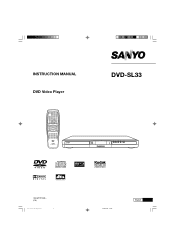
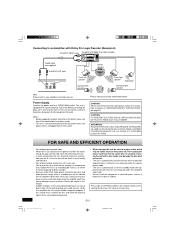
INSTRUCTION MANUAL DVD Video Player DVD-SL33 z/ON LAST MEMO PICTURE MODE OPEN/CLOSE PROGRAM /RANDOM REPEAT A-B REPEAT ON SCREEN ZOOM ANGLE ANGLE REPLAY SUBTITLE CHANGE SETUP SUBTITLE ON/OFF b 4 ENT AUDIO TOP MENU 5 MENU a RETURN REV SLOW PAUSE/STEP FWD SLOW PREV NEXT REV 1 4 7 PLAY 23 FWD CLEAR C 560 SEARCH MODE 89 REMOTE CONTROLLER RB-SL22 q OPEN/CLOSE n a f e z/ON 1AD6P1P1928-(CA) DVD-SL33/CA(English) 1 13/06/2003, 10:06 English
INSTRUCTION MANUAL DVD Video Player DVD-SL33 z/ON LAST MEMO PICTURE MODE OPEN/CLOSE PROGRAM /RANDOM REPEAT A-B REPEAT ON SCREEN ZOOM ANGLE ANGLE REPLAY SUBTITLE CHANGE SETUP SUBTITLE ON/OFF b 4 ENT AUDIO TOP MENU 5 MENU a RETURN REV SLOW PAUSE/STEP FWD SLOW PREV NEXT REV 1 4 7 PLAY 23 FWD CLEAR C 560 SEARCH MODE 89 REMOTE CONTROLLER RB-SL22 q OPEN/CLOSE n a f e z/ON 1AD6P1P1928-(CA) DVD-SL33/CA(English) 1 13/06/2003, 10:06 English
Instruction Manual
Page 2
... Replay E20 Repeat Playback E21 Designated Range Repeat Playback (A-B Repeat) ..... See "Setting Digital Out" in a safe place for the first time. DVD-SL33/CA(English) 2 -E1- 13/06/2003, 10:06 IMPORTANT INFORMATION: To connect this unit to connect this manual carefully before connecting your DVD video player and operating it for future reference.
... Replay E20 Repeat Playback E21 Designated Range Repeat Playback (A-B Repeat) ..... See "Setting Digital Out" in a safe place for the first time. DVD-SL33/CA(English) 2 -E1- 13/06/2003, 10:06 IMPORTANT INFORMATION: To connect this unit to connect this manual carefully before connecting your DVD video player and operating it for future reference.
Instruction Manual
Page 9
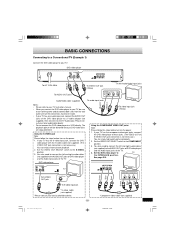
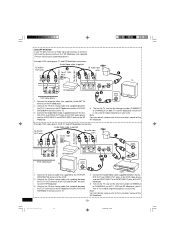
... input jacks, connect the DVD video player to TV the INTERLACE position. Set the VIDEO OUT SELECT switch to a VCR directly. See page E15. Green Blue Red Green Blue Red COMPONENT VIDEO INPUT Y PB PR *Component video cable (not supplied) DVD-SL33/CA(English) 9 13/06.../2003, 10:06 BASIC CONNECTIONS Connecting to a Conventional TV (Example 1) Connect the DVD video player to your local audio/video dealer. -E8-
... input jacks, connect the DVD video player to TV the INTERLACE position. Set the VIDEO OUT SELECT switch to a VCR directly. See page E15. Green Blue Red Green Blue Red COMPONENT VIDEO INPUT Y PB PR *Component video cable (not supplied) DVD-SL33/CA(English) 9 13/06.../2003, 10:06 BASIC CONNECTIONS Connecting to a Conventional TV (Example 1) Connect the DVD video player to your local audio/video dealer. -E8-
Instruction Manual
Page 10
... IN terminal of the RF Modulator. Connect the antenna cable (not supplied) to the instruction manual of the VCR and the ANT. VCR 4. DVD-SL33/CA(English) 10 13/06/2003, 10:06 Turn on the TV, and set the channel number (CHANNEL3 or CHANNEL4) on both TV and...(Yellow) (Red) R (White) L TV A/V INPUT JACKS TO TV ANT. Connect the antenna cable (not supplied) to the instruction manual of the VCR. 2. Example: DVD video player, VCR, TV and RF Modulator connections Audio/Video cable (supplied) To AUDIO OUT jacks To audio input 4 jacks To AC 120V, 1 60Hz (Red) R (White) L...
... IN terminal of the RF Modulator. Connect the antenna cable (not supplied) to the instruction manual of the VCR and the ANT. VCR 4. DVD-SL33/CA(English) 10 13/06/2003, 10:06 Turn on the TV, and set the channel number (CHANNEL3 or CHANNEL4) on both TV and...(Yellow) (Red) R (White) L TV A/V INPUT JACKS TO TV ANT. Connect the antenna cable (not supplied) to the instruction manual of the VCR. 2. Example: DVD video player, VCR, TV and RF Modulator connections Audio/Video cable (supplied) To AUDIO OUT jacks To audio input 4 jacks To AC 120V, 1 60Hz (Red) R (White) L...
Instruction Manual
Page 11
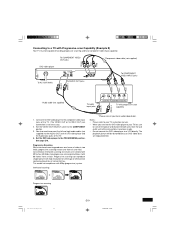
...Please consult your TV, be sure to turn off the power and disconnect both units from scratch. Set the DVD video player to the AUDIO OUT jack of DVD video player and the Audio input jacks of video in two fields, progressive scanning creates one frame in one second with 30... to a VCR directly. Notes: • Please refer to your TV instruction manual. • When you connect the DVD video player to your local audio/video dealer. Progressive scanning DVD-SL33/CA(English) 11 -E10- 13/06/2003, 10:06 Progressive scanning can reproduce shaper picture with 60 frames from the...
...Please consult your TV, be sure to turn off the power and disconnect both units from scratch. Set the DVD video player to the AUDIO OUT jack of DVD video player and the Audio input jacks of video in two fields, progressive scanning creates one frame in one second with 30... to a VCR directly. Notes: • Please refer to your TV instruction manual. • When you connect the DVD video player to your local audio/video dealer. Progressive scanning DVD-SL33/CA(English) 11 -E10- 13/06/2003, 10:06 Progressive scanning can reproduce shaper picture with 60 frames from the...
Instruction Manual
Page 12
...Red Green Blue Red To S-VIDEO OUT jack S-VIDEO IN 1 To S-video input jack *S-video cable (not supplied) *Please consult your local audio/video dealer. DVD video player (Red) R (White) L To AC 120V, 60Hz To AUDIO OUT jacks To VIDEO OUT jack (Yellow) TV with the S-video cable (not supplied). (The... from the wall outlet until all the connections have been made. • Do not connect the DVD video player to the AUDIO OUT jacks of DVD video player and the Audio input jacks of the Audio System. DVD-SL33/CA(English) 12 *Component video cable (not supplied) 13/06/2003, 10:06 To audio ...
...Red Green Blue Red To S-VIDEO OUT jack S-VIDEO IN 1 To S-video input jack *S-video cable (not supplied) *Please consult your local audio/video dealer. DVD video player (Red) R (White) L To AC 120V, 60Hz To AUDIO OUT jacks To VIDEO OUT jack (Yellow) TV with the S-video cable (not supplied). (The... from the wall outlet until all the connections have been made. • Do not connect the DVD video player to the AUDIO OUT jacks of DVD video player and the Audio input jacks of the Audio System. DVD-SL33/CA(English) 12 *Component video cable (not supplied) 13/06/2003, 10:06 To audio ...
Instruction Manual
Page 13
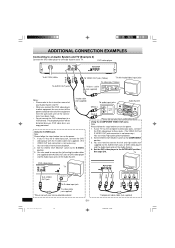
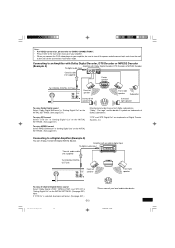
...refer to the instruction manual of Digital Theater Systems, Inc. Connecting to a Digital Amplifier (Example 5) You can enjoy 2 Channel Digital Stereo Sound. DVD-SL33/CA(English) 13 13/06/2003, 10:06 "DTS" and "DTS Digital Out" are trademarks of Dolby Laboratories. "Dolby", "Pro Logic" and... the double-D symbol are trademarks of your amplifier. • When you connect the DVD video player to your local audio/video dealer. Connecting to an Amplifier with Dolby Digital Decoder, DTS Decoder or MPEG2 Decoder (Example 4) Amplifier with...
...refer to the instruction manual of Digital Theater Systems, Inc. Connecting to a Digital Amplifier (Example 5) You can enjoy 2 Channel Digital Stereo Sound. DVD-SL33/CA(English) 13 13/06/2003, 10:06 "DTS" and "DTS Digital Out" are trademarks of Dolby Laboratories. "Dolby", "Pro Logic" and... the double-D symbol are trademarks of your amplifier. • When you connect the DVD video player to your local audio/video dealer. Connecting to an Amplifier with Dolby Digital Decoder, DTS Decoder or MPEG2 Decoder (Example 4) Amplifier with...
Instruction Manual
Page 14
...- Connecting to an Amplifier with Dolby Pro Logic Decoder (Example 6) To AUDIO INPUT jacks Amplifier with a polarized plug. CAUTION: When connecting the DVD video player, follow the installation instruction in the surrounding temperature can cause damage to the standby mode after 10 seconds. tion may be used for a long ...power cord. • When not in use the unit in areas where extremes in an area where there is a tendency to operate properly. DVD-SL33/CA(English) 14 13/06/2003, 10:06 Power Supply Connect the power cord to remove a disc which can cause dew to your ...
...- Connecting to an Amplifier with Dolby Pro Logic Decoder (Example 6) To AUDIO INPUT jacks Amplifier with a polarized plug. CAUTION: When connecting the DVD video player, follow the installation instruction in the surrounding temperature can cause damage to the standby mode after 10 seconds. tion may be used for a long ...power cord. • When not in use the unit in areas where extremes in an area where there is a tendency to operate properly. DVD-SL33/CA(English) 14 13/06/2003, 10:06 Power Supply Connect the power cord to remove a disc which can cause dew to your ...
Instruction Manual
Page 16
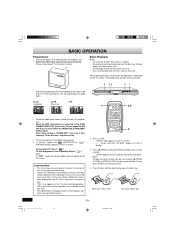
... the disc tray. • Discs must select the INTERLACE or PROGRESSIVE position. or For 5-inch (12cm) disc For 3-inch (8cm) disc -E15- DVD-SL33/CA(English) 16 13/06/2003, 10:06 Foreign objects can damage the unit. • Do not apply excessive force to change without notice. When... the basic instruction of the disc. • " " may need extra instruction. Press [z/ON]. • "SANYO" logo appears on the TV screen blinks, and then "NO dISC" appears on the power (TV and DVD video player). 2. Turn on the FL display. 2. Note: In " " mode, the closed caption may not be placed...
... the disc tray. • Discs must select the INTERLACE or PROGRESSIVE position. or For 5-inch (12cm) disc For 3-inch (8cm) disc -E15- DVD-SL33/CA(English) 16 13/06/2003, 10:06 Foreign objects can damage the unit. • Do not apply excessive force to change without notice. When... the basic instruction of the disc. • " " may need extra instruction. Press [z/ON]. • "SANYO" logo appears on the TV screen blinks, and then "NO dISC" appears on the power (TV and DVD video player). 2. Turn on the FL display. 2. Note: In " " mode, the closed caption may not be placed...

Instruction Manual
Page 28
... 4 ], [ a ], [ 5 ] or [ b ] to move the cursor to the desired picture. • To go to the next or previous thumbnail pictures, press [NEXT e] or [PREV f]. 3. DVD-SL33/CA(English) 28 13/06/2003, 10:06 You'll get back your prints and negatives as usual-plus you'll get a special CD that... OPERATION KODAK Picture CD Playback With KODAK Picture CD, it's easy to start the slide show. Just bring your computer and view them on this DVD video player. Press [ 4 ], [ a ], [ 5 ] or [ b ] to move the highlighted box to the desired file. 2) Press [ENT] (or [a PLAY]) to turn film into pictures ...
... 4 ], [ a ], [ 5 ] or [ b ] to move the cursor to the desired picture. • To go to the next or previous thumbnail pictures, press [NEXT e] or [PREV f]. 3. DVD-SL33/CA(English) 28 13/06/2003, 10:06 You'll get back your prints and negatives as usual-plus you'll get a special CD that... OPERATION KODAK Picture CD Playback With KODAK Picture CD, it's easy to start the slide show. Just bring your computer and view them on this DVD video player. Press [ 4 ], [ a ], [ 5 ] or [ b ] to move the highlighted box to the desired file. 2) Press [ENT] (or [a PLAY]) to turn film into pictures ...

Instruction Manual
Page 31
...PREV NEXT REV 1 4 7 PLAY 23 FWD CLEAR C 560 SEARCH MODE 89 4 a 5 4:3 LB (Letterbox): Select when a conventional TV set is connected. DVD-SL33/CA(English) 31 -E30- 13/06/2003, 10:06 Press [SETUP] in "FULL" size. (Setting the wide screen TV to "FULL" mode is played ...]. (In this example, "TV Type 4:3 PS" remains.) 11. When the wide screen disc is also necessary.) Notes: • The screen size may remain on the player, "Normal" and "Dark") appears. Press [ a ] to select "TV Type". 8. Press [ENT]. The submenu ("4:3 LB", "4:3 PS" and "16:9") appears. Dimmer TV Type Drak...
...PREV NEXT REV 1 4 7 PLAY 23 FWD CLEAR C 560 SEARCH MODE 89 4 a 5 4:3 LB (Letterbox): Select when a conventional TV set is connected. DVD-SL33/CA(English) 31 -E30- 13/06/2003, 10:06 Press [SETUP] in "FULL" size. (Setting the wide screen TV to "FULL" mode is played ...]. (In this example, "TV Type 4:3 PS" remains.) 11. When the wide screen disc is also necessary.) Notes: • The screen size may remain on the player, "Normal" and "Dark") appears. Press [ a ] to select "TV Type". 8. Press [ENT]. The submenu ("4:3 LB", "4:3 PS" and "16:9") appears. Dimmer TV Type Drak...
Instruction Manual
Page 35
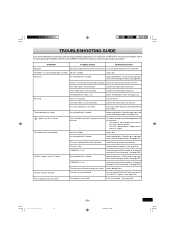
...be completed at this time because: • The feature is set to "Normal". (See page E30.) DVD-SL33/CA(English) 35 -E34- 13/06/2003, 10:06 Reset it . • The DVD software doesn't support the fea- SYMPTOM POSSIBLE CAUSE CORRECTIVE ACTION No power. Insert the power plug into the...disc. (Check the disc logo, type, color system and region number. No power plug connection at the moment. • The DVD software restricts it to receive signal from the player. Connect the audio cables into the jack. The disc is loaded. See page E14.) The TV is dark. Press the q ...
...be completed at this time because: • The feature is set to "Normal". (See page E30.) DVD-SL33/CA(English) 35 -E34- 13/06/2003, 10:06 Reset it . • The DVD software doesn't support the fea- SYMPTOM POSSIBLE CAUSE CORRECTIVE ACTION No power. Insert the power plug into the...disc. (Check the disc logo, type, color system and region number. No power plug connection at the moment. • The DVD software restricts it to receive signal from the player. Connect the audio cables into the jack. The disc is loaded. See page E14.) The TV is dark. Press the q ...
Instruction Manual
Page 36
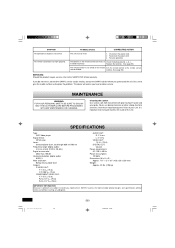
... strong chemical cleaners since these could damage the finish of the unit. DVD-SL33/CA(English) 36 -E35- 13/06/2003, 10:06 The batteries in the remote control are subject to continuous improvement, SANYO reserves the right to modify product designs and specifications without notice and without...window. (See page E6.) SERVICING: Should this product require service, refer to give the model number and explain the problem. SPECIFICATIONS Type: DVD Video player Signal format: NTSC color Laser: Semiconductor laser, wavelength 650 nm/790 nm Frequency range (digital audio): 4 Hz to 44 kHz...
... strong chemical cleaners since these could damage the finish of the unit. DVD-SL33/CA(English) 36 -E35- 13/06/2003, 10:06 The batteries in the remote control are subject to continuous improvement, SANYO reserves the right to modify product designs and specifications without notice and without...window. (See page E6.) SERVICING: Should this product require service, refer to give the model number and explain the problem. SPECIFICATIONS Type: DVD Video player Signal format: NTSC color Laser: Semiconductor laser, wavelength 650 nm/790 nm Frequency range (digital audio): 4 Hz to 44 kHz...
