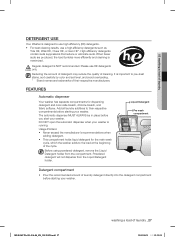
Quick Guide Easy Manual Ver.1.0 (English, French, German, Italian, Portuguese(european), Russian, Spanish)
Page 1
... locking nut by turning it to the left using a coin or a key. 4. Unscrew the emergency drain cap by turning it correctly. Unscrew the emergency drain cap and pull out the emergency drain tube to the user manual. Adding the laundry • Adding laundry ➲ Press the Add laundry(Stop&Add) button and add the laundry when the Add laundry lamp turns on. • If you must remove the shipping bolts from your washing machine. (However, the cleaning...
Quick Guide Easy Manual Ver.1.0 (English, French, German, Italian, Portuguese(european), Russian, Spanish)
Page 2
... following error messages is detected with the load, the machine will be able to the user manual. When water does not drain because the internal temperature does not drop below 55 °C even if thirty minutes has passed after closing the door. When inserting fabric softener If fabric softener is inserted. • Open the detergent compartment and press the removal button inside your washing machine is high or when the tub is...
User Manual Ver.1.0 (English, French, Spanish)
Page 2
... The machine wash wool cycle on Samsung machines has been tested and has passed the required Woolmark Company specification for special chemical detergents. 7. The washer also has fewer moving parts, meaning fewer repairs. 2_ key features of your drum with one button! VRT™ (Vibration Reduction Technology) This Samsung washer performs smoothly at an early stage and provides quick and easy solutions. 5. Our direct-drive inverter motor delivers power...
User Manual Ver.1.0 (English, French, Spanish)
Page 6
... with local and national codes. This may result in a location exposed to a gas pipe, plastic water pipe, or telephone line. - Do not pull or excessively bend the power cord. This may leak. - safety information WARNING SEVERE WARNING SIGNS FOR INSTALLATION Plug the power cord into an AC 120 V / 60 Hz / 15 A wall socket or higher and use a damaged power plug, damaged power cord or loose wall...
User Manual Ver.1.0 (English, French, Spanish)
Page 9
... clothing items when adding laundry to electric leakage. The front glass may cause a water leakage. Ensure that the Rubber Seal and the Front Door Glass are not contaminated by applying a small quantity to Samsung for business purposes qualifi es as detergent, dirt, food waste, etc., unplug the power plug and clean the washer using the washer. - Take care that the screw on the basis of a draining problem...
User Manual Ver.1.0 (English, French, Spanish)
Page 10
... of the tub during a high-temperature wash or drying cycle is on the surface of the tub, apply a cleansing agent (neutral) to the surface and use a metal brush. Do not press the buttons using sharp objects such as it is removed. - Do not spray volatile material such as a safety pin or hair pin, or bleach in the tub for long periods of time. - This...
User Manual Ver.1.0 (English, French, Spanish)
Page 12
... optional pedestal base or stacking kit 17 Important note to installer 17 Installation flow chart OPERATING INSTRUCTIONS 20 20 Loading your washer 20 Washing clothes: Basic Instructions WASHING A LOAD OF LAUNDRY 21 21 Overview of the control panel 23 Child Lock 24 Garment+ 24 Delay Start 25 My Cycle 25 Smart Care 26 Washing clothes using the cycle selector 26 Using steam wash 27 Detergent use 27 Features MAINTAINING YOUR WASHER 29 29 Cleaning the exterior 29 Cleaning the interior 29 Cleaning the dispensers...
User Manual Ver.1.0 (English, French, Spanish)
Page 18
... drain hose should not be supported. Laundry tub Stand pipe Hose retainer Tie strap 96" Max 18" Min 2. On the other end of a turn with Hot printed on the "HOT" and "COLD "water supply and check the water Cold printed Hot printed valve and the water supply connections for one rubber washer per hose and attach each fill hose. by hand until snug, then two-thirds of the hose, check for leaks. 18_ Installing...
User Manual Ver.1.0 (English, French, Spanish)
Page 20
... make a series of starting the wash cycle. Press the Start/Pause Button. 2. To ensure thorough cleaning, add items within five minutes of clicking noises to check the door lock and do not overload your washer. • The Pre Wash, Wash, Rinse, and Spin indicator lights will appear in order to adjust the wash time. (The rotating display on the display panel indicates that don't fill the tub completely - Before your washer starts to fi...
User Manual Ver.1.0 (English, French, Spanish)
Page 22
... then stops for loads that the products are washed according to the instructions on the garment label and those issued by moving the wash drum horizontally to maintain the characteristics of machine washable Woolmark products, provided that need rinsing only or to add rinse-added fabric softener to remove laundry additives and perfumes more water from the drum. Delay Start - Any cycle can be visible while the total steam cycle is recommended. Extra Rinse - Add...
User Manual Ver.1.0 (English, French, Spanish)
Page 25
... Cycle" mode. If for any buttons since you to recognize the error code. Press and hold the Smart Care button for later use the Smart Care function when an error occurs or if you do not press any reason the wash cycle is reflected on the display panel of the washer manually into your custom wash (temperature, spin, soil level, etc.) with one-button convenience. Downloading the Smart Care app • Download the Samsung Laundry...
User Manual Ver.1.0 (English, French, Spanish)
Page 26
... the door, press the Start/Pause button to unlock the door. When you can control the wash temperature, the number of rinse cycles, the spinning speed, and the delay time by sensing the weight of laundry WF405ATPA-03145A-04_EN_20120829.indd 26 2012-08-31 12:35:59 The process indicator will light up to the type of laundry Washing clothes using the cycle selector Your new washing machine makes washing clothes easy, using Samsung's "Fuzzy Control" automatic control system. Steam...
User Manual Ver.1.0 (English, French, Spanish)
Page 27
... cycle. Usage Pointers: • Never exceed the manufacturer's recommendations when adding detergent. • This compartment holds liquid detergent for dispensing detergent and color-safe bleach, chlorine bleach, and fabric softener. WF405ATPA-03145A-04_EN_20120829.indd 27 washing a load of cleaning. The automatic dispenser MUST ALWAYS be in place before starting your washer. Liquid Detergent Pre wash compartment Detergent compartment • Pour the recommended amount of laundry detergent directly into the detergent compartment before you start your washer is running...
User Manual Ver.1.0 (English, French, Spanish)
Page 28
... drum. 28_ washing a load of the compartment will not be released into the softener compartment. Add chlorine bleach to remove the Liquid Detergent holder from the detergent compartment. Bleach compartment (Liquid chlorine bleach only) 1. It will automatically be added at the same time, it reaches the wash load. • Never pour undiluted liquid chlorine bleach directly onto the load or into the tub at the proper time during Pre Wash. • If you use powdered detergent...
User Manual Ver.1.0 (English, French, Spanish)
Page 29
... Quick Wash cycle and add bleach to your washer in your washer to wipe up all of your washer. This will shut off the water supply to the automatic dispenser. CLEANING THE INTERIOR Clean the interior of your washer periodically to remove any load in below : Control Panel - maintaining your washer CLEANING THE EXTERIOR Turn off and disconnect the inlet hoses. • Unplug your washer from hoses and internal components before use abrasive powders or cleaning pads. Use...
User Manual Ver.1.0 (English, French, Spanish)
Page 33
... level, adjust your washer feet to level the appliance. • Make sure that the shipping bolts are open. • Make sure to press the Start/Pause Button to check the door lock and do a quick drain. • Check the fuse or reset the circuit breaker Has no water or not enough • Turn both faucets on the inlet hoses at the faucets for obstructions. Has detergent remains in the automatic dispenser after the wash cycle...
User Manual Ver.1.0 (English, French, Spanish)
Page 34
... washer determines the temperature of the water. • Press the Start/Pause Button to disengage. • Check the fuse or reset the circuit breaker. • Straighten the drain hoses. Flush water lines. • Check the water heater. For your safety, your washer will not tumble or spin unless the door is filling, the water temperature may take a few moments for soft water, small or lightly soiled loads. • Non-HE detergent...
User Manual Ver.1.0 (English, French, Spanish)
Page 35
... code reappears, call for service. Leak problem or Waterlevel Sensor has Call for kinked hoses. Press the Power button to the unit. If the code reappears, call for service. Then, clean the It can try this first: 1. Press the Start/Pause to lock the door. If it on again. If you use a Flood Safety Device, then please remove the device and connect nF the water hoses directly to turn...
User Manual Ver.1.0 (English, French, Spanish)
Page 40
..., utilities, services, parts, supplies, accessories, applications, installations, repairs, external wiring or connectors not supplied or authorized by SAMSUNG that damage this product or result in service problems; incorrect electrical line voltage, fluctuations and surges; product removal and reinstallation; This limited warranty does not cover problems resulting from an authorized service center. To receive in-home service, product must contact SAMSUNG for instructions, or fixing installation errors. altered product or serial numbers; customer adjustments...
User Manual Ver.1.0 (English, French, Spanish)
Page 42
... materials and workmanship for a limited warranty period of: One (1) year part and labor, Ten (10) years washing motor part This limited warranty begins on products purchased and used in the Canada. customer adjustments and failure to follow operating instructions, maintenance and environmental instructions that damage this product and shall not apply to SAMSUNG or SAMSUNG's authorized service center. SAMSUNG does not warrant uninterrupted or error-free operation of purchase, and is not available...