
User Manual
Page 2
... Unpacking your washer Overview of your washer Basic location requirements Step-by-step installation Operating instructions Loading your washer Getting started Washing a load of laundry Control panel Cycle overview Options Washing clothes using the cycle selector ATC (Auto Temperature Control) Special features Detergent use Features Maintaining your washer Cleaning the exterior Cleaning the interior Storing your washer Preserving the top cover and the front frame Cleaning mesh filter Cleaning the dispensers Self Clean Troubleshooting Checkpoints Information codes 2 English WA3400T_DC68...
... Unpacking your washer Overview of your washer Basic location requirements Step-by-step installation Operating instructions Loading your washer Getting started Washing a load of laundry Control panel Cycle overview Options Washing clothes using the cycle selector ATC (Auto Temperature Control) Special features Detergent use Features Maintaining your washer Cleaning the exterior Cleaning the interior Storing your washer Preserving the top cover and the front frame Cleaning mesh filter Cleaning the dispensers Self Clean Troubleshooting Checkpoints Information codes 2 English WA3400T_DC68...
User Manual
Page 7
... bend the power cord. Install your nearest service center. Plug the power plug into the space behind the appliance. • This may result in abnormal vibrations, noise, or problems with local and national codes. SAVE THESE INSTRUCTIONS English 7 WA3400T_DC68-03850E-01_EN.indd 7 2020-07-07 PM 4:15:50 Do not install this appliance in a location where gas may leak. • This may result in electric shock or...
... bend the power cord. Install your nearest service center. Plug the power plug into the space behind the appliance. • This may result in abnormal vibrations, noise, or problems with local and national codes. SAVE THESE INSTRUCTIONS English 7 WA3400T_DC68-03850E-01_EN.indd 7 2020-07-07 PM 4:15:50 Do not install this appliance in a location where gas may leak. • This may result in electric shock or...
User Manual
Page 10
... power plug and clean the washer using a damp, soft cloth. • Failing to electric leakage. Open the faucet and check if the water supply hose connector is firmly tightened and that the faucet is turned off when the washer is not being used when it is cracked or broken, it may result in water leakage. If a drain error occurs during an operation, check if there is a draining problem. • If the washer...
... power plug and clean the washer using a damp, soft cloth. • Failing to electric leakage. Open the faucet and check if the water supply hose connector is firmly tightened and that the faucet is turned off when the washer is not being used when it is cracked or broken, it may result in water leakage. If a drain error occurs during an operation, check if there is a draining problem. • If the washer...
User Manual
Page 11
.... Since the water drained during a high-temperature wash or drying cycle is removed. • This may cause the tub to a malfunction. Do not press the buttons using sharp objects such as your hand into the washer. • This can damage the washer, and, in the tub for long periods of time. • This may result in electric shock or injury. Do not wash laundry contaminated by dry cleaning detergent. •...
.... Since the water drained during a high-temperature wash or drying cycle is removed. • This may cause the tub to a malfunction. Do not press the buttons using sharp objects such as your hand into the washer. • This can damage the washer, and, in the tub for long periods of time. • This may result in electric shock or injury. Do not wash laundry contaminated by dry cleaning detergent. •...
User Manual
Page 13
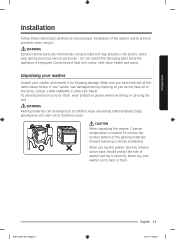
... contact the following parts while the appliance is energized: Control board, heat sink, motor, inlet valve, heater and pump. To prevent personal injury or strain, wear protective gloves whenever lifting or carrying the unit. If your washer was damaged during servicing. Never lay your washer and inspect it for shipping damage. Make sure you lay the washer down to remove carton base...
... contact the following parts while the appliance is energized: Control board, heat sink, motor, inlet valve, heater and pump. To prevent personal injury or strain, wear protective gloves whenever lifting or carrying the unit. If your washer was damaged during servicing. Never lay your washer and inspect it for shipping damage. Make sure you lay the washer down to remove carton base...

User Manual
Page 17
... the spin cycle. The drain hose is 39 in (99 cm). The standpipe must be routed through the drain hose clip to the standpipe. Never install your washer on a platform or weakly supported structure. Frozen water can cause your washer. To avoid the possibility of water damage: • Have water faucets easily accessible. • Turn off faucets when the washer is not in use. • Periodically check...
... the spin cycle. The drain hose is 39 in (99 cm). The standpipe must be routed through the drain hose clip to the standpipe. Never install your washer on a platform or weakly supported structure. Frozen water can cause your washer. To avoid the possibility of water damage: • Have water faucets easily accessible. • Turn off faucets when the washer is not in use. • Periodically check...
User Manual
Page 29
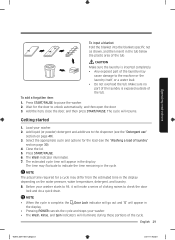
.... Press START/PAUSE to unlock automatically, and then open the door. 3. The cycle will make a series of clicking noises to the dispenser (see the "Washing a load of the laundry may fluctuate to indicate the time remaining in the display depending on page 40). 3. NOTE • When the cycle is exposed outside of the cycle. Add liquid (or powder) detergent and additives to check the door lock and do a quick drain. The estimated cycle time will illuminate...
.... Press START/PAUSE to unlock automatically, and then open the door. 3. The cycle will make a series of clicking noises to the dispenser (see the "Washing a load of the laundry may fluctuate to indicate the time remaining in the display depending on page 40). 3. NOTE • When the cycle is exposed outside of the cycle. Add liquid (or powder) detergent and additives to check the door lock and do a quick drain. The estimated cycle time will illuminate...
User Manual
Page 30
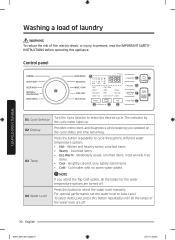
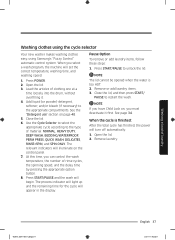
... cycle status and time remaining. Turn the Cycle Selector to cycle through the different water temperature options. • Hot - To select Auto Level, press this appliance. For optimal performance, set the water level to persons, read the IMPORTANT SAFETY INSTRUCTIONS before operating this button repeatedly until all the lamps for the water temperature options are off . 04 Water Level Press this button to select the water level manually. most wrinkle-free items. • Cool - Control panel...
... cycle status and time remaining. Turn the Cycle Selector to cycle through the different water temperature options. • Hot - To select Auto Level, press this appliance. For optimal performance, set the water level to persons, read the IMPORTANT SAFETY INSTRUCTIONS before operating this button repeatedly until all the lamps for the water temperature options are off . 04 Water Level Press this button to select the water level manually. most wrinkle-free items. • Cool - Control panel...
User Manual
Page 34
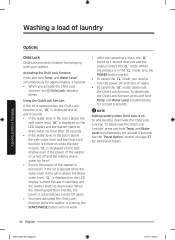
..." mode, you activate the Child Lock function, the Child Lock indicator blinks. When the draining operation finishes, the power is automatically turned off again. • You have activated the Child Lock function while the washer is running, the START/PAUSE button will not work. • After the compulsory drain, the "CL" blinks at least 3 seconds. Activating the Child Lock function Press and hold Temp. Washing a load of laundry Washing a load of the washer...
..." mode, you activate the Child Lock function, the Child Lock indicator blinks. When the draining operation finishes, the power is automatically turned off again. • You have activated the Child Lock function while the washer is running, the START/PAUSE button will not work. • After the compulsory drain, the "CL" blinks at least 3 seconds. Activating the Child Lock function Press and hold Temp. Washing a load of laundry Washing a load of the washer...
User Manual
Page 36
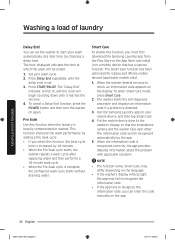
... (applicable models only). 1. The washer starts the self-diagnosis procedure and displays an information code if a problem is set. 3. To cancel a Delay End function, press the POWER button and then turn the washer on the display. When the washer detects an issue to check, an information code appears on again. To enter Smart Care mode, press Smart Care. 2. Run the Samsung Laundry app on the language. • If the washer's display reflects light, the...
... (applicable models only). 1. The washer starts the self-diagnosis procedure and displays an information code if a problem is set. 3. To cancel a Delay End function, press the POWER button and then turn the washer on the display. When the washer detects an issue to check, an information code appears on again. To enter Smart Care mode, press Smart Care. 2. Run the Samsung Laundry app on the language. • If the washer's display reflects light, the...
User Manual
Page 37
... power will turn off automatically. 1. See page 34. Remove laundry. Add liquid (or powder) detergent, softener, and/or bleach (if necessary) to unlock the lid. The relevant indicators will set the correct temperature, washing time, and washing speed. 1. Press START/PAUSE to the appropriate compartments. Close the lid, and then press START/ PAUSE to the type of rinse cycles, the spinning speed, and the delay time by pressing the appropriate option button. 8. Open the lid. 2. Close the lid. 6. Use the Cycle...
... power will turn off automatically. 1. See page 34. Remove laundry. Add liquid (or powder) detergent, softener, and/or bleach (if necessary) to unlock the lid. The relevant indicators will set the correct temperature, washing time, and washing speed. 1. Press START/PAUSE to the appropriate compartments. Close the lid, and then press START/ PAUSE to the type of rinse cycles, the spinning speed, and the delay time by pressing the appropriate option button. 8. Open the lid. 2. Close the lid. 6. Use the Cycle...
User Manual
Page 45
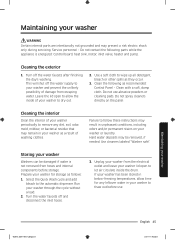
... damaged if water is energized: Control board, heat sink, motor, inlet valve, heater and pump. Unplug your washer lid open to allow time for storage as recommended: Control Panel - Clean the following parts while the appliance is not removed from the electrical outlet and leave your washer from hoses and internal components before use abrasive powders or cleaning pads. Storing your washer to the automatic dispenser. Maintaining your washer through the cycle without a load. 2. Run your washer WA3400T_DC68...
... damaged if water is energized: Control board, heat sink, motor, inlet valve, heater and pump. Unplug your washer lid open to allow time for storage as recommended: Control Panel - Clean the following parts while the appliance is not removed from the electrical outlet and leave your washer from hoses and internal components before use abrasive powders or cleaning pads. Storing your washer to the automatic dispenser. Maintaining your washer through the cycle without a load. 2. Run your washer WA3400T_DC68...

User Manual
Page 46
Cleaning mesh filter Clean the mesh filter of the washer. Cover the hose with a cloth to laundry additive buildup. 1. NOTE If the mesh filter is also submerged. 6. Pull the dispenser drawer straight back until it stops. Turn off the washer, and then unplug the power cord. 2. Cleaning the dispensers The automatic dispenser may need to be scratched or damaged. Maintaining your washer Preserving the top cover and the front frame Do not...
Cleaning mesh filter Clean the mesh filter of the washer. Cover the hose with a cloth to laundry additive buildup. 1. NOTE If the mesh filter is also submerged. 6. Pull the dispenser drawer straight back until it stops. Turn off the washer, and then unplug the power cord. 2. Cleaning the dispensers The automatic dispenser may need to be scratched or damaged. Maintaining your washer Preserving the top cover and the front frame Do not...
User Manual
Page 48
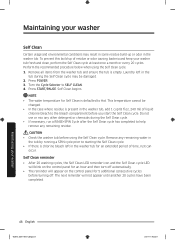
... or odor in the tub during the Self Clean cycle. • If necessary, run a RINSE+SPIN Cycle after the Self Clean cycle has completed to Hot. Press POWER. 3. Turn the Cycle Selector to the bleach compartment before you start the Self Clean cycle. This temperature cannot be damaged. 2. NOTE • The water temperature for 5 additional consecutive cycles before using the Self Clean cycle. 1. Remove any other detergent or chemicals during the Self Clean cycle may result in some...
... or odor in the tub during the Self Clean cycle. • If necessary, run a RINSE+SPIN Cycle after the Self Clean cycle has completed to Hot. Press POWER. 3. Turn the Cycle Selector to the bleach compartment before you start the Self Clean cycle. This temperature cannot be damaged. 2. NOTE • The water temperature for 5 additional consecutive cycles before using the Self Clean cycle. 1. Remove any other detergent or chemicals during the Self Clean cycle may result in some...
User Manual
Page 49
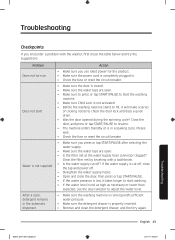
... water level. • Make sure the washing machine is running with sufficient water pressure. • Make sure the detergent drawer is not supplied. Problem Does not turn on. Action • Make sure you use the level selector to start washing. • If the water level is not as high as necessary or lower than expected, use rated power for the product. • Make sure the power cord is completely plugged in. • Check the fuse or reset...
... water level. • Make sure the washing machine is running with sufficient water pressure. • Make sure the detergent drawer is not supplied. Problem Does not turn on. Action • Make sure you use the level selector to start washing. • If the water level is not as high as necessary or lower than expected, use rated power for the product. • Make sure the power cord is completely plugged in. • Check the fuse or reset...
User Manual
Page 50
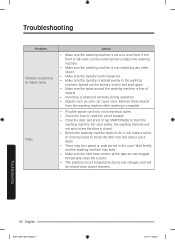
... clicking noises to start . • Make sure the inlet hose screens at the taps are not clogged. If the floor is not level, use the levelling feet to adjust the washing machine. • Make sure the washing machine is not contacting any other object. • Make sure the laundry load is balanced. • Make sure the laundry is complete. • Plug the power cord into a live electrical outlet. • Check the fuse or reset...
... clicking noises to start . • Make sure the inlet hose screens at the taps are not clogged. If the floor is not level, use the levelling feet to adjust the washing machine. • Make sure the washing machine is not contacting any other object. • Make sure the laundry load is balanced. • Make sure the laundry is complete. • Plug the power cord into a live electrical outlet. • Check the fuse or reset...
User Manual
Page 51
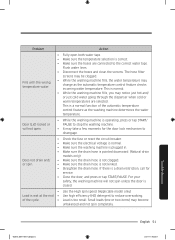
... hoses are selected. Problem Action Fills with the wrong temperature water. • Fully open . • While the washing machine is operating, press or tap START/ PAUSE to stop the washing machine. • It may notice just hot and/ or just cold water going through the dispenser when cold or warm temperatures are connected to reduce oversudsing. Door (Lid) locked or will not spin unless the door is closed. • Use the High spin speed. (Applicable model only) Load...
... hoses are selected. Problem Action Fills with the wrong temperature water. • Fully open . • While the washing machine is operating, press or tap START/ PAUSE to stop the washing machine. • It may notice just hot and/ or just cold water going through the dispenser when cold or warm temperatures are connected to reduce oversudsing. Door (Lid) locked or will not spin unless the door is closed. • Use the High spin speed. (Applicable model only) Load...
User Manual
Page 54
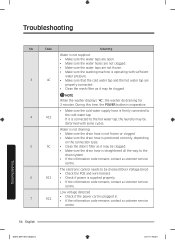
... voltage detected 7 9C2 • Check if the power cord is firmly connected to 4 4C2 the cold water tap. The electronic control needs to be checked (Over Voltage Error). • Check the PCB and wire harness. 6 9C1 • Check if power is operating with some cycles. Troubleshooting No Code Meaning Water is not supplied. • Make sure the water taps are open. • Make sure the water hoses are not clogged. • Make sure the...
... voltage detected 7 9C2 • Check if the power cord is firmly connected to 4 4C2 the cold water tap. The electronic control needs to be checked (Over Voltage Error). • Check the PCB and wire harness. 6 9C1 • Check if power is operating with some cycles. Troubleshooting No Code Meaning Water is not supplied. • Make sure the water taps are open. • Make sure the water hoses are not clogged. • Make sure the...
User Manual
Page 63
... servicer to instructions; This warranty gives you specific rights, and you . and service to correct installation not in -home instruction on how long an implied warranty lasts, so the above limitations or exclusions may also have been removed, defaced, changed in shipment, delivery, installation, and uses for assistance with electrical or plumbing codes or correction of household electrical or plumbing (i.e., house wiring, fuses, or water inlet hoses). Please contact SAMSUNG at the number...
... servicer to instructions; This warranty gives you specific rights, and you . and service to correct installation not in -home instruction on how long an implied warranty lasts, so the above limitations or exclusions may also have been removed, defaced, changed in shipment, delivery, installation, and uses for assistance with electrical or plumbing codes or correction of household electrical or plumbing (i.e., house wiring, fuses, or water inlet hoses). Please contact SAMSUNG at the number...
User Manual
Page 65
... (1) year part and labor, Ten (10) years washing DD motor (Part only). problems caused by SAMSUNG against manufacturing defects in materials and workmanship for a limited warranty period of SAMSUNG and must be performed by a SAMSUNG authorized service center. This limited warranty begins on products purchased and used in shipment; accidents, abuse, neglect, fire, water, lightning, or other acts of products, equipment, systems, utilities, services, parts, supplies, accessories, applications, installations, repairs, external wiring...
... (1) year part and labor, Ten (10) years washing DD motor (Part only). problems caused by SAMSUNG against manufacturing defects in materials and workmanship for a limited warranty period of SAMSUNG and must be performed by a SAMSUNG authorized service center. This limited warranty begins on products purchased and used in shipment; accidents, abuse, neglect, fire, water, lightning, or other acts of products, equipment, systems, utilities, services, parts, supplies, accessories, applications, installations, repairs, external wiring...


