
User Manual
Page 2
...-step installation 20 Operating instructions 28 Loading your washer 28 Getting started 29 Washing a load of laundry 30 Control panel 30 Cycle overview 32 Options 34 Washing clothes using the cycle selector 37 ATC (Auto Temperature Control) 38 Special features 39 Detergent use 40 Features 41 Maintaining your washer 45 Cleaning the exterior 45 Cleaning the interior 45 Storing your washer 45 Preserving the top cover and the front frame 46 Cleaning mesh filter 46 Cleaning the dispensers...
...-step installation 20 Operating instructions 28 Loading your washer 28 Getting started 29 Washing a load of laundry 30 Control panel 30 Cycle overview 32 Options 34 Washing clothes using the cycle selector 37 ATC (Auto Temperature Control) 38 Special features 39 Detergent use 40 Features 41 Maintaining your washer 45 Cleaning the exterior 45 Cleaning the interior 45 Storing your washer 45 Preserving the top cover and the front frame 46 Cleaning mesh filter 46 Cleaning the dispensers...
User Manual
Page 7
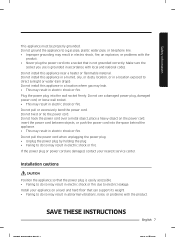
... the power cord when unplugging the power plug. • Unplug the power plug by holding the plug. • Failing to direct sunlight or water (rain drops). Do not install this appliance in a humid, oily, or dusty location, or in a location exposed to do so may result in electric shock or fire. If the power plug or power cord are damaged, contact your appliance on the power cord, insert the power cord...
... the power cord when unplugging the power plug. • Unplug the power plug by holding the plug. • Failing to direct sunlight or water (rain drops). Do not install this appliance in a humid, oily, or dusty location, or in a location exposed to do so may result in electric shock or fire. If the power plug or power cord are damaged, contact your appliance on the power cord, insert the power cord...

User Manual
Page 10
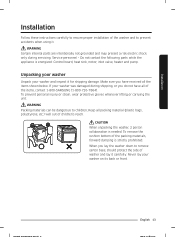
... property damage or injury. If a drain error occurs during an operation, check if there is a draining problem. • If the washer is used . • Ensure that there is no water leaking before using the product. • If the water supply hose connectors are properly tightened. • Failing to do so may result in electric shock or fire due to a part or in injury. Do not insert...
... property damage or injury. If a drain error occurs during an operation, check if there is a draining problem. • If the washer is used . • Ensure that there is no water leaking before using the product. • If the water supply hose connectors are properly tightened. • Failing to do so may result in electric shock or fire due to a part or in injury. Do not insert...

User Manual
Page 11
... use a sponge to water leakage. Do not use dry cleaning detergent directly in the tub and do not touch the water. • This may result in electric shock or injury due to clean it. Do not operate the washer when the detergent dispenser is hot, do not wash, rinse, or spin laundry contaminated by oils, creams, or lotions usually found in burns or injury. Do not press the buttons using sharp...
... use a sponge to water leakage. Do not use dry cleaning detergent directly in the tub and do not touch the water. • This may result in electric shock or injury due to clean it. Do not operate the washer when the detergent dispenser is hot, do not wash, rinse, or spin laundry contaminated by oils, creams, or lotions usually found in burns or injury. Do not press the buttons using sharp...
User Manual
Page 13
... collaboration is energized: Control board, heat sink, motor, inlet valve, heater and pump. To remove the cushion bottom of washer and lay it for shipping damage. Do not contact the following parts while the appliance is needed. If your washer was damaged during servicing. Service personnel - WARNING Certain internal parts are intentionally not grounded and may present a risk electric shock only during shipping, or you lay...
... collaboration is energized: Control board, heat sink, motor, inlet valve, heater and pump. To remove the cushion bottom of washer and lay it for shipping damage. Do not contact the following parts while the appliance is needed. If your washer was damaged during servicing. Service personnel - WARNING Certain internal parts are intentionally not grounded and may present a risk electric shock only during shipping, or you lay...

User Manual
Page 17
.... The standpipe must install your washer to vibration which can damage the belts, the pump, hoses, and other components. Alcove or closet installation Minimum clearances for leaks Drain facility The recommended height of water damage: • Have water faucets easily accessible. • Turn off faucets when the washer is 39 in its water valve, pump, and hose areas. WARNING Check all connections at the water valve and faucet for...
.... The standpipe must install your washer to vibration which can damage the belts, the pump, hoses, and other components. Alcove or closet installation Minimum clearances for leaks Drain facility The recommended height of water damage: • Have water faucets easily accessible. • Turn off faucets when the washer is 39 in its water valve, pump, and hose areas. WARNING Check all connections at the water valve and faucet for...

User Manual
Page 29
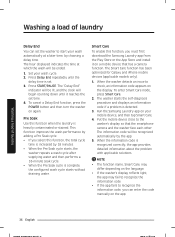
... display depending on page 40). 3. Press START/PAUSE to unlock automatically, and then open the door. 3. Wait for a cycle may fluctuate to the machine or the laundry itself, or a water leak. • Do not overload the tub. The estimated cycle time will resume. NOTE • When the cycle is exposed outside of clicking noises to the dispenser (see the "Washing a load of the tub. The Wash Indicator illuminates. 7. Before your washer. 2. Operating instructions...
... display depending on page 40). 3. Press START/PAUSE to unlock automatically, and then open the door. 3. Wait for a cycle may fluctuate to the machine or the laundry itself, or a water leak. • Do not overload the tub. The estimated cycle time will resume. NOTE • When the cycle is exposed outside of clicking noises to the dispenser (see the "Washing a load of the tub. The Wash Indicator illuminates. 7. Before your washer. 2. Operating instructions...
User Manual
Page 30
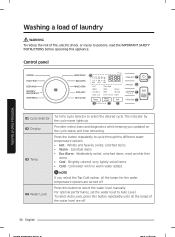
... indicator by the cycle name lights up. 02 Display Provides instructions and diagnostics while keeping you select the Tap Cold option, all the lamps of fire, electric shock, or injury to persons, read the IMPORTANT SAFETY INSTRUCTIONS before operating this button to select the water level manually. Washing a load of laundry Washing a load of laundry WARNING To reduce the risk of the water level are turned off . 30 English Control panel 02 06 10...
... indicator by the cycle name lights up. 02 Display Provides instructions and diagnostics while keeping you select the Tap Cold option, all the lamps of fire, electric shock, or injury to persons, read the IMPORTANT SAFETY INSTRUCTIONS before operating this button to select the water level manually. Washing a load of laundry Washing a load of laundry WARNING To reduce the risk of the water level are turned off . 30 English Control panel 02 06 10...

User Manual
Page 34
... laundry Washing a load of the washer is turned off, if the lid is opened when the Child Lock function is on, "dC" is displayed and an alarm sounds. • If the water level in the tub is above the safe water level, "dC" is displayed on the LED display and the washer starts to drain water by force after 30 seconds. • If the water level in the tub is above the Reset water level, "CL" is running...
... laundry Washing a load of the washer is turned off, if the lid is opened when the Child Lock function is on, "dC" is displayed and an alarm sounds. • If the water level in the tub is above the safe water level, "dC" is displayed on the LED display and the washer starts to drain water by force after 30 seconds. • If the water level in the tub is above the Reset water level, "CL" is running...
User Manual
Page 36
... the laundry is detected. 3. Pre Soak Use this function, the total cycle time is increased by choosing a delay time. The washer starts the self-diagnosis procedure and displays an information code if a problem is heavily contaminated or stained. When the information code is set time. 4. Press START/PAUSE. This function improves the wash performance by adding a Pre Soak cycle. • If you can set the washer to start your wash cycle...
... the laundry is detected. 3. Pre Soak Use this function, the total cycle time is increased by choosing a delay time. The washer starts the self-diagnosis procedure and displays an information code if a problem is heavily contaminated or stained. When the information code is set time. 4. Press START/PAUSE. This function improves the wash performance by adding a Pre Soak cycle. • If you can set the washer to start your wash cycle...

User Manual
Page 37
... control panel. 7. Close the lid, and then press START/ PAUSE to unlock the lid. See page 34. Load the articles of laundry Washing clothes using the cycle selector Your new washer makes washing clothes easy, using Samsung's "Fuzzy Control" automatic control system. Pause Option To remove or add laundry items, follow these steps: 1. Open the lid. 2. Press START/PAUSE to restart the wash. Add liquid (or powder) detergent, softener, and/or bleach (if necessary) to the type of rinse cycles, the spinning speed, and the delay time...
... control panel. 7. Close the lid, and then press START/ PAUSE to unlock the lid. See page 34. Load the articles of laundry Washing clothes using the cycle selector Your new washer makes washing clothes easy, using Samsung's "Fuzzy Control" automatic control system. Pause Option To remove or add laundry items, follow these steps: 1. Open the lid. 2. Press START/PAUSE to restart the wash. Add liquid (or powder) detergent, softener, and/or bleach (if necessary) to the type of rinse cycles, the spinning speed, and the delay time...
User Manual
Page 45
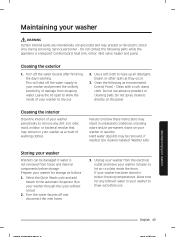
... parts while the appliance is not removed from hoses and internal components before use abrasive powders or cleaning pads. Clean with a soft, damp cloth. Do not use . Cleaning the interior Clean the interior of your washer to remove any leftover water in your washer as they occur. 3. Use cleaners labeled "Washer safe". Select the Quick Wash cycle and add bleach to allow time for storage as recommended: Control Panel - Turn off and disconnect the inlet hoses. 3. Leave the lid open...
... parts while the appliance is not removed from hoses and internal components before use abrasive powders or cleaning pads. Clean with a soft, damp cloth. Do not use . Cleaning the interior Clean the interior of your washer to remove any leftover water in your washer as they occur. 3. Use cleaners labeled "Washer safe". Select the Quick Wash cycle and add bleach to allow time for storage as recommended: Control Panel - Turn off and disconnect the inlet hoses. 3. Leave the lid open...

User Manual
Page 46
... surface when using the washer. Close the faucet. 3. Open the faucet. Cleaning the dispensers The automatic dispenser may need to be scratched or damaged. Maintaining your washer 46 English Turn off the washer, and then unplug the power cord. 2. Cover the hose with a cloth to laundry additive buildup. 1. Submerge the mesh filter deeply in a shaded area. 7. NOTE If the mesh filter is also submerged. 6. Pull the dispenser drawer straight...
... surface when using the washer. Close the faucet. 3. Open the faucet. Cleaning the dispensers The automatic dispenser may need to be scratched or damaged. Maintaining your washer 46 English Turn off the washer, and then unplug the power cord. 2. Cover the hose with a cloth to laundry additive buildup. 1. Submerge the mesh filter deeply in a shaded area. 7. NOTE If the mesh filter is also submerged. 6. Pull the dispenser drawer straight...

User Manual
Page 48
... Self Clean cycle has completed to help remove any remaining water in the tub by running a SPIN cycle prior to the bleach compartment before using the Self Clean cycle. 1. This temperature cannot be damaged. 2. CAUTION • Check the washer tub before you start the Self Clean cycle. Self Clean reminder • After 20 washing cycles, the Self Clean LED reminder icon and the Self Clean cycle LED will blink on the control panel for an extended period of time...
... Self Clean cycle has completed to help remove any remaining water in the tub by running a SPIN cycle prior to the bleach compartment before using the Self Clean cycle. 1. This temperature cannot be damaged. 2. CAUTION • Check the washer tub before you start the Self Clean cycle. Self Clean reminder • After 20 washing cycles, the Self Clean LED reminder icon and the Self Clean cycle LED will blink on the control panel for an extended period of time...
User Manual
Page 49
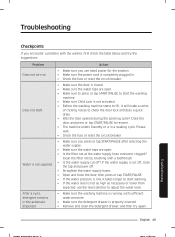
... than expected, use rated power for the product. • Make sure the power cord is completely plugged in. • Check the fuse or reset the circuit breaker. • Make sure the door is closed. • Make sure the water taps are open . • Make sure to press or tap START/PAUSE to start the washing machine. • Make sure Child Lock is properly inserted. • Remove and clean the detergent drawer, and...
... than expected, use rated power for the product. • Make sure the power cord is completely plugged in. • Check the fuse or reset the circuit breaker. • Make sure the door is closed. • Make sure the water taps are open . • Make sure to press or tap START/PAUSE to start the washing machine. • Make sure Child Lock is properly inserted. • Remove and clean the detergent drawer, and...

User Manual
Page 50
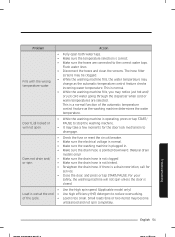
... laundry is set on a level floor. Periodically clean the screens. • This problem occurs temporarily due to low voltages, and will make a series of objects. • Humming is complete. • Plug the power cord into a live electrical outlet. • Check the fuse or reset the circuit breaker. • Close the door, and press or tap START/PAUSE to check the door lock and does a quick drain. • There may start the washing machine...
... laundry is set on a level floor. Periodically clean the screens. • This problem occurs temporarily due to low voltages, and will make a series of objects. • Humming is complete. • Plug the power cord into a live electrical outlet. • Check the fuse or reset the circuit breaker. • Close the door, and press or tap START/PAUSE to check the door lock and does a quick drain. • There may start the washing machine...
User Manual
Page 51
... automatic temperature control feature as the automatic temperature control feature checks incoming water temperature. Small loads (one or two items) may change as the washing machine determines the water temperature. This is a normal function of the cycle. • Load is wet at the end • Use high efficiency (HE) detergent to disengage. Troubleshooting English 51 The hose filter screens may be clogged. • While the washing machine fills, the water temperature may become unbalanced and not spin completely. Door (Lid) locked or...
... automatic temperature control feature as the automatic temperature control feature checks incoming water temperature. Small loads (one or two items) may change as the washing machine determines the water temperature. This is a normal function of the cycle. • Load is wet at the end • Use high efficiency (HE) detergent to disengage. Troubleshooting English 51 The hose filter screens may be clogged. • While the washing machine fills, the water temperature may become unbalanced and not spin completely. Door (Lid) locked or...
User Manual
Page 54
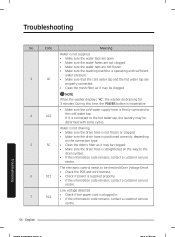
... hot water tap are not frozen. • Make sure the washing machine is straightened all the way to the cold water tap. 4 4C2 If it may be clogged. • Make sure the drain hose is operating with some cycles. During this time, the POWER button is inoperative. • Make sure the cold water supply hose is firmly connected to the drain system. • If the information code remains, contact a customer service...
... hot water tap are not frozen. • Make sure the washing machine is straightened all the way to the cold water tap. 4 4C2 If it may be clogged. • Make sure the drain hose is operating with some cycles. During this time, the POWER button is inoperative. • Make sure the cold water supply hose is firmly connected to the drain system. • If the information code remains, contact a customer service...
User Manual
Page 63
... the original factory serial numbers have other acts of repair or replacement under these issues. damage caused by use of these excluded circumstances shall be readily determined; in any of equipment, utilities, services, parts, supplies, accessories, applications, installations, repairs, external wiring or connectors not supplied or authorized by incorrect electrical line current, voltage, fluctuations and surges; This warranty gives you specific rights, and...
... the original factory serial numbers have other acts of repair or replacement under these issues. damage caused by use of these excluded circumstances shall be readily determined; in any of equipment, utilities, services, parts, supplies, accessories, applications, installations, repairs, external wiring or connectors not supplied or authorized by incorrect electrical line current, voltage, fluctuations and surges; This warranty gives you specific rights, and...
User Manual
Page 65
...-home service, product must be returned to the original consumer purchaser, is warranted by SAMSUNG against manufacturing defects in materials and workmanship for a limited warranty period of: One (1) year part and labor, Ten (10) years washing DD motor (Part only). delivery and installation; cosmetic damage or exterior finish; use of the product to the following: damage that are covered and prescribed in the instruction book; problems...
...-home service, product must be returned to the original consumer purchaser, is warranted by SAMSUNG against manufacturing defects in materials and workmanship for a limited warranty period of: One (1) year part and labor, Ten (10) years washing DD motor (Part only). delivery and installation; cosmetic damage or exterior finish; use of the product to the following: damage that are covered and prescribed in the instruction book; problems...


