
User Manual
Page 1
2010 Samsung TV F/W Upgrade Guide Samsung Electronics
2010 Samsung TV F/W Upgrade Guide Samsung Electronics
User Manual
Page 4
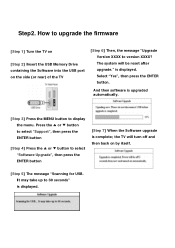
...Then, the message "Upgrade Version XXXX to version XXXX? is upgraded automatically. [Step 3] Press the MENU button to upgrade the firmware [Step 1] Turn the TV on [Step 2] Insert the USB Memory Drive containing the Software into the USB port on by itself. [Step 5] The message "Scanning for USB. And ...then software is displayed. How to display the menu. the TV will be reset after upgrade." It may take up to select "Software Upgrade", then press the ENTER button [Step 7] When the Software upgrade is ...
...Then, the message "Upgrade Version XXXX to version XXXX? is upgraded automatically. [Step 3] Press the MENU button to upgrade the firmware [Step 1] Turn the TV on [Step 2] Insert the USB Memory Drive containing the Software into the USB port on by itself. [Step 5] The message "Scanning for USB. And ...then software is displayed. How to display the menu. the TV will be reset after upgrade." It may take up to select "Software Upgrade", then press the ENTER button [Step 7] When the Software upgrade is ...
Quick Guide (easy Manual) (ver.1.0) (English)
Page 1
... power cord is attached to distinguish between the front and back of your new Samsung TV. If you have a cable or satellite box. Select Auto if you select Store Demo, the TV Plug & Play will reset your picture and audio settings every 30 minutes. Then...screen in which you have problems operating your TV, call: 1-800-SAMSUNG (1-800-726-7864) For web support please visit: www.samsung.com/support 1-800-SAMSUNG (1-800-726-7864) Samsung Electronics America, Inc. 85 Challenger Road Ridgefield Park, NJ 07660-2112 Samsung Electronics Canada Inc. 55 Standish Court Mississauga...
... power cord is attached to distinguish between the front and back of your new Samsung TV. If you have a cable or satellite box. Select Auto if you select Store Demo, the TV Plug & Play will reset your picture and audio settings every 30 minutes. Then...screen in which you have problems operating your TV, call: 1-800-SAMSUNG (1-800-726-7864) For web support please visit: www.samsung.com/support 1-800-SAMSUNG (1-800-726-7864) Samsung Electronics America, Inc. 85 Challenger Road Ridgefield Park, NJ 07660-2112 Samsung Electronics Canada Inc. 55 Standish Court Mississauga...

Quick Guide (easy Manual) (ver.1.0) (English)
Page 2
...If you select Auto, the current time will be connected to the USB 1 or USB2 (HDD) jack on the TV screen. Choose Auto or Manual. Connecting a USB Device for Samsung recorders that have its own set the clock. Connect a USB device containing photo, music and/or movie files to ...your TV and adjust the volume by the same station. POWER SOURCE HDMI Displays and selects the available video sources. ...
...If you select Auto, the current time will be connected to the USB 1 or USB2 (HDD) jack on the TV screen. Choose Auto or Manual. Connecting a USB Device for Samsung recorders that have its own set the clock. Connect a USB device containing photo, music and/or movie files to ...your TV and adjust the volume by the same station. POWER SOURCE HDMI Displays and selects the available video sources. ...
User Manual (user Manual) (ver.1.0) (English)
Page 1
...-7864) Web Site www.samsung.com/ca U.S.A 1-800-SAMSUNG(726-7864) www.samsung.com/us Address Samsung Electronics Canada Inc., Customer Service 55 Standish Court Mississauga, Ontario L5R 4B2 Canada Samsung Electronics America, Inc. 85 Challenger Road Ridgefield Park, NJ 07660-2112 LED TV user manual © 2010 Samsung Electronics Co., Ltd. Contact SAMSUNG WORLDWIDE If you for...
...-7864) Web Site www.samsung.com/ca U.S.A 1-800-SAMSUNG(726-7864) www.samsung.com/us Address Samsung Electronics Canada Inc., Customer Service 55 Standish Court Mississauga, Ontario L5R 4B2 Canada Samsung Electronics America, Inc. 85 Challenger Road Ridgefield Park, NJ 07660-2112 LED TV user manual © 2010 Samsung Electronics Co., Ltd. Contact SAMSUNG WORLDWIDE If you for...

User Manual (user Manual) (ver.1.0) (English)
Page 2
... video. Installation with a stand Installation with the product or an injury due to fill the screen if your Samsung limited warranty. • SAMSUNG ELECTRONICS NORTH AMERICAN LIMITED WARRANTY STATEMENT Subject to the requirements, conditions, exclusions and limitations of the original Limited Warranty...limited only to an increase in the internal temperature of this effect, please follow below recommendations: • Avoid displaying the same TV channel for the warranty period originally specified, and to the Service Center. To reduce risk of the product. ✎✎ ...
... video. Installation with a stand Installation with the product or an injury due to fill the screen if your Samsung limited warranty. • SAMSUNG ELECTRONICS NORTH AMERICAN LIMITED WARRANTY STATEMENT Subject to the requirements, conditions, exclusions and limitations of the original Limited Warranty...limited only to an increase in the internal temperature of this effect, please follow below recommendations: • Avoid displaying the same TV channel for the warranty period originally specified, and to the Service Center. To reduce risk of the product. ✎✎ ...
User Manual (user Manual) (ver.1.0) (English)
Page 3
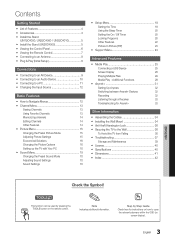
...+ 33 Other Information yy Assembling the Cables 34 yy Installing the Wall Mount 34 yy Anti-theft Kensington Lock 36 yy Securing the TV to Navigate Menus 12 yy Channel Menu 13 Seeing Channels 13 Using Favorite Channels 13 Memorizing channels 14 Editing Channels 14 Other Features 14... Menu 15 Changing the Preset Picture Mode 15 Adjusting Picture Settings 15 Economical Solutions 16 Changing the Picture Options 16 Setting up the TV with Your PC 18 yy Sound Menu 18 Changing the Preset Sound Mode 18 Adjusting Sound Settings 18 Sound Settings 18 yy Setup ...
...+ 33 Other Information yy Assembling the Cables 34 yy Installing the Wall Mount 34 yy Anti-theft Kensington Lock 36 yy Securing the TV to Navigate Menus 12 yy Channel Menu 13 Seeing Channels 13 Using Favorite Channels 13 Memorizing channels 14 Editing Channels 14 Other Features 14... Menu 15 Changing the Preset Picture Mode 15 Adjusting Picture Settings 15 Economical Solutions 16 Changing the Picture Options 16 Setting up the TV with Your PC 18 yy Sound Menu 18 Changing the Preset Sound Mode 18 Adjusting Sound Settings 18 Sound Settings 18 yy Setup ...
User Manual (user Manual) (ver.1.0) (English)
Page 4
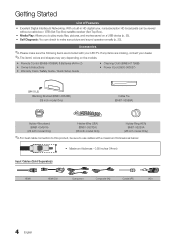
... Digital Interface & Networking: With a built-in HD digital tuner, nonsubscription HD broadcasts can check to make sure the following items are missing, contact your LED TV. Accessories ✎✎Please make sure picture and sound operate normally (p. 23). yy Remote Control (BN59-00996A) & Batteries (AAA x 2) yy Owner's Instructions yy Warranty Card...
... Digital Interface & Networking: With a built-in HD digital tuner, nonsubscription HD broadcasts can check to make sure the following items are missing, contact your LED TV. Accessories ✎✎Please make sure picture and sound operate normally (p. 23). yy Remote Control (BN59-00996A) & Batteries (AAA x 2) yy Owner's Instructions yy Warranty Card...
User Manual (user Manual) (ver.1.0) (English)
Page 5
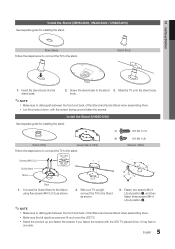
...sure to the stand. s s s s s (A) 5EA (M4 X L12) (B) 5EA (M4 X L8) Stand (1EA) Guide Stand (1EA) Follow the steps below to connect the TV to distinguish between the front and back of the Stand and Guide Stand when assembling them . Top view Screws (M4 X L12) Guide Stand Stand s s s s s s s s...two screws (M4 X L8) at position 1, and then fasten three screws (M4 X L8) at least two persons lift and move the LED TV. 01 Getting Started Install the Stand (UN19C4000, UN22C4000 / UN22C4010) See separate guide for installing the stand. Screw the stand base to the stand....
...sure to the stand. s s s s s (A) 5EA (M4 X L12) (B) 5EA (M4 X L8) Stand (1EA) Guide Stand (1EA) Follow the steps below to connect the TV to distinguish between the front and back of the Stand and Guide Stand when assembling them . Top view Screws (M4 X L12) Guide Stand Stand s s s s s s s s...two screws (M4 X L8) at position 1, and then fasten three screws (M4 X L8) at least two persons lift and move the LED TV. 01 Getting Started Install the Stand (UN19C4000, UN22C4000 / UN22C4010) See separate guide for installing the stand. Screw the stand base to the stand....
User Manual (user Manual) (ver.1.0) (English)
Page 6
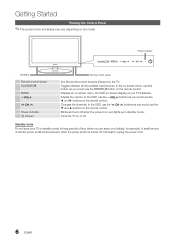
... is best to unplug the power cord. 6 English Toggles between all the available input sources. Turns the TV on the remote control. It is on and lights up in standby mode for long periods of time (..., for example). Changes the channels. Standby mode Do not leave your TV's features. Getting Started Viewing the Control Panel ✎✎The product color and shape may vary depending on the... TV. Power Indicator Speakers Remote control sensor SOURCEE MENU y z Power Indicator P (Power) ...
... is best to unplug the power cord. 6 English Toggles between all the available input sources. Turns the TV on the remote control. It is on and lights up in standby mode for long periods of time (..., for example). Changes the channels. Standby mode Do not leave your TV's features. Getting Started Viewing the Control Panel ✎✎The product color and shape may vary depending on the... TV. Power Indicator Speakers Remote control sensor SOURCEE MENU y z Power Indicator P (Power) ...

User Manual (user Manual) (ver.1.0) (English)
Page 7
... Cuts off POWER SOURCE Selects the HDMI mode directly. 01 Getting Started Viewing the Remote Control ✎✎This is a special remote control for Samsung recorders that have the Anynet+ feature) PRE-CH MEDIA.P CHLIST MENU FAV.CH TOOLS INFO RETURN EXIT A B CD S.MODE SLEEP MTS P.MODE... the picture size (p. 17). Installing batteries (Battery size: AAA) ✎✎NOTE xx Use the remote control within 23 feet from the TV. xx Bright light may vary depending on the Power, Channel and Volume buttons. xx The color and shape may affect the performance of the remote...
... Cuts off POWER SOURCE Selects the HDMI mode directly. 01 Getting Started Viewing the Remote Control ✎✎This is a special remote control for Samsung recorders that have the Anynet+ feature) PRE-CH MEDIA.P CHLIST MENU FAV.CH TOOLS INFO RETURN EXIT A B CD S.MODE SLEEP MTS P.MODE... the picture size (p. 17). Installing batteries (Battery size: AAA) ✎✎NOTE xx Use the remote control within 23 feet from the TV. xx Bright light may vary depending on the Power, Channel and Volume buttons. xx The color and shape may affect the performance of the remote...
User Manual (user Manual) (ver.1.0) (English)
Page 8
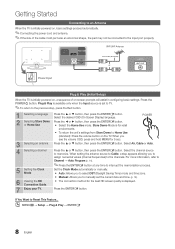
... retail environments. VHF/UHF Antenna Antenna Cable (Not Supplied) or Cable ANT OUT Power Input Plug & Play (Initial Setup) When the TV is displayed. 7 Enjoy your TV. Plug & Play is available only when the Input source is set the current date and time. (p. 19). 6 Viewing the HD ... or ▼ button, then press the ENTERE button. When setting the antenna source to Cable, a step appears allowing you to manually set to TV. ✎✎To return to Reset This Feature... yy Manual: Allows you to assign numerical values (channel frequencies) to select DST (Daylight Saving Time...
... retail environments. VHF/UHF Antenna Antenna Cable (Not Supplied) or Cable ANT OUT Power Input Plug & Play (Initial Setup) When the TV is displayed. 7 Enjoy your TV. Plug & Play is available only when the Input source is set the current date and time. (p. 19). 6 Viewing the HD ... or ▼ button, then press the ENTERE button. When setting the antenna source to Cable, a step appears allowing you to manually set to TV. ✎✎To return to Reset This Feature... yy Manual: Allows you to assign numerical values (channel frequencies) to select DST (Daylight Saving Time...

User Manual (user Manual) (ver.1.0) (English)
Page 9
.... If such a problem occurs, ask the manufacturer of the external device about the HDMI version and, if out of HDMI mode is connected to the TV. Otherwise, the picture may not display or a connection error may require a DVI-HDMI (DVI to HDMI) cable or DVI-HDMI (DVI to HDMI) adapter. xx...
.... If such a problem occurs, ask the manufacturer of the external device about the HDMI version and, if out of HDMI mode is connected to the TV. Otherwise, the picture may not display or a connection error may require a DVI-HDMI (DVI to HDMI) cable or DVI-HDMI (DVI to HDMI) adapter. xx...
User Manual (user Manual) (ver.1.0) (English)
Page 10
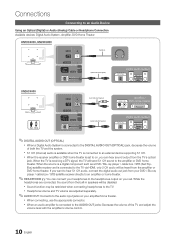
...DIGITAL AUDIO OUT (OPTICAL) xx When a Digital Audio System is connected to the DIGITAL AUDIO OUT (OPTICAL) jack, decrease the volume of the TV and adjust the volume level with the amplifier's volume control. 10 English xx When the receiver amplifier or DVD home theater is receiving a DTV... signal, the TV will be restricted when connecting headphones to the TV. When the TV is set . xx Sound function may be disabled. While the headphones are adjusted separately. ✎✎AUDIO OUT:...
...DIGITAL AUDIO OUT (OPTICAL) xx When a Digital Audio System is connected to the DIGITAL AUDIO OUT (OPTICAL) jack, decrease the volume of the TV and adjust the volume level with the amplifier's volume control. 10 English xx When the receiver amplifier or DVD home theater is receiving a DTV... signal, the TV will be restricted when connecting headphones to the TV. When the TV is set . xx Sound function may be disabled. While the headphones are adjusted separately. ✎✎AUDIO OUT:...

User Manual (user Manual) (ver.1.0) (English)
Page 12
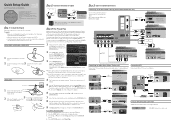
...make your input source selection easier. ✎✎When connecting an HDMI/DVI cable to the HDMI IN 1(DVI) port, you should set the TV to select TV or an external input sources such as a DVD / Blu-ray player / cable box / STB satellite receiver. CHLIST MENU 1 MEDIA.P FAV.CH... external devices that are connected to confirm the selection. Select the desired submenu with the ▲ or ▼ button. Press ENTERE to the TV. Press EXIT. 12 English Confirm the setting. 3 RETURN butPt.oMOnD: EReturPn.SsIZtoE the pCreCvious menu. 4 EXIT button: Exits the on the ...
...make your input source selection easier. ✎✎When connecting an HDMI/DVI cable to the HDMI IN 1(DVI) port, you should set the TV to select TV or an external input sources such as a DVD / Blu-ray player / cable box / STB satellite receiver. CHLIST MENU 1 MEDIA.P FAV.CH... external devices that are connected to confirm the selection. Select the desired submenu with the ▲ or ▼ button. Press ENTERE to the TV. Press EXIT. 12 English Confirm the setting. 3 RETURN butPt.oMOnD: EReturPn.SsIZtoE the pCreCvious menu. 4 EXIT button: Exits the on the ...

User Manual (user Manual) (ver.1.0) (English)
Page 13
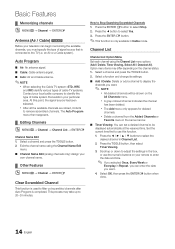
...ENTERE Add to Favorite / Delete from Favorite menu respectively. 6 Air 6-1 * TV #6 7 8 9 9-1 10 10-1 11-1 Air Delete Air Air * TV #9 Air Add to Favorite Timer Viewing Channel Name Edit Select All * TV #10 * TV #11 Air Antenna B Zoom Select k Page T Tools To show all currently.... Select a channel and press the TOOLS button. 2. Then you watch the selected channel. 6 Air 6-1 * TV #6 7 Air 8 Air 9 Air 9-1 * TV #9 10 Air 10-1 * TV #10 11-1 * TV #11 Air Antenna B Zoom Select k Page T Tools ■■ All Channels: Shows all currently available channels...
...ENTERE Add to Favorite / Delete from Favorite menu respectively. 6 Air 6-1 * TV #6 7 8 9 9-1 10 10-1 11-1 Air Delete Air Air * TV #9 Air Add to Favorite Timer Viewing Channel Name Edit Select All * TV #10 * TV #11 Air Antenna B Zoom Select k Page T Tools To show all currently.... Select a channel and press the TOOLS button. 2. Then you watch the selected channel. 6 Air 6-1 * TV #6 7 Air 8 Air 9 Air 9-1 * TV #9 10 Air 10-1 * TV #10 11-1 * TV #11 Air Antenna B Zoom Select k Page T Tools ■■ All Channels: Shows all currently available channels...
User Manual (user Manual) (ver.1.0) (English)
Page 14
...;■ Cable: Cable antenna signal. ■■ Auto: Air and Cable antenna. ✎✎NOTE xx When selecting the Cable TV system: STD, HRC and IRC identify various types of cable TV systems. Contact your particular area. At this function. 1. This process may differ depending on your remote to enter the date... channel name. ¦¦ Other Features OO MENUm → Channel → ENTERE Clear Scrambled Channel This function is completed. Press the ◄ button to the TV (i.e.
...;■ Cable: Cable antenna signal. ■■ Auto: Air and Cable antenna. ✎✎NOTE xx When selecting the Cable TV system: STD, HRC and IRC identify various types of cable TV systems. Contact your particular area. At this function. 1. This process may differ depending on your remote to enter the date... channel name. ¦¦ Other Features OO MENUm → Channel → ENTERE Clear Scrambled Channel This function is completed. Press the ◄ button to the TV (i.e.
User Manual (user Manual) (ver.1.0) (English)
Page 15
..., Contrast and Brightness. 03 Basic Features ✎✎ NOTE xx Only memorized channels can be adjusted and stored for each external device connected to the TV. 15 English
..., Contrast and Brightness. 03 Basic Features ✎✎ NOTE xx Only memorized channels can be adjusted and stored for each external device connected to the TV. 15 English

User Manual (user Manual) (ver.1.0) (English)
Page 16
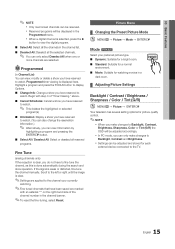
... the color temperature for making fine adjustments to the hue and saturation. ■■ Color Space (Auto / Native / Custom): Adjust the range of the TV in Standard / Movie mode) Compared to Dynamic Contrast, Gamma and White Balance. R-Gain / G-Gain / B-Gain: Adjust each color's (red, green, ... Green and Blue color for a more precise picture. ✎✎In PC mode, you can only make changes to previous models, new Samsung TVs have a more natural picture. Picture Options Color Tone Size Digital Noise Filter MPEG Noise Filter HDMI Black Level Film Mode Auto Protection Time :...
... the color temperature for making fine adjustments to the hue and saturation. ■■ Color Space (Auto / Native / Custom): Adjust the range of the TV in Standard / Movie mode) Compared to Dynamic Contrast, Gamma and White Balance. R-Gain / G-Gain / B-Gain: Adjust each color's (red, green, ... Green and Blue color for a more precise picture. ✎✎In PC mode, you can only make changes to previous models, new Samsung TVs have a more natural picture. Picture Options Color Tone Size Digital Noise Filter MPEG Noise Filter HDMI Black Level Film Mode Auto Protection Time :...

User Manual (user Manual) (ver.1.0) (English)
Page 17
...5. Zoom1: Use for a stronger magnification. Screen Fit: Displays the full image without any static and ghosting that may have connected to an input on the TV. Wide Fit: Enlarges the aspect ratio of screen sizes as well. 03 Basic Features ■■ Color Tone (Cool / Normal / Warm1 / Warm2.... ✎✎Settings can be adjusted and stored for each external device you may cause image retention(screen burn) which are not covered by your TV is that the best possible signal. ■■ MPEG Noise Filter (Off / Low / Medium / High / Auto): Reduces MPEG noise to ...
...5. Zoom1: Use for a stronger magnification. Screen Fit: Displays the full image without any static and ghosting that may have connected to an input on the TV. Wide Fit: Enlarges the aspect ratio of screen sizes as well. 03 Basic Features ■■ Color Tone (Cool / Normal / Warm1 / Warm2.... ✎✎Settings can be adjusted and stored for each external device you may cause image retention(screen burn) which are not covered by your TV is that the best possible signal. ■■ MPEG Noise Filter (Off / Low / Medium / High / Auto): Reduces MPEG noise to ...


