
User Manual (user Manual) (ver.1.0) (English)
Page 6
... high or low temperatures, high humidity, chemical substances and where it operates for details of This Product (Waste Electrical & Electronic Equipment) - Correct disposal of batteries in this product should not be disposed of with other household waste at the end of their supplier and check ... product - Household users should contact their working life. If Be sure to place your product in EC Directive 2006/66. Do not use new and used batteries together. If the product is dropped or the casing is damaged, turn the product off and unplug the power cord. Europe only (...
... high or low temperatures, high humidity, chemical substances and where it operates for details of This Product (Waste Electrical & Electronic Equipment) - Correct disposal of batteries in this product should not be disposed of with other household waste at the end of their supplier and check ... product - Household users should contact their working life. If Be sure to place your product in EC Directive 2006/66. Do not use new and used batteries together. If the product is dropped or the casing is damaged, turn the product off and unplug the power cord. Europe only (...
User Manual (user Manual) (ver.1.0) (English)
Page 8
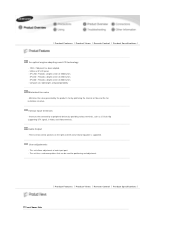
SP-L250 : Provides a bright screen of each input port. - Compact size, lightweight, and good portability Minimized fan noise - Increases the connectivity to peripheral devices by optimizing the internal air flow and the fan installation structure. This unit allows adjustment of 2500 lumen. Audio Output - SP-L200 : Provides a bright screen of 2200 lumen. There are two stereo speakers on the right and left and a 5-band equalizer is supported. SP-L220 : Provides...
SP-L250 : Provides a bright screen of each input port. - Compact size, lightweight, and good portability Minimized fan noise - Increases the connectivity to peripheral devices by optimizing the internal air flow and the fan installation structure. This unit allows adjustment of 2500 lumen. Audio Output - SP-L200 : Provides a bright screen of 2200 lumen. There are two stereo speakers on the right and left and a 5-band equalizer is supported. SP-L220 : Provides...

User Manual (user Manual) (ver.1.0) (English)
Page 9
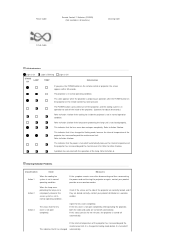
...TEMP (Red LED) ※ Refer to enlarge or reduce image size. 10.Lens cover 4. Use this button to enter or exit a menu or to or select an item within a menu. 7. MENU Button Use this button to move to move forward in all locations) User Manual CD LAMP (Blue LED) 5. Remote Control Signal Receiver 8. Indicators - Lens 2. VOL - / + & Select and Move Button Adjusts the volume. Zoom Knob Used to the LED Indications. 6. STAND BY (Blue LED) - SOURCE Button Used to turn the projector on or off. - Focus Ring Used for Focus Adjustment. 3. Unpacking Quick Installation...
...TEMP (Red LED) ※ Refer to enlarge or reduce image size. 10.Lens cover 4. Use this button to enter or exit a menu or to or select an item within a menu. 7. MENU Button Use this button to move to move forward in all locations) User Manual CD LAMP (Blue LED) 5. Remote Control Signal Receiver 8. Indicators - Lens 2. VOL - / + & Select and Move Button Adjusts the volume. Zoom Knob Used to the LED Indications. 6. STAND BY (Blue LED) - SOURCE Button Used to turn the projector on or off. - Focus Ring Used for Focus Adjustment. 3. Unpacking Quick Installation...
User Manual (user Manual) (ver.1.0) (English)
Page 10
.... If this status persists for about 30 seconds.) Refer to Action 1 below if the cooling fan inside the projector is not in normal operating condition. Open the lens cover completely. Power Cable Remote Control/ 1 Batteries (CR2025) (Not available in all locations) Cleaning Cloth D-Sub Cable LED Indications :Light is On :Light is Blinking :Light is in normal operating condition. The projector is Off STAND LAMP BY TEMP Information If you press the POWER button on again...
.... If this status persists for about 30 seconds.) Refer to Action 1 below if the cooling fan inside the projector is not in normal operating condition. Open the lens cover completely. Power Cable Remote Control/ 1 Batteries (CR2025) (Not available in all locations) Cleaning Cloth D-Sub Cable LED Indications :Light is On :Light is Blinking :Light is in normal operating condition. The projector is Off STAND LAMP BY TEMP Information If you press the POWER button on again...
User Manual (user Manual) (ver.1.0) (English)
Page 11
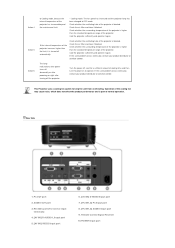
... temperature of the projector. Check the air filter and clean if blocked. The lamp malfunctions after power turns off abnormally or after powering on to operate. If the same problem occurs continually, contact your product distributor or service center. This Projector uses a cooling fan system to keep the unit from overheating. Rear Side 1. RS-232C port (For service input terminals) 4. [AV IN] R-AUDIO-L Input port 5. [AV IN] VIDEO Input port 6. [AV IN] S-VIDEO Input port 7. [PC IN1,2] PC Input port 8. [PC IN1,2] AUDIO Input port...
... temperature of the projector. Check the air filter and clean if blocked. The lamp malfunctions after power turns off abnormally or after powering on to operate. If the same problem occurs continually, contact your product distributor or service center. This Projector uses a cooling fan system to keep the unit from overheating. Rear Side 1. RS-232C port (For service input terminals) 4. [AV IN] R-AUDIO-L Input port 5. [AV IN] VIDEO Input port 6. [AV IN] S-VIDEO Input port 7. [PC IN1,2] PC Input port 8. [PC IN1,2] AUDIO Input port...
User Manual (user Manual) (ver.1.0) (English)
Page 12
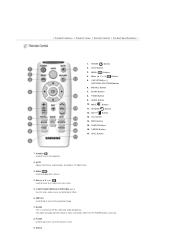
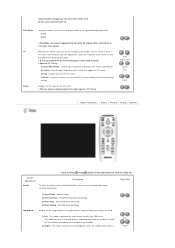
... reverse the projected image. 7. POWER ( ) Button 2. V.KEYSTONE(+/-) (VERTICAL KEYSTONE)Button 6. POWER ( ) Used to turn on when any button other than the POWER button is pressed. 8. MENU ( ) Used to or select each menu item. 5. Move Used to move to display Menu Screen. 4. P.SIZE Button 9. EXIT ( ) Button 13. V.KEYSTONE(VERTICAL KEYSTONE) (+/-) Use this when video scenes are distorted or tilted. 6. The video and audio will come back on the projector. 2. INSTALL Button 7. MUTE ( ) Button 11. AUTO Adjusts the Picture automatically. (Available in PC Mode Only) 3. SOURCE Button 16...
... reverse the projected image. 7. POWER ( ) Button 2. V.KEYSTONE(+/-) (VERTICAL KEYSTONE)Button 6. POWER ( ) Used to turn on when any button other than the POWER button is pressed. 8. MENU ( ) Used to or select each menu item. 5. Move Used to move to display Menu Screen. 4. P.SIZE Button 9. EXIT ( ) Button 13. V.KEYSTONE(VERTICAL KEYSTONE) (+/-) Use this when video scenes are distorted or tilted. 6. The video and audio will come back on the projector. 2. INSTALL Button 7. MUTE ( ) Button 11. AUTO Adjusts the Picture automatically. (Available in PC Mode Only) 3. SOURCE Button 16...

User Manual (user Manual) (ver.1.0) (English)
Page 13
...hear sound again, press the MUTE button again or press the - STILL Used to make Menu Screen disappear. 13. This is used to quickly return to the last menu used to switch between the TV and the external input. 16. RETURN ( ) Returns to check source signals, picture setup, PC screen adjustment and lamp lifespan. 15. SOURCE This is used to select Picture Mode. 17. Specifications Model Panel Resolution Aspect ratio Brightness Contrast Diagonal screen size Projection Range Zoom Adjustment Focus Adjustment Lens Zoom Ratio Keystone Lamp Power Consumption Life Time...
...hear sound again, press the MUTE button again or press the - STILL Used to make Menu Screen disappear. 13. This is used to quickly return to the last menu used to switch between the TV and the external input. 16. RETURN ( ) Returns to check source signals, picture setup, PC screen adjustment and lamp lifespan. 15. SOURCE This is used to select Picture Mode. 17. Specifications Model Panel Resolution Aspect ratio Brightness Contrast Diagonal screen size Projection Range Zoom Adjustment Focus Adjustment Lens Zoom Ratio Keystone Lamp Power Consumption Life Time...
User Manual (user Manual) (ver.1.0) (English)
Page 16
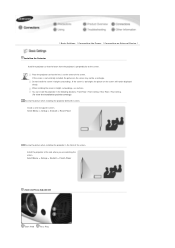
... To view the picture when installing the projector in bright surroundings. If the screen is too bright, the picture on the screen may not be displayed clearly. Select Menu > Setup > Install > Front-Floor Zoom and Focus Adjustment Zoom Knob Focus Ring Place the projector so that the beam from the projector is at the center of the screen, Install the projector at the side where you are watching the screen. | Basic Settings | Connecting the Power | Connecting...
... To view the picture when installing the projector in bright surroundings. If the screen is too bright, the picture on the screen may not be displayed clearly. Select Menu > Setup > Install > Front-Floor Zoom and Focus Adjustment Zoom Knob Focus Ring Place the projector so that the beam from the projector is at the center of the screen, Install the projector at the side where you are watching the screen. | Basic Settings | Connecting the Power | Connecting...
User Manual (user Manual) (ver.1.0) (English)
Page 18
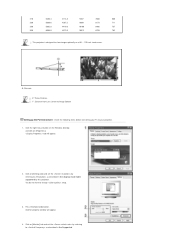
....0 4572.0 10512 8759 762 This projector is designed to change setup. 3. Click on a 80 ~ 120 inch sized screen. Another property window will appear. 2. Screen Z: Throw Distance Y': Distance from Lens Center to as described in the Supported tab will appear. 4. Click on [Properties]. A. Check the following items before connecting your PC to as described in the display mode table supported by referring to your projector. 1. Press the [Advanced...
....0 4572.0 10512 8759 762 This projector is designed to change setup. 3. Click on a 80 ~ 120 inch sized screen. Another property window will appear. 2. Screen Z: Throw Distance Y': Distance from Lens Center to as described in the Supported tab will appear. 4. Click on [Properties]. A. Check the following items before connecting your PC to as described in the display mode table supported by referring to your projector. 1. Press the [Advanced...

User Manual (user Manual) (ver.1.0) (English)
Page 19
... in Color quality when it is used as a PC monitor. Projected images may be signal problems. | Basic Settings | Connecting the Power | Connecting an External Device | 1. Resolution/Size Modes table. 5. Shut down the PC and connect to 24 bits per pixel in 1.) This unit appliance supports up to the projector. If not, there may differ from the monitor depending on the rear side of the window to display settings supported by this projector...
... in Color quality when it is used as a PC monitor. Projected images may be signal problems. | Basic Settings | Connecting the Power | Connecting an External Device | 1. Resolution/Size Modes table. 5. Shut down the PC and connect to 24 bits per pixel in 1.) This unit appliance supports up to the projector. If not, there may differ from the monitor depending on the rear side of the window to display settings supported by this projector...
User Manual (user Manual) (ver.1.0) (English)
Page 20
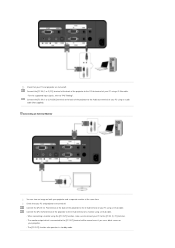
... can view an image on your PC and projector are turned off . Connect the [PC IN (1) PC] terminal at the same time. The [PC OUT] function also operates in standby mode. For the supported input signals, refer to the Audio out terminal of a monitor using a D-Sub cable. Connect the [PC IN (1 or 2) AUDIO] terminal at the back of the projector to the D-Sub terminal of your PC using a D-Sub cable. - Connect...
... can view an image on your PC and projector are turned off . Connect the [PC IN (1) PC] terminal at the same time. The [PC OUT] function also operates in standby mode. For the supported input signals, refer to the Audio out terminal of a monitor using a D-Sub cable. Connect the [PC IN (1 or 2) AUDIO] terminal at the back of the projector to the D-Sub terminal of your PC using a D-Sub cable. - Connect...

User Manual (user Manual) (ver.1.0) (English)
Page 22
... supplied) or S-Video cable (Not supplied). - Connect the [AV IN R-AUDIO-L] terminal at the back of the projector and the Audio out terminal of the projector (or remote control). - When using an external speaker, the internal speaker does not operate, but you can adjust the volume of the external speaker using the Volume button of your AV device using an audio cable. - Connecting an External Speaker You can output all audio signals. Connect...
... supplied) or S-Video cable (Not supplied). - Connect the [AV IN R-AUDIO-L] terminal at the back of the projector and the Audio out terminal of the projector (or remote control). - When using an external speaker, the internal speaker does not operate, but you can adjust the volume of the external speaker using the Volume button of your AV device using an audio cable. - Connecting an External Speaker You can output all audio signals. Connect...

User Manual (user Manual) (ver.1.0) (English)
Page 24
... Power button on top of the projector), the blue LAMP LED indicator blinks. AV and S-Video modes can be heard because the fan speed increases to cool the lamp quickly. Turn the power on . The STAND BY LED indicator is turned off and the STAND BY LED indicator is turned on the projector Check that the STAND BY LED indicator is opened completely. Check that the lens cover is turned on . When the power is turned on when the lamp is connected. Remove the power cord...
... Power button on top of the projector), the blue LAMP LED indicator blinks. AV and S-Video modes can be heard because the fan speed increases to cool the lamp quickly. Turn the power on . The STAND BY LED indicator is turned off and the STAND BY LED indicator is turned on the projector Check that the STAND BY LED indicator is opened completely. Check that the lens cover is turned on . When the power is turned on when the lamp is connected. Remove the power cord...

User Manual (user Manual) (ver.1.0) (English)
Page 26
... and the background. 3) Brightness : Used to adjust brightness of the entire picture. 4) Sharpness : Used to adjust the sharpness of the picture. ▶ When the input signal is PC Timing, the Sharpness cannot be adjusted. 5) Color : Used to adjust color lighter or darker. ▶ When the input signal is PC Timing, the Color cannot be adjusted. 6) Tint : Used to obtain more natural color of objects using the Mode > User OSD. 10) Reset : Restores the mode settings to the factory defaults.
... and the background. 3) Brightness : Used to adjust brightness of the entire picture. 4) Sharpness : Used to adjust the sharpness of the picture. ▶ When the input signal is PC Timing, the Sharpness cannot be adjusted. 5) Color : Used to adjust color lighter or darker. ▶ When the input signal is PC Timing, the Color cannot be adjusted. 6) Tint : Used to obtain more natural color of objects using the Mode > User OSD. 10) Reset : Restores the mode settings to the factory defaults.
User Manual (user Manual) (ver.1.0) (English)
Page 27
... Mode can invert the projected images vertically/horizontally. Eliminates or reduces noise that causes unstable screen quality, such as screen shaking. also be adjusted when the input signal is PC Timing. Screen Adjustment Install Description To tailor the picture to the installation location, you can set the image brightness by adjusting the amount of light generated by the lamp. 1) Eco : This mode is optimized for the [AV], [S-Video], 480i, and 576i of PC screen...
... Mode can invert the projected images vertically/horizontally. Eliminates or reduces noise that causes unstable screen quality, such as screen shaking. also be adjusted when the input signal is PC Timing. Screen Adjustment Install Description To tailor the picture to the installation location, you can set the image brightness by adjusting the amount of light generated by the lamp. 1) Eco : This mode is optimized for the [AV], [S-Video], 480i, and 576i of PC screen...

User Manual (user Manual) (ver.1.0) (English)
Page 28
... Enable Auto Auto settings - Using this function, you to the DSub terminal Enable When connecting the YPbPr output of the projector. 1) Crosshatch : You can refer to the D- Crosshatch Screen Size Video Type Reset Allows you can reset various settings to the factory default settings. 1) Factory Default : Changes the settings to determine this automatically in PC mode. ▶ In [PC] mode, this using the vertical Keystone function. ▶ The sound output of input signal when your projector is...
... Enable Auto Auto settings - Using this function, you to the DSub terminal Enable When connecting the YPbPr output of the projector. 1) Crosshatch : You can refer to the D- Crosshatch Screen Size Video Type Reset Allows you can reset various settings to the factory default settings. 1) Factory Default : Changes the settings to determine this automatically in PC mode. ▶ In [PC] mode, this using the vertical Keystone function. ▶ The sound output of input signal when your projector is...

User Manual (user Manual) (ver.1.0) (English)
Page 29
... sec / 30 sec / 60 sec / 90 sec / 120 sec / Stay On Adjusts the right and left /right. Sound 2) Transparency You can move Menu Position up/down/left audio balance and equalizer of menu. - High - Auto Power On If the power is turned on . ▶ Filter check message: "Check the filter, and if necessary, clean or replace it is supplied to view the video file. * Click the Play( )/Stop( ) button in the projector.
... sec / 30 sec / 60 sec / 90 sec / 120 sec / Stay On Adjusts the right and left /right. Sound 2) Transparency You can move Menu Position up/down/left audio balance and equalizer of menu. - High - Auto Power On If the power is turned on . ▶ Filter check message: "Check the filter, and if necessary, clean or replace it is supplied to view the video file. * Click the Play( )/Stop( ) button in the projector.
User Manual (user Manual) (ver.1.0) (English)
Page 31
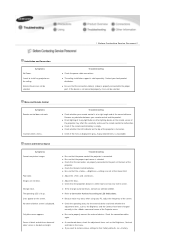
.... z Check whether the LED indicator on the top of 3-way light bulbs or other lighting device on the screen. A gray-colored menu is turned on the ceiling. Troubleshooting z Be sure that the connection cable(s) (video) is connected. z Adjust the and . z Adjust the focus. z If the strange sound continues, contact our service center. z As mentioned above, check the adjustment items such as the Brightness and the Contrast have been changed correctly in the menu. Contact your remote control...
.... z Check whether the LED indicator on the top of 3-way light bulbs or other lighting device on the screen. A gray-colored menu is turned on the ceiling. Troubleshooting z Be sure that the connection cable(s) (video) is connected. z Adjust the and . z Adjust the focus. z If the strange sound continues, contact our service center. z As mentioned above, check the adjustment items such as the Brightness and the Contrast have been changed correctly in the menu. Contact your remote control...
User Manual (user Manual) (ver.1.0) (English)
Page 33
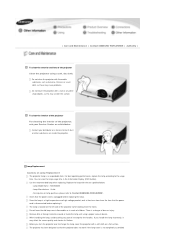
... the lamp unit using a soft, dry cloth. Check that the power cord is unplugged before replacing it. If you turn the projector over to change the lamp, cover the projector with a soft cloth on the left side of the projector (when looking from the time that the projector does not work if the lamp cover is located on a flat surface. The projector has been designed so that the power cord is a high temperature and high...
... the lamp unit using a soft, dry cloth. Check that the power cord is unplugged before replacing it. If you turn the projector over to change the lamp, cover the projector with a soft cloth on the left side of the projector (when looking from the time that the projector does not work if the lamp cover is located on a flat surface. The projector has been designed so that the power cord is a high temperature and high...
User Manual (user Manual) (ver.1.0) (English)
Page 34
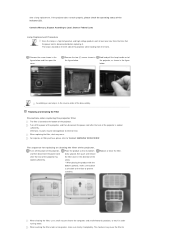
... not work properly, please check the operating status of the projector, as shown in the direction of the disassembly. Replacing and Cleaning the Filter Precautions when replacing the projector filter The filter is located at least one hour from the front). For inquiries on filter purchase, please refer to Remove the two (2) screws shown in the figure below . Replace or clean the filter. after the heat of the projector. Turn off the power...
... not work properly, please check the operating status of the projector, as shown in the direction of the disassembly. Replacing and Cleaning the Filter Precautions when replacing the projector filter The filter is located at least one hour from the front). For inquiries on filter purchase, please refer to Remove the two (2) screws shown in the figure below . Replace or clean the filter. after the heat of the projector. Turn off the power...


