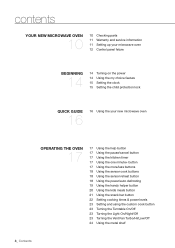
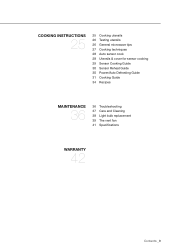
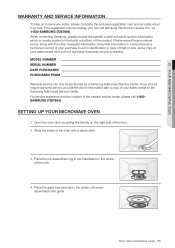
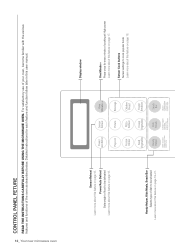
User Manual (user Manual) (ver.1.0) (English)
Page 1
To receive a more complete service, please register your product at www.samsung.com/global/register SMH7185 Microwave Oven user manual imagine the possibilities Thank you for purchasing a Samsung product.
User Manual (user Manual) (ver.1.0) (English)
Page 3
... result in minor personal injury or property damage. Unplug the power plug from the wall socket. Note Precautions to avoid possible exporsure to exessive microwave energy: Do not attempt to operate this manual maen: WARNING: Hazards or unsafe practices that may result in severe personal injury or death. ... safety infomation what the icons and signs in this oven with the safety interlocks. Do not attempt or use. It is no damage to microwave energy. Make sure the machine is damaged. SAVE THESE INSTRUCTIONS Safety information _ Do not place any object between the oven front face and ...
User Manual (user Manual) (ver.1.0) (English)
Page 4
...the oven. Keep the inside . Remove lids from heated surfaces. TO REDUCE RISK OF BURNS, ELECTRIC SHOCK, FIRE, PERSONAL INJURY OR EXPOSURE TO EXCESSIVE MICROWAVE ENERGY: Read all safety instructions before heating. See "IMPORTANT GROUNDING INSTRUCTIONS" on page 7 of the oven clean. Do not use as described in ... or laboratory use only mild, nonabrasive soaps or detergents applied with any electrical appliance, basic safety precautions should be repaired, call 1-800-SAMSUNG (7267864) for the name of oven is not designed for use over both gas and electric cooking equipment.
User Manual (user Manual) (ver.1.0) (English)
Page 5
... INSTRUCTIONS Safety information _ Visible bubbling or boiling when the container is removed from hands and face. Carefully remove container coverings, directing steam away from the microwave oven is in this appliance. for examination, repair, or adjustment. Handle with care. Do not store this appliance if it has a damaged cord or plug...
User Manual (user Manual) (ver.1.0) (English)
Page 6
... SAFETY INSTRUCTIONS, continued TO REDUCE THE RISK OF FIRE IN THE OVEN: Remove wire twist-ties from plastic cooking bags before placing bags in the microwave oven for storage purposes. Do not overcook food. Do not use . Watch appliance carefully if paper, plastic, or other utensil into the container. If the...
User Manual (user Manual) (ver.1.0) (English)
Page 7
...60 Hz. If the power cord is equipped with a cord that includes a grounding wire and a grounding plug. Never leave surface units beneath your microwave oven unattended at high heat settings. Boilovers cause smoking and greasy spillovers that is in a risk of a grease fire on the surface units below ...the microwave oven, smother a flaming pan on the surface unit by providing an escape wire for the electrical current. Plug the three-prong power cord...
User Manual (user Manual) (ver.1.0) (English)
Page 8
contents your new microwave oven 10 10 Checking parts 11 Warranty and service information 11 Setting up your microwave oven 12 Control panel feture beginning 14 14 Turning on the power 14 Using the my choice feature 15 Setting the clock 15 Setting the ...child protection lock quick guide 16 16 Using the your new microwave oven operating the oven 17 17 Using the help button 17 Using the pause/cancel button 17 Using the kitchen timer 17 Using the one...
User Manual (user Manual) (ver.1.0) (English)
Page 9
cooking instructions 25 25 Cooking utensils 26 Testing utensils 26 General microwave tips 27 Cooking techniques 28 Auto sensor cook 28 Utensils & cover for sensor cooking 29 Sensor Cooking Guide 30 Sensor Reheat Guide 30 Power/Auto Defrosting Guide 31 Cooking Guide 34 Recipes maintenance 36 36 Troubleshooting 37 Care and Cleaning 38 Light bulb replacement 39 The vent fan 41 Specifications warranty 42 Contents _
User Manual (user Manual) (ver.1.0) (English)
Page 10
Microwave oven Shelf Glass Tray Roller Guide Ring Charcoal filter Grease Filters (2ea) Exhaust adaptor Hardware-kit Manuals (User & Installations) Templates (Top & Wall) Registration Card 10_ Your new microwave oven your new microwave oven Checking parts Unpack your dealer. If any part is missing or broken, call your microwave oven and check to make sure that you have all the parts shown here.
User Manual (user Manual) (ver.1.0) (English)
Page 11
If you should require warranty service, provide the above information with a copy of your microwave oven 1. Place the pre-assembled ring in the indentation in the center of the nearest service center, please call Samsung Electronics Canada, Inc., at 1-800-SAMSUNG (7267864). Please record these numbers below, along with a damp cloth. 3. For service assistance...
User Manual (user Manual) (ver.1.0) (English)
Page 12
... about this feature on page 17. Power/Auto Defrost Sets weight of the oven as described below. 12_ Your new microwave oven Control panel feture READ THE INSTRUCTIONS CAREFULLY BEFORE USING THE MICROWAVE OVEN. For satisfactory use of your oven, become familiar with the various features and functions of food to be...
User Manual (user Manual) (ver.1.0) (English)
Page 13
.... Turntable On/Off Learn more about this feature on page 23. Clock Sets current time Learn more about this feature on page 15. Your new microwave oven _13 More, Less Increase or decrease cooking time Learn more about this feature on page 17. Custom Cook Learn more about these features on...
User Manual (user Manual) (ver.1.0) (English)
Page 14
... time you plug the power cord into an outlet, or after there has been an interruption in power, the display shows after plugging in your microwave and then press number 1 button. The display will show : ENGLISH PRESS START 4. Press MY CHOICE button and then press the number 2 button. The... time can choose between pounds(LBS) and kilograms(KG). 1. Press MY CHOICE button. Using the my choice feature Your new microwave oven can be advanced one hour for dst without resetting the clock. Simply press MY CHOICE to suit your personal tastes. The display shows: LBS...
User Manual (user Manual) (ver.1.0) (English)
Page 15
...00, enter 5,0,0. Press the MY CHOICE button and the number 5 button at least three numbers to set for standard time, this point, the microwave oven cannot be used by pressing the Clock button. The display returns to the time of day will need to reset the clock. To unlock... Sunday of the United States at 2 a.m. For example, if the current time is set the clock. Setting the child protection lock You can lock your microwave oven so it , repeat steps 1-2 above . The display will show: 500 4. Press the START button. The display will show : SELECT AM/PM 2....
User Manual (user Manual) (ver.1.0) (English)
Page 16
... 1. Press the ONE MINUTE + button once for more informations Set cooking time and power levels 1. Press SENSOR REHEAT button. 2. quick guide Using the your new microwave oven One minute cooking 1. Press START to reheat. 2. The display will show REHEAT and the oven will start automatically. • See page 18 for more...
User Manual (user Manual) (ver.1.0) (English)
Page 17
... to set cooking times. The time will display, and the oven starts automatically. 2. 04 OPERATING THE OVEN operating the oven Using the help button Your microwave offers helpful instructions for two minutes. The display counts down and beeps when the time has elapsed. 4. Using the one minute+ button This button offers...
User Manual (user Manual) (ver.1.0) (English)
Page 18
... time for various types and amounts of precooked food. Using the power/auto defrosting To thaw frozen food, set the weight of your new microwave. Open the oven door, and turn the food over . 4. See "Power/auto defrosting guide" on page 30 for example). See "... Plate of food and casserole should be stored at least five minutes between each bag to adjust the cooking time, you have set your microwave oven will begin cooking automatically. • When cooking popcorn, wait at refrigerator temperature. The Power Defrost function will start automatically. •...
User Manual (user Manual) (ver.1.0) (English)
Page 19
... Soften cream cheese Melt butter AMOUNT 1 cup chips or 1 square 8-oz package 1 stick 2 sticks REMARKS Place chocolate chips or square in a microwave-safe container. Unwrap cream cheese and place on microwave-safe container. 04 OPERATING THE OVEN Using the handy helper button 1. The display shows: MELT CHOCOLATE 1CUP CHIPS. • Press the...
User Manual (user Manual) (ver.1.0) (English)
Page 20
... and arrange nuggets in crisping sleeve) 9-oz package size 1 sandwich 2 sandwiches REMARKS Put a paper towel on top of food. Prick hot dogs and place on microwave-safe plate. Let stand 1 minute after heating. NOTE: Refer to the kids meals chart.) 2. Remove from "crisping sleeve". NOTE: For larger size sandwiches, use the...) 1 serving 2 servings Frozen sandwiches (in spoke fashion. Do not cover. NOTE: Refer to increase the heating time. 20_ Operating the oven Arrange french fries on microwave-safe plate. After cooking, plot with sandwich.
User Manual (user Manual) (ver.1.0) (English)
Page 22
... NEXT STAGE COOKING TIME 4. If you want the power set at any other than one second to three different stages of cooking, each with your microwave. The display shows: PRESS START OR ENTER NEXT STAGE COOKING TIME. POWER LEVEL 1 Warm 6 Simmer 2 Low 7 Medium high 3 Deforst 8 Reheat 4 Medium low 9 Saute 5 ...you have set it using the POWER LEVEL button. 1. You can set the power level at High. Setting cooking times & power levels Your microwave allows you to set multiple stages of cooking with its own time length and power level. You can set up to 99 minutes, 99 ...