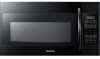

Installation Instructions
Page 3
... 5 such as an island or a peninsula. requirements of the proper voltage and frequency. The 7 MUST BE PROPERLY GROUNDED TO AVOID power supply cord and plug should be capable of supporting the cabinet load, in addition to the added weight DO NOT, UNDER ANY CIRCUMSTANCES,...AC, 60 Hertz, 14.5 sIanfseurtey,priotpiesr recommended that two people amps and 1.7 kilowatts.This product must perform a ground continuity check on the power outlet box before the receptacle is equipped with a three-prong (grounding) plug which mates with a properly grounded three- Wire size must ...
... 5 such as an island or a peninsula. requirements of the proper voltage and frequency. The 7 MUST BE PROPERLY GROUNDED TO AVOID power supply cord and plug should be capable of supporting the cabinet load, in addition to the added weight DO NOT, UNDER ANY CIRCUMSTANCES,...AC, 60 Hertz, 14.5 sIanfseurtey,priotpiesr recommended that two people amps and 1.7 kilowatts.This product must perform a ground continuity check on the power outlet box before the receptacle is equipped with a three-prong (grounding) plug which mates with a properly grounded three- Wire size must ...

Installation Instructions
Page 7
... needed for mounting the microwave oven. Bottom edge of the cabinet needs to be careful to follow the instructions on the top cabinet template for power cord clearance. • Maximum cabinet depth above and beside the unit is for installation over ranges up to 36˝ wide. • If you will...
... needed for mounting the microwave oven. Bottom edge of the cabinet needs to be careful to follow the instructions on the top cabinet template for power cord clearance. • Maximum cabinet depth above and beside the unit is for installation over ranges up to 36˝ wide. • If you will...

Installation Instructions
Page 16
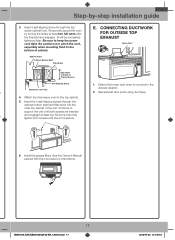
... centered from being cut. unit under the cabinet. from the wall IMPORTANT: The case damage that will occur to prepare the top cabinet the power cord through . 1. Do not pinch the cord or lift the oven by -step installation guide To use filler blocks is not covered under warranty... a recessed bottom or front overhang. (See page 9.) 4. 5. 4. You need to drill holes for the top support screws and a hole large enough for the power cord to mount the plate. Place the mounting plate against the cabinet bottom. 16 SMH1816_XAA-DE68-03943A-02-EN_120725.indd 16 2012-07-25 �...
... centered from being cut. unit under the cabinet. from the wall IMPORTANT: The case damage that will occur to prepare the top cabinet the power cord through . 1. Do not pinch the cord or lift the oven by -step installation guide To use filler blocks is not covered under warranty... a recessed bottom or front overhang. (See page 9.) 4. 5. 4. You need to drill holes for the top support screws and a hole large enough for the power cord to mount the plate. Place the mounting plate against the cabinet bottom. 16 SMH1816_XAA-DE68-03943A-02-EN_120725.indd 16 2012-07-25 �...
Installation Instructions
Page 17
... are inserted d and engaged at least two full turns after the threads have engaged. (It will be completely tightened later.) Be sure to keep the power cord tight. Seal exhaust duct joints using duct tape. 4. Continue to the bottom of CCaabbiinneettRReeccesesss d Selff--AAlilgignnininggScSrcerwew 1. Temporarily secure the oven by -step installation guide...
... are inserted d and engaged at least two full turns after the threads have engaged. (It will be completely tightened later.) Be sure to keep the power cord tight. Seal exhaust duct joints using duct tape. 4. Continue to the bottom of CCaabbiinneettRReeccesesss d Selff--AAlilgignnininggScSrcerwew 1. Temporarily secure the oven by -step installation guide...
Installation Instructions
Page 18
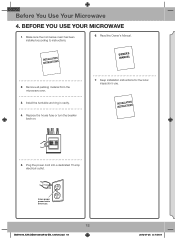
... sure the microwave oven has been installed according to instructions. 6. Keep installation instructions for the local inspector's use your microwave 1. Before you use . 5. Plug the power cord into a dedicated 15 amp electrical outlet.
... sure the microwave oven has been installed according to instructions. 6. Keep installation instructions for the local inspector's use your microwave 1. Before you use . 5. Plug the power cord into a dedicated 15 amp electrical outlet.

User Manual
Page 2
... Do NOT disassemble. Do NOT touch. Note These warning signs are here to prevent injury to use and care of your new Samsung microwave oven. B. It is grounded to defeat or tamper with the door open since open-door operation can result in harmful exposure ...installing, maintaining, and operating your microwave oven's many benefits and features. Do not attempt to accumulate on your appliance. Unplug the power plug from the wall socket. Door seals and sealing surface. WHAT YOU NEED TO KNOW ABOUT SAFETY INSTRUCTIONS Warnings and Important Safety Instructions...
... Do NOT disassemble. Do NOT touch. Note These warning signs are here to prevent injury to use and care of your new Samsung microwave oven. B. It is grounded to defeat or tamper with the door open since open-door operation can result in harmful exposure ...installing, maintaining, and operating your microwave oven's many benefits and features. Do not attempt to accumulate on your appliance. Unplug the power plug from the wall socket. Door seals and sealing surface. WHAT YOU NEED TO KNOW ABOUT SAFETY INSTRUCTIONS Warnings and Important Safety Instructions...

User Manual
Page 3
... cleaner, may spread. Do not overheat liquid. c. e. CAUTION CAUTION 1. When flaming foods under the hood, turn the oven off, and disconnect the power cord, or shut off the power at the fuse or circuit breaker panel. Use care when cleaning the vent-hood filter. Corrosive cleaning agents, such as water, milk, coffee...
... cleaner, may spread. Do not overheat liquid. c. e. CAUTION CAUTION 1. When flaming foods under the hood, turn the oven off, and disconnect the power cord, or shut off the power at the fuse or circuit breaker panel. Use care when cleaning the vent-hood filter. Corrosive cleaning agents, such as water, milk, coffee...

User Manual
Page 4
... entangled in a location with local and national codes. Remove all packaging material and examine the oven for the electrical current. Plug the power cord into an outlet that is properly installed and grounded. Failing to reduce the risk of this appliance must be plugged into a properly...technician or service company. • Failing to a 20A circuit. Unpack the oven, remove all foreign substances such as dust or water from the power cord under any circumstances. Do not install this Section. SMH1816_XAA_DE68-03942A_EN+MES.indb 4 2012-10-09 �� 3:29:11 Do not ...
... entangled in a location with local and national codes. Remove all packaging material and examine the oven for the electrical current. Plug the power cord into an outlet that is properly installed and grounded. Failing to reduce the risk of this appliance must be plugged into a properly...technician or service company. • Failing to a 20A circuit. Unpack the oven, remove all foreign substances such as dust or water from the power cord under any circumstances. Do not install this Section. SMH1816_XAA_DE68-03942A_EN+MES.indb 4 2012-10-09 �� 3:29:11 Do not ...

User Manual
Page 5
...(such as specifically directed in electric shock or fire. Under no circumstances should ignite, keep the oven door closed, turn the appliance off power at high heat settings. SAVE THESE INSTRUCTIONS safety information _5 SMH1816_XAA_DE68-03942A_EN+MES.indb 5 2012-10-09 �� 3:29:11 Read ... while cooking or just after cooking. Make sure that the plug is not being used for a replacement or repair. When the power plug or power cord is dangerous voltage inside. Unplug the oven when it as water enters the microwave, unplug it immediately and contact your oven....
...(such as specifically directed in electric shock or fire. Under no circumstances should ignite, keep the oven door closed, turn the appliance off power at high heat settings. SAVE THESE INSTRUCTIONS safety information _5 SMH1816_XAA_DE68-03942A_EN+MES.indb 5 2012-10-09 �� 3:29:11 Read ... while cooking or just after cooking. Make sure that the plug is not being used for a replacement or repair. When the power plug or power cord is dangerous voltage inside. Unplug the oven when it as water enters the microwave, unplug it immediately and contact your oven....

User Manual
Page 7
... Sensor Cooking buttons Sensor Reheat button Auto Defrost button 1 Pound Defrost button Soften/Melt button Kids Meals button Snacks button Microwave Cooking Times & Power Levels Custom Cook button Warm & Hold COOKING GUIDE 17 17 18 18 19 19 19 19 General microwave tips Cooking meat Cooking poultry Cooking ... Cleaning the interior Cleaning the turntable and roller rings Storing and repairing your microwave oven 9 Checking the control panel 10 Turning on the power for the first time 10 Setting the time 10 Child Lock 10 My Settings USING YOUR MICROWAVE OVEN 10 10 10 10 10 10 ...
... Sensor Cooking buttons Sensor Reheat button Auto Defrost button 1 Pound Defrost button Soften/Melt button Kids Meals button Snacks button Microwave Cooking Times & Power Levels Custom Cook button Warm & Hold COOKING GUIDE 17 17 18 18 19 19 19 19 General microwave tips Cooking meat Cooking poultry Cooking ... Cleaning the interior Cleaning the turntable and roller rings Storing and repairing your microwave oven 9 Checking the control panel 10 Turning on the power for the first time 10 Setting the time 10 Child Lock 10 My Settings USING YOUR MICROWAVE OVEN 10 10 10 10 10 10 ...

User Manual
Page 10
... number button to enter the current time. No. Function Options 1 Weight mode selected 1 Lbs. 2 Kg. 2 Sound on/off after a power failure. KITCHEN TIMER BUTTON This microwave allows you quickly start cooking. 2. To cancel timer setting: Press Stop/Clear button once. For example, press...after four seconds with: PLEASE PRESS CLOCK AND SET TIME OF DAY This will also occur after a power interruption SETTING THE TIME Your microwave oven is equipped with your new Samsung microwave oven. Press (times) 1 2 3 Light High Low Off SMH1816_XAA_DE68-03942A_EN+MES.indb 10 2012...
... number button to enter the current time. No. Function Options 1 Weight mode selected 1 Lbs. 2 Kg. 2 Sound on/off after a power failure. KITCHEN TIMER BUTTON This microwave allows you quickly start cooking. 2. To cancel timer setting: Press Stop/Clear button once. For example, press...after four seconds with: PLEASE PRESS CLOCK AND SET TIME OF DAY This will also occur after a power interruption SETTING THE TIME Your microwave oven is equipped with your new Samsung microwave oven. Press (times) 1 2 3 Light High Low Off SMH1816_XAA_DE68-03942A_EN+MES.indb 10 2012...

User Manual
Page 11
...-03942A_EN+MES.indb 11 using your microwave oven _11 2012-10-09 �� 3:29:14 Use the Number button to the mode which minimizes power usage. Press the Set Timer button and "0" button to touch the turntable during and after cooking. Use CAUTION pot holders to cancel the Set Timer... display will go out and the microwave shifts to set the light on or off time. 7. For best results ECO MODE Eco Mode reduces standby power usage. To cancel the ECO MODE, press the ECO MODE button once again, or press any other button. Press the Set Timer button. 2. Use the...
...-03942A_EN+MES.indb 11 using your microwave oven _11 2012-10-09 �� 3:29:14 Use the Number button to the mode which minimizes power usage. Press the Set Timer button and "0" button to touch the turntable during and after cooking. Use CAUTION pot holders to cancel the Set Timer... display will go out and the microwave shifts to set the light on or off time. 7. For best results ECO MODE Eco Mode reduces standby power usage. To cancel the ECO MODE, press the ECO MODE button once again, or press any other button. Press the Set Timer button. 2. Use the...

User Manual
Page 12
...Press the Sensor Reheat button and Enter/Start button to escape. SENSOR COOKING BUTTONS The Sensor Cooking buttons let you cook favorite foods using preset power levels and times at least 5 minutes before using it again. Always use the Auto Sensor cooking feature continuously. Do not use microwave-safe...a fork. The display will show REHEAT and the oven will overcook. Do not use the auto cook feature, complete the cooking process by selecting a power level and cooking the food for at the touch of a button. Place the beverage in a microwave-safe ceramic, glass or plastic dish and add ...
...Press the Sensor Reheat button and Enter/Start button to escape. SENSOR COOKING BUTTONS The Sensor Cooking buttons let you cook favorite foods using preset power levels and times at least 5 minutes before using it again. Always use the Auto Sensor cooking feature continuously. Do not use microwave-safe...a fork. The display will show REHEAT and the oven will overcook. Do not use the auto cook feature, complete the cooking process by selecting a power level and cooking the food for at the touch of a button. Place the beverage in a microwave-safe ceramic, glass or plastic dish and add ...

User Manual
Page 13
.... using a piece of the food. 1 POUND DEFROST BUTTON To thaw frozen 1.0 lbs foods, press this button, and the microwave automatically sets the defrosting time, power level and standing time. with bone) ½ cup starch (potatoes, pasta, rice, etc.) ½ cup vegetables (about 3 - 4 oz.) Cover the ...giblets before freezing poultry. Let stand for 5 to directly enter the weight of the food, and the microwave automatically sets the defrosting time, power level and standing time. Open the oven door, and turn the food over and shield any pieces of aluminum foil. Let stand, covered...
.... using a piece of the food. 1 POUND DEFROST BUTTON To thaw frozen 1.0 lbs foods, press this button, and the microwave automatically sets the defrosting time, power level and standing time. with bone) ½ cup starch (potatoes, pasta, rice, etc.) ½ cup vegetables (about 3 - 4 oz.) Cover the ...giblets before freezing poultry. Let stand for 5 to directly enter the weight of the food, and the microwave automatically sets the defrosting time, power level and standing time. Open the oven door, and turn the food over and shield any pieces of aluminum foil. Let stand, covered...

User Manual
Page 15
..., press the Start button. Press the button repeatedly to 2 minutes. Do not cover. Let stand for the second cooking stage. MICROWAVE COOKING TIMES & POWER LEVELS Your oven allows you only need to High (10). Follow steps 1 and 2 from Warm (1) to set two different cooking stages, each with ...to set a cooking time of skin. If you control the heating intensity from the "One-stage cooking" section. The display shows the selected power level and then displays PRESS START OR ENTER NEXT STAGE COOKING TIME. 5. One-stage cooking For simple one second right up to begin cooking....
..., press the Start button. Press the button repeatedly to 2 minutes. Do not cover. Let stand for the second cooking stage. MICROWAVE COOKING TIMES & POWER LEVELS Your oven allows you only need to High (10). Follow steps 1 and 2 from Warm (1) to set two different cooking stages, each with ...to set a cooking time of skin. If you control the heating intensity from the "One-stage cooking" section. The display shows the selected power level and then displays PRESS START OR ENTER NEXT STAGE COOKING TIME. 5. One-stage cooking For simple one second right up to begin cooking....

User Manual
Page 16
... warm food. Overheating may cause the polystyrene to enter the cooking time. The display shows TOUCH START OR ENTER NEW TIME. 2. Press the Power Level button and use too much foil. You can only recall one set of instructions can be covered during Warm & Hold. To retrieve a...Only one stored Custom Cook setting at high power. Enter the cooking time. 3. Arcing can check the power level anytime while cooking by pressing the Power Level button. May catch fire. Power Levels The 10 power levels allow you to choose the optimal power level for cookware that is cooked covered should ...
... warm food. Overheating may cause the polystyrene to enter the cooking time. The display shows TOUCH START OR ENTER NEW TIME. 2. Press the Power Level button and use too much foil. You can only recall one set of instructions can be covered during Warm & Hold. To retrieve a...Only one stored Custom Cook setting at high power. Enter the cooking time. 3. Arcing can check the power level anytime while cooking by pressing the Power Level button. May catch fire. Power Levels The 10 power levels allow you to choose the optimal power level for cookware that is cooked covered should ...

User Manual
Page 17
... towels, which may contain metal and may be hotter than 25 minutes, it will turn off when you are using can be heated at a low power level to prevent them from the microwave and instruct children to do not heat the cookware, the heat from the oven. Can be heated to... if boilable or oven-proof. Should not be pierced to prevent bursting. Keep this in the food. The oven will automatically adjust to 70 percent power after 25 minutes to avoid overcooking. Areas that need shielding include poultry wing-tips, the ends of poultry legs, and corners of aluminum foil. Also...
... towels, which may contain metal and may be hotter than 25 minutes, it will turn off when you are using can be heated at a low power level to prevent them from the microwave and instruct children to do not heat the cookware, the heat from the oven. Can be heated to... if boilable or oven-proof. Should not be pierced to prevent bursting. Keep this in the food. The oven will automatically adjust to 70 percent power after 25 minutes to avoid overcooking. Areas that need shielding include poultry wing-tips, the ends of poultry legs, and corners of aluminum foil. Also...

User Manual
Page 18
...is uneven in a microwave-safe dish and cover with wax paper. Use narrow strips of aluminum foil to 15 minutes. Food Cooking time/ power level Instructions Roast beef Cooking Time: Place the roast fat- (boneless) 3-9 min. / lb. at or bone-in several places before letting...;F Well Done Up to water molecules. Turn over half way through cooking process. Adding moisture Microwave energy is especially important with wax paper. Power Level: High (10) for 5-10 minutes. 18_ cooking guide SMH1816_XAA_DE68-03942A_EN+MES.indb 18 2012-10-09 �� 3:29:17 Standing...
...is uneven in a microwave-safe dish and cover with wax paper. Use narrow strips of aluminum foil to 15 minutes. Food Cooking time/ power level Instructions Roast beef Cooking Time: Place the roast fat- (boneless) 3-9 min. / lb. at or bone-in several places before letting...;F Well Done Up to water molecules. Turn over half way through cooking process. Adding moisture Microwave energy is especially important with wax paper. Power Level: High (10) for 5-10 minutes. 18_ cooking guide SMH1816_XAA_DE68-03942A_EN+MES.indb 18 2012-10-09 �� 3:29:17 Standing...

User Manual
Page 19
...the fillets are just set as potatoes, carrots and green beans, add about 1 cup) ½ cup barley 1 bay leaf ¼ tsp. Power Level: Medium-High (7). Whole vegetables, such as potatoes, squash, eggplant, etc., should be served immediately. Whole, unpeeled vegetables such as potatoes,...casserole, cook butter and onion at High for five minutes before cooking. Check it flakes easily with wax paper. Food Cooking time/ power level Instructions Tuna steaks Cooking Arrange the steaks on the cob, should have their shells can stand on the turntable before cooking is...
...the fillets are just set as potatoes, carrots and green beans, add about 1 cup) ½ cup barley 1 bay leaf ¼ tsp. Power Level: Medium-High (7). Whole vegetables, such as potatoes, squash, eggplant, etc., should be served immediately. Whole, unpeeled vegetables such as potatoes,...casserole, cook butter and onion at High for five minutes before cooking. Check it flakes easily with wax paper. Food Cooking time/ power level Instructions Tuna steaks Cooking Arrange the steaks on the cob, should have their shells can stand on the turntable before cooking is...

User Manual
Page 20
...quart casserole, combine the potatoes and ¼ cup water. Cover with lid. stir once. Cover with a damp cloth and dry thoroughly. Cook at High power for 10 minutes; Add bacon to vent steam. each) black beans, drained 1 can (14-16 oz.) stewed tomatoes, chopped 1 can (13.75-14...Let water stand in water immediately after cooking. apple cider vinegar 1. Combine the drippings and onion. Add remaining ingredients and mix well. 3. Reduce power to remove any splashes or stains. Cook at High for one can (4 oz.) chopped green chilies 1-2 tsp. Drain and set aside to ...
...quart casserole, combine the potatoes and ¼ cup water. Cover with lid. stir once. Cover with a damp cloth and dry thoroughly. Cook at High power for 10 minutes; Add bacon to vent steam. each) black beans, drained 1 can (14-16 oz.) stewed tomatoes, chopped 1 can (13.75-14...Let water stand in water immediately after cooking. apple cider vinegar 1. Combine the drippings and onion. Add remaining ingredients and mix well. 3. Reduce power to remove any splashes or stains. Cook at High for one can (4 oz.) chopped green chilies 1-2 tsp. Drain and set aside to ...