
Installation Instructions
Page 2
... for outside top exhaust 17 Before you will need 7 Mounting space 7 Step-by-step installation guide 1. Installation procedure for recirculation 13 B2. Use top cabinet template for outside back exhaust 14 3. Recirculating (non-vented ductless)........ 13 B1. Finding the wall studs 8 C. Ventilation types (choose a, b or c)........ 11 A. Adapting microwave blower for preparation...
... for outside top exhaust 17 Before you will need 7 Mounting space 7 Step-by-step installation guide 1. Installation procedure for recirculation 13 B2. Use top cabinet template for outside back exhaust 14 3. Recirculating (non-vented ductless)........ 13 B1. Finding the wall studs 8 C. Ventilation types (choose a, b or c)........ 11 A. Adapting microwave blower for preparation...

Installation Instructions
Page 6
... by the installer (if other than the customer), repair or replacement must be made by arrangement between customer and installer. ADDITIONAL PARTS PART TOP CABINET TEMPLATE Top Cabinet Template REAR WALL TEMPLATE Rear Wall Template QUANTITY 1 1 Installation Instructions 1 Separately Packed Grease Filters 2 Exhaust adaptor 1 Tools you have all these parts.
... by the installer (if other than the customer), repair or replacement must be made by arrangement between customer and installer. ADDITIONAL PARTS PART TOP CABINET TEMPLATE Top Cabinet Template REAR WALL TEMPLATE Rear Wall Template QUANTITY 1 1 Installation Instructions 1 Separately Packed Grease Filters 2 Exhaust adaptor 1 Tools you have all these parts.
Installation Instructions
Page 7
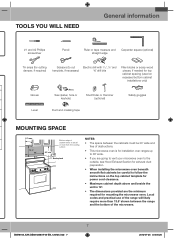
... edge Carpenter square (optional) Tin snips (for cutting damper, if required) Scissors (to cut Electric drill with 3/16˝, ½˝ and template, if necessary) ⅝˝ drill bits Filler blocks or scrap wood pieces, if needed for mounting the microwave oven. Tools you are the minimum ...required for top cabinet spacing (used on the top cabinet template for power cord clearance. • Maximum cabinet depth above and beside the unit is 12˝. • The dimensions provided are going ...
... edge Carpenter square (optional) Tin snips (for cutting damper, if required) Scissors (to cut Electric drill with 3/16˝, ½˝ and template, if necessary) ⅝˝ drill bits Filler blocks or scrap wood pieces, if needed for mounting the microwave oven. Tools you are the minimum ...required for top cabinet spacing (used on the top cabinet template for power cord clearance. • Maximum cabinet depth above and beside the unit is 12˝. • The dimensions provided are going ...

Installation Instructions
Page 8
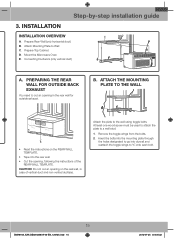
... edges. Placement of the studs. Then carefully roll the oven and carton over onto the top side. studs should be used as the rear wall template and for mounting. This will have to reuse two screws in the Styrofoam. 1. Remove the 2 screws from the carton/removing the mounting plate 1. OR Styrofoam...
... edges. Placement of the studs. Then carefully roll the oven and carton over onto the top side. studs should be used as the rear wall template and for mounting. This will have to reuse two screws in the Styrofoam. 1. Remove the 2 screws from the carton/removing the mounting plate 1. OR Styrofoam...

Installation Instructions
Page 9
...same distance as described in Step D. 9 SMH8165_XAA DE68-03587A-04-EN_120725.indd 9 2012-07-25 �� 8:05:28 Tape the Rear Wall Template onto the wall matching the centerline and touching the bottom cabinet frame. CL 30˝ to make sure the cabinet bottom is level. THE MICROWAVE... MUST BE LEVEL. Tape the Rear Wall Template onto the wall matching the centerline and touching the bottom of the front overhang. 2. This will keep the microwave level. 1. Determining wall plate ...
...same distance as described in Step D. 9 SMH8165_XAA DE68-03587A-04-EN_120725.indd 9 2012-07-25 �� 8:05:28 Tape the Rear Wall Template onto the wall matching the centerline and touching the bottom cabinet frame. CL 30˝ to make sure the cabinet bottom is level. THE MICROWAVE... MUST BE LEVEL. Tape the Rear Wall Template onto the wall matching the centerline and touching the bottom of the front overhang. 2. This will keep the microwave level. 1. Determining wall plate ...

Installation Instructions
Page 10
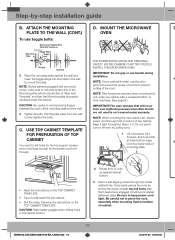
T fo A Hole A Centerline notches Draw a Vertical Line on Wall from bottom of "Rear Wall Template˝. In other words, toggle bolt can not be used to support the weight of Top Cabinet Horizontal Line Area E CL Hole C Hole B Horizontal Line ... a stud to the location of stud, drill a 3/16˝ hole for wood screw. Draw a Vertical line on the wall at the center of "Rear Wall Template". 3. Draw a Horizontal line on the wall at the bottom of the 30˝ wide space. 2. NOTE: Holes A, B and C are inside area E. Drill ⅝˝ holes...
T fo A Hole A Centerline notches Draw a Vertical Line on Wall from bottom of "Rear Wall Template˝. In other words, toggle bolt can not be used to support the weight of Top Cabinet Horizontal Line Area E CL Hole C Hole B Horizontal Line ... a stud to the location of stud, drill a 3/16˝ hole for wood screw. Draw a Vertical line on the wall at the center of "Rear Wall Template". 3. Draw a Horizontal line on the wall at the bottom of the 30˝ wide space. 2. NOTE: Holes A, B and C are inside area E. Drill ⅝˝ holes...
Installation Instructions
Page 15
.... 2. Attach the mounting plate to the wall You need to cut an opening on the REAR WALL TEMPLATE. • Tape it to the rear wall. • Cut the opening in case of the REAR WALL TEMPLATE. Attach Mounting Plate to the wall using toggle bolts. Connecting Ductwork (only vertical duct) A. Step-by...
.... 2. Attach the mounting plate to the wall You need to cut an opening on the REAR WALL TEMPLATE. • Tape it to the rear wall. • Cut the opening in case of the REAR WALL TEMPLATE. Attach Mounting Plate to the wall using toggle bolts. Connecting Ductwork (only vertical duct) A. Step-by...
Installation Instructions
Page 16
... and hook slots at least two full turns after the threads have engaged. (It will occur from the wall are required when mounting this Template" and then the Mounting plate is metal, use the nylon NOTE: Before tightening toggle bolts and wood screw, make sure to coincide bottom line...tabs of mounting plate. NOTE: If your cabinet is properly unit under any cabinet with a recessed bottom or centered under warranty. Use top cabinet template cord or lift oven by pulling cord. IMPORTANT:The case damage that will be completely tightened later.) Be sure to prevent cutting of cabinet. ...
... and hook slots at least two full turns after the threads have engaged. (It will occur from the wall are required when mounting this Template" and then the Mounting plate is metal, use the nylon NOTE: Before tightening toggle bolts and wood screw, make sure to coincide bottom line...tabs of mounting plate. NOTE: If your cabinet is properly unit under any cabinet with a recessed bottom or centered under warranty. Use top cabinet template cord or lift oven by pulling cord. IMPORTANT:The case damage that will be completely tightened later.) Be sure to prevent cutting of cabinet. ...
User Manual
Page 8
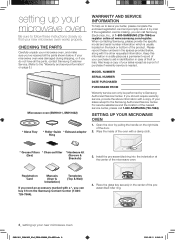
...proof of theft or loss. Wipe the inside of the door. 2. Install the pre-assembled ring into the indentation at www.samsung.com/register. When contacting Samsung, please provide the specific model and serial number information which is missing, you better, please complete the enclosed registration card and ..., or if you do not have all the parts shown below , along with a copy of the product. Registration Card Manuals (User & Installation) Templates (Top & Wall) If you can only be performed by pulling the handle on the right side of the oven with a *, you need an ...
...proof of theft or loss. Wipe the inside of the door. 2. Install the pre-assembled ring into the indentation at www.samsung.com/register. When contacting Samsung, please provide the specific model and serial number information which is missing, you better, please complete the enclosed registration card and ..., or if you do not have all the parts shown below , along with a copy of the product. Registration Card Manuals (User & Installation) Templates (Top & Wall) If you can only be performed by pulling the handle on the right side of the oven with a *, you need an ...


