
Installation Instructions
Page 2
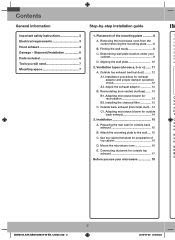
...wall plate 10 2. Outside back exhaust (horizontal duct)... 14 C1. Connecting ductwork for outside back exhaust 14 3. Attach the mounting plate to the wall...... 15 C. Placement of top cabinet 16 D. Adjust the exhaust adaptor 12 B. Preparing the rear ...(vertical duct).......... 12 A1. Adapting microwave blower for exhaust adaptor and proper damper operation check 12 A2. Adapting microwave blower for preparation of the mounting plate 8 A. Use top cabinet template for outside back exhaust 15 B. Determining wall plate location under your microwave 18 Im T o co ...
...wall plate 10 2. Outside back exhaust (horizontal duct)... 14 C1. Connecting ductwork for outside back exhaust 14 3. Attach the mounting plate to the wall...... 15 C. Placement of top cabinet 16 D. Adjust the exhaust adaptor 12 B. Preparing the rear ...(vertical duct).......... 12 A1. Adapting microwave blower for exhaust adaptor and proper damper operation check 12 A2. Adapting microwave blower for preparation of the mounting plate 8 A. Use top cabinet template for outside back exhaust 15 B. Determining wall plate location under your microwave 18 Im T o co ...
Installation Instructions
Page 3
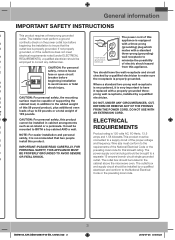
prong wall receptacle, installed by a qualified 3 CAUTION: For personal safety, the mounting electrician. 3 surface must be mounted to BOTH a top cabinet AND a wall. It must conform to avoid severe or fatal Where a standard two-prong wall receptacle 2 shock injury. requirements 5 NOTE: For ...
prong wall receptacle, installed by a qualified 3 CAUTION: For personal safety, the mounting electrician. 3 surface must be mounted to BOTH a top cabinet AND a wall. It must conform to avoid severe or fatal Where a standard two-prong wall receptacle 2 shock injury. requirements 5 NOTE: For ...

Installation Instructions
Page 6
..., return the unit to make sure you will find the installation hardware contained in which it was bought for metal cabinets) QUANTITY 1 2 2 1 You will need Mounting space 6 SMH8165_XAA DE68-03587A-04-EN_120725.indd 6 2012-07-25 �� 8:05:25 ADDITIONAL PARTS PART TOP CABINET TEMPLATE Top Cabinet Template REAR WALL...
..., return the unit to make sure you will find the installation hardware contained in which it was bought for metal cabinets) QUANTITY 1 2 2 1 You will need Mounting space 6 SMH8165_XAA DE68-03587A-04-EN_120725.indd 6 2012-07-25 �� 8:05:25 ADDITIONAL PARTS PART TOP CABINET TEMPLATE Top Cabinet Template REAR WALL...
Installation Instructions
Page 7
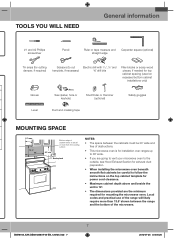
... cut Electric drill with 3/16˝, ½˝ and template, if necessary) ⅝˝ drill bits Filler blocks or scrap wood pieces, if needed for mounting the microwave oven. Local codes and practical use of cabinet needs to be careful to follow the instructions on the top cabinet template for power... (used on recessed bottom cabinet installations only) Gloves Level Saw (saber, hole or keyhole) Stud finder or Hammer (optional) Duct and masking tape Safety goggles Mounting space 12˝ max. 16 ½˝ 30˝ 2˝ 30˝ min.
... cut Electric drill with 3/16˝, ½˝ and template, if necessary) ⅝˝ drill bits Filler blocks or scrap wood pieces, if needed for mounting the microwave oven. Local codes and practical use of cabinet needs to be careful to follow the instructions on the top cabinet template for power... (used on recessed bottom cabinet installations only) Gloves Level Saw (saber, hole or keyhole) Stud finder or Hammer (optional) Duct and masking tape Safety goggles Mounting space 12˝ max. 16 ½˝ 30˝ 2˝ 30˝ min.

Installation Instructions
Page 8
... to reuse two screws in the Styrofoam. 1. Pull the carton up and off the oven. The center of the mounting plate C A. SSccrreewws s SSccrreewws s MMoouunntitnigngPlaPtelate 3. THE MICROWAVE MUST BE CONNECTED TO AT LEAST ONE WALL STUD. 5. This plate will indicate a stud location. 2. ...Studs Center 2. The oven should be 16˝ or 24˝ from this mark. This will be resting in original loction of outcase after removing mounting plate. 8 SMH8165_XAA DE68-03587A-04-EN_120725.indd 8 2012-07-25 �� 8:05:27 Placement of any adjacent 4. Finding the wall studs...
... to reuse two screws in the Styrofoam. 1. Pull the carton up and off the oven. The center of the mounting plate C A. SSccrreewws s SSccrreewws s MMoouunntitnigngPlaPtelate 3. THE MICROWAVE MUST BE CONNECTED TO AT LEAST ONE WALL STUD. 5. This plate will indicate a stud location. 2. ...Studs Center 2. The oven should be 16˝ or 24˝ from this mark. This will be resting in original loction of outcase after removing mounting plate. 8 SMH8165_XAA DE68-03587A-04-EN_120725.indd 8 2012-07-25 �� 8:05:27 Placement of any adjacent 4. Finding the wall studs...

Installation Instructions
Page 9
... line on the wall at the center of the 30˝ CL 30˝ to the depth of installation with front overhang only, align the mounting tabs with no back or side frame, install the mounting plate down the same distance as the front overhang depth. Step-by-step installation guide C.
... line on the wall at the center of the 30˝ CL 30˝ to the depth of installation with front overhang only, align the mounting tabs with no back or side frame, install the mounting plate down the same distance as the front overhang depth. Step-by-step installation guide C.

Installation Instructions
Page 10
... the stud. If none of A, B and C is in a stud, find a stud somewhere in a stud to the location of "Rear Wall Template". 3. Set the mounting plate aside. 10 SMH8165_XAA DE68-03587A-04-EN_120725.indd 10 2012-07-25 �� 8:05:29 T fo A Hole A Centerline notches Draw a Vertical Line on...Line Draw a Horizontal line on 3 locations (Hole A, Hole B, Hole C) but if the location of hole is important to use at least one wood screw mounted firmly in area E and draw a forth circle to avoid cutting fingers on the wall at the center of "Rear Wall Template˝. NOTE: DO NOT...
... the stud. If none of A, B and C is in a stud, find a stud somewhere in a stud to the location of "Rear Wall Template". 3. Set the mounting plate aside. 10 SMH8165_XAA DE68-03587A-04-EN_120725.indd 10 2012-07-25 �� 8:05:29 T fo A Hole A Centerline notches Draw a Vertical Line on...Line Draw a Horizontal line on 3 locations (Hole A, Hole B, Hole C) but if the location of hole is important to use at least one wood screw mounted firmly in area E and draw a forth circle to avoid cutting fingers on the wall at the center of "Rear Wall Template˝. NOTE: DO NOT...

Installation Instructions
Page 12
ne 2. A2. A1. Exhaust Adaptor and Damper is removed sa and damper pivots easoly before mounting 3 microwave. • You will need to make adjustments to assure proper alignment with your house exhaust duct after installation completion. Make sure tape securing damper ...
ne 2. A2. A1. Exhaust Adaptor and Damper is removed sa and damper pivots easoly before mounting 3 microwave. • You will need to make adjustments to assure proper alignment with your house exhaust duct after installation completion. Make sure tape securing damper ...
Installation Instructions
Page 15
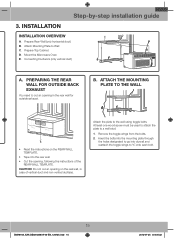
...190;˝ onto each bolt. 15 SMH8165_XAA DE68-03587A-04-EN_120725.indd 15 2012-07-25 �� 8:05:32 Insert the bolts into the mounting plate through the holes designated to go into drywall and reattach the toggle wings to a wall stud. 1. Prepare Rear Wall (only horizontal duct) ...B. Installation INSTALLATION OVERVIEW A. Attach the mounting plate to the wall You need to the rear wall. • Cut the opening on the REAR WALL TEMPLATE. • Tape it to cut an...
...190;˝ onto each bolt. 15 SMH8165_XAA DE68-03587A-04-EN_120725.indd 15 2012-07-25 �� 8:05:32 Insert the bolts into the mounting plate through the holes designated to go into drywall and reattach the toggle wings to a wall stud. 1. Prepare Rear Wall (only horizontal duct) ...B. Installation INSTALLATION OVERVIEW A. Attach the mounting plate to the wall You need to the rear wall. • Cut the opening on the REAR WALL TEMPLATE. • Tape it to cut an...
Installation Instructions
Page 16
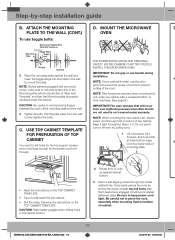
... fingers between the back of oven up against the wall and installation. Use top cabinet template cord or lift oven by -step installation guide B. Mount the microwave D PLATE TO THE WALL (cont.) oven To use handle during 3. Step-by pulling cord. insert the toggle wings into the holes... in the cabinet bottom. 2. Mounting plate with Horizontal line of top cabinet You need to drill holes for the top support screws and a hole large enough for Toggles More Than...
... fingers between the back of oven up against the wall and installation. Use top cabinet template cord or lift oven by -step installation guide B. Mount the microwave D PLATE TO THE WALL (cont.) oven To use handle during 3. Step-by pulling cord. insert the toggle wings into the holes... in the cabinet bottom. 2. Mounting plate with Horizontal line of top cabinet You need to drill holes for the top support screws and a hole large enough for Toggles More Than...
Installation Instructions
Page 17
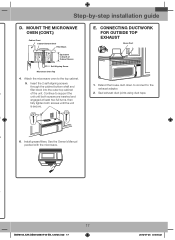
.... See the Owner's Manual packed with the microwave. Connecting ductwork for outside top exhaust House Duct Equivalent to support the 2. Step-by-step installation guide D. MOUNT THE MICROWAVE OVEN (cont.) Cabinet Front Cabinet Bottom Shelf Filler Block E. Insert the 2 self-aligning screws through the cabinet bottom shelf and filler block into...
.... See the Owner's Manual packed with the microwave. Connecting ductwork for outside top exhaust House Duct Equivalent to support the 2. Step-by-step installation guide D. MOUNT THE MICROWAVE OVEN (cont.) Cabinet Front Cabinet Bottom Shelf Filler Block E. Insert the 2 self-aligning screws through the cabinet bottom shelf and filler block into...
User Manual
Page 4
... you are available and you can use an extension cord, read and follow the specific "Grounding instructions" found in electric shock or fire. Do not mount over the counter top or tabletop where it is equipped with a cord that it with the product, or injury. Do not pull or excessively bend...
... you are available and you can use an extension cord, read and follow the specific "Grounding instructions" found in electric shock or fire. Do not mount over the counter top or tabletop where it is equipped with a cord that it with the product, or injury. Do not pull or excessively bend...
User Manual
Page 19
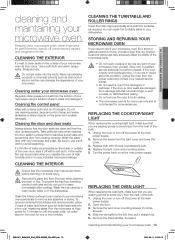
...are wearing gloves to avoid injury from the heat of water (add lemon juice for extra freshness) into the vents. Replace the light cover and mounting screw. 5 Turn the power back on the inside or outside of the microwave parts. • Do not repair, replace or service any ...splashes or stains. Remove the vent cover mounting screws (3 middle screws). 4. Dust and dampness may adversely affect the ability of your nearest service center. • Do not use cleaning sprays, ...
...are wearing gloves to avoid injury from the heat of water (add lemon juice for extra freshness) into the vents. Replace the light cover and mounting screw. 5 Turn the power back on the inside or outside of the microwave parts. • Do not repair, replace or service any ...splashes or stains. Remove the vent cover mounting screws (3 middle screws). 4. Dust and dampness may adversely affect the ability of your nearest service center. • Do not use cleaning sprays, ...
User Manual
Page 20
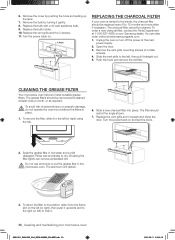
Remove the cover by turning it . 20_ cleaning and maintaining your Samsung dealer. Remove the vent grille mounting screws (3 middle screws). 4. The grease filters should rest at least once a month, or as required. Turn the power back on . 1. Do not use ammonia or ...
Remove the cover by turning it . 20_ cleaning and maintaining your Samsung dealer. Remove the vent grille mounting screws (3 middle screws). 4. The grease filters should rest at least once a month, or as required. Turn the power back on . 1. Do not use ammonia or ...


